How to connect an OVHcloud domain name to a Webflow hosting plan
1734 Ansichten
Objective
You are the holder of a domain name with OVHcloud and you want to connect it to a Webflow hosting plan. In this guide, you will find the steps to prepare and configure your OVHcloud DNS zone, so that you can configure your Webflow hosting plan.
Find out how to connect your OVHcloud domain name to a Webflow hosting plan.
-
Webflow Support does not have access to your OVHcloud domain name settings and therefore cannot advise you on the information you will need to provide.
-
OVHcloud provides services which you are responsible for with regard to their configuration and management. You are therefore responsible for ensuring they function correctly.
We have provided you with this guide in order to help you with common tasks. Nevertheless, we recommend contacting a specialist provider and/or the service’s publisher if you encounter any difficulties. We will not be able to assist you ourselves. You can find more information in the Go further section of this guide.
Requirements
- A domain name registered with OVHcloud
- The necessary permissions to manage the domain name
- A Webflow web hosting plan
- Access to manage this hosting plan with Webflow
OVHcloud Control Panel Access
- Direct link: Domain names
- Navigation path:
Web Cloud>Domain names> Select your domain name
Instructions
Before following the two steps in this guide, we recommend that you get familiar with configuring a DNS zone using our guide on Editing an OVHcloud DNS zone.
Your DNS zone is potentially already preconfigured or linked to a hosting plan. We will look at how to identify each DNS record required to connect to your Webflow hosting plan. Some records will need to be deleted to avoid conflicts with DNS records required in this configuration. Others will simply need to be modified or created. For a better understanding, we will use the domain name "mydomain.ovh" as an example. Replace it with your domain name during configuration.
1. Configure your Webflow hosting plan
When using a Webflow hosting plan with an OVHcloud domain name, you must first prepare your hosting plan by following the instructions in the How to connect your custom domain section from this page of the Webflow documentation.
2. Configure your DNS records on your OVHcloud account
Before you continue:
- Open a tab in your web browser.
- Open this webflow documentation page.
- Go to the “How to set your DNS records” section of the Webflow documentation.
The following instructions will help you configure your OVHcloud DNS zone more easily.
Log in to the OVHcloud Control Panel in the Web Cloud section. Click Domain names, then choose the domain name concerned. Go to the DNS Zone tab.
The table lists all of the DNS records for the selected domain name.
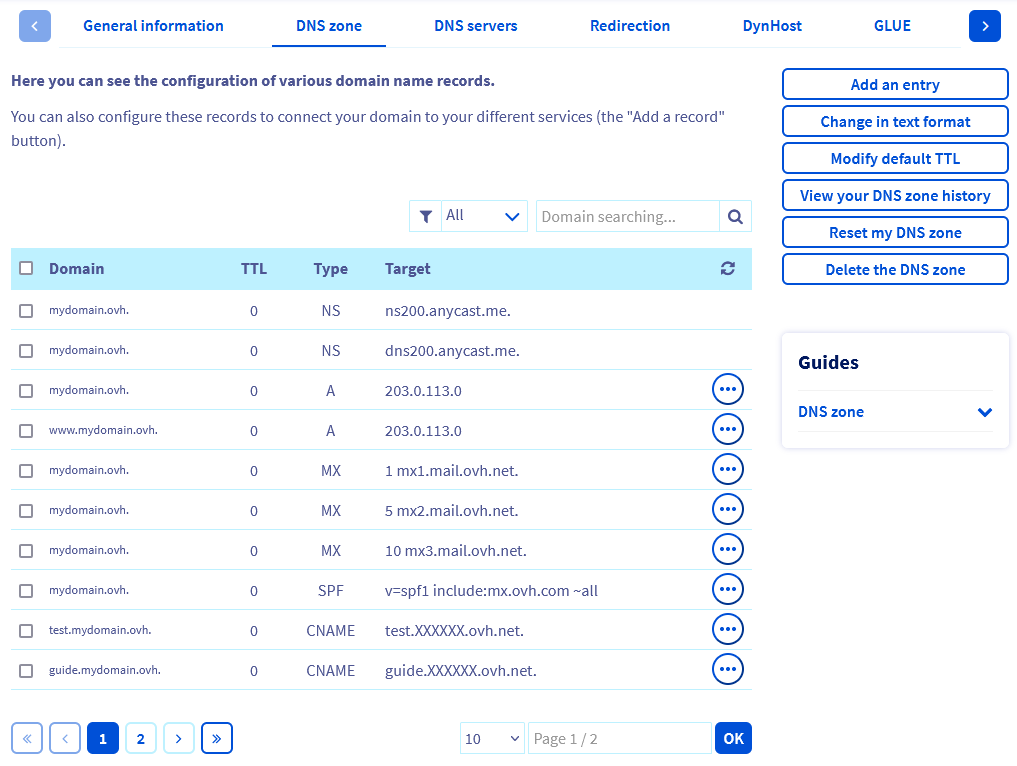
Each DNS record can be modified by clicking on the ... button to the right of the table row concerned, then clicking on Modify record.
Follow the steps in order by browsing the following tabs:
Record A
To identify existing A records, click the filter menu at the top of the DNS records table and select A.

- Click the
...button to the right of the table row that corresponds to your domain name alone, without a subdomain (e.g.mydomain.ovh.), then clickModify record. - If a record for the "www" subdomain is present (e.g.:
www.mydomain.ovh.), you must delete it so that it does not conflict with the CNAME record you enter in step 4. Click the...button to the right of the table row for your domain name with the subdomain "www", then clickDelete record. - If you do not have an existing "A" record, click the
Add an entrybutton in the top right-hand corner of your screen and select theA
You must create two "A" records in succession in order to enter the two IPv4 addresses for Webflow. Leave the Sub-domain field empty and enter the first IPv4 address of Webflow75.2.70.75in the Target field. ClickNextand confirm your "A" record. Repeat for the second IPv4 address99.83.190.102, and proceed to step 2.
AAAA record
To identify existing "AAAA" records, click the filter menu at the top of the DNS records table and select AAAA.

- Click the
...button to the right of the table row that corresponds to your domain name alone, without a subdomain (e.g.mydomain.ovh.), then clickDelete record. - If a record for the "www" subdomain is present (e.g.:
www.mydomain.ovh.), also delete it so that it does not conflict with the CNAME record you enter in step 4. Click the...button to the right of the table row for your domain name with the subdomain "www", then clickDelete record. - If you do not have an existing AAAA record, proceed to step 3.
TXT record
To identify existing "TXT" records, click the filter menu at the top of the DNS records table and select TXT.

- If "TXT" records are present for the domain name alone (e.g.
mydomain.ovh.) and for its subdomain in "www" (e.g.www.mydomain.ovh.), you must delete them so that they do not conflict with the CNAME record that you enter in step 4. Click the...button to the right of the table row for your domain name with the subdomain "www", then clickDelete record. - You must create a record of type "TXT". Click on the
Add an entrybutton in the top right-hand corner of your screen and select theTXT"Pointer record". Enter the Sub-domain with the value_webflowin the Target field, and enter the value in theSite settings > Publishing tab > Productionsection of your Webflow account, of typeone-time-verification=XXXXXXXX. ReplaceXXXXXXXXwith the value present in your Webflow account.
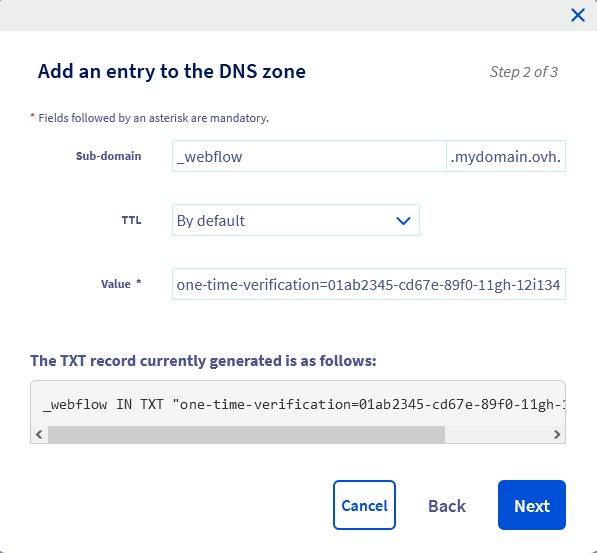
ClickNextto validate your TXT record and proceed to step 4.
CNAME record
To identify existing "CNAME" records, click the filter menu at the top of the DNS records table and select CNAME.
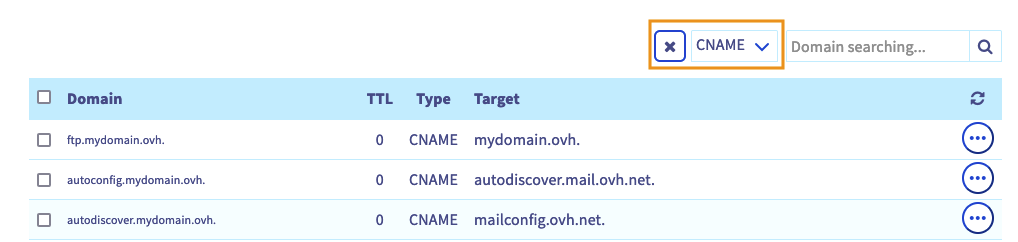
- Click the
...button to the right of the table row corresponding to your subdomain in "www." (e.g.mydomain.ovh.), then clickModify record. - If you do not have an existing "CNAME" record, click the
Add an entrybutton in the top right-hand corner of your screen, and select theCNAME"pointer record’. Enter Sub-domain with the valuewwwand enterproxy-ssl.webflow.comin the Target field.
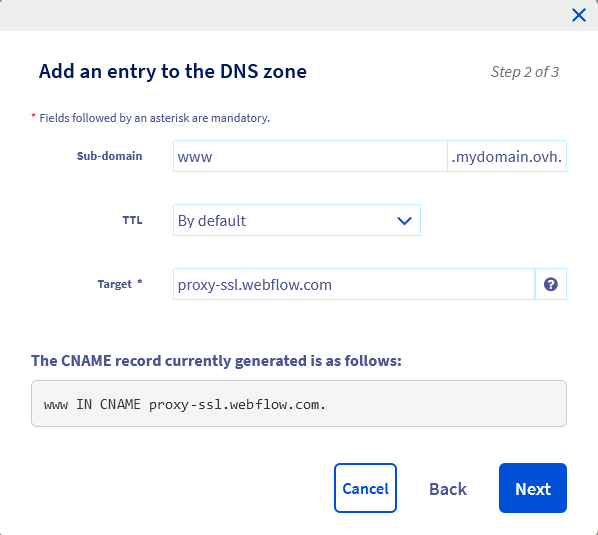
ClickNextto validate your "CNAME" record.
The DNS zone is now configured to link to a Webflow hosting plan.
It may take up to 48 hours to verify your domain name.
If you are using an OVHcloud email solution, or planning to subscribe to one of our email solutions, you will also need to prepare your DNS zone accordingly. Read our guide on configuring an MX record.
Go further
Modifying an OVHcloud domain name’s DNS servers
Creating an OVHcloud DNS zone for a domain name
To delegate the management of your domain name to another OVHcloud customer account, follow the guide on Managing contacts for OVHcloud services.
For specialised services (SEO, development, etc.), contact OVHcloud partners.
If you would like assistance using and configuring your OVHcloud solutions, please refer to our support offers.
Join our community of users.

