How to upgrade a Cloud Disk Array (CDA) using the OVHcloud API
78 visualizações
--- title: 'How to upgrade a Cloud Disk Array (CDA) using the OVHcloud API' excerpt: 'Learn how to increase the storage capacity of your OVHcloud Cloud Disk Array (CDA) using the OVHcloud API' updated: 2025-05-15
Objective
This guide explains how to upgrade your OVHcloud Cloud Disk Array (CDA) cluster to increase its storage capacity. It describes the technical behaviour of a live upgrade, the necessary API calls, and how to retrieve required service information. This operation is performed entirely online, without interrupting read/write access to your data, and is available via the OVHcloud API.
At the moment, upgrading a Cloud Disk Array (CDA) cluster is only available via the OVHcloud API. It cannot be done through the OVHcloud Control Panel.
Requirements
- A Cloud Disk Array solution
- Access to the OVHcloud API
OVHcloud Control Panel Access
- Direct link: Cloud Disk Array
- Navigation path:
Bare Metal Cloud>Cloud Disk Array> Select your service
If you are not familiar with the OVHcloud API, read our First Steps with the OVHcloud API guide.
Instructions
How the CDA Upgrade Works
Upgrading a Cloud Disk Array (CDA) cluster is a fully online process that does not interrupt data availability. Throughout the operation, customers retain full read and write access to their data.
During the upgrade, you may observe slightly degraded performance or increased I/O latency. This is temporary and expected while data is being rebalanced across the cluster.
Upgrade Workflow
The upgrade process follows these steps:
- Upgrade Order Initiation: The customer initiates an upgrade request via the OVHcloud API and proceeds with payment.
- Provisioning of New Storage Nodes: New Ceph OSD (Object Storage Daemon) nodes are automatically provisioned and added to the cluster. These are deployed in groups of three, with each node placed in a separate rack to maintain redundancy and failure domain isolation.
- Cluster Acknowledgment: Once the new nodes are up and running, the system marks the upgrade operation as complete from the customer’s perspective. No further action is required from the user.
- Automatic Data Rebalancing: In the background, Ceph initiates a data rebalancing phase. Existing data is redistributed across the entire cluster, including the newly added nodes—while ensuring that the configured replication level (typically three replicas) is maintained throughout the process.
- Performance Stabilization: The rebalancing continues until the cluster reaches an even distribution of data, as determined by Ceph’s internal placement algorithms. Once completed, the cluster returns to optimal performance.
Retrieving required information
Before initiating a CDA upgrade, you will need two key pieces of information:
- The service name of your CDA cluster
- The plan code corresponding to your current configuration
Follow the steps below to retrieve them using the OVHcloud API.
Step 1. Get you service name (Skip this step if you already know your service name)
You can retrieve it via the OVHcloud Control Panel or the following API call:
Use the following API call:
This will return a list of your CDA services. Each service is identified by a UUID, for example 48e5f77f-427b-4261-9799-7861033659fb.
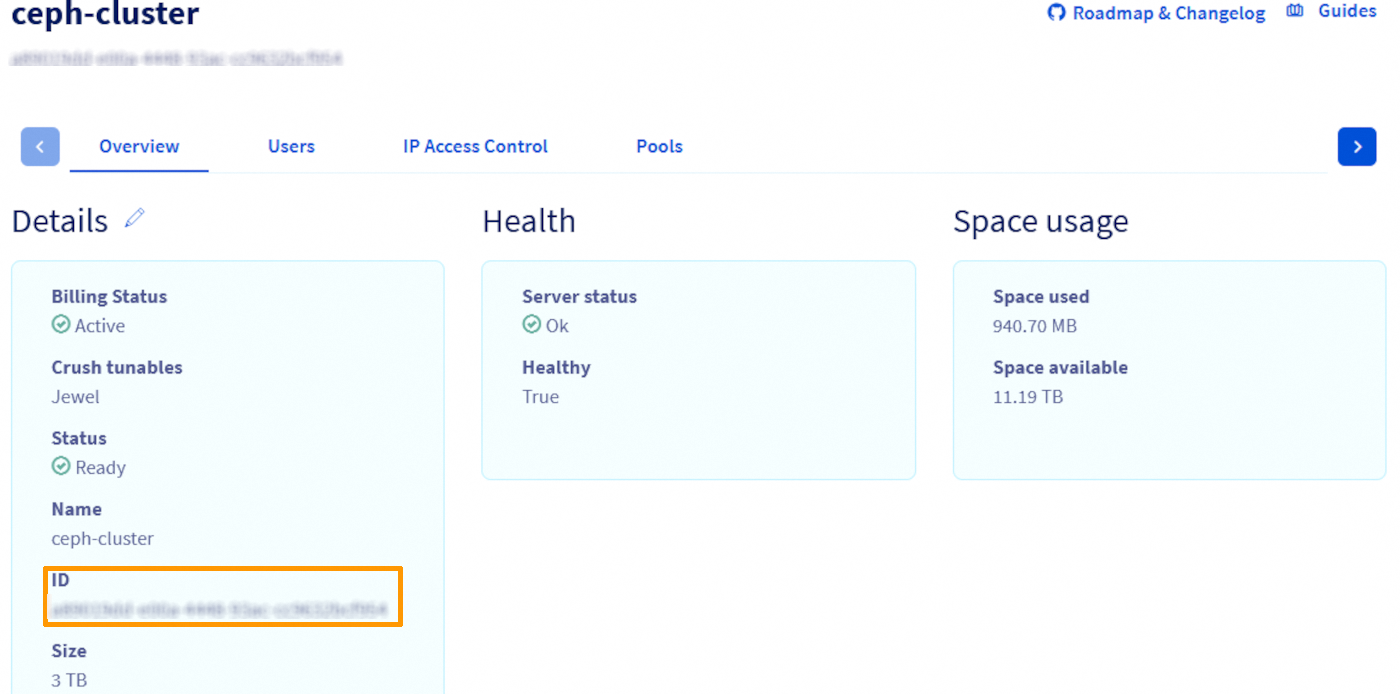
In your Cloud Disk Array service page, go to the Details section and locate the ID field. This value is your CDA service name.
Step 2. Identify Your Plan Code (skip this step if you know which plan you use)
Your CDA plan determines the type and size of storage used. The two available plans are:
- storage-2tb - old setup on nvme+hdd (on 2TB HDD disks)
- cda-3tb - new setup on nvme (3TB NVME disks)
Retrieve the Service ID:
Use the service name (UUID) from Step 1 to get the corresponding service ID:
The service ID is a number, e.g. 1234567
Retrieve the Service Details:
Now query the service information using the service ID:
Look for the following field in the response:
The value under billing.plan.code is your plan code, which you will need to perform the upgrade.
How to Perform the Upgrade
The upgrade process is straightforward and requires just one API call.
Step 1: Access the API Console
Choose the appropriate API console for your region:
Step 2: Submit the Upgrade Order
Use the following API endpoint:
Replace the placeholders with your service details:
- serviceName: The UUID of your CDA cluster (e.g. 6cb82c75-29fd-4d77-9928-0de6ad9ff5fe)
- planCode: Your current CDA plan code — either:
- storage-2tb (legacy configuration with HDD + NVMe)
- cda-3tb (new generation with full NVMe)
- quantity: The number of additional units you want to provision (1–24). For example:
| Quantity | Total added capacity |
|---|---|
| 1 | 2 TB (3 x 2TB disks) |
| 2 | 4 TB (6 x 2TB disks) |
| ... | ... |
| 24 | 48 TB (72 x 2TB disks) |
Quantity refers to how many units you want in total, not how many units you want to add.
For example, if your cluster currently has 3 TB of storage and you want to increase it to 6 TB, you need to set quantity = 2 (not 1).
Similarly, if your cluster has 9 TB and you want to grow it to 12 TB, you need to set quantity = 4.
Step 3: Retrieve the Payment Link
If the API call is successful, the response will include a payment URL located in the following field:
Step 4: Confirm the Order
Open the provided URL, complete the payment process, and your upgrade will begin automatically. The new storage nodes are typically added to your CDA cluster within a few minutes after payment is confirmed.
Go further
Visit our dedicated Discord channel: https://discord.gg/ovhcloud. Ask questions, provide feedback and interact directly with the team that builds our Storage and Backup services.
If you need training or technical assistance to implement our solutions, contact your sales representative or click on this link to get a quote and ask our Professional Services experts for assisting you on your specific use case of your project.
Join our community of users.

