Run Serverless containers on OVHcloud Managed Kubernetes with Knative
254 visualizações
Objective
Knative is a platform to deploy and manage Serverless applications on Kubernetes.
Knative provides a set of middleware components build on top of Kubernetes, abstracting away the complex details and enabling developers to focus on what matters. Built by codifying the best practices shared by successful real-world implementations, Knative solves the "boring but difficult" parts of deploying and managing cloud native services so you don't have to.
Concretely, you will deploy Knative components and Knative will create Kubernetes components itself. You don't have to worry about Kubernetes components.
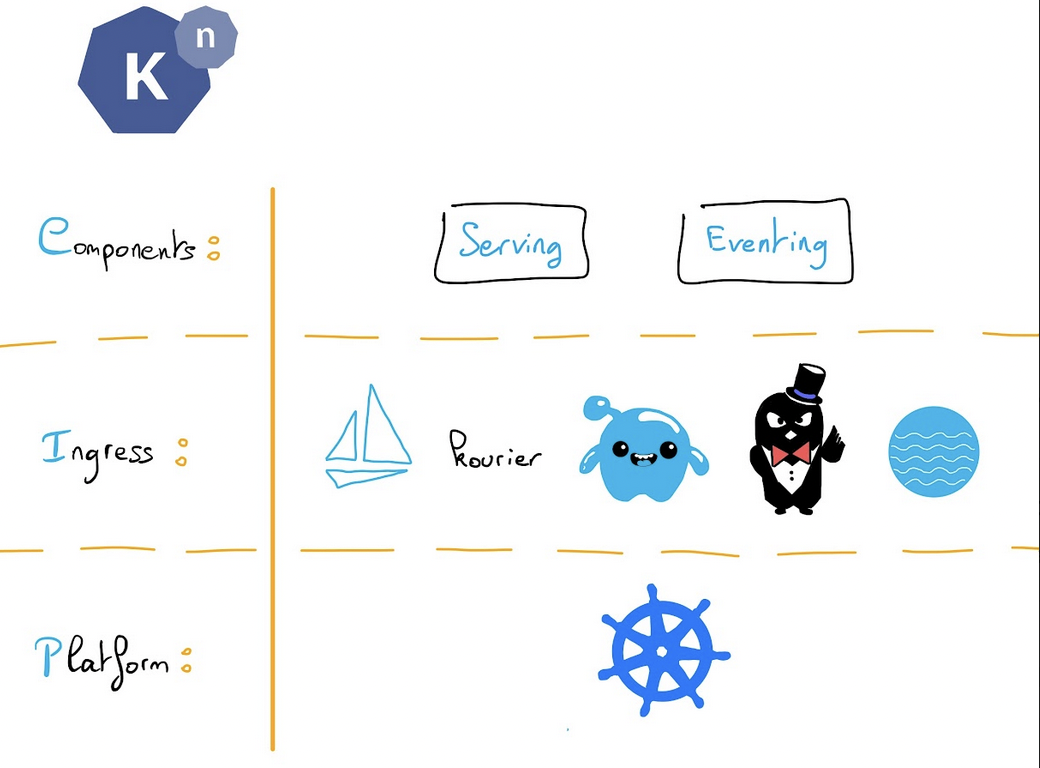
Knative supports multiple HTTP routing layers, including Istio, Gloo, Contour, Kourier and Ambassador.
Knative has two components:
- Serving
- Eventing
It helps for:
- Rapid deployment of Serverless containers
- Scale to zero (no call = no pod = no memory/CPU usage)
- Scale from zero (traffic spike start x Pods)
- Configuration & revision management
- Traffic splitting between revisions, blue/green...
- Eventing system
Read more about Knative 1.0 features.
Knative reached the 1.0 milestone. To celebrate this achievement, in this tutorial we are going to install Knative on a freshly created OVHcloud Managed Kubernetes Service cluster and we will deploy an example app using Knative Serving component. You can use the Reset cluster function in the Public Cloud section of the OVHcloud Control Panel to reinitialize your cluster before following this tutorial.
Requirements
This tutorial presupposes that you already have a working OVHcloud Managed Kubernetes cluster, and some basic knowledge of how to operate it. If you want to know more on those topics, please look at the deploying a Hello World application documentation.
Instructions
Install Knative "kn" CLI
The Knative CLI (kn) provides a quick and easy interface for creating Knative resources, such as Knative Services and Event Sources, without the need to create or modify YAML files directly.
kn also simplifies completion of otherwise complex procedures such as autoscaling and traffic splitting.
In order to install the CLI, follow the instructions depending on your OS.
Then test the CLI is correctly installed in your computer:
Here is an example of the result:
Installing Knative
Installing the Knative Serving component
The first thing to do is to install the Knative Serving component:
- Install the required custom resources by running the command:
Here is an example of the result:
- Install the core components of Knative Serving by running the command:
Here is an example of the result:
Installing a networking layer (Ingress Gateway)
As the networking layer, you can install the one you want: Istio, Contour, Gloo or Ambassador. In this tutorial, we will install Kourier: a lightweight Knative Serving Ingress.
Install the Knative Kourier controller by running the command:
Configure Knative Serving to use Kourier by default by running the command:
As you can see, a new kourier-system namespace is created with a deployment:
Fetch the External IP address or CNAME by running the command:
Here is an example of the result:
Warning: As the `LoadBalancer` creation is asynchronous, and the provisioning of the load balancer can take several minutes, you will surely get a `<pending>` state for the `EXTERNAL-IP` field. Please try again in a few minutes to get the external IP.
Save this to use in the following Configure DNS section.
Verifying the installation
A new knative-serving namespace has been created on your Kubernetes cluster with knative serving components, so let's check if Knative Serving components are correctly running:
Here is an example of the result:
And we can check the Knative Serving installed version:
kubectl get namespace knative-serving -o 'go-template={{index .metadata.labels "app.kubernetes.io/version"}}'Here is an example of the result:
Knative Serving version 1.17.0 is correctly deployed in our cluster, Cool!
Configuring DNS
For this tutorial, though it is not mandatory, you can configure DNS to prevent the need to run curl commands with a host header.
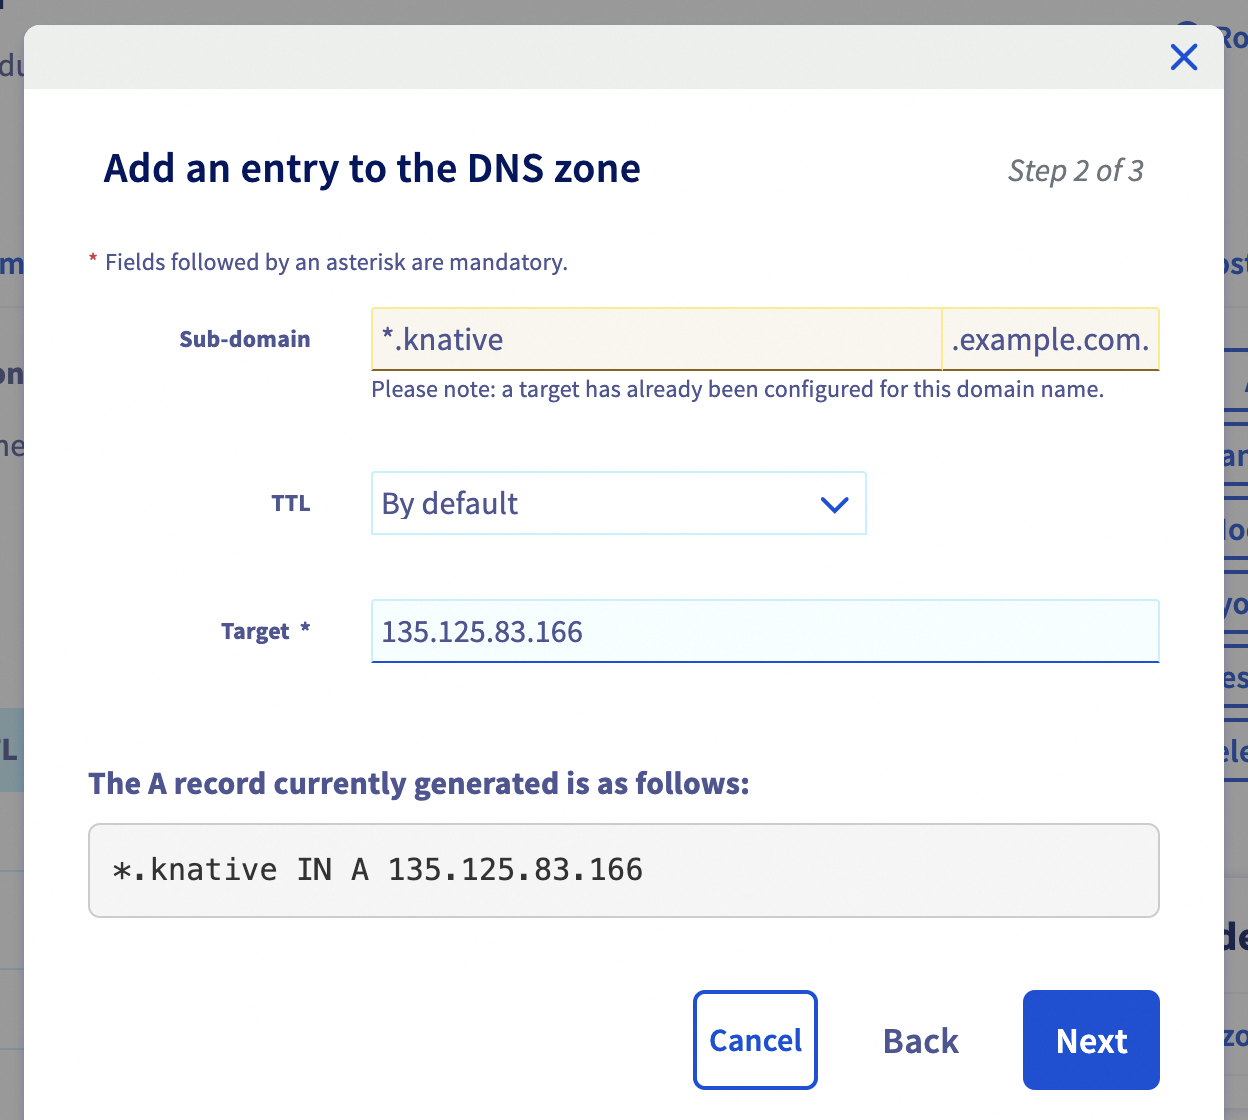
To configure DNS for Knative, take the External IP from setting up networking (135.125.83.166 in this example), and configure it with your DNS provider as follows:
Configure a wildcard A record for the domain:
On OVHcloud you can create a new entry to an existant DNS zone, like this:
Once your DNS provider has been configured, direct Knative to use that domain:
For more information about DNS on OVHcloud, please read our guide on how to configure a DNS zone.
Deploying an application
To verify that Knative is truly working in the cluster, you are going to deploy a hello-world application.
The first thing to do is to create a namespace in which our apps will run:
kubectl create namespace knative-appsHere is an example of the result:
Now, let's create our first Knative Service file named service.yaml:
apiVersion: serving.knative.dev/v1
kind: Service
metadata:
  name: hello-world
spec:
  template:
    spec:
      containers:
      - image: ovhplatform/hello
        ports:
            - containerPort: 80
As you can see, the Knative service YAML file is simple and concise.
We need to apply it on our cluster with the command:
kubectl apply -f service.yaml -n knative-appsHere is an example of the result:
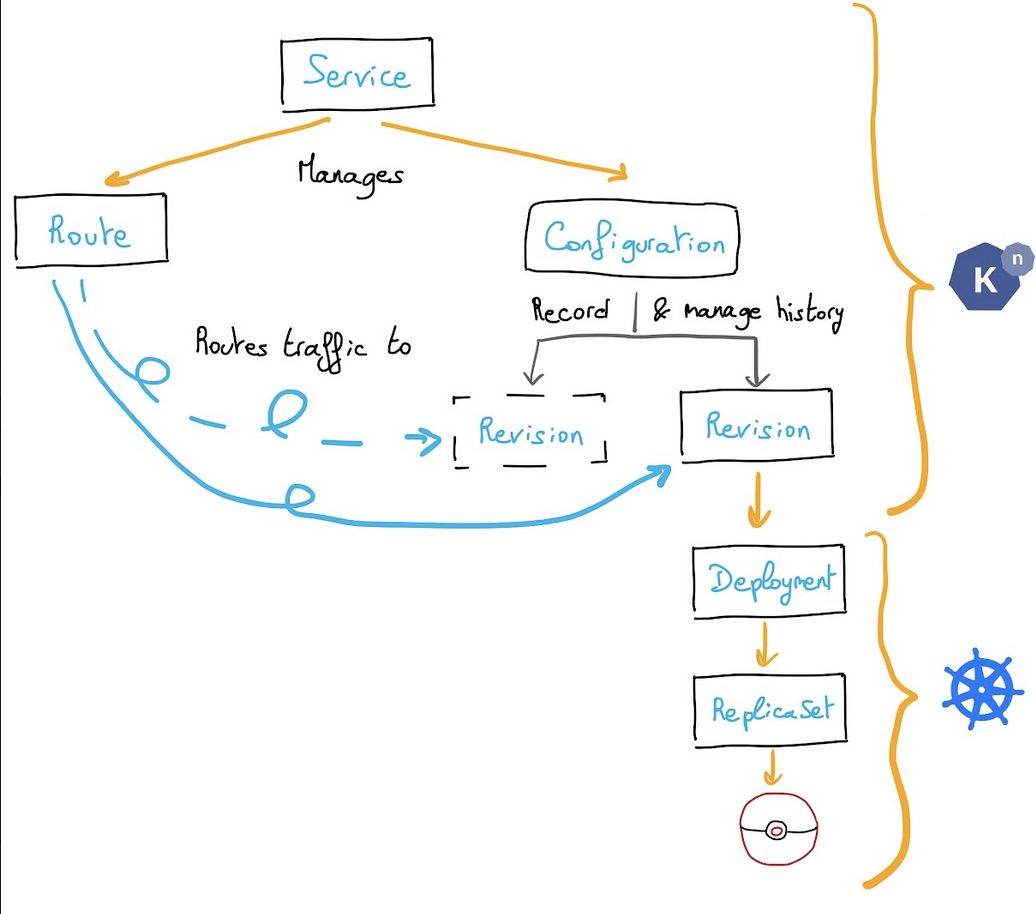
Under the hood, Knative created several Knative and Kubernetes components:
A deployment:
A pod:
Services:
And also Knative service, route and revision:
As we can see, by default, 100% of the traffic goes to the hello-world-00001 revision.
Now, we need to retrieve the route URL:
With this information, we can test to call our app:
$ curl http://hello-world.knative-apps.knative.example.com
<!doctype html>

<html>
<head>
<title>OVH K8S</title>
</head>
<style>
.title {
font-size: 3em;
padding: 2em;
text-align: center;
}
</style>
<body>
<div class="title">
<p>Hello from Kubernetes!</p>
<img src="./ovh.svg">
</div>
</body>
</html>
Scaling to zero
One of Knative Serving's powers is built-in automatic scaling (autoscaling). This means your Knative Service only spins up your application to perform its job, if it is needed; otherwise, it will "scale to zero" by spinning down and waiting for a new request to come in.
So, if you don't send requests to your application, Pods will be terminated automatically! :-)
Cool!
What's next?
Now you have a working "Hello World" app deployed on Knative on an OVHcloud Managed Kubernetes cluster. Next time we will see Knative awesome features like traffic splitting, blue/green deployment and horizontal scaling.
In this tutorial we only see the Serving component. If you are interested about Knative Eventing component, we recommand you the official documentation.
Cleanup
If you want, you can uninstall Knative apps, serving and core components.
First, delete our Hello World app:
Then, delete Knative CRDs:
Then, delete Knative resources:
Finally, delete namespaces:
Go further
-
If you need training or technical assistance to implement our solutions, contact your sales representative or click on this link to get a quote and ask our Professional Services experts for assisting you on your specific use case of your project.
-
Join our community of users on https://community.ovh.com/en/.

