Enterprise File Storage - Connect a Public Cloud instance to an EFS Volume via vRack Private Network
41 wyśw.
Objective
Mount an Enterprise File Storage (EFS) NFS volume from a Public Cloud instance using a private vRack network.
This ensures that all data traffic remains on the private network, with no Internet exposure.
The EFS volume and the Public Cloud instance must be located in the same region (e.g. RBX, GRA, or SBG), as OpenStack private networks are regional.
Requirements
- An Enterprise File Storage service in your OVHcloud account.
- An OVHcloud Public Cloud instance in the same region.
- An active vRack Private Network in the same region.
- Access to the OVHcloud Control Panel or the OpenStack CLI.
OVHcloud Control Panel Access
- Direct link: Enterprise File Storage
- Navigation path:
Bare Metal Cloud>Enterprise File Storage
Overview
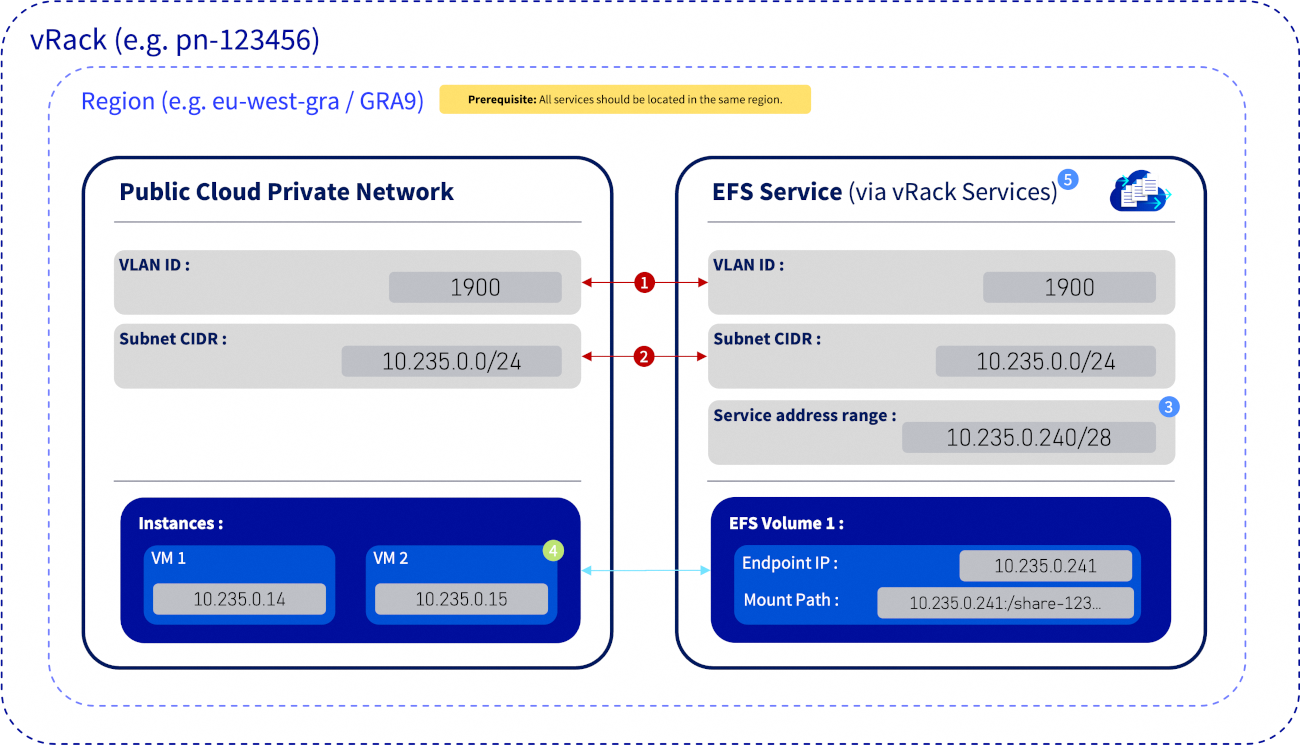
The diagram below illustrates how an Enterprise File Storage (EFS) volume connects to a Public Cloud instance through a private vRack network.
-
Critical Match — VLAN ID
The VLAN ID (e.g.
1900) must be identical in both the Public Cloud private network and the vRack Services configuration. -
Critical Match — Subnet CIDR
The subnet CIDR (e.g.
10.235.0.0/24) must also match across both services to ensure they operate within the same logical network in the vRack. -
Info — Service address range
The service address range (e.g.
10.235.0.240/28) is a reserved subset of the main subnet. These IPs are exclusively used by EFS service endpoints (e.g.10.235.0.241) and must not be assigned to instances. -
Security — ACL Rule
The EFS volume’s Access Control List (ACL) must explicitly authorize the private IP of any instance requiring access (e.g.
10.235.0.15). -
Concept — vRack Services
vRack Services acts as a secure network bridge, allowing managed services such as EFS outside your Public Cloud project to connect seamlessly to your private vRack network.
Instructions
Step 1 - Associate the Public Cloud project with the vRack
Before deploying your Enterprise File Storage (EFS) volume through a private vRack network, your Public Cloud project must first be associated with a vRack.
This association enables private networking between your Public Cloud instances and OVHcloud managed services such as EFS.
Follow the procedure described in the step 1: activating and managing a vRack in our guide "Configuring vRack for Public Cloud".
Step 2 - Create a Private Network in Your Public Cloud Project
To connect your Public Cloud instance to an EFS volume via vRack, first provision a dedicated private network within your project.
This isolated network enables secure communication between your instances and OVHcloud storage resources through the vRack architecture.
Follow the procedure described in the step 2: creating a private network in the vRack in our guide "Configuring vRack for Public Cloud".
Step 3 — Launch the Instance on the Private Network
Deploy your Public Cloud instance within the private network you created. Ensure it is connected to the correct subnet to enable secure communication over the vRack.
Follow the procedure described in the step 3: integrating an instance into vRack in our guide "Configuring vRack for Public Cloud".

Ensure that an IP address is assigned to the instance in the selected subnet (e.g. 10.235.0.15).
Step 4 - Create a vRack Service resource for EFS
There are two ways to create a vRack Service resource for your EFS volume.
Both methods achieve the same goal: securely connecting your EFS service to your vRack and Public Cloud instances.
First method: creating via vRack Services
A vRack Service resource acts as a network adapter, connecting managed services like EFS to your vRack and its private subnet.
For detailed guidance, see OVHcloud’s official documentation: vRack Services - Exposing a Managed Service on your vRack.
-
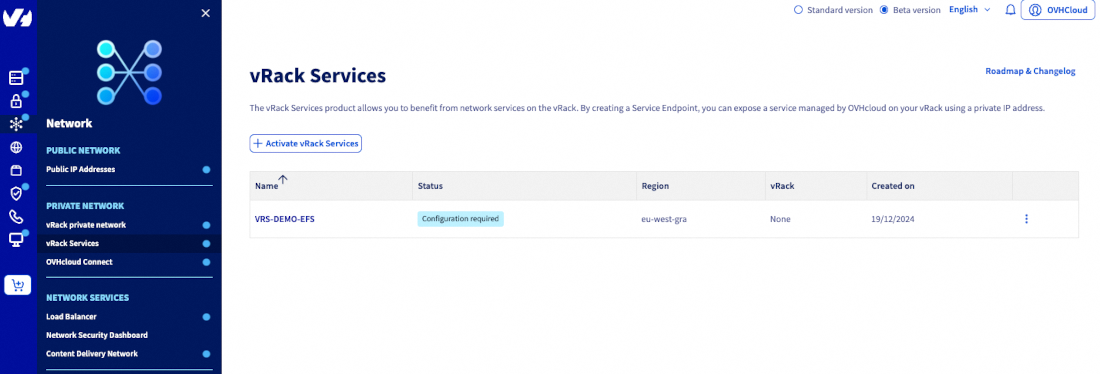
In the OVHcloud Control Panel, navigate to
Networksection, then click onvRack Services. -
Then click
Activate vRack Services. -
Select the same region as your vRack, Public Cloud instance and EFS service. Then click
Activate vRack Services. -
Select
No thanks, i already have a vRackand accept the terms and conditions to confirm.
-
Then, locate your newly created vRack Service in the list and click its name.
-
Edit the vRack Service with the following configuration:
- Private Network: Select the same vRack used for your Public Cloud project.

-
Create a subnet:
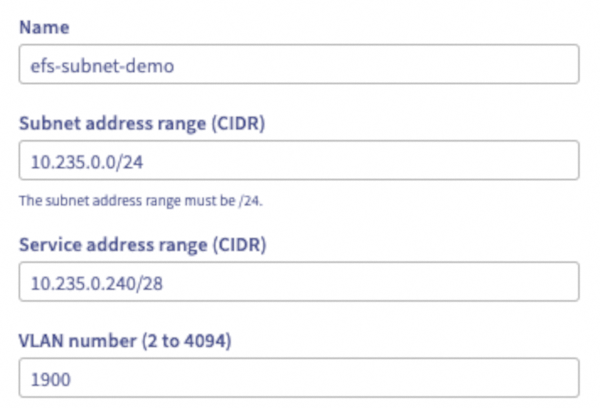
Ensure the CIDR matches your Public Cloud private network.
- Subnet address Range: e.g.
10.235.0.0/24. - Service address Range: e.g.
10.235.0.240/28.- Reserved subset of the private subnet for assigning IPs to managed EFS services within the vRack.
- VLAN: Use the same VLAN number as your Public Cloud private network (see Step 2).
- Click
Create subnet.
- Subnet address Range: e.g.
-
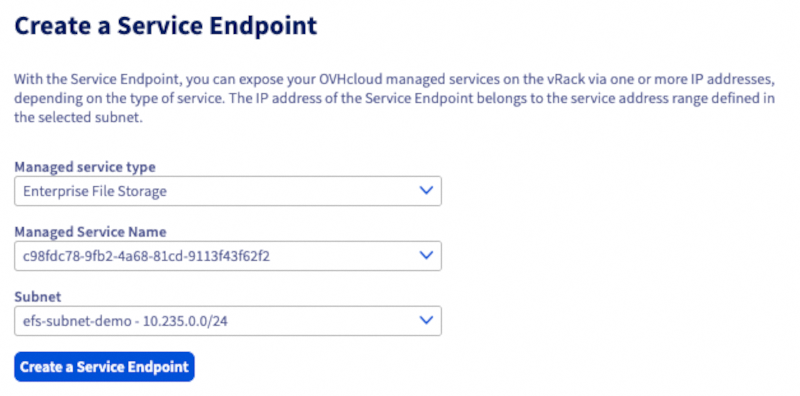
Create a Service Endpoint:
Second method: creating via Enterprise File Storage section
-
Select your EFS service.
-
In the
Network Configurationbox, clickConfigure Network Settings.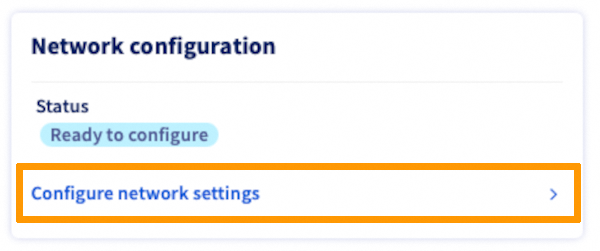
-
Select your vRack.
-
If no vRack Services have been created yet, activate the vRack Services and follow the first method: creating via vRack Services from the third point.
-
If you have already created a vRack service, select your dedicated service.
Step 5 — Connect the EFS Volume to the vRack
Once the previous steps are completed successfully, all volumes created in your EFS service will automatically reside within your vRack and its dedicated subnet, making them immediately accessible to your Public Cloud instances.
Step 6 — Configure access control (ACLs)
In the Access Control List (ACL) tab of your EFS volume:
-
Add the IPs or CIDR ranges authorized to mount the volume:
- To allow a single instance, enter the instance's IP address, for example:
10.235.0.15. - To allow all instances within the subnet, enter the subnet address, for example:
10.235.0.0/24.
- To allow a single instance, enter the instance's IP address, for example:
-
Set the desired Access Level: Read and write or Read-only.
Recommendation: Use individual IPs whenever possible to enhance security.
After applying the ACLs, verify network connectivity from your Public Cloud instance:
Step 7 — Mount the NFS Volume
-
Install the NFS client on your Public Cloud instance:
bash sudo apt install -y nfs-common -
Mount the EFS volume:
bash
sudo mkdir -p /mnt/efs
sudo mount -t nfs -o vers=3,timeo=600,retrans=2 <YOUR-EFS-SERVICE-IP>:/share_<ID> /mnt/efs
df -h /mnt/efs
Step 8 — Enable Automatic Mount on Boot (optional)
To ensure your EFS volume mounts automatically at startup, add the following entry to the /etc/fstab file:
Then test the configuration:
If no errors occur, the EFS volume will now automatically mount on boot.
Expected Result
- The instance can access the EFS volume via .
- All communication occurs privately within the vRack.
- The NFS mount is fully functional and persistent across reboots.
Troubleshooting
| Symptom | Likely Cause | Resolution |
|---|---|---|
| mount.nfs: No route to host | Instance and EFS not in the same region, or wrong VLAN ID. | Ensure the instance, EFS, and vRack Services are in the same region. Recreate the vRack Service using the same VLAN ID as the private network. |
| mount.nfs: access denied by server | EFS ACL missing or incorrect. | Add the instance IP (e.g. 10.235.0.x) or subnet (e.g. 10.235.0.0/24) with protocol NFSv3 and Read/Write access. |
| mount command hangs indefinitely | Wrong NFS version or unresponsive endpoint. | Use: -o vers=3,timeo=600,retrans=2 to force NFSv3 and define timeouts. |
| mount succeeds but no read/write | ACLs or POSIX permissions too strict. | Adjust ACLs or update volume-level permissions. |
| mount works, but not after reboot | Missing /etc/fstab entry. | Add: <YOUR-EFS-SERVICE-IP>:/share_<ID> /mnt/efs nfs vers=3,timeo=600,retrans=2 0 0. |
| vRack Services shows “Inactive” | Service not yet provisioned. | Wait for provisioning to complete, or reattach the service from the EFS Private Network tab. |
Go further
Managing Enterprise File Storage from the OVHcloud Control Panel
Enterprise File Storage - API Quickstart
Enterprise File Storage - Managing volumes
Enterprise File Storage - Managing volume ACLs
Enterprise File Storage - Managing volume snapshots
If you need training or technical assistance to implement our solutions, contact your sales representative or click on this link to get a quote and ask our Professional Services experts for assisting you on your specific use case of your project.
Join our community of users.

