Installing the Kubernetes Dashboard on OVHcloud Managed Kubernetes
289 wyśw.
The Kubernetes Dashboard is a general purpose, web-based UI for Kubernetes clusters. It allows users to manage and troubleshoot applications running in their cluster, as well as manage the cluster itself.
Before you begin
This tutorial assumes that you already have a working OVHcloud Managed Kubernetes cluster, and some basic knowledge of how to operate it. If you want to know more on those topics, please look at the OVHcloud Managed Kubernetes Service Quickstart.
This tutorial describes the most basic way of using the Dashboard with your OVHcloud Managed Kubernetes cluster. Please refer to the official docs for a deeper understanding, specially on subjects like access control, for more in-depth information.
Deploy the Dashboard in your cluster
Depending on the version of Kubernetes you are running, you have to choose the right Dashboard version to deploy in order to avoid incompatibilities.
It should display something like this:
Create An Authentication Token (RBAC)
In order to access the Dashboard, you need to create a new user with the service account mechanism in Kubernetes. Grant this user admin permissions, then log in to the Dashboard using their bearer token. Let's look at these steps in more detail.
Create Service Account
First, we will create a service account with the name admin-user in the kubernetes-dashboard namespace.
To do this, please copy the following YAML into a dashboard-service-account.yml file:
You should then apply the file to add the service account to your cluster:
It should display something like this:
Create a RoleBinding
Using the cluster-admin role for your cluster, we will create a RoleBinding, binding it to your ServiceAccount.
To do this, please copy the following YAML into a dashboard-cluster-role-binding.yml file:
You should then apply the file to add the RoleBinding to your cluster:
It should display something like this:
Create a Secret ServiceAccountToken
In Kubernetes v1.24.0 Secret API objects containing service account tokens are no longer auto-generated for every ServiceAccount. Because of this, we'll need to create it ourselves.
To do this, please copy the following YAML into a service-account-token.yml file:
You should then apply the file to add the Secret to your cluster:
It should display something like this:
Bearer Token
Next step is recovering the bearer token you will use to log in your Dashboard. Execute the following command:
It should display something like:
Copy the token and store it securely, as it's your key to the Dashboard.
Access the Dashboard
To access the Dashboard from your local workstation, you must create a secure channel to your OVHcloud Managed Kubernetes cluster. You can do this by using kubectl as a proxy from your workstation to the cluster:
Your kubectl is opening a connection and acting as a proxy from your workstation to the cluster. Any HTTP request to your local port (8001) will be proxified and sent to the cluster API.
Next, access the Dashboard at:
http://localhost:8001/api/v1/namespaces/kubernetes-dashboard/services/https:kubernetes-dashboard:/proxy/
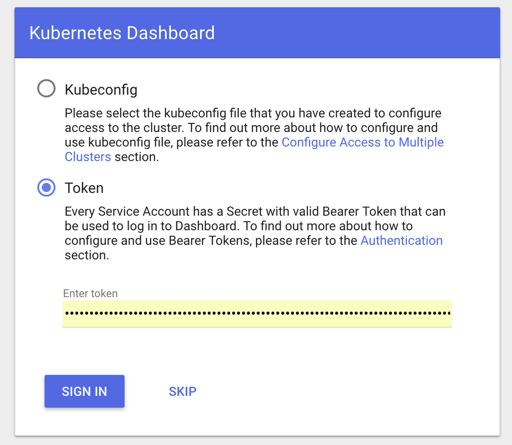
In the log-in page, select authentication by token, and use the bearer token you recovered in the previous step.
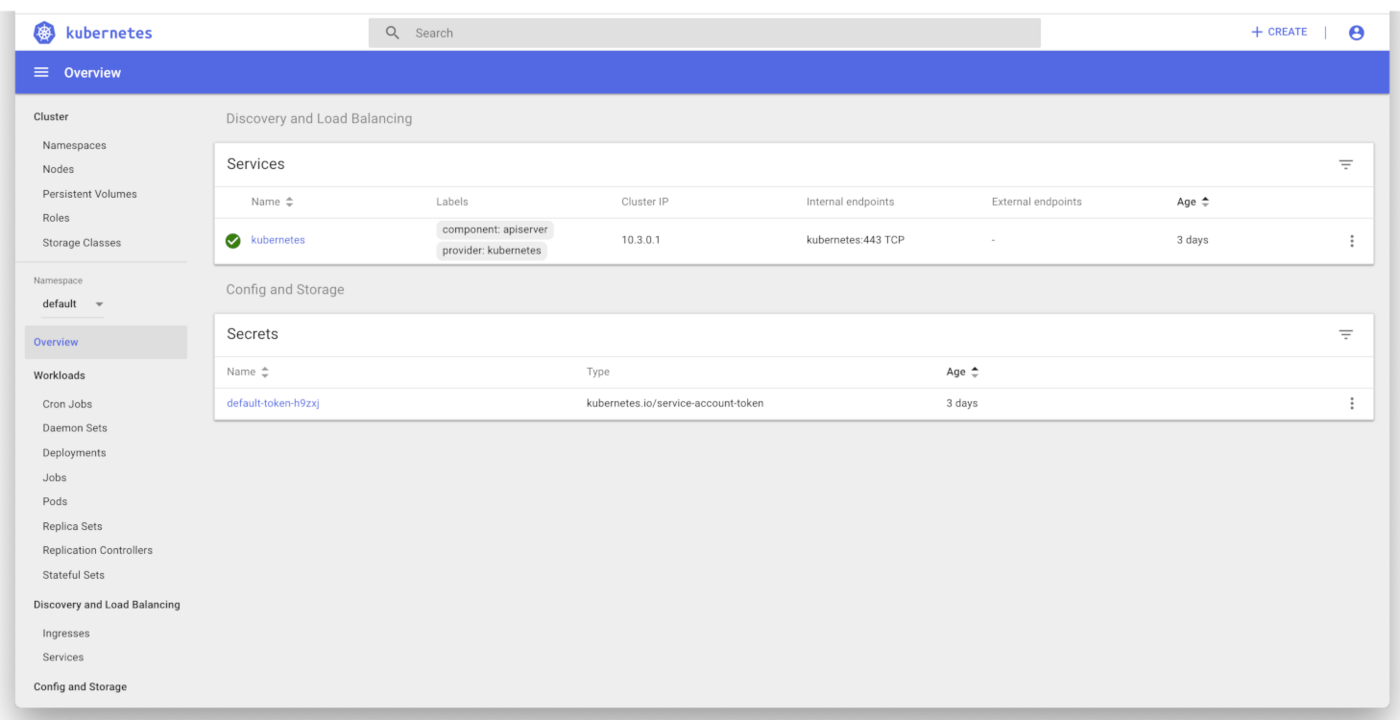
You will then be taken directly to your Dashboard:
Delete all kubernetes-dashboard resources
To remove all resources created by your previous kubernetes-dashboard deployment, just execute the following command line:
Go further
-
If you need training or technical assistance to implement our solutions, contact your sales representative or click on this link to get a quote and ask our Professional Services experts for assisting you on your specific use case of your project.
-
Join our community of users.

