Creating a cluster
768 wyśw.
Objective
The OVHcloud Managed Kubernetes service lets you deploy production-ready clusters without the operational overhead of setting them up or maintaining them. You can create a cluster directly through the OVHcloud Control Panel, or automate the process using Infrastructure as Code (IaC) tools.
OVHcloud offers a native Terraform provider, and for developers who prefer working in their own programming languages, tools like Pulumi provide even more flexibility. This guide walks you through the different ways to create a Kubernetes cluster, so you can choose the one that best fits your workflow.
OVHcloud Control Panel
Terraform
Terraform is an open-source infrastructure as code (IaC) tool created by Hashicorp in 2014, written in Go. It aims to build, change and version control your infrastructure. You can define and provision your infrastructure by writing the definition of your resources in Hashicorp Configuration Language (HCL).
This tool has a powerful and very intuitive command line interface (CLI).
If you are interested in leveraging your knowledge about Terraform CLI, a Cheat Sheet exists.
CDK for Terraform
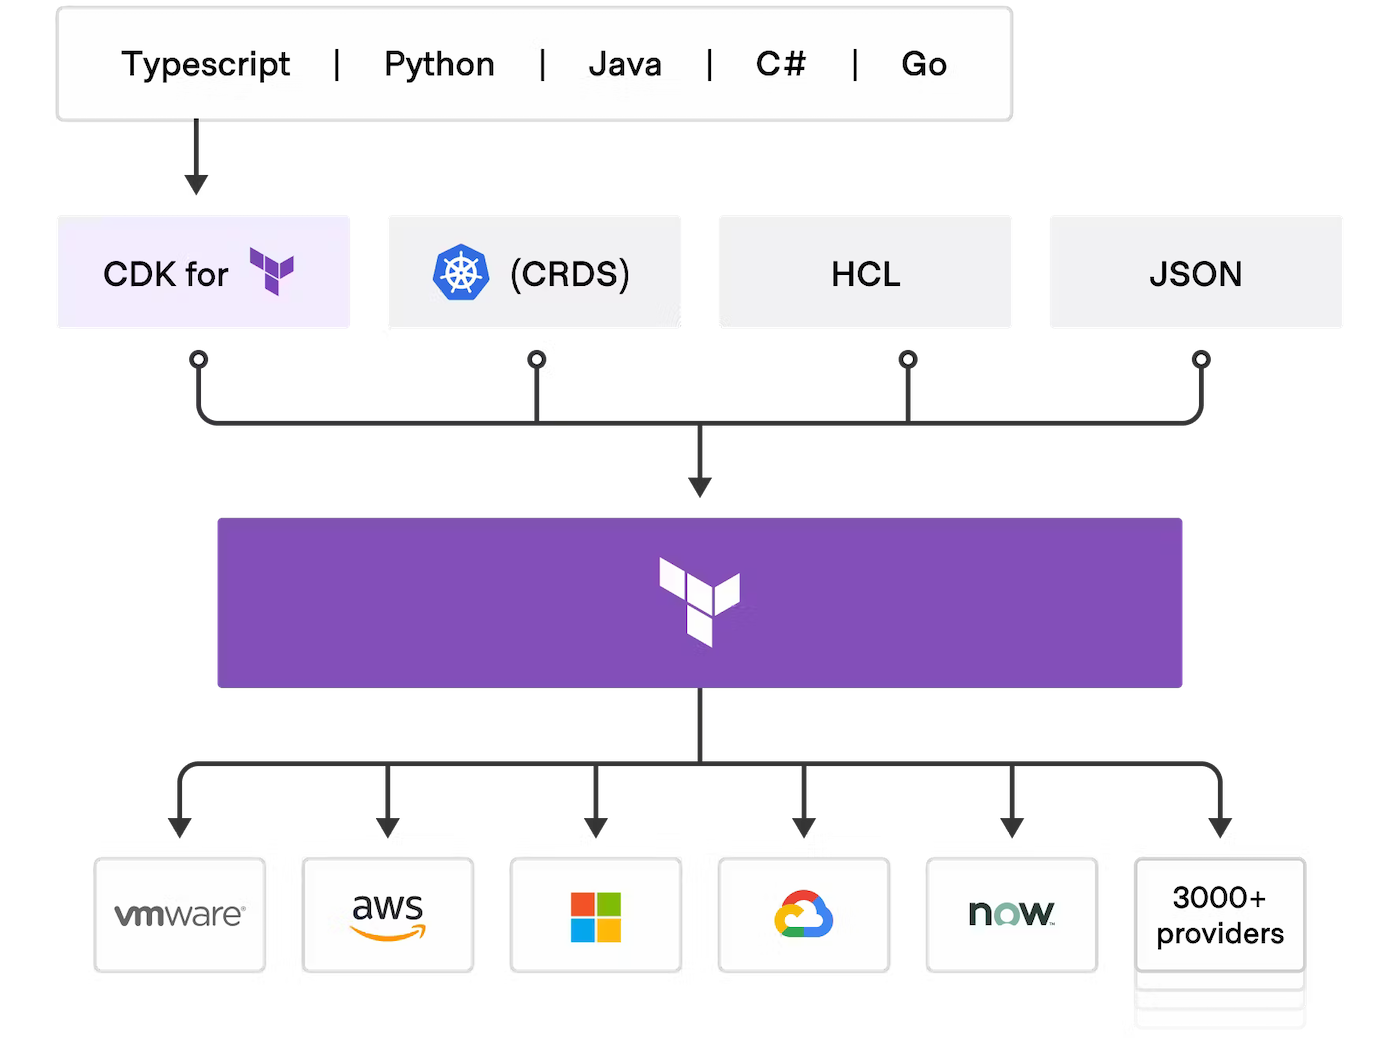
Cloud Development Kit for Terraform, also called CDKTF, converts the definitions you write in your preferred programming language to Terraform configuration files. It uses Terraform to provision and manage your infrastructure when you deploy your application.
It supports several programming languages: Go, Python, Java, TypeScript and C#. There is no need to define your infrastructures in HCL (Hashicorp Configuration Language) and it supports all existing Terraform providers and modules.
Read the official documentation of CDK for Terraform if you need further information.
Pulumi

Pulumi is an Infrastructure as code (IasC) tool that allows you to build your infrastructures with a programming language, in Golang for example.
Users define the desired state in Pulumi programs and Pulumi create the desired resources.
Pulumi offers an intuitive command line interface (CLI), to provision, update or delete your infrastructure. If you are familiar with Docker Compose CLI and Terraform CLI, you will adopt Pulumi CLI too.
Requirements
The specific prerequisites for each tool will be annotated in it directly.
- A Public Cloud project in your OVHcloud account
Take advantage of reduced prices by committing to a period of 1 to 36 months on your Public Cloud resources. More information on our Savings Plans page.
OVHcloud Control Panel Access
- Direct link: Public Cloud Projects
- Navigation path:
Public Cloud> Select your project
Instructions
Via OVHcloud Control Panel
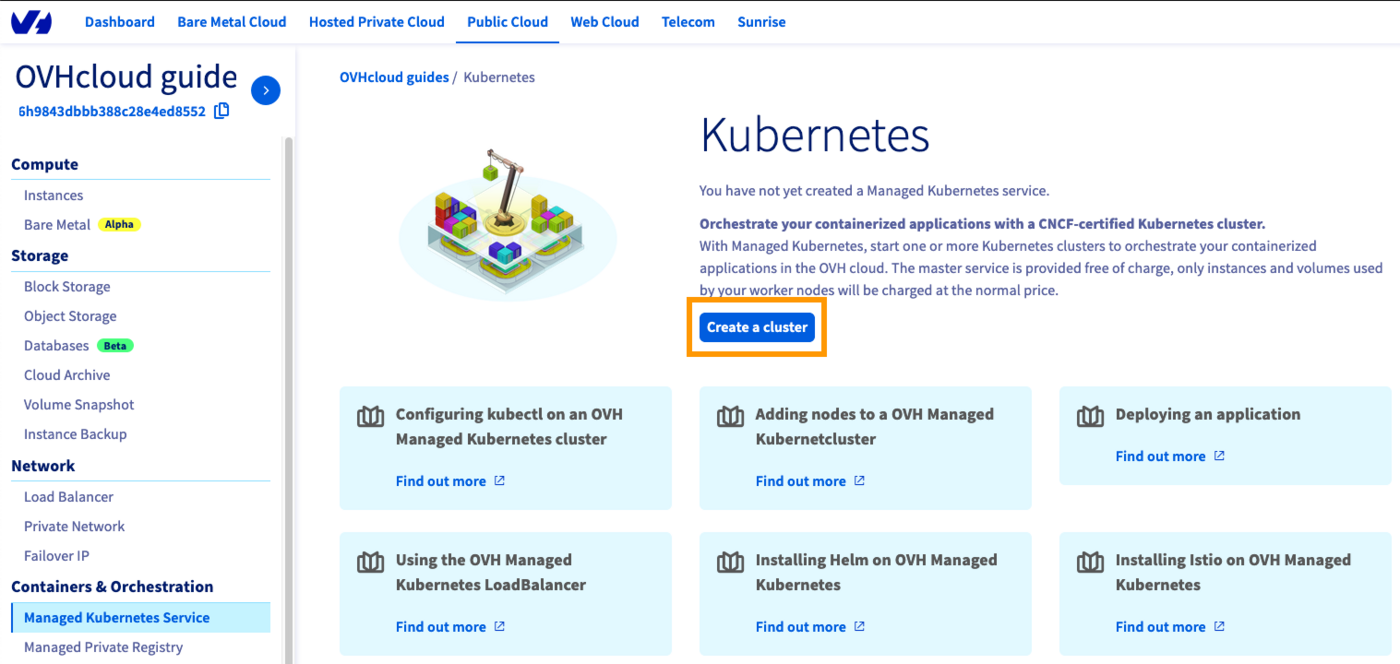
Access the administration UI for your OVHcloud Managed Kubernetes clusters by clicking on Managed Kubernetes Service in the left-hand menu and click on Create a cluster.
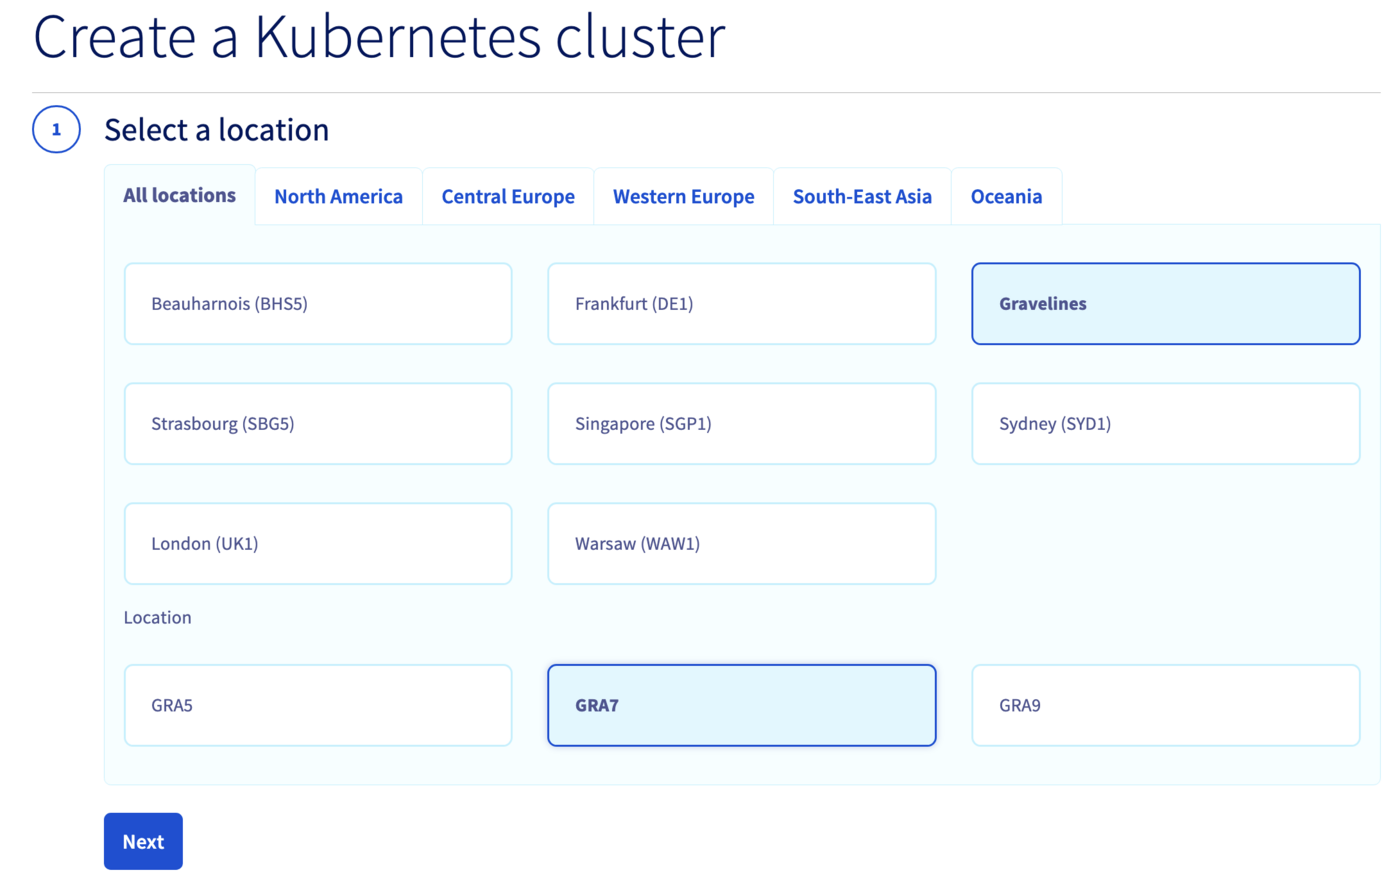
Select a location for your new cluster.
Choose the minor version of Kubernetes.
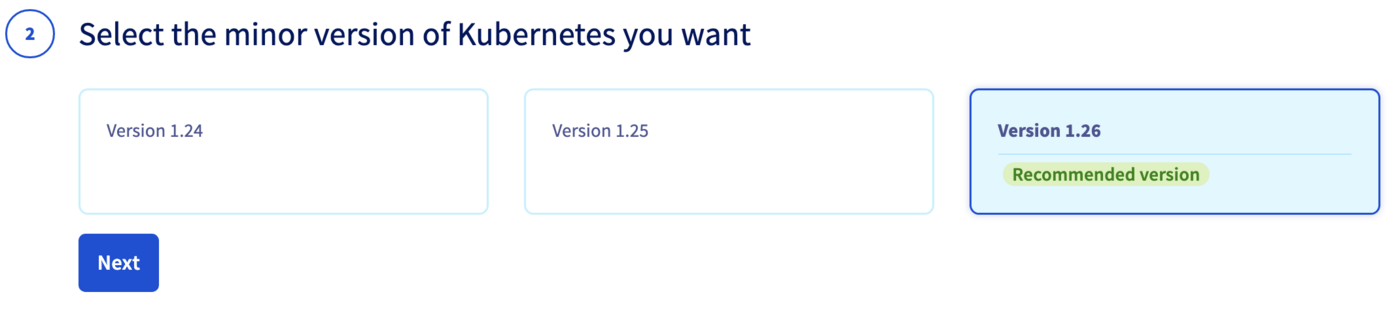
We recommend to always use the last stable version.
Please read our End of life / end of support page to understand our version policy.
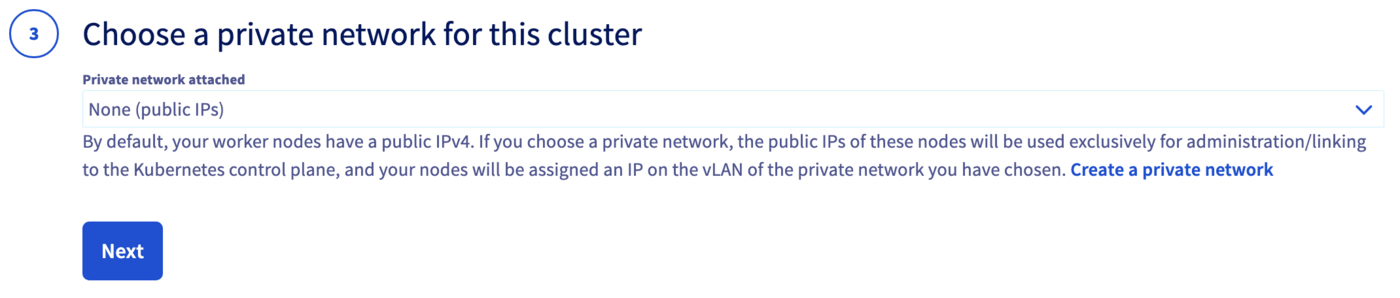
You can now choose to integrate your Kubernetes cluster into a private network using OVHcloud vRack. For more information about this option, please read our guide Using the vRack.
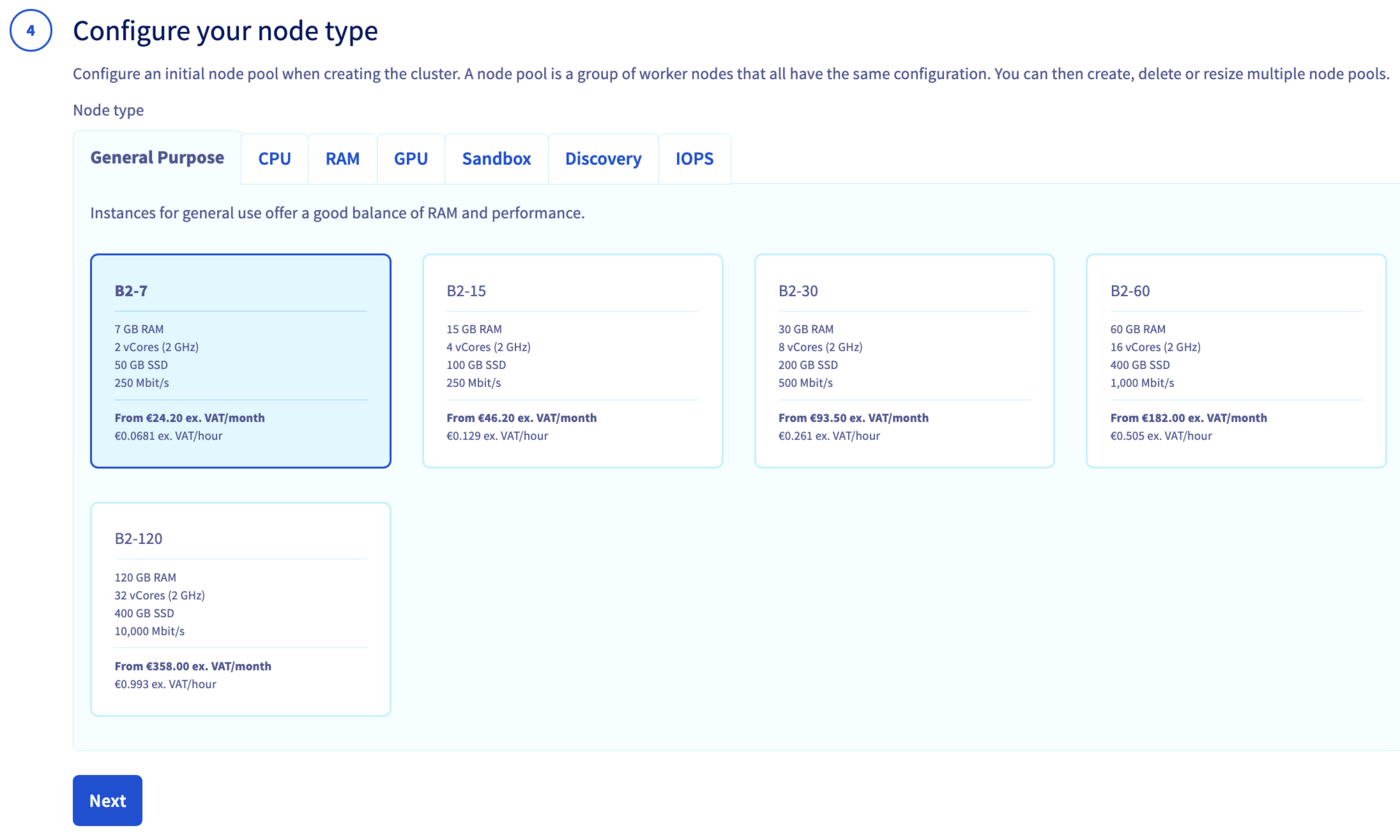
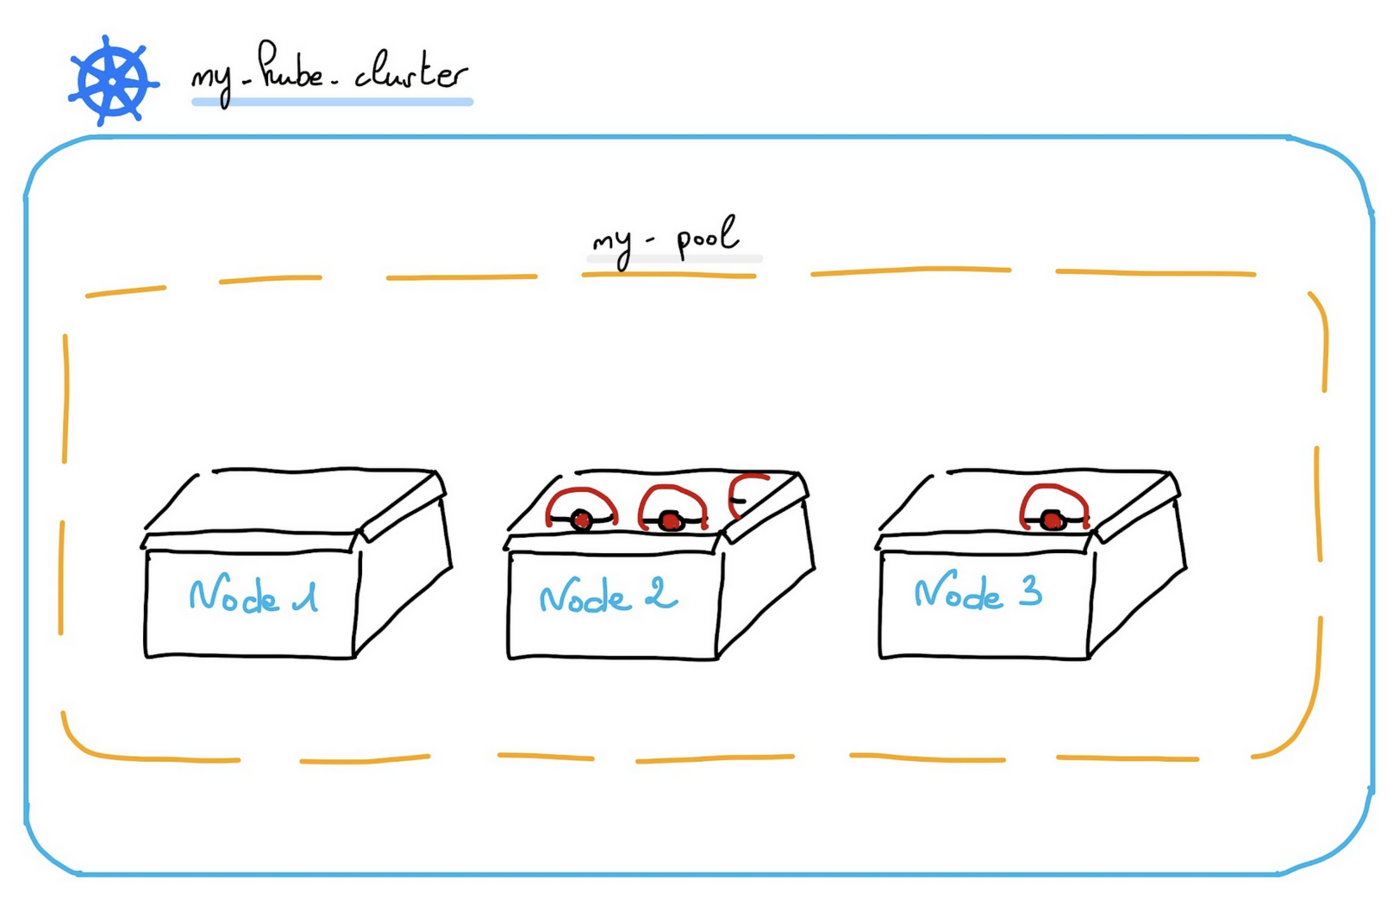
Now you can configure the default node pool. A node pool is a group of nodes sharing the same configuration, allowing you a lot of flexibility in your cluster management.
You can read the Managing node pools guide for more information on node pools.
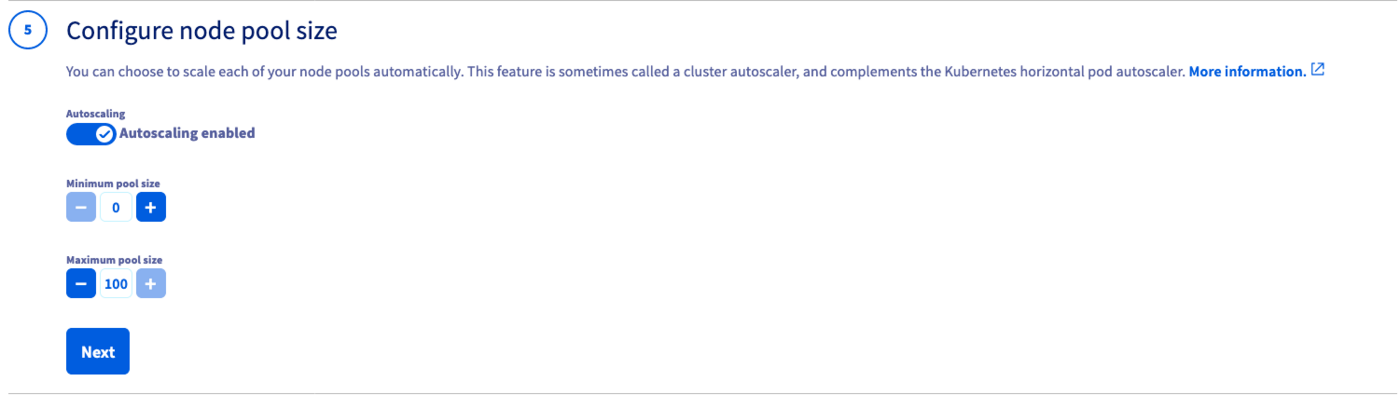
In the next step, define the size of the default node pool.
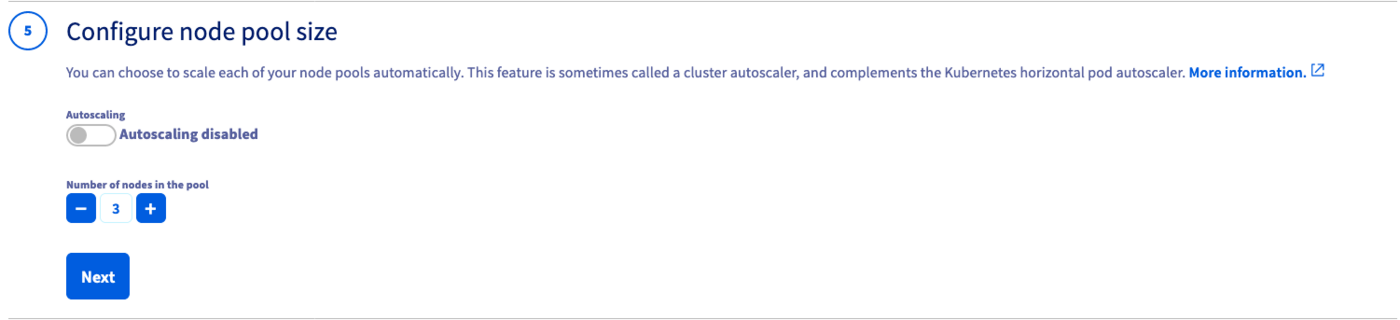
Alternatively, you can enable the Autoscaling feature for the cluster. Define the minimum and maximum pool size in that case.
In the next step, choose the appropriate billing mode (monthly or hourly). You can also enable the anti-affinity mode here.
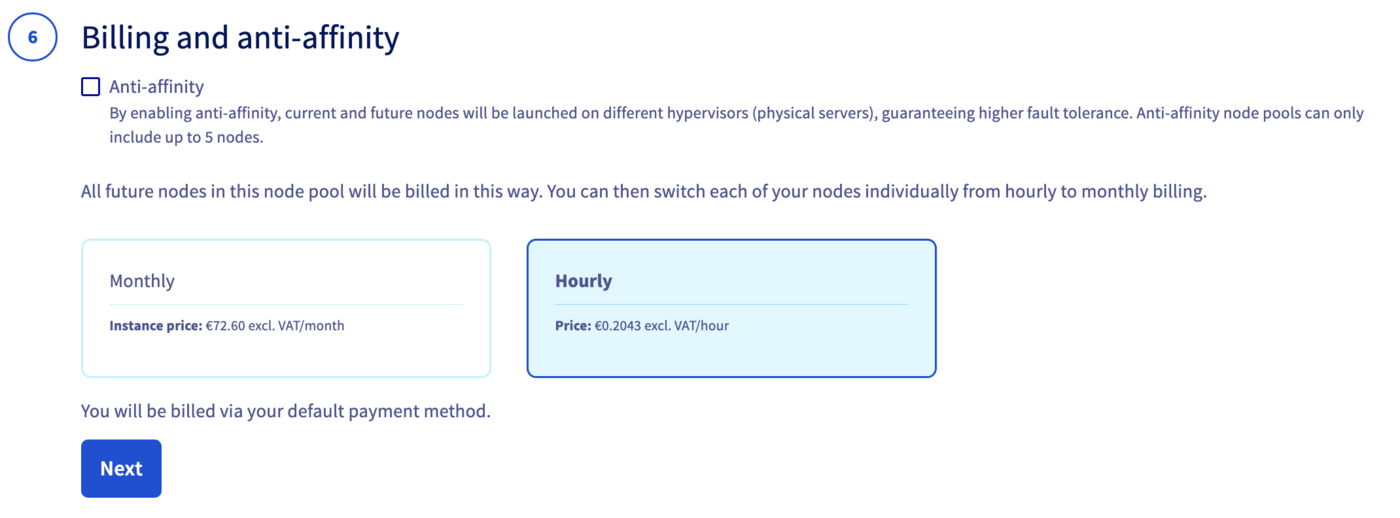
By enabling anti-affinity, current and future nodes will be launched on different hypervisors (physical servers), guaranteeing higher fault tolerance. Anti-affinity node pools can only include up to 5 nodes.
Moreover, if you choose the monthly billing method, you cannot change later from monthly to hourly. A change is only possible the other way around.
Enter a name for your cluster.

Finally, click the Send button.
The cluster creation is now in progress. It should be available within a few minutes in your OVHcloud Control Panel.
After a cluster is created, you can no longer change:
- The region.
- The private network ID.
Via Terraform
Before starting, you should have installed Terraform CLI, version 0.12.x minimum, on your machine. You can install it by following detailed installation instructions or with the tool tfenv.
OVHcloud Terraform provider
In order to create a Kubernetes cluster and other resources, OVHcloud provides a Terraform provider which is available in the official Terraform registry.
All available resources and data sources have their definition and documentation.
In this guide, we will create two resources:
- A cloud_project_kube, that represents an OVHcloud managed Kubernetes cluster
- A cloud_project_kube_nodepool, that represents a Kubernetes Node Pool
Getting your cluster/API tokens information
The "OVH provider" needs to be configured with a set of credentials:
application_keyapplication_secretconsumer_key
Why?
Because, behind the scenes, the "OVH Terraform provider" is doing requests to OVHcloud APIs.
In order to retrieve this necessary information, please follow First steps with the OVHcloud APIs tutorial.
Concretely, you have to generate these credentials via the OVH token generation page with the following rights:
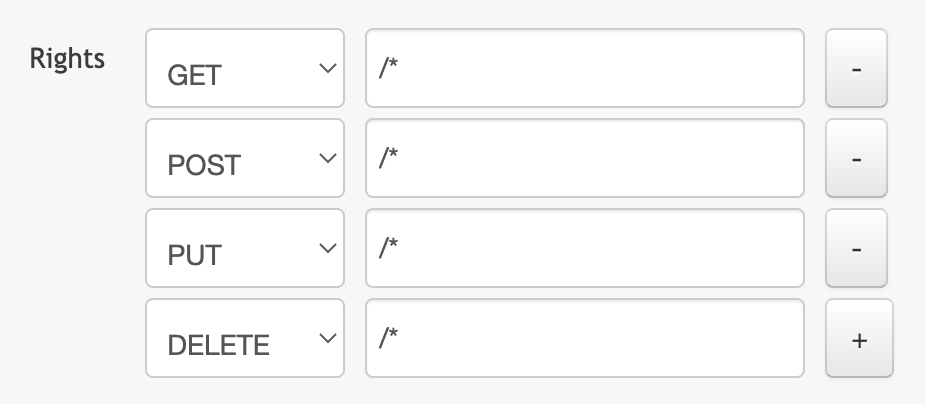
When you have successfully generated your OVH tokens, please keep them. You'll have to define them in the coming minutes ;-).
The last needed information is the service_name: it is the ID of your Public Cloud project.
How to get it?
In the Public Cloud section, you can retrieve your service name ID thanks to the Copy to clipboard button.
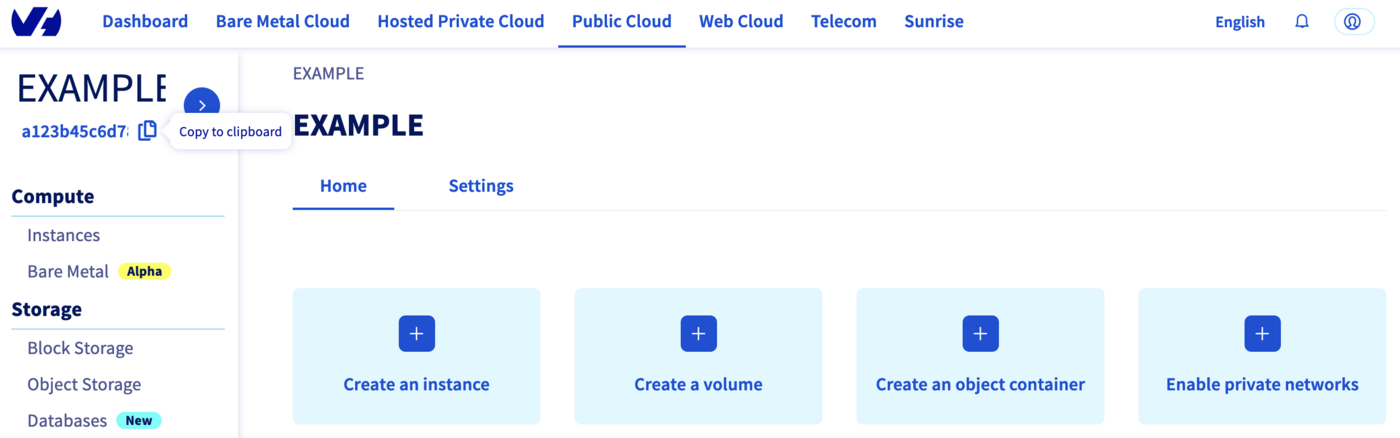
You will also use this information in Terraform resources definition files.
Create a cluster
When you want to manage (create, modify, and remove) your infrastructure, getting started with Terraform is easy.
Just create files ending with .tf containing the description of the resources you want to have.
In our case, we want to create:
- An OVHcloud managed Kubernetes cluster.
- A nodepool.
So, let's start!
Resources definition
First, create a provider.tf file with the minimum version, european endpoint ("ovh-eu") and keys you previously got in this guide.
Terraform 0.13 and later:
Terraform 0.12 and earlier:
Alternatively the secret keys can be retrieved from your environment.
OVH_ENDPOINTOVH_APPLICATION_KEYOVH_APPLICATION_SECRETOVH_CONSUMER_KEY
This later method (or a similar alternative) is recommended to avoid storing secret data in a source repository.
Here, we defined the ovh-eu endpoint because we want to call the OVHcloud Europe API, but other endpoints exist, depending on your needs:
ovh-eufor OVHcloud Europe APIovh-usfor OVHcloud US APIovh-cafor OVHcloud North-America API
Then, create a variables.tf with service_name:
Define the resources you want to create in a new file called ovh_kube_cluster.tf:
In this resources configuration, we ask Terraform to create a Kubernetes cluster, in the GRA7 region, using Kubernetes version 1.34.
And we tell Terraform to create a Node Pool with 3 Nodes with B2-7 machine type.
You can't use "_" or "." as a separator in a node pool name or a flavor name. You would obtain a "gzip: invalid header" during node pool creation.
Finally, create a output.tf file with the following content:
With this output, we tell Terraform to retrieve the kubeconfig file content. This information is needed to connect to the new Kubernetes cluster.
For your information, outputs are useful to retrieve and display specific information after the resources creation.
Your code organisation should be like this:
Create our cluster through Terraform
Now we need to initialise Terraform, generate a plan, and apply it.
The init command will initialize your working directory which contains .tf configuration files.
It’s the first command to execute for a new configuration, or after doing a checkout of an existing configuration in a given git repository for example.
The init command will:
- Download and install Terraform providers/plugins.
- Initialise backend (if defined).
- Download and install modules (if defined).
Now, we can generate our plan:
Thanks to the plan command, we can check what Terraform wants to create, modify or remove.
The plan is OK for us, so let's apply it:
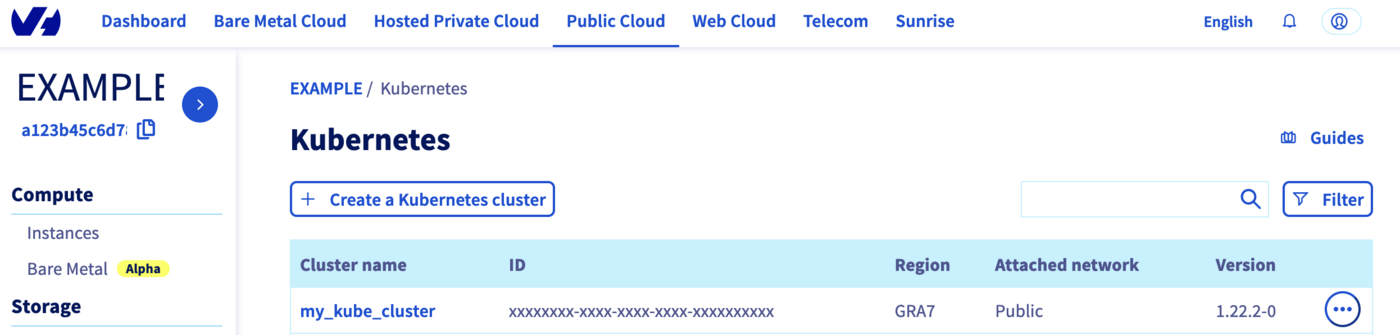
Now, click on Managed Kubernetes Service in the left-hand menu.
As you can see, your cluster has been successfuly created:
Now, click on my_kube_cluster, then on the Node pools tab:
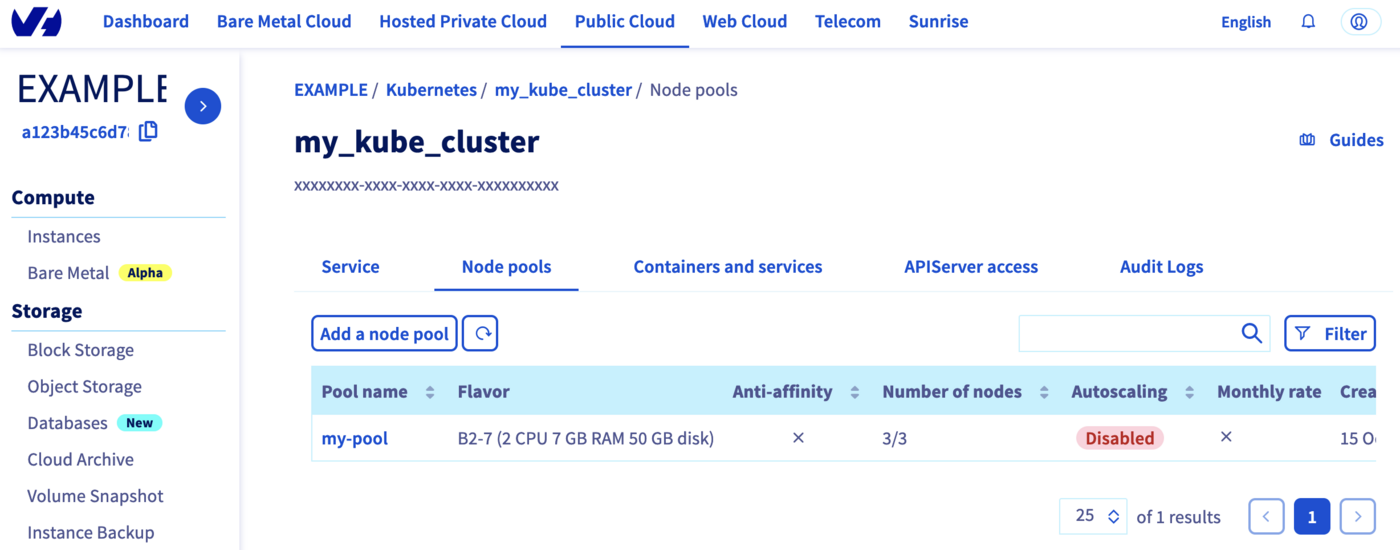
Our node pool is created too.
Perfect!
Via CDK for Terraform
You need to have:
- Kubernetes CLI installed.
- Cloud Development Kit for Terraform CLI installed.
- Go installed.
OVHcloud Terraform provider
In order to create a Kubernetes cluster and other resources, OVHcloud provides a Terraform provider which is available in the official Terraform registry.
All available resources and data sources have their own definition and documentation.
CDKTF will "translate" your code into an HCL configuration file and then call terraform and use the existing OVHcloud Terraform provider.
We will create two resources:
- A cloud_project_kube, that represents an OVHcloud managed Kubernetes cluster
- A cloud_project_kube_nodepool, that represents a Kubernetes Node Pool
Getting your cluster/API tokens information
The "OVH provider" needs to be configured with a set of credentials:
endpointapplication_keyapplication_secretconsumer_keyservice_name
This is because, behind the scenes, the "OVH Terraform provider" is doing requests to OVHcloud APIs.
To retrieve the necessary information, please follow the tutorial First steps with the OVHcloud APIs.
Concretely, you have to generate these credentials via the OVH token generation page with the following rights:
Once you have successfully generated your OVH tokens, keep them. You will need to define them later.
The last piece of information you need is the service_name: this is the ID of your Public Cloud project.
How do you get it?
In the Public Cloud section, you can retrieve your Public Cloud project ID thanks to the Copy to clipboard button.
Summary of the needed environment variables:
| Provider Argument | Environment Variables | Description | Mandatory |
|---|---|---|---|
endpoint | OVH_ENDPOINT | OVHcloud Endpoint. Possible value are: ovh-eu, ovh-ca, ovh-us, soyoustart-eu, soyoustart-ca, kimsufi-ca, kimsufi-eu, runabove-ca | ✅ |
application_key | OVH_APPLICATION_KEY | OVHcloud Access Key | ✅ |
application_secret | OVH_APPLICATION_SECRET | OVHcloud Secret Key | ✅ |
consumer_key | OVH_CONSUMER_KEY | OVHcloud Consumer Key | ✅ |
service_name | OVH_CLOUD_PROJECT_SERVICE | OVHcloud Public Cloud project ID | ✅ |
These keys can be generated via the OVHcloud token generation page.
Example:
Deploying an OVHcloud Managed Kubernetes cluster and a node pool in Go / Golang
In this guide, we want to create, in Go:
- An OVHcloud managed Kubernetes cluster.
- A node pool.
Project initialization
Create a folder and access it:
Initialize your project with cdktf CLI:
The command initializes the application in the programming language you have specified (Go in our case) with the list of existing Terraform providers you have defined (OVHcloud and Hashicorp local) and stores the Terraform State locally (thanks to the --local flag).
The code organization of your project is created:
Let's explain the different generated files:
cdktf.jsoncontains configuration settings for your applicationgeneratedfolder contains the OVHcloud Terraform provider translated in Go.gitignorecontains the gitignore filego.modandgo.sumfiles contain the dependencies of your Go applicationhelpcontains useful cdktf commands to executemain.gois the Go programmain_test.gois for declaring unit test for your Go program
Resources definition
Edit the main.go file and replace the existing content with the following content:
In this resource configuration, we ask Terraform to create a Kubernetes cluster, in the GRA5 region, using the latest recommended version of Kubernetes.
We tell Terraform to create a node pool with 3 nodes with machine type B2-7.
And we tell Terraform to save the Kubernetes cluster configuration in a local file named kubeconfig.yaml. This information is needed to connect to the new Kubernetes cluster.
For your information, outputs are useful for retrieving and displaying specific information after resources have been created.
Creating a cluster through CDKTF
We can now use Terraform, via the CDK, to deploy our Kubernetes cluster and its node pool.
The following command will generate the Terraform plan. If you aprove it, the changes will be applied.
Click on Managed Kubernetes Service in the left-hand menu.
As you can see, your cluster has been successfuly created:
Click on my_desired_cluster, then on the Node pools tab:
Our node pool is also created.
Via Pulumi
You need to:
- Install Pulumi CLI.
- Have an account in Pulumi.
- Have a Pulumi access token.
- Install kubectl CLI.
One advantage of Pulumi is that it allows you to build your infrastructures with the programming language of your choice. It supports a variety of programming languages.
In this tutorial you will be able to deploy your Kubernetes cluster and its node pool in the Go/Golang programming language.
For your information, our OVH Pulumi provider currently supports Go but also Python, Node.js/Typescript and C#/Dotnet.
Examples:
Before you begin
Verify the Pulumi CLI is successfully installed in your machine with the pulumi version command.
You should have a result like this:
OVHcloud Pulumi provider
In order to create a Kubernetes cluster and other resources, you will use the OVHcloud Pulumi provider. This provider is a bridge to our official Terraform provider.
All available Pulumi resources have their definition and documentation.
In this guide, we will create two resources:
- A Kube resource that represents an OVHcloud managed Kubernetes cluster
- A KubeNodePool resource that represents a Kubernetes Node Pool
Getting your cluster/API tokens information
The “OVH provider” needs to be configured with a set of credentials, which can be set using Pulumi stack configuration or environment variables:
ovh:endpoint(environment variable:OVH_ENDPOINT)ovh:applicationKey(environment variable:OVH_APPLICATION_KEY)ovh:applicationSecret(secret) (environment variable:OVH_APPLICATION_SECRET)ovh:consumerKey(environment variable:OVH_CONSUMER_KEY)
Why?
Behind the scenes, the provider is doing requests to OVHcloud APIs.
In order to retrieve this necessary information, please follow our first steps with the OVHcloud APIs guide.
In concrete terms, you have to generate these credentials via the OVH token generation page with the following rights:
When you have successfully generated your OVH tokens, please save them as you will have to use them in the coming minutes.
The last needed information is the serviceName: it is the ID of your Public Cloud project.
How to get it?
In the Public Cloud section, you can retrieve your service name ID thanks to the Copy to clipboard button.
Define the secret keys as environment variables:
Replace xxx by the correct values and ovh-eu with the correct endpoint.
Deploy your Kubernetes cluster in Go / Golang
Pulumi project creation and initialization
In Pulumi, the infrastructure is organized into projects. In the Pulumi ecosystem, a project represents a Pulumi program which, when run, declares the desired infrastructure for Pulumi to manage.
First, create a folder named pulumi_ovh_kube which represents our project and go into it.
Initialize your project:
The output should be like this:
The command creates a dev stack and the code organization of your project:
Now you need to install the Pulumi OVH provider.
In order to create an OVHcloud Managed Kubernetes cluster, you need to define the serviceName.
Edit the Pulumi.yaml file with the following content:
Replace <your-service-name> by your Public Cloud project.
Then, edit the main.go file and replace the content with the following:
This Go program will create an OVHcloud Managed Kubernetes cluster:
- Named
my-desired-cluster. - In the
GRA5region. - In your Public Cloud project (depending on the
serviceNameyou defined).
And a Kubernetes Node Pool:
- Named
my-desired-pool. - With
b2-7flavor/machine type. - With 1 desired node, 2 node minimum and 3 node maximum.
Then, run the go mod tidy command to ask Go to download and install the necessary Go providers and dependencies.
Create your Kubernetes cluster through Pulumi
Now you can deploy your cluster and the node pool. To do that, just execute the pulumi up comand.
This will display the plan/the preview of the desireed state. You will be prompted to choose the stack (dev by default) and to confirm that you want to perform/apply the changes.
Click on Managed Kubernetes Service in the left-hand menu.
As you can see, your cluster has been successfuly created:
Now, click on my_kube_cluster then on the Node pools tab:
YOur node pool is created too.
Connect to the cluster
Via Terraform
Our cluster is created, now we need to connect to it in order to check our nodes, existing pods and to deploy our applications.
In order to do this, retrieve the kubeconfig file locally:
You can define it in your $KUBECONFIG environment variable or you can use it directly in the kubectl command with --kubeconfig option.
List our Node Pool:
Display the list of Nodes:
$ kubectl --kubeconfig=/Users/<your-user>/.kube/my_kube_cluster.yml get node
NAME STATUS ROLES AGE VERSION
my-pool-node-1bb290 Ready <none> 1d v1.34.0
my-pool-node-8280a6 Ready <none> 1d v1.34.0
my-pool-node-8a1bfe Ready <none> 1d v1.34.0Awesome!
You can now deploy your applications and/or create new clusters through Terraform.
Via CDK for Terraform
Our cluster has been created, we now need to connect to it to check our nodes and existing pods and deploy our applications.
In order to do this, the kubeconfig file was created locally:
You can define it in your $KUBECONFIG environment variable or you can use it directly in the kubectl command with --kubeconfig option.
List of our Node Pool:
Display the list of Nodes:
You can now deploy your applications and/or create new clusters through Terraform.
Via Pulumi
Your cluster is created, you now need to connect to it in order to check your nodes, existing pods and to deploy your applications.
In order to do this, retrieve the kubeconfig file locally from the dev Pulumi stack:
You can define it in your $KUBECONFIG environment variable or you can use it directly in the kubectl command with the --kubeconfig option.
List your Node Pools:
Display the list of Nodes:
You can now deploy your applications and/or create new clusters through Pulumi.
Known issues
Via Terraform
"gzip: invalid header"
You defined the node pool you want to create? So it's time to enter the terraform apply command.
We do agree the error message is not user friendly, we will work on it. ;-)
If you get this "gzip: invalid header" error message, the issue is that you name the flavor or the node pool name with an invalid character: "_" or ".".
The API don't support these characters so that's the reason why you obtained this error message.
In order to fix it, change the flavor name and/or the pool name to a correct one, for example:
"not enough xxx quotas"
By default, the Public Cloud projects as well as the resources total (RAM, CPU, disk space, number of instances, etc.) you can use are limited for security reasons.
When you create a new Kubernetes Node Pool, if you run out of resources in your available quota, the Nodes might be in error.
You may get the following error message: "not enough xxx quotas".
xxx can be: RAM, CPU, VM, Disk or Port.
If this is the case, the quotas must be increased.
In order to check your quotas and increase them, please follow this tutorial:
Via CDK for Terraform
"not enough xxx quotas"
By default, Public Cloud projects as well as the total resources (RAM, CPU, disk space, number of instances, etc.) that you can use are limited for security reasons.
When you create a new Kubernetes Node pool, if you run out of resources in your available quota, the Nodes might be in error.
You may get the following error message: "not enough xxx quotas".
"xxx" can be: RAM, CPU, VM, Disk or Port.
If this is the case, the quotas must be increased. In order to check your quotas and increase them, please follow this tutorial:
Via Pulumi
"Provider is missing a required configuration key"
If you encounter the following error, it means you forgot to export the needed OVHcloud environment variables.
The solution is to export the missing required configuration:
Replace xxx by the correct values and ovh-eu with the correct endpoint.
"Node pool name xxx is invalid, only lowercase characters, digits and '-' are accepted"
Have you defined the node pool you want to create? If so, it's time to enter the pulumi up command.
If you get this error message, the issue is that you named the flavor or the node pool with an invalid character: "_" or ".".
The API don't support these characters so that's the reason why you obtained this error message.
In order to fix this, change the flavor name and/or the pool name to a correct one, for example in Go:
"not enough xxx quotas"
By default, the Public Cloud projects as well as the resources total (RAM, CPU, disk space, number of instances, etc.) you can use are limited for security reasons.
When you create a new Kubernetes Node Pool, if you run out of resources in your available quota, the Nodes might be in error.
You may get the following error message: "not enough xxx quotas".
"xxx" can be RAM, CPU, VM, Disk or Port.
If this is the case, the quotas must be increased.
In order to check your quotas and increase them, please follow this tutorial:
Destroy (cleanup)
Via Terraform
If you want to easily destroy created resources, you can use terraform destroy command.
Perfect, your Kubernetes cluster and associated resources (Nodes, Pods...) have been correctly destroyed!
Via CDK for Terraform
If you want to easily destroy created resources, you can use the cdktf destroy command.
Your Kubernetes cluster and associated resources (Nodes, Pods...) have been correctly destroyed!
Via Pulumi
If you want to easily destroy created resources, you can use the pulumi destroy command.
Your Kubernetes cluster and associated resources (Nodes, Pods...) have been correctly destroyed.
Go further
To have an overview of OVHcloud Managed Kubernetes service, you can go to the OVHcloud Managed Kubernetes page.
To deploy your first application on your Kubernetes cluster, we invite you to follow our guide to configuring default settings for kubectl and deploying a Hello World application.
-
If you need training or technical assistance to implement our solutions, contact your sales representative or click on this link to get a quote and ask our Professional Services experts for assisting you on your specific use case of your project.
-
Join our community of users.

