Automatizzare l'invio di SMS con n8n tramite l'API OVHcloud
38 viste
Obiettivo
Questa guida ti spiega come integrare l'API SMS di OVHcloud in n8n, per inviare automaticamente SMS dai tuoi workflow. Imparerai a configurare una chiamata HTTP firmata tramite l'API OVHcloud per attivare l'invio di un messaggio.
Scopri come inviare SMS da n8n utilizzando l'API OVHcloud.
Prerequisiti
- Disporre di un account SMS OVHcloud e un mittente SMS valido.
- Disporre di un VPS OVHcloud, di un server o di un computer locale con n8n installato e accessibile.
Procedura
Se non hai ancora installato n8n sul tuo VPS, segui le istruzioni del nostro tutorial "Installare n8n su un VPS OVHcloud".
Passo 1 – Generare le credenziali API OVHcloud
Prima di poter inviare SMS tramite l'API OVHcloud, devi disporre dei seguenti tre identificatori:
- Application key
- Application secret
- Consumer key
Per farlo, consulta la sezione Utilizzo avanzato: associare le API OVHcloud con un'applicazione del nostro tutorial "Iniziare a utilizzare le API OVHcloud", quindi copia e conserva i tre identificatori Application key, Application secret e Consumer key.
Passo 2 — Creare il workflow e i nodi
Accedi alla tua interfaccia n8n e clicca sul pulsante Create Workflow.
Crea i seguenti nodi (vuoti per il momento):
Set - Credentials: di tipo Edit Fields (Set).Set - Request Details: di tipo Edit Fields (Set).Merge: di tipo Merge.Sign - Generate Signature: di tipo Code.SMS - Send: di tipo HTTP Request.
Per ulteriori informazioni sulla creazione dei nodi, consulta la documentazione ufficiale di n8n.
Collega i nodi in questo ordine:
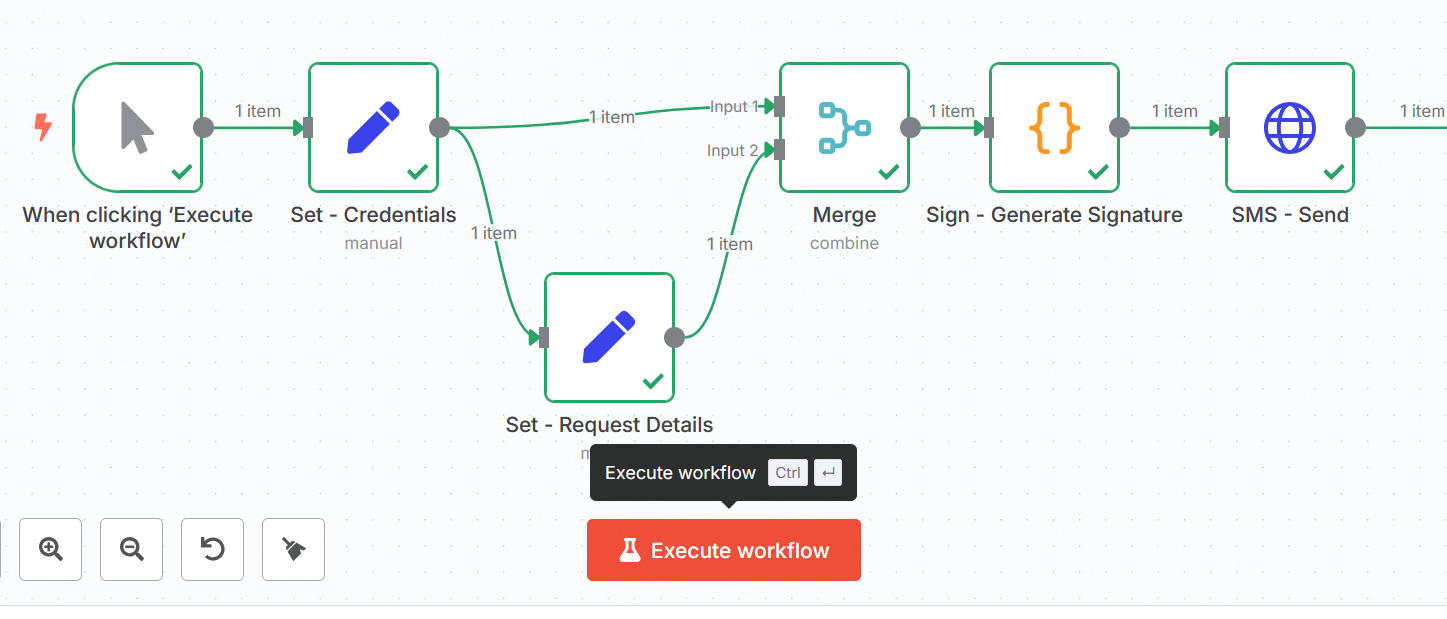
Il nodo Merge riceve le uscite dei due nodi Set - Credentials e Set - Request Details, quindi alimenta Sign - Generate Signature, che alimenta SMS - Send.
Passo 3 — Configurare il nodo Set – Credentials
Aggiungi i seguenti parametri nel tuo nodo Set - Credentials:
- Mode:
Manual Mapping.
| Nome | Valore |
|---|---|
| applicationKey | "IL_TUO_APPLICATION_KEY" |
| consumerKey | "IL_TUO_CONSUMER_KEY" |
| serviceName | "IL_TUO_ACCOUNT_SMS_OVHCLOUD" (ad esempio: "sms-ab12345-1") |
| applicationSecret | "IL_TUO_APPLICATION_SECRET" |
| timestamp | {{ Math.floor(Date.now() / 1000) }} |
Passo 4 — Configurare il nodo Set – Request Details
Configura il nodo Set - Request Details:
- Mode:
Manual Mapping. - Aggiungi un campo denominato
bodydi tipoObjectcon il contenuto seguente (esempio minimo).
- Il numero del destinatario (
receivers) deve essere nel formato internazionale e iniziare ad esempio con "+336" o "+337" per un numero mobile francese. - Il mittente deve essere definito nel tuo account OVHcloud. Per effettuare un test senza dichiarare un mittente e utilizzare un numero corto, sostituisci
"sender": "Your_sender"con"senderForResponse": true.
Passo 5 — Configurare il nodo Merge
Configura il nodo Merge:
- Mode:
Combine. - Combine by:
Position. - Number of Inputs:
2.
Collega Set - Credentials in Input 1 e Set - Request Details in Input 2.
In uscita (output), dovresti ottenere a livello identico: applicationKey, applicationSecret, consumerKey, serviceName, timestamp e body.
Passo 6 — Configurare il nodo Sign – Generate Signature
Configura il nodo Sign - Generate Signature:
- Mode:
Run once for each item. - Language:
JavaScript.
Incolla il codice seguente:
Non utilizzare HMAC qui (OVHcloud aspetta "$1$" + SHA1(AppSecret + … + Timestamp)). Il parametro bodyString è esattamente il JSON che verrà inviato successivamente (nessun altro stringify). L'URL firmata deve essere strettamente identica a quella dell'invio (stesso host, non aggiungere / finale).
Passo 7 — Configurare il nodo SMS - Send
Configura il nodo SMS - Send:
- Method:
POST. - URL:
{{$json.url}}. - Authentication:
None. - Send Headers:
ON. - Specify Headers:
Using fields below.
Aggiungi i seguenti parametri di header:
| Nome | Valore |
|---|---|
| Content-Type | application/json |
| X-Ovh-Application | {{$json.applicationKey}} |
| X-Ovh-Consumer | {{$json.consumerKey}} |
| X-Ovh-Timestamp | {{$json.timestamp}} |
| X-Ovh-Signature | {{$json.signature}} |
Attiva il Send Body e aggiungi i seguenti parametri di body:
| Nome | Valore |
|---|---|
| Body Content Type | Raw |
| Content Type | application/json |
| Body | {{$json.bodyString}} |
Testa il tuo workflow
Esegui il tuo workflow. Le seguenti fasi vengono eseguite:
- Set - Credentials: mette a disposizione applicationKey, consumerKey, serviceName (e eventualmente applicationSecret se non l'hai esternalizzato).
- Set - Request Details: prepara l'oggetto body contenente il corpo del SMS.
- Merge (Combine/Position): unisce le due uscite dei nodi precedenti.
- Sign - Generate Signature (Code): calcola bodyString, timestamp, signature (SHA-1 semplice) e l'URL di chiamata.
- SMS - Send (HTTP Request): invia il POST verso l'URL con il body {{$json.bodyString}} e gli header X-Ovh-*.
Il messaggio viene quindi trasmesso tramite l'API OVHcloud al tuo destinatario.
Errori frequenti
Invalid_signature (400)
- L'URL firmata è diversa dall'URL inviata (host diverso,
/finale in più). - Il body firmato è diverso dal body inviato (re-
stringify, spazi, ordine, ecc.). - L'orologio locale è troppo fuori sincrono. Utilizza invece l'ora del server OVHcloud (vedi la sezione Industrializzazione e sicurezza).
SMS sender ... does not exist (403)
Il sender (mittente) non è dichiarato/validato nel tuo Spazio Cliente OVHcloud. Testa con "senderForResponse": true o valida il tuo mittente.
Bad Request
- Controlla in ogni nodo il nome e il valore dei tuoi parametri.
- Assicurati che gli header e i body siano completi.
- Verifica che l'URL del nodo
SMS - Sendrispetti bene il formato seguente:https://eu.api.ovh.com/1.0/sms/sms-ab12345-1/jobs
Errori del nodo Code
- Non utilizzare
require('crypto')in n8n ma piuttosto SHA-1 puro JavaScript sopra. - Utilizza la modalità per item e evita di chiamare
$input.all()nel tuo codice.
Industrializzazione e sicurezza
Se desideri industrializzare il tuo workflow e renderlo più sicuro, applica i seguenti consigli.
Ora del server OVHcloud
Aggiungi un nodo di tipo HTTP Request prima della firma:
GET https://eu.api.ovh.com/1.0/auth/time- Recupera il valore e sostituisci
timestampcon questo valore esatto.
Non far transitare l’applicationSecret
- Conservalo come variabile d'ambiente (ad esempio:
OVH_APP_SECRET) e leggilo nel nodo di tipo Code (Sign - Generate Signature) tramite$env.OVH_APP_SECRET, o tramite la funzionalità Secrets/Credentials di n8n. - In alternativa, non restituirlo mai in uscita dal nodo.
Gestione dei caratteri
Se il tuo messaggio contiene emoji/accents non GSM, utilizza "coding": "ucs2".
Per saperne di più
Contatta la nostra Community di utenti.

