Migrating an infrastructure to a new vDC
86 viste
This guide explains how to move virtual machines (VM) from a previous source virtual DataCenter (vDC) (PREMIER or SDDC) to a new destination vDC (VMware on OVHcloud).
The addition of a vDC of the latest generation and therefore the ability to move VMs to this new vDC is not yet available for all VMware infrastructures as upgrades and maintenance operations are in progress. We will notify you as soon as this option becomes available to you.
Objective
In 2023, OVHcloud has launched 4 new ranges:
- vSphere: OVHcloud Managed VMware vSphere is our most accessible solution for infrastructure migration, application, datacentre extension or disaster recovery plan needs (with Veeam or Zerto solutions available as an additional option).
- Hyperconverged Storage (vSAN): The Hyperconverged Storage solution meets your needs for ultra-powerful storage. Equipped with NVMe SSDs, our servers have been specially designed to accommodate even the most demanding applications. With VMware vSAN, you can manage your storage in a scalable way, just as you would in your own datacentre.
- Network Security Virtualization (NSX): The Network Security solution is based on VMware NSX (NSX-T) network and security virtualisation software. You can manage your security rules, operations and automation in a consistent way across your different cloud environments. NSX secures your software, whether it is hosted on virtual machines or in containers, and reduces the threat of ransomware thanks to micro-segmentation.
- Software-Defined Datacenter (NSX & vSAN): The Software-Defined Datacentre solution includes hyperconverged storage (vSAN) and network and security virtualisation (NSX-T) features. You get an optimal cloud environment for migrating and modernising your most critical applications.
You can now upgrade from commercial ranges prior to 2020 to the new ranges while keeping the same VMware infrastructure (pcc-123-123-123-123) using Storage Motion and vMotion.
There are two aspects involved in this process:
- The OVHcloud infrastructure itself which includes the customer's side of administrating an infrastructure.
- The VMware infrastructure, which includes the entire VMware ecosystem.
Requirements
- A PCC infrastructure (PREMIER or SDDC)
- Access to the OVHcloud Control Panel (
VMwarein theHosted Private Cloudsection) - Access to the vSphere Control Panel
Instructions
If you want to be assisted by:
This guide will utilise the notions of a source vDC and a destination vDC. Please find an index of the tasks you will be performing:
Step 1 Design your infrastructure
Step 1.1 Choose between the different VMware On OVHcloud ranges
Step 1.2 Select your hosts (compute)
Step 1.3 Select your datastores (storage)
Step 2 Build your new infrastructure
Step 2.1 Add a new destination vDC
Step 2.1.1 Check that your service is eligible to move to the target range
Step 2.1.2 Get your "serviceName"
Step 2.1.3 Get your "planCode"
Step 2.1.4 Verify you are able to upgrade with your serviceName and planCode for destination range
Step 2.1.5 Create the order
Step 2.2 Add new hosts and Datastores
Step 2.3 Convert a datastore to a global datastore
Step 3 Prepare your destination vDC in the OVHcloud context
Step 3.1 Check inherited characteristics (Certifications, KMS, access restrictions)
Step 3.1.1 Certifications
Step 3.1.2 Key Management Server (KMS)
Step 3.1.3 Access restrictions
Step 3.2 Assign users rights
Step 3.3 Activate Veeam Managed Backup & Zerto Disaster Recovery Options
Step 3.4 Check your network (vRack, Public IP)
Step 3.4.1 vRack
Step 3.4.2 Public network
Step 4 Prepare your destination vDC in the VMware context
Step 4.1 Reconfigure VMware High Availability (HA)
Step 4.2 Reconfigure VMware Distributed Resource Scheduler (DRS)
Step 4.3 Rebuild resource pools
Step 4.4 Recreate Datastores Clusters (if relevant)
Step 4.5 Enable vSAN (if relevant)
Step 4.6 Recreate vSphere networking
Step 4.7 Check inventory organisation (if relevant)
Step 4.8 Migrate NSX-V to NSX (if pertinent)
Step 4.8.1 NSX Distributed Firewall
Step 4.8.2 NSX Distributed Logical Router
Step 4.8.3 NSX Edges
Step 4.8.3.1 Create T1 and segments
Step 4.8.3.2 DHCP
Step 4.8.3.3 DNS
Step 4.8.3.4 NAT Rules
Step 4.8.3.5 Load Balancing NSX
Step 4.8.3.6 Firewall for T0 T1 gateways
Step 4.8.3.7 VPN
Step 4.8.3.7.1 IPSec
Step 4.8.3.7.2 SSL VPN
Step 4.8.3.8 Reconfiguration of the Initial IP Block
Step 4.9 Extend Zerto Disaster Recovery Protection (if relevant)
Step 4.9.1 VPG as Source
Step 4.9.2 VPG as Destination
Step 5 Migrate your workload
Step 5.1 Storage Motion
Step 5.2 vMotion
Step 6 Finalize your migration
Step 6.1 Reconfigure Veeam Managed Backup (if relevant)
Step 6.2 Reconfigure Zerto Disaster Recovery (if relevant)
Step 6.3 Recreate Affinity rules
Step 6.4 Reconfigure the Private Gateway (if relevant)
Step 6.5 Put hosts in maintenance mode
Step 6.6 Remove old datastores
Step 6.7 Remove old hosts
Step 6.8 Remove the source vDC
Step 7 How to recreate an advanced NSXv architecture on NSX
Step 1 Design your infrastructure
At the end of step 1, you should have a clear view of which 2023 commercial range you want to upgrade to, as well as which hosts and storage you want to use.
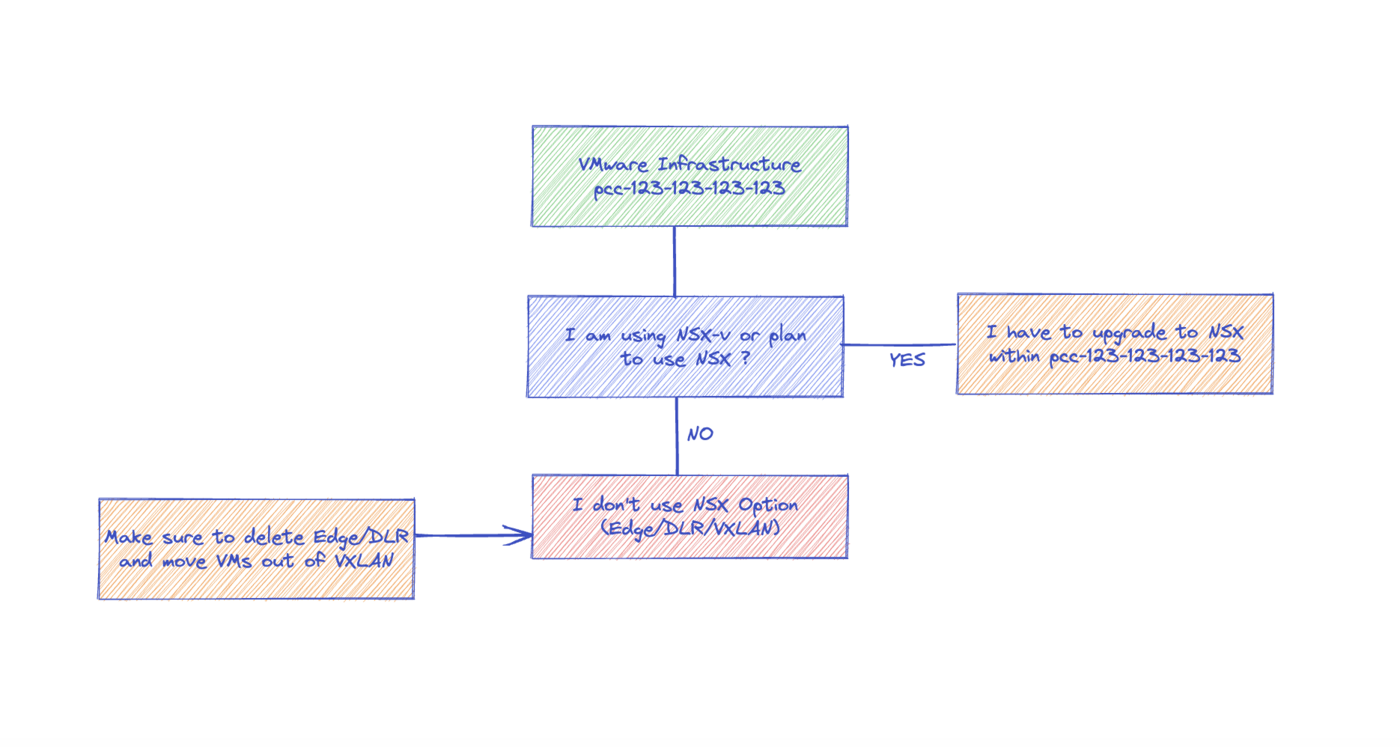
Step 1.1 Choose between the different VMware on OVHcloud ranges
As an Hosted Private Cloud VMware customer with host prior to 2020, you want to upgrade to VMware on OVHcloud.
Here are a few guidelines:
- If you are using or you plan to use NSX => you must upgrade to Network Security Virtualization or Software-Defined DataCenter
- If you need your VMware infrastructure to be certified (HDS, PCI-DSS, HIPA) => you must upgrade to VMware on OVHcloud
- If you don't have NSX on your current infrastructure and you don't have need for certifications => you can choose vSphere.
- Veeam Managed Backup and Zerto Disaster Recovery options are available.
Please be reminded that you do not create a new service, you will need to order your resources individually. Creating a new vDC will not deliver 2 hosts and 2 datastores.
Step 1.2 Select your hosts (compute)
You have now chosen your commercial range.
Please note that this choice is not definitive, you can start with 2 hosts of 96GB RAM and switch to 3 hosts of 192GB RAM.
Step 1.3 Select your datastores (storage)
You have now chosen your commercial range and your hosts. Please note that some of your actual datastores might be compatible with the newer ranges, that is to say those datastores can be made global. A global datastore is a datastore mounted on all clusters / virtual datacenters within a VMware infrastructure, i.e. shared between the source vDC and the destination vDC. Run the OVHcloud API to check datastores compatibility:
Expected return: boolean
If the API return is TRUE, this datastore is compatible with the newer ranges and you can keep this datastore, you will make it global later on in the upgrade process.
If the API return is FALSE, this datastore is not compatible, you will need to order new datastores, VMware On OVHcloud datastores.
Based on your needs in terms of storage capacity, you can select which type and how many datastores you would order.
You only need to replace the datastores that are not compatible. You will be able to release the datastores that are not compatible after you upgrade your storage.
Please note that this choice is not definitive, you can start with 4x3TB and switch to 2x6TB later on.
Step 2 Build your new infrastructure
At the end of step 2, you should have within your existing VMware infrastructure (pcc-192-0-2-1) a new Destination vDC with new 2023 hosts, and global datastores.
Step 2.1 Add a new destination vDC
You can add a destination vDC following those steps:
You will not be able to see the new vDC in the vSphere client until you have assigned the correct permissions to users for the new vDC.
Step 2.2 Add new hosts and Datastores
In the OVHcloud Control Panel, you will see your new vDC attached to your existing service. You can proceed with ordering new hosts and datastores (selected in step 1) in the new Destination vDC following this Information about Hosted Private Cloud billing guide.
Step 2.3 Convert a datastore to a global datastore
You now have new datastores in the new virtual Datacenter, as well as compatible datastores in the previous datacenter. You can convert those datastores to global
Run the OVHcloud API to convert the datastore to global:
Expected return: Task information
Be careful: converting a datastore to global may conflict with some VMware features, such as Storage DRS. For more details, see the VMware documentation.
Step 3 Prepare your destination vDC in the OVHcloud context
Step 3.1 Check inherited characteristics (Certifications, KMS, access restrictions)
Step 3.1.1 Certifications
These options are enabled per vCenter and apply to any vDC. If an option has been enabled, they stay available on the destination vDC.
Step 3.1.2 Key Management Server (KMS)
This option is to enable and configure per vCenter and apply to any vDC. If virtual machines are protected by encryption, they stay protected on the destination vDC.
Step 3.1.3 Access restrictions
For connections to the VMware platform, you can choose to block access to vSphere by default. Please refer to our guide on the vCenter access policy for details.
If the access policy has been changed to "Restricted", the new vDC will inherit the access policy that the source vDC uses.
Step 3.2 Assign users rights
In the lifecycle of the source vDC, a list of users may have been created for business or organisational needs. These users will also be present on the new vDC but will have no permissions on this new vDC. You must therefore assign the users the appropriate rights, depending on the configuration of the destination vDC.
To do this, please refer to our guides on Changing user rights, Changing the User Password and Associating an email with a vSphere user.
Step 3.3 Activate Veeam Managed Backup & Zerto Disaster Recovery Options
This options are enabled and configured per vDC. You need to enable the relevant option on the new vDC.
Step 3.4 Check your network (vRack, Public IP)
Step 3.4.1 vRack
VMnetworks located in the same region cannot be interconnected in a vRack.
As part of a migration process, by default, the new vDC will be linked to the same vRack as the source vDC. Please consult our guide to Using Private Cloud within a vRack.
Step 3.4.2 Public network
The Public IP addresses attached to the source vDC will automatically be available for use in the destination vDC.
Step 4 Prepare your destination vDC in the VMware context
Step 4.1 Reconfigure VMware High Availability (HA)
Setting up a new vDC involves reconfiguring VMware High Availability (HA), including boot order and priority. Please consult our guide about VMware HA configuration.
Here is a checklist of aspect to take into account:
- Host monitoring settings
- VM monitoring settings
- Admission control
- Advanced HA options
- VM Overrides
Automation tips: Powercli cmdlet “Get-Cluster” returns information on HA and DRS configuration settings that can be applied to the destination cluster with “Set-Cluster” cmdlet.
Step 4.2 Reconfigure VMware Distributed Resource Scheduler (DRS)
Setting up a new vDC involves reconfiguring the VMware Distributed Resource Scheduler (DRS) feature, in particular the affinity or anti-affinity rules for groups of hosts and VMs. Please consult our guide about configuring VMware DRS.
Here is a checklist of aspects to take into account:
- Automation level
- VM/Hosts Groups
- VM/Host affinity/anti-affinity rules
- VM Overrides
Automation tips: This VMware community thread details options to export and import affinity-rules via powercli.
Step 4.3 Rebuild resource pools
Setting up a new vDC requires rebuilding resource pools including reservations, shares, and vApps. This also applies to vApps and any start-up order configuration set in the vApps.
For more information, consult VMware's documentation for managing resource pools.
Here is a checklist of aspects to take into account:
- CPU/Memory shares settings
- CPU/Memory reservations
- CPU/Memory expandable option
- CPU/Memory Limits
Automation tips: Powercli cmdlet “Get-ResourcePool” to gather the resource pool information and cmdlet “New-ResourcePool” to recreate the resource pool on the destination vDC.
Step 4.4 Recreate Datastores Clusters (if relevant)
If datastore clusters are present in the source vDC, setting up a new vDC may involve the need to recreate these Datastore Clusters on the destination vDC if the same level of structure and SDRS is needed.
Here is a checklist of aspects to take into account:
- SDRS automation level
- SDRS space, I/O, rule, policy, VM evacuation settings
- SDRS affinity/anti-affinity rules
- SDRS VM Overrides
Step 4.5 Enable vSAN (if relevant)
If vSAN was enabled on your source VDC, you will need to enable it again on the destination vDC. Please refer to our guide on Using VMware Hyperconvergence with vSAN.
Step 4.6 Recreate vSphere networking
Setting up a new vDC involves recreating the vRack VLAN-backed portgroups on the destination vDC to ensure VM network consistency. If vRack VLANs are in use on the source VDC, vRack can be used to stretch the L2 domain to the destination vDC to allow for a more phased migration plan. For more information consult our guide about Using Hosted Private Cloud within a vRack.
Here is a checklist of aspects to take into account:
- Portgroup VLAN type
- Security settings (Important in case promiscuous mode is needed)
- Teaming and Failover settings
- Customer network resource allocation
For more information, consult OVHcloud's guide How to create a V(x)LAN within a vRack and VMware's documentation on how to edit general distributed port group settings.
Automation tips: Powercli cmdlet “Export-VDPortGroup” can retrieve Distibuted Virtual Portgroup information which can then be imported into the destination Distributed Switch with the use of the “New-VDPortgroup -BackupPath” cmdlet.
- Some virtual routing appliances such as pfSense use CARP to provide high availability.
- VMs that use CARP will need “Promiscuous Mode” enabled in the security settings of a portgroup.
- Customers can enable this setting themselves on the vRack vDS on the destination vDC.
- However, if promiscuous mode needs to be enabled on the “VM Network” portgroup in the new vDC, follow the instructions from this guide.
Step 4.7 Check inventory organisation (if relevant)
For organisational reasons, the VMs, hosts or datastores may have been placed in directories.
If you still need this organisation, you will need to create it again in the destination vDC.
Step 4.8 Migrate NSX-V to NSX (if applicable)
As part of an NSX-V to NSX-T migration, several NSX-V services need to be migrated to NSX-T. If you are using any of the services listed below, here is a step-by-step guide on how to migrate them.
If you need technical support, our Professional Services team can help you rebuild your network architecture with customised services.
As a first step, please read our documentation on getting started with NSX.
Step 4.8.1 NSX Distributed Firewall
However, it is crucial to understand that objects placed in the Distributed Firewall will correspond to the significant object ID locally. For example, if a vRack VLAN port group is used in a rule in the Distributed Firewall, it will reference the port group from the original vDC only, not from a recreated vRack port group in the destination vDC.
It will be necessary to verify if the Distributed Firewall contains significant local objects and modify the Distributed Firewall so that it can also see the objects in the new vDC. For example, a rule that uses a vRack VLAN port group from the original vDC can be modified to use both the original vRack VLAN port group and the new vRack VLAN port group in the destination vDC.
The objects to be considered are:
- Clusters
- Datacenters
- Distributed Port Groups
- Legacy Port Groups
- Resource Pool
- vApp
For more information, read our documentation on Managing the distributed firewall in NSX.
Step 4.8.2 NSX Distributed Logical Router
The NSX-V Distributed Logical Router does not have a direct equivalent in NSX. To migrate the Distributed Logical Router, routing should be directly done in the T1 Gateways.
Step 4.8.3 NSX Edges
Generally, depending on the number of edges deployed via NSX-V in the source vDC, you should create T1 Gateways in the NSX of the destination vDC. However, it might be beneficial to step back and review the implemented network architecture to better align with the requirements of the new NSX product.
Additionally, if your production requires zero service interruption, solutions can be implemented to avoid these disruptions.
In both cases mentioned above, our Professional Services team can assist you in this process.
Step 4.8.3.1 Create T1 and segments
To create T1 Gateways, follow our documentation on Adding a New Tier-1 Gateway. This documentation also guides you on how to create segments. Before creating segments, it is necessary to inventory the VXLANs used in the source vDC and create a segment for each VXLAN used in your infrastructure.
Afterwards, you can connect them to the provided T0 in NSX.
For more information, read our documentation on segment management in NSX.
It is also possible to create VLAN-type segments and connect them to vRack via the ovh-tz-vrack Transport Zone. Then, either at the T1 level or at the T0 level with Service-type interfaces, VLAN segments should be positioned to establish connectivity with vRack via NSX.
Step 4.8.3.2 DHCP
To recreate DHCP and associate them with your segments and T1 Gateways, refer to our guide on configuring DHCP in NSX.
Step 4.8.3.3 DNS
To recreate DNS and associate them with your T1 Gateways, please refer to our guide on configuring the DNS forwarder in NSX.
Step 4.8.3.4 NAT Rules
To recreate your NAT rules and associate them with the T1 Gateways, please refer to our guide on Setting up NAT for port redirections with NSX.
Step 4.8.3.5 NSX Load Balancing
To recreate your Load Balancers, follow the instructions in our guide on configuring Load Balancing in NSX.
Step 4.8.3.6 T0 T1 Gateway Firewall
To recreate the firewall rules associated with your previous edges, please refer to our guide on Gateway Firewall Management in NSX.
Step 4.8.3.7 VPN
Step 4.8.3.7.1 IPSec
To recreate your IPSec sessions, please refer to our guide on setting up an IPsec Tunnel with NSX.
Step 4.8.3.7.2 SSL VPN
If you are using SSL VPN functionality, unfortunately, this feature no longer exists in NSX. However, there are open-source alternatives available, such as OpenVPN, OpenConnect VPN, WireGuard, etc. These network appliances need to be deployed on dedicated VMs hosted in your HPC. Each client needs to be installed on the employees' workstations to regain access to their VPN.
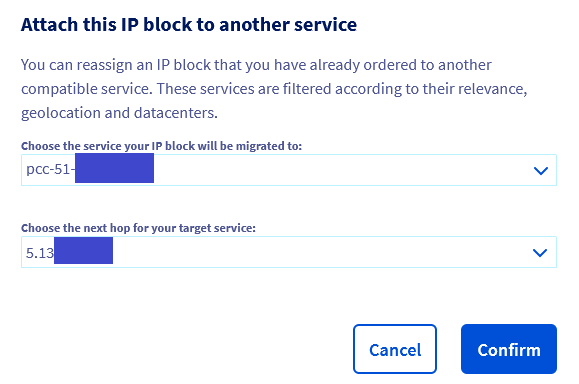
Step 4.8.3.8 Reconfiguration of the Initial IP Block
This step will result in a service interruption as all traffic will be redirected to the T0 VIP (you will no longer be able to use this IP block with VMs on the VM Network portgroup). It is up to you to decide whether you want to point the primary IP block of NSX-V to the NSX-T0 before or after migrating your VMs (see Step 5.2).
For this step, you will need two elements:
- The IP block initially associated with the NSX-V vDC.
- The public IP of the VIP associated with the NSX-T0 (visible in
Networking=>Tier-0 Gateways=>ovh-T0-XXXX=> expand =>HA VIP Configuration=> click on1=>IP Address / Masksection)
Next, in the OVHcloud Control Panel, follow the instructions in our Move an Additional IP guide to move the initial NSX-V block to the PCC service you are migrating, but specify the VIP IP of the T0 as the "next hop", as shown in the example below:
Step 4.9 Extend Zerto Disaster Recovery Protection (if relevant)
The Zerto Replication is configured at the vDC level. To protect workload on the new vDC, you need to do some actions.
Prerequisites:
- Having a new vDC
- Having under the new vDC a host cluster with the required number of hosts (same as the source cluster with a minimum of 2 hosts)
- Having under the new vDC a datastore that can be accessible from the two (2) hosts
- Having enabled Zerto Replication on the new vDC
Run the OVHcloud API to prepare the migration:
{datacenterId} is the new vDC id, you can get it with the following API call:
A task is launched on the infrastructure to deploy vRA on each of the hosts of the new vDC.
The hosts ordered in the new vDC after executing this API call will no longer have Z-VRA automatically. In this case, you will need to contact the support teams in order to deploy the Z-VRA on the new hosts. This change will only last for the migration time of your infrastructure, until you use the Zerto migration end API call Step 6.2.
After this, the Zerto Replication will work on both datacenters:
- The old one is still running and protects your workload.
- The new one is ready to host your workload.
The next step depends on the current configuration per Virtual Protection Group:
- Source of replication
- Destination of replication
Step 4.9.1 VPG as Source
With the migration on the new vDC, Zerto will continue to protect workload with vRA deployed on the target cluster and hosts.
Step 4.9.2 VPG as Destination
Unfortunately, there is no way to update VPG configuration, the only option is to delete the VPG and create a new one.
Step 5 Migrate your workload
Step 5.1 Storage Motion
You now have old datastores in the previous vDC (not compatible with the new ranges) and global datastores (either previous compatbile ones or new ones). You can use Storage Motion to move a virtual machine and its disk files from one datastore to another while the virtual machine is running.
Step 5.2 vMotion
Since both source and destination vDC are within the same vCenter, hot or cold VMware vMotion can be used to migrate VMs.
Hot vMotion can be used when the CPU chipset is the same between source and destination (eg Intel to Intel).
Cold vMotion can be used when the CPU chipset is different between source and destination (eg AMD to Intel).
Here is a checklist of aspects to take into account:
- ESXi host CPU chipsets on source and destination vDCs
- EVC modes on source and destination Clusters
- vDS versions are the same between source and destination vDC. You can upgrade the vDS vRACK in the source vDC. For the vDS with VM Network (VXLAN vDS), please contact the support so that the vDS can be upgraded.
It is recommended to test the migration path with low-impact or test VMs before production migration.
Step 6 Finalize your migration
Step 6.1 Reconfigure Veeam Managed Backup (if relevant)
If OVHcloud provided Veeam is currently in use to backup VMs on the source vDC, it will be necessary to use the OVHcloud API to re-check the backup jobs after the VMs have been migrated to the new vDC.
Here is how to proceed:
{datacenterId} is the old vDC id, you can get it with the following API call:
1. Enable the Veeam Managed Backup option on the new vDC from the OVHcloud Control Panel.
2. Migrate the VM(s) from source vDC to destination vDC.
3. Run the OVHcloud API to re-check the backup date:
This API call is to be executed on the old vDC (source vDC).
Warning! Between 7:00 pm and 8:00 am, the robot does not execute. It waits until 8:00 am to work. This period is defined in the operation of the robot.
4. If you have migrated only part of the virtual machines whose backups are enabled, you can repeat steps 2 and 3 in order to transfer their backup jobs to the new vDC.
Before you continue, you can check visually, in the graphic Backup Management plug-in on the new vDC, that the backup jobs are present and active. You can then disable Veeam Backup on the old vDC. You can do this via the following API call:
Warning, this last call will remove the Veeam option from the vDC. This will result in the destruction of all backup jobs / retention points that would still be present on the old vDC.
Do not hesitate to first use the API call “checkBackupJobs” (mentioned in step 3 above) several times to ensure you have backups on the new vDC.
If you have any doubts, contact OVHcloud support to monitor backup jobs.
Step 6.2 Reconfigure Zerto Disaster Recovery (if relevant)
Run the OVHcloud API to finalize the migration:
{datacenterId} is the new vDC id, you can get it with the following API call:
A task is launched to:
- Check if no destination VPG still exists on the datacenter: they MUST be removed.
- Switch the Zerto Replication option (subscription) from the old to the new vDC.
- Remove all vRA from hosts on the old vDC.
Step 6.3 Recreate Affinity rules
Affinity rules are based on VM objects so rules can only be created after VMs have been migrated to the destination vDC. Once the migration is completed, affinity rules can be re-applied on the destination vDC.
Automation tips: This VMware community thread details options to export and import affinity-rules via powercli.
Step 6.4 Reconfigure the Private Gateway (if relevant)
To "move" Private Gateway to destination vDC, you must first disable it by following the steps in Disable the private gateway.
If you have enabled a compliancy or a security level that require the use of the Private Gateway, you alone are responsible for reactivating it (launch enabling).
Then enable it again by following the steps in Enable the private gateway and choose the datacentreId of the new vDC.
Step 6.5 Put hosts in maintenance mode
You must put hosts in maintenance mode by following these steps:
- In the vSphere Client navigate to
Hosts and Clusters. - Navigate to a
Host. - Right click the
Host. - Navigate to
Maintenance Mode. - Click
Enter Maintenance Mode.
Step 6.6 Remove old datastores
At this step, we can consider there is no longer any data and/or VM on the old vDC, so we can now remove resources.
In the following instructions, {datacenterId} is the old vDC id, you can get it with the following API call:
With the API, get the filer (datastore) ID list:
Then for each id:
For global datastores, you can use the following API call:
A task is created for each call, you can follow the progress with:
Wait for the full completion of tasks before continuing.
Step 6.7 Remove old hosts
In the following instructions, {datacenterId} is the old vDC id, you can get it with the following API call:
With the API, get the host id list:
Then for each id:
A task is created for each call, you can follow the progress with:
Wait for the full completion of tasks before continuing.
Step 6.8 Remove vDC
In the following instructions, {datacenterId} is the old vDC id, you can get it with the following API call:
With the API, ask for the vDC deletion:
Step 7 - How to recreate an advanced NSXv architecture on NSX
You can find all the information on setting up an advanced NSX-v architecture on NSX by watching this video.
Recreate an advanced NSX-v architecture on NSX from OVHcloud on Vimeo.
FAQ
Below is a list of frequently asked questions about vDC migration.
What are the impacts when sharing my datastores between my vDCs?
There is no impact on your production, billing or ZFS snapshots. However, it is not currently possible to unshare a datastore. We'll change that later.
Will the VMs (with public IPs) be accessible from the outside if they are in the new vDC when the PFSENSEs are in the old vDC?
Yes, the VM network is at the level of the VMware infrastructure and therefore on the 2 vDC.
Is it possible to set up a PFSENSE in the old vDC and another in the new vDC?
Yes, it is even necessary to have 2 different PFSENSEs to avoid IP conflicts.
Are the VXLANs available on both vDCs?
VXLANs are only available on Premier, not Essentials.
We do not use NSX. The migration procedure specifies that the source/destination vDS must have the same version. On the source, our only vDS is in 6.0.0, so I guess we have to update it. The documentation/video/interface indicate that we can do it ourselves without any downtime if it's vRack. I thought it was vRack but we can't update (the menu is grayed out). Does that mean it's vxlan? How do I tell the difference between vRack and vLAN?
If it is grayed out, it is probably the public DVS (vmnetwork) /vxlan. The vrack DVS is a second DVS with the word "vrack" at the end. Please open a support ticket so that we can confirm this with you and perform the DVS upgrade if required.
How do I know if my network adapters are VLAN or VxLAN and compatible with Essentials? In vSphere, I see for example and without further details: vxw-dvs-74-virtualwire-20-sid-...
All that is %-virtual-% is vxlan.
If I have several VMs that pass through the same EDGE NSX, will I need to migrate all of the VMs and the EDGE at the same time, otherwise I will no longer have an internet connection on some VMs?
Yes, you will need to move the EDGE with a redeployment before moving the VMs. Depending on the case, with or without wide area networks, the two actions can be separated.
Can we create a DRS pool for global datastores? I think I have already tried unsuccessfully between 2 vDC 2014 / 2016.
There are limitations for global datastores. We recommend only using them to migrate between the two vDCs, then having "standard" datastores on the new vDC and making the datastores global at the end of the migration.
We have an SDDC 2016 with 6 x 6 TB SSD Acceleraded (ordered in 2021) with "convert to global" available in the OVHcloud Control Panel. Can we convert them to global and keep them as they are in the new vDC (to avoid the vMotion storage phase)? Memo: the 6 DS are in a storage cluster.
Yes, if the VMs point to these DS, there will be no storage motion steps.
What are the limitations/differences in migration depending on the range you have chosen (Essentials or Premier)?
There are no differences between upgrading to Essentials or Premier. The only difference is in the steps linked to the NSX component. These steps are required for an upgrade to Premier and are not relevant for an upgrade to Essentials.
How long will it take to migrate (depending on the number of VMs)?
The speeds recorded for the Storage Motion step are between 0.5 and 1TB per hour. For vMotion, this depends heavily on the size of the VM, on average less than a minute; it can take up to 3 minutes for VMs of several TB.
Which Microsoft licenses are available in SPLA mode?
Windows licenses (standard and datacentre) and SQL Server (standard and web) are available on 2020 solutions in SPLA mode.
I need to upgrade 2 VMware infrastructure, which are currently used as part of a DRP zerto with data replication. Do I need to upgrade my secondary or primary infrastructure first?
There is no obligation, we recommend you to upgrade the secondary infrastructure first to control the process before you upgrade the primary infrastructure.
Will the historical cap on hourly resources still be deployed?
No, the hourly billing limit is disabled on the 2020 offers (Premier & Essentials). All older ranges will continue to work with the hourly billing limit in place.
Will the price of previous offers change?
No, there are no price changes planned for the old solutions.
In which language are OVHcloud Professional Services available?
OVHcloud Professional Services are available in English and French.
Can OVHcloud Professional Services recreate my NSX user accounts & configurations for me?
Our Professional Services do not carry out any operations on the customer's infrastructure. We are here to help, guide and advise you. In this scenario, we will direct our customer to a partner who will be able to execute the operations in the customer infrastructure.
What is the duration of the credits in the Pack of Technical Advice Services?
The pack is valid for 3 months from the order date.
How do I know how many hours of Credits have been used and are still outstanding?
Your OVHcloud sales representative or technical referrer is able to provide you with this information.
What happens if the consulting session takes less time than expected?
A session is scheduled and counted in 1-hour blocks. For example, a session scheduled for 2 hours and 1.5 hours would be billed for 2 hours. A session scheduled for 3 hours but only 1.5 hours would be charged at 2 hours.
Go further
If you need training or technical assistance to implement our solutions, contact your sales representative or click on this link to get a quote and ask our Professional Services experts for a custom analysis of your project.
Join our community of users on https://community.ovh.com/en/.

