Move2Cloud - Migrating VMware Workloads to OVHcloud SecNumCloud with Veeam Replication
84 viste
Objective
This guide explains how to migrate your on-premises VMware workloads to an OVHcloud Hosted Private Cloud (HPC) SecNumCloud environment using Veeam Replication.
This guide applies to Hosted Private Cloud environments qualified for SecNumCloud (SNC).
Some features such as OVHcloud IAM are not available in SNC environments.
Requirements
Before getting started, make sure you have:
- An up-to-date inventory of VMs with FQDNs, IP addresses, OS versions, and dependencies.
- A plan to group VMs into migration batches (per application stack).
- A complete list of subnets and VLAN IDs for the target HPC.
- Correctly sized compute and storage resources (hosts, datastores, vSAN).
- A configured VPN or OVHcloud Connect link (non-NAT).
- Access to Veeam Backup & Replication.
- A second OVHcloud account (NIC) for ordering the Veeam Enterprise Service (required in SNC environments).
Instructions
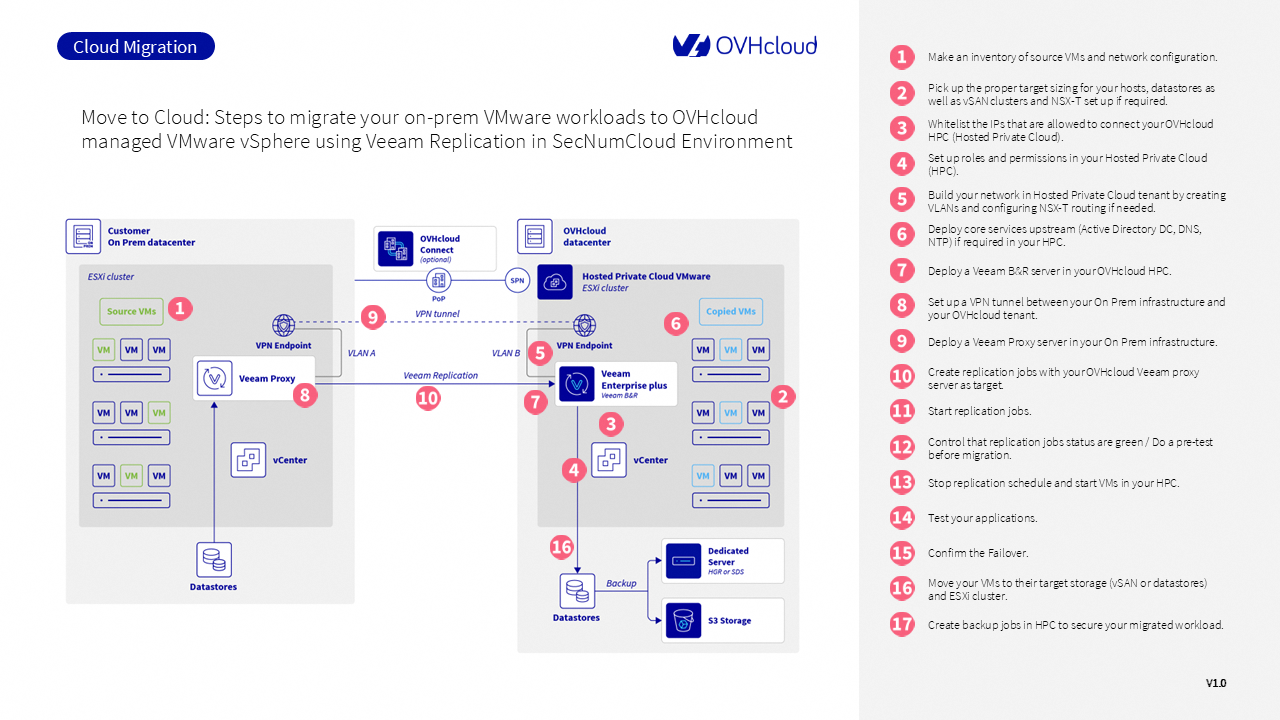
Step 1: Make an inventory of source VMs and network configuration
- List all source VMs with their FQDNs, IPs, and OS versions.
- Group VMs by application dependency (web/app/db) to define migration batches.
- List subnets and VLANs. OVHcloud vRack supports over 4000 VLANs, allowing you to keep your original IP plan.
Step 2: Size your HPC resources
- Define your core, RAM, and storage needs based on your current consolidation ratio (e.g., vCPU/pCPU).
- Choose between NFS datastores and vSAN depending on IOPS requirements.
- If using NSX-T:
- Plan segments and overlays.
- Assess north/south traffic.
- Decide on virtual firewalls (Stormshield, FortiVM, Palo Alto VM-Series).
- For internet-facing services, request additional public IPs or use the BYOIP feature.
Step 3: Authorize vCenter access via IP whitelisting
vCenter access is restricted by default in OVHcloud environments. To allow access:
- Follow the dedicated guide to whitelist the IP addresses of your source infrastructure and Veeam components.
- To enable access without triggering 2FA on Veeam components, refer to the Application access permission section of this guide.
Step 4: Configure roles and permissions
As IAM is not available in SecNumCloud environments, you need to define and manage user access directly within vSphere.
To learn how to set up local users and activate two-factor authentication, follow this documentation.
Step 5: Build your target network
Plan your network architecture in advance:
- Create a flow matrix showing allowed traffic between VMs by VLAN and protocol.
- Use the preconfigured distributed vSwitches (dVS) and VLANs provided by OVHcloud.
- If you are using NSX-T, you’ll need to configure Tier-0/Tier-1 gateways and define distributed firewall rules.
To get started with NSX-T in your HPC, refer to the NSX first steps guide.
Step 6: Deploy core services
To reduce unnecessary traffic between your environments, deploy essential services directly inside the target Hosted Private Cloud:
- NTP: Use
ntp.ovh.net - DNS: Deploy a Domain Controller if required
- Authentication: Set up local or hybrid authentication services
Step 7: Install Veeam B&R server in OVHcloud HPC
You must deploy a Veeam Backup & Replication (B&R) server directly in the OVHcloud Hosted Private Cloud.
In SNC environments, this must be ordered from a second OVHcloud NIC.
For step-by-step instructions on how to install and configure Veeam in the cloud, follow this official guide.
Step 8: Set up secure connectivity
Set up a secure tunnel between your on-premises infrastructure and the OVHcloud HPC using one of the following options:
- Configure IPsec VPN with NSX
- Use a compatible third-party solution like Stormshield or OPNsense
If you need higher performance and lower latency, you can optionally use OVHcloud Connect.
SNC environments require SPNs (Security Provider Names). Learn more in this connectivity guide.
Step 9: Deploy the Veeam proxy server on-prem
On your on-premises infrastructure, configure a server to act as a Veeam proxy. This proxy is responsible for data transfer during replication.
To set it up, follow this official Veeam proxy configuration guide.
Step 10: Create replication jobs
Once the cloud and proxy infrastructure is ready, go to Veeam B&R and create the replication jobs targeting the Hosted Private Cloud.
For guidance, follow this Veeam job creation guide.
Step 11: Start replication
You can now start your replication jobs and monitor their progress from the Veeam console.
To manage, pause or edit jobs, refer to this section of the Veeam documentation.
Step 12: Test replication
Once the jobs are complete, it’s a good idea to run a test failover.
You can do this using the Failover Now option. For instructions, check out:
Step 13: Perform the final migration
When you're ready to switch production to the cloud, initiate a Planned Failover in Veeam. This step gracefully shuts down on-prem VMs, performs a last sync, and boots the VMs in your HPC.
For the full procedure, see the Planned Failover guide.
Step 14: Validate applications
After the failover:
- Check that all VMs are online and reachable
- Test AD, DNS, antivirus, databases, web services, and other business-critical applications
Step 15: Confirm permanent failover
To finalise the migration, use the Permanent Failover feature in Veeam.
For a full walkthrough, consult the Permanent Failover guide.
Step 16: Move VMs to target storage
Now that your workloads are running in the cloud, you can optimize storage placement using Storage vMotion. Move VMs to appropriate datastores (NFS or vSAN) depending on performance needs.
Learn more in the Storage vMotion guide.
Step 17: Create backup jobs
To protect your VMs long-term, configure backup jobs in Veeam that use OVHcloud Object Storage (S31-compatible).
Follow the steps in our dedicated backup guide.
1: S3 is a trademark of Amazon Technologies, Inc. OVHcloud’s service is not sponsored by, endorsed by, or otherwise affiliated with Amazon Technologies, Inc.
Troubleshooting
Verify ESXi host accessibility
If you experience issues accessing the Hosted Private Cloud infrastructure during your backups, test connectivity to each host in the cluster from your Veeam components (server, proxy).
Example for host .50:
On Windows (PowerShell):
On Linux:
- If the hosts are not reachable, create an outbound rule on your Veeam components to allow the port range 950-999.
- Depending on the number of hosts, you may also need to open ranges 1100-1255 and 1300-1551.
- If the hosts are reachable but errors persist, please contact OVHcloud Support for further analysis.
Go further
If you need training or technical assistance to implement our solutions, contact your sales representative or click on this link to get a quote and ask our Professional Services experts for a custom analysis of your project.
Ask questions, give your feedback and interact directly with the team building our Hosted Private Cloud services on the dedicated Discord channel.
Join our community of users.

