Object Storage - Optimising Performance
196 viste
Objective
There are several ways to optimise the performance of your buckets on Object Storage. The following guide will walk you through the different optimisation methods.
Using byte range fetch
OVHcloud Object Storage supports byte range fetch. This retrieves an object chunk by chunk, with each chunk defined by a byte range. The main advantage is that you can parallelise GET requests to download an object, with each GET requesting a specific range of bytes: typical sizes for byte range requests are 8 MB or 16 MB, but you can specify any size.
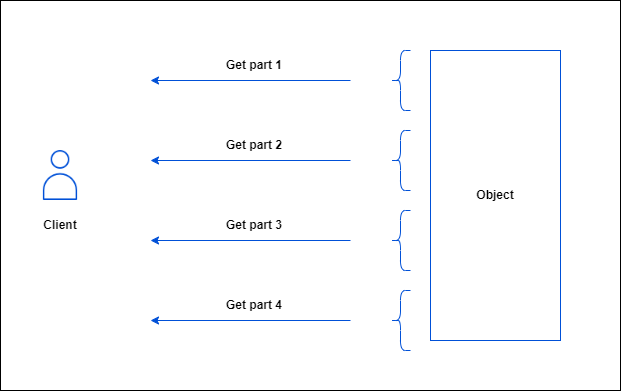
To download part of an object, you must use additional parameters to specify which part of the object you want to retrieve. The following example downloads the first part, between 0 and 500 bytes, of an object named <object_key> stored in the <bucket_name> bucket and writes the output to a file named object_part:
Using MPUs
You can upload a single object as a collection of parts using multipart upload. These parts are yours to upload separately and in any sequence. You can retransmit a part without affecting the others if the transmission of a part fails. Once you have downloaded all the parts, OVHcloud Object Storage assembles them and rebuilds the object.
You should consider using multipart uploads for objects > 100MB
The benefits of using multipart upload are as follows:
- Increased throughput: each part can be uploaded concurrently.
- Fast recovery from network problems: since each part can be uploaded separately and independently, you can re-upload the missing part without restarting the whole upload.
Instructions
Using the AWS CLI
You will need the following:
- An OVHcloud bucket created
- The AWS CLI installed and configured
- A large file split into multiple parts
Did you know?
When you use a high level command to upload an object using the cp command, the AWS CLI automatically does a multipart-upload. To better optimise the default configuration values for multipart uploads (multipart_threshold, multipart_chunksize), you can consult this article and see the table explaining how to configure the AWS CLI.
The following section explains how to perform a multipart upload using the low level commands of the AWS CLI.
First, you need to initiate a multipart upload:
Do not forget to save the upload ID, key and bucket name for use with the upload-part command.
For each part, you need to create an upload-part command in which you specify the bucket, the key and the upload ID:
Part numbers can range from 1 to 10,000 inclusive. You can check the technical limitations here.
Save the ETag value of each part for later. They are required to complete the multipart upload.
Once all the parts have been uploaded, you need to call the complete-multipart-upload command to complete the process and for OVHcloud Object Storage to rebuild the final object:
Where mpu.json is:
If a multipart upload is not completed, the final object will not be assembled and will remain invisible. Nevertheless, all uploaded parts remain stored and incur storage charges.
To avoid unnecessary costs, you can abort the multipart upload using the following AWS CLI command:
The upload ID is returned by the create-multipart-upload command or can be retrieved by listing ongoing multipart uploads:
Example of aborting a specific multipart upload after retrieving its upload ID:
Using other third party tools
The following list describes the options to perform multipart uploads using other tools. The list is NOT exhaustive as you might want to check the relevant documentation of the tool you are using.
s3cmd
Size of each chunk of a multipart upload.
Files bigger than SIZE are automatically uploaded as multithreaded-multipart, smaller files are uploaded using the traditional method.
SIZE is in Mega-Bytes, default chunk size is 15MB, minimum allowed chunk size is 5MB, maximum is 5GB.
Example:
For more information on s3cmd, consult the official documentation here.
rclone
Size threshold at which point rclone switches from single file upload to multipart upload.
Size of each chunk used in multipart uploads.
Number of chunks uploaded concurrently.
Example:
For more information on rclone, consult the official documentation here.
Increasing the number of concurrent requests
Another way to improve throughput is to increase the number of concurrent requests.
To customize the default value on the AWS CLI, consult this guide.
For other tools, you should check the relevant documentation of the software you are using.
I/O optimisation
It is also possible to significantly optimise performances by adopting good practices to distribute the I/Os as widely as possible in the object storage cluster, taking advantage of the sharding mechanism.
What is sharding
OpenIO is a software-defined storage solution on which OVHcloud Object Storage is based.
In OpenIO, a container is basically an internal logical entity that contains all the objects for a given bucket. Each container is associated with an internal metadata database that lists all the addresses in the cluster of the objects contained in it. By default, an Object Storage bucket is associated with one container but this can change with the sharding mechanism.
Sharding is the mechanism by which a container is split into 2 new sub-containers (and thus its associated metadata database is also split in 2) when it reaches a critical number of objects called shards.
Sharding enables:
- optimising read/write operations by distributing them evenly over several servers (shards).
- distributing data storage over the whole cluster to increase resilience.
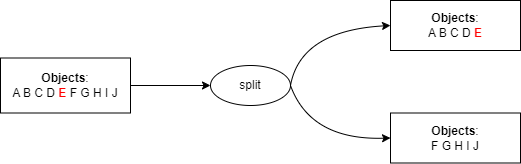
We use the object keys (prefix/name) to determine which objects are pushed into which sub-container using the following logic:
- Create 2 new shards.
- Find the median value of an alphabetically sorted list of all object keys.
- Copy the content of the root container to the shards.
- In the first shard, keep only the first half of the objects (from the object with the first key in the list to the object with a key equal to the median value) and clean up the second half.
- In the second shard, keep only the second half of the objects and clean up the first half.
- The root container then only lists references to the shards i.e which range of objects in which shard.
This logic can be summed up as follows:
Prefix good practices
You can optimise the I/Os on the cluster by taking advantage of the sharding mechanisms described above.
The main strategy is to keep the cardinality of object keys to the left, i.e. to use prefixes that allow sharding to divide incoming objects as evenly as possible.
Let's consider a use case where you would want to store logs in an OVHcloud Object Storage.
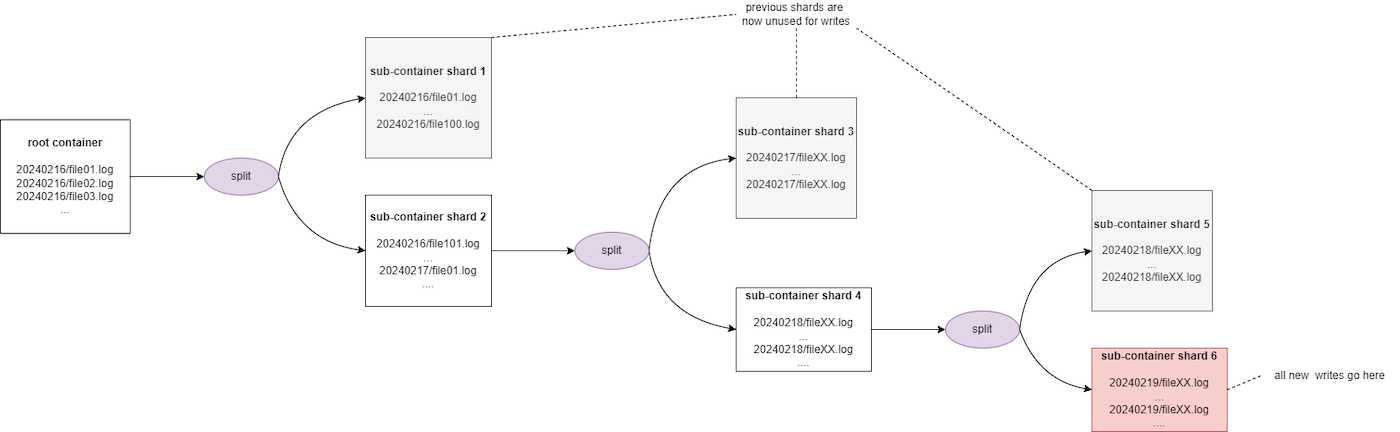
Scenario 1: Bad practice by using the date as prefix
List of objects:
- 20240216/file01.log
- 20240216/file02.log
- 20240216/file03.log
- ...
- 20240217/file01.log
- 20240217/file02.log
- ...
Assuming a threshold of 100, after the 100th object is uploaded, the sharding is triggered to divide the objects into two shards:
- from 20240216/file01.log to 20240216/file100.log in the first shard
- from 20240216/file101.log and beyond to a second shard
This solution is not optimal because, since dates are incremental by nature, all new downloads will always be carried out on the second shard, which will be split again when it reaches a critical size. Thus, all future write operations will always be performed on the latest shard created and the previous shards will get rarely accessed. Furthermore, you may experience some throttling during the sharding process.
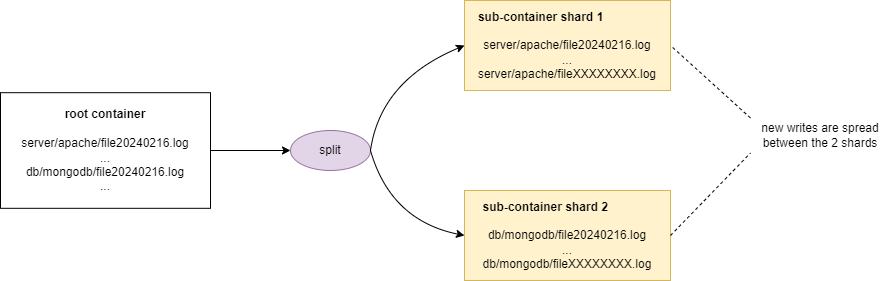
Scenario 2: Good practice by keeping the cardinality to the right
List of objects:
- server/apache/file20240216.log
- server/apache/file20240217.log
- server/apache/file20240218.log
- ...
- db/mongodb/file20240216.log
- db/mongodb/file20240217.log
- ...
Assuming a threshold of 100, after the 100th object is uploaded, the sharding is triggered to split the objects in 2 shards. This 2nd scenario is optimal because all new uploads will be spread on the 2 shards.
Optimise ramp up time
When you upload a very large number of objects at once, you trigger the sharding mechanism. As the sharding process occurs, you may experience some throttling.
In order to avoid the reduced performance (503 SLOWDOWN errors), we recommend that you optimise your uploads by spreading your request over time. This spread does not have to be linear, but it does have to give us enough time to balance your workload.
A simple way to achieve that lies in better 503 slowdown errors management and error recovery: ramp up your uploads until you hit 503 errors and modulate your workload to accommodate the throttling until sharding is complete and then ramp up again.
Increase object sizes
Objects are considered small if they are less than 1 MB in size. When it comes to large volumes of data (PB scale), the total number of objects quickly reaches billions or even trillions. Managing metadata administration on this scale and the number of I/O operations poses a major challenge: how to provide a quality service without losing information or compromising performance?
When applicable, we recommend that you increase the object/part size as much as possible in order to reduce the number of objects.
Go further
If you need training or technical assistance to implement our solutions, contact your sales representative or click on this link to get a quote and ask our Professional Services experts for assisting you on your specific use case of your project.
Join our community of users.

