AI Deploy - Tutorial - Deploy a Rasa chatbot with a simple Flask app
345 viste
AI Deploy is covered by OVHcloud Public Cloud Special Conditions.
Objective
In a previous tutorial, we created and trained a Rasa Chatbot with AI Notebooks: How to create and train a chatbot on OVHcloud. Now, the aim of this tutorial is to deploy a chatbot with OVHcloud AI Tools. We also train our chatbot with AI Training.
We used the famous open source framework Rasa to build the chatbot. To deploy our chatbot, we will use the Flask framework and create a web app.
This tutorial's objectives are:
- Secure the Flask application.
- Deploy the Rasa model with AI deploy.
- Deploy the Flask application and converse with the chatbot.
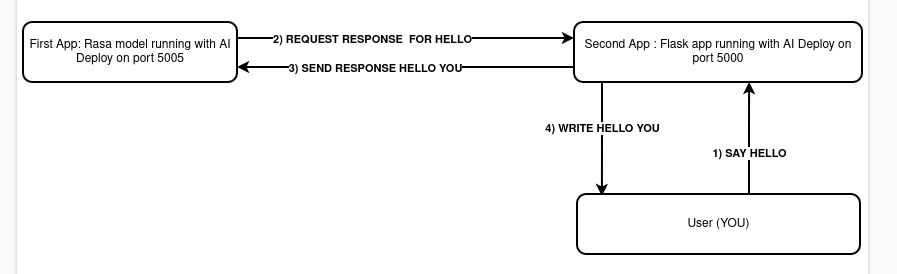
Here is a schema to explain how it works:
Requirements
- A Public Cloud project created
- The ovhai CLI interface installed on your system (more information here)
- Docker installed on your local computer
- A Docker Hub account
- Knowledge about building images with Dockerfile
Instructions
We will create two AI apps to deploy the Rasa model. First, you will have to create two environment variables for the Flask app.
Clone our example repository
Please make sure you have cloned the GitHub repository. You can find it here.
Create environment variables
Frontend and backend (the chatbot) have to communicate safely and securely. We will generate security keys for that.
The first variable will be the secret key for the Json web token signature to access your Rasa chatbot. To generate this key, we use Python. If you have Python 2.6+ installed on your machine, you can run Python inside a terminal and then:
The second one will be the algorithm used for the Json web token. The algorithm used will be H256.
You have your two environment variables. Time to save them! Create an .env file inside the flask_app folder. Your .env should look like this:
JWT_SECRET_KEY=your-jwebtoken-generated-before
JWT_ALGORITHM=HS256
Your environment variables are saved. One more thing to do is to add in the docker-compose.yml file in the Rasa image the JWT_SECRET_KEY value. The value must be the same in the .env file. Otherwise, your model will not be able to run. Now, let's test locally our app or let's deploy our chatbot!
If you have already trained a Rasa model with OVHcloud, you should already have an object storage container with your trained models. If you don't have this one, please continue this tutorial to create one. Otherwise, you can go directly here.
Add one object storage
The container we will create contain at least one model. This model will be served on a platform with AI Deploy.
We can specify during creation if we want them in read-only, read-write and co. Splitting input data and output data is a good practice, allowing you faster development code and avoids risk of deleting data.
The obvious goal about using object storage and not the local storage of the AI Notebook is to decorrelate compute and storage, allowing us to stop or delete the notebook while keeping the data safe.
If you want to know more about data storage concept, read this guide: Create an object container.
For the chatbot deployment, we will create one object storage bucket. It will contain a pretrained model. If you've already trained a model before with other tutorials, don't create a new container.
To create the volume in GRA (Gravelines data centre) in read-only, go into the folder ai-training-examples/apps/flask/conversational-rasa-chatbot/back-end/models. After, you will just have to type:
The model 20221220-094914-yellow-foley.tar.gz will be added in your container <model-output-container>. That's it, now you can deploy your chatbot.
Test it locally (optional)
A good practice is to test your work locally before going to production.
Open a terminal, move to the project folder (ai-training-examples/apps/flask/conversational-rasa-chatbot) then use this command:
This command will create 2 containers, one for the Rasa model backend and one for the frontend server handled by Flask. Once the two containers are running (it will take 5 minutes max), you can go directly on your localhost on port 5000, the port of your frontend app.
To stop the containers, run this command:
Deploy the Rasa model in the Cloud
For simplicity, we will use the ovhai CLI. With one command line, you will have your model up and running securely with TLS!
We will need to create a container in order to deploy the chatbot. You don't have to create the Dockerfile since an example of it can be found in our GitHub repository. This Dockerfile is here and looks like the following:
Build the Docker image from the Dockerfile
From the directory containing your Dockerfile (/apps/flask/conversational-rasa-chatbot/back-end/), run one of the following commands to build your application image:
-
The first command builds the image using your system’s default architecture. This may work if your machine already uses the
linux/amd64architecture, which is required to run containers with our AI products. However, on systems with a different architecture (e.g.ARM64onApple Silicon), the resulting image will not be compatible and cannot be deployed. -
The second command explicitly targets the
linux/AMD64architecture to ensure compatibility with our AI services. This requiresbuildx, which is not installed by default. If you haven’t usedbuildxbefore, you can install it by running:docker buildx install
The dot . argument indicates that your build context (place of the Dockerfile and other needed files) is the current directory.
The -t argument allows you to choose the identifier to give to your image. Usually image identifiers are composed of a name and a version tag <name>:<version>. For this example we chose /rasa-chatbot-backend:latest.
Push the image
Run the following command:
Deploy the app
Now that your container is created, let's run our application and deploy our model!
Explanation of each line:
- Launch an app in AI Deploy with the name "rasa-back".
- Specify that our URL is not secured by OVHcloud. The model will be in fact secured with a Json web token. The only person who will access your model is the Flask frontend application. This is also why you created environment variables before. If you want to know more about Json web tokens, please refer to https://jwt.io/.
- The port of the rasa model is 5005.
- 4 CPUs are sufficient to deploy the model.
- We will add a volume to get the model file.
- In the
-eargument, please put the jwt secret key you've generated which is in your.envfile. - In the last line you specify the Docker image to load and also the bash command to run inside the Docker container.
Explication of the bash command running the chatbot (you can find it inside the Dockerfile):
rasa run: Run a specific model to be used with others applications.-m trained-models: Specify the path to the models trained before.--cors "*": Enable all cors, our frontend application must have access to the model.--debug: Print all of the logs for each user connected and disconnected.--connector socketio: Specify this connector to enable a connection to create a new website.--credentials "crendentials.yml": Specify here the path of the credentials file.--endpoints "endpoints.yml": Specify the path of theendpoints.ymlfile.rasa run actions: The custom actions you've made before to launch them and use them.
Now, you can wait until your app is started, then go to the URL. Nothing special will happen, just a small message with hello from Rasa 3.2.10!
For better interactions, we will now deploy the Flask frontend. For simplification, everything is on the cloned GitHub repository.
Deploy the frontend App
- Create the Dockerfile
First, we will need to create the Dockerfile. As before, this Dockerfile has already been created and is located in the front-end folder. The file is here and looks like this:
Let's now run the app on AI Deploy! To do so, you will need to create a Docker image. Go into the front-end folder (ai-training-examples/apps/flask/conversational-rasa-chatbot/front-end) and run one of the following commands:
Then push your image:
- Deploy the Docker image
Once built, let's run the Frontend application with the ovhai CLI.
But first, get the URL of your backend Rasa chatbot app. It will be something like this: https://259b36ff-fc61-46a5-9a25-8d9a7b9f8ff6.app.gra.ai.cloud.ovh.net/. You can have it with the CLI by listing all of your apps and locating the one you want.
Now you can run this command:
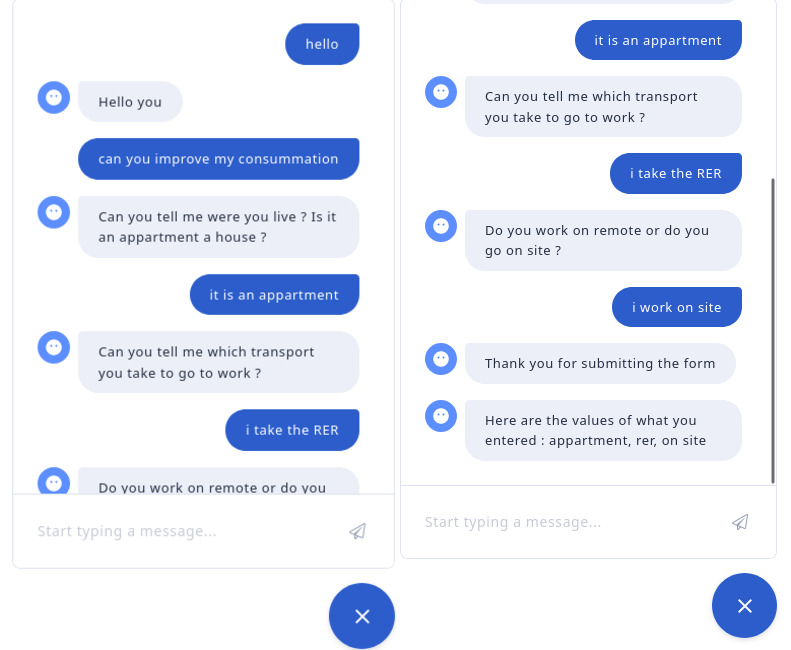
That's it! On the URL of this app, you can speak to your chatbot. Try to have a simple conversation! If you reload the page, you will notice that the chatbot goes back to zero. So every user is different on each machine.
Here is an example of a discussion with the chatbot:
Go further
If you want to see how the model is created and trained with AI Notebooks, please follow this tutorial.
How to create and train a rasa chatbot
If you want to train a Rasa chatbot with the tool AI Training, please refer to this tutorial.
How to train a chatbot with Docker and AI Training
If you want to use more functionalities of Rasa, please follow this link. We use Rasa Open Source and not Rasa X.
If you want to know more about the Flask framework, please go to this link.
Feedback
Please send us your questions, feedback and suggestions to improve the service:
- On the OVHcloud Discord server
If you need training or technical assistance to implement our solutions, contact your sales representative or click on this link to get a quote and ask our Professional Services experts for a custom analysis of your project.

