Enforcing policy management on OVHcloud Managed Kubernetes with Kyverno
788 vues
Objective
Kyverno (Greek for “govern”) is a policy engine designed specifically for Kubernetes.
![]()
With Kyverno, policies are managed as Kubernetes resources and no new language is required to write policies (compared to OPA Gatekeeper which uses Rego programming language). This allows using familiar tools such as kubectl, git, and kustomize to manage policies.
Kyverno policies can validate, mutate and generate Kubernetes resources.
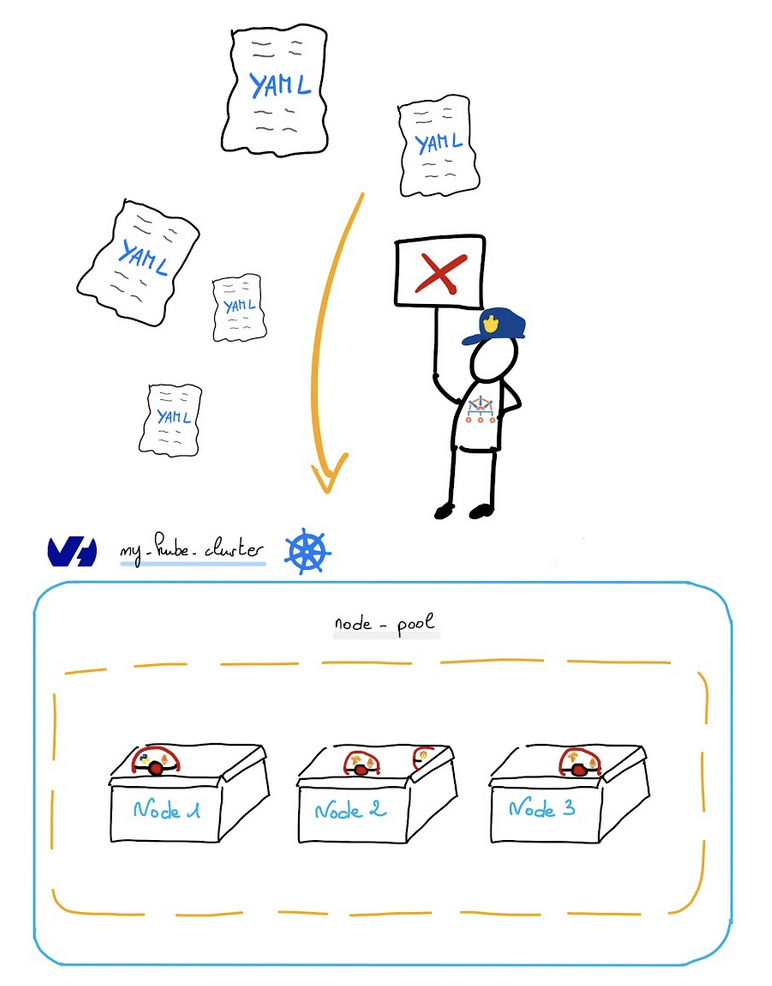
Kyverno runs as a dynamic admission controller in a Kubernetes cluster. Kyverno receives validating and mutating admission webhook HTTP callbacks from the Kubernetes API-Server and applies matching policies to return results that enforce admission policies or reject requests.
Kyverno policies can match resources using the resource kind, name, and label selectors. Wildcards are supported in names.
Mutating and Validating policies can be written as overlays (similar to Kustomize).
Policy enforcement is captured using Kubernetes events. Kyverno also reports policy violations for existing resources.

Concretely, when you apply a resource on the Kubernetes cluster, the manifest you sent to Kubernetes API must pass many stages before they get created as a resource you desire. Two stages in which we are interesting are Mutating Admission and Validating admission.
Kyverno many features include:
- Validate and mutate using overlays (like Kustomize!)
- Synchronize configurations across namespaces
- Scan existing workloads and generate audit reports
- Block non-conformant resources using admission controls, or report policy violations
- Test policies and validate resources using the
kyvernoCLI, in your CI/CD pipeline, before applying to your cluster
Read more about Kyverno.
Secure a Kubernetes cluster is important so thanks to Kyverno you can check several security best practices, for example:
- Configure Readiness & Liveness probes
- Configure resource quotas
- Do not use mutable (latest) image tags
- Restrict image registries
- Configure pod security
- Fine-grained RBAC
As at OVHcloud, we like to provide you with the best products and services and for us security is important, that's why we wanted to help you discover Kyverno which will help you secure your OVHcloud Managed Kubernetes with policy management.
In this guide you will:
- Install Kyverno
- Write and deploy several policies
- Test the behavior
You can use the Reset cluster function in the Public Cloud section of the OVHcloud Control Panel to reinitialize your cluster before following this tutorial.
Requirements
This tutorial presupposes that you already have a working OVHcloud Managed Kubernetes cluster, and some basic knowledge of how to operate it. If you want to know more on those topics, please look at the deploying a Hello World application documentation.
Instructions
Installing Kyverno CLI
You can install the CLI using Krew or building the CLI from source by example.
For this tutorial you will install the CLI from source:
You should have results like this:
After the installation, check that the kyverno CLI is working:
You should have a behavior like this:
The Kyverno Command Line Interface (CLI) is designed to validate and test policies behavior prior to adding them to a cluster.
So the best practice is to use the kyverno CLI in your CI/CD pipelines to assist with the resource authoring process to ensure they conform to standards prior to them being deployed.
Installing Kyverno
For this tutorial we are using the Kyverno Helm chart.
Add the Kyverno Helm repository:
These commands will add the Kyverno Helm repository to your local Helm chart repository and update the installed chart repositories:
Install the latest version of Kyverno with helm install command:
This command will install the latest version of Kyverno and create a new kyverno namespace:
You can also install Kyverno in HA (High Availability) mode with the following command:
helm install kyverno kyverno/kyverno -n kyverno --create-namespace --set=replicaCount=3
You can check if the Kyverno pod is correctly running:
And you can check that Kyverno installed several webhooks on your cluster:
Create and deploy policies
Kyverno is running on your OVHcloud Managed Kubernetes cluster, so now you can simply create and deploy policies with the rules you want to put in place in your cluster.
In this guide we will show you how to create several policies that will:
- Deny deploying resources in the
defaultnamespace - Create automatically a ConfigMap in all namespaces except
kube-system,kube-publicandkyverno - Add automatically a label to Pods, Services, ConfigMaps, and Secrets in a given namespace
Policy 1: Disallow deployments in the default namespace
For our first example we want to deny deploying resources in the default namespace.
Why? Because it's a good practice to isolate workloads/applications with Namespaces. One namespace per project/team/...
So imagine if several teams deploy different applications in the default namespace, they will not be isolated.
The policy will validate whether new resources can be deployed, so we will create a validate policy.
Create a new policy in a policy-disallow-default-namespace.yaml file:
The validationFailureAction policy attribute that controls admission is set to enforce to block resource creation or updates when the resource is non-compliant.
Using the default value audit will report violations (in a PolicyReport or ClusterPolicyReport) but will not block requests.
To deploy the Kyverno policy in the cluster, execute the following command to apply the YAML file:
After applying the policy, check if the policy is correctly applied on the cluster:
With Kyverno installation, new CRDs have been added. The one that interests us is the new resource type ClusterPolicy. So in order to list, display, edit and remove Kyverno policies, you can execute kubectl command with ClusterPolicy resource object type.
Ex: kubectl get clusterpolicy or kubectl get cpol with the short name.
Now you will try to deploy a simple application in the default namespace.
For that, create a file named my-pod.yaml with the following content:
Apply it without defining any namespace (namespace is default by default):
Perfect, you no longer have the ability to deploy a Pod/Deployment/ReplicaSet/Job/StatefulSet in the default namespace.
Policy 2: Create a ConfigMap in all namespaces excepted kube-system, kube-public and kyverno
For our second example we want to create a generate policy that will create a new ConfigMap called zk-kafka-address in all new namespaces except kube-system, kube-public and kyverno.
Create a new policy in a policy-generate-cm.yaml file:
When the synchronize attribute is set to true, modifications will be synchronized to the generated resources.
So in our case, if you change the values of ZK_ADDRESS and KAFKA_ADDRESS for example, all the created ConfigMap will be updated.
To deploy the Kyverno policy in the cluster, execute the following command to apply the YAML file:
After applying the policy, check if the policy is correctly applied on the cluster:
The generate rule is triggered during the API CREATE operation, so for this policy when a new namespace is created.
In order to test the behavior of this policy, you will create a new namespace test2:
And then check if the new ConfigMap appears in the new test2 namespace:
You should have results like these:
As you can see the ConfigMap zk-kafka-address have been created in the new test2 namespace.
Policy 3: Add a label app: my-awesome-app to Pods, Services, ConfigMaps, and Secrets in a given namespace
The aim of this policy is to automatically add a label app=my-awesome-app to Pods, Services, ConfigMaps, and Secrets in the namespaces team-a.
In order to do that, we will show you how to deploy a mutate policy.
Resource mutation occurs before validation, so the validation rules should not contradict the changes performed by the mutation section.
Create a new policy in a policy-add-label.yaml file:
To deploy the Kyverno policy in the cluster, execute the following command to apply the YAML file:
After applying the policy, check if the policy is correctly applied on the cluster:
Now you can create a new namespace team-a, deploy a new Pod into it and check if the new label have been correctly added automatically:
Previously in this guide we showed you the creation of a Pod in a file named my-pod.yaml, so in this step you can reuse it.
You should obtain the following results:
Debugging/validating
Previously in this guide we show you how to install the kyverno CLI. With this CLI you can apply, test and validate policies.
In this tutorial we want to show you that the CLI is perfect for a usage on your local machine (for dev/test usages) and in your CI/CD pipelines in order to test and validate the policies you want to deploy in production are correct.
You can for example check if policies we created are validated with the kyverno validate command:
You should obtain results like these:
Troubleshooting
If you have any problem with Kyverno, for example you deployed a policy and don't know why it's not working, you can go to the Kyverno troubleshooting page.
What's next?
You now have a policy management on your Kubernetes cluster, and you deployed a few policies to test the behavior of Kyverno.
In order to see more examples of policies, you can go to Kyverno policies repository. This repository contains Kyverno policies for a wide array of usage on various Kubernetes and ecosystem resources and subjects.
If you have any questions or troubles about Kyverno, you can also go to Kyverno Slack community.
Having a policy management is a good practice to follow. It will help you to keep your cluster clean and secure.
Next time we will see another tutorial that will help you to secure your OVHcloud Managed Kubernetes clusters.
Cleanup
First, remove the ClusterPolicies you deployed in this guide:
To uninstall Kyverno, as you installed it through Helm, you can use helm uninstall command in order to delete the Kyverno Helm installed chart:
Go further
-
If you need training or technical assistance to implement our solutions, contact your sales representative or click on this link to get a quote and ask our Professional Services experts for assisting you on your specific use case of your project.
-
Join our community of users.

