Enterprise File Storage - Premiers pas avec Trident CSI
161 vues
Objectif
Ce guide a pour objectif de fournir une référence claire et pas-à-pas pour déployer et configurer NetApp Trident CSI sur OVHcloud Managed Kubernetes (MKS), permettant un accès fluide à Enterprise File Storage via le vRack. Ce guide regroupe les meilleures pratiques, les prérequis, la configuration IAM, la mise en place du backend, ainsi que les fonctionnalités avancées telles que la gestion des snapshots et des volumes.
Prérequis
- Un service Enterprise File Storage dans votre compte OVHcloud
- Un cluster OVHcloud Managed Kubernetes
- Un vRack avec vRack Services configuré
- Connaître les API OVHcloud et/ou la CLI OVHcloud
Avant de commencer, assurez-vous que votre environnement répond aux critères suivants :
vRack
- Projet Public Cloud et vRack Services appartiennent au même vRack
Région
- vRack Services et EFS sont dans la même région
Réseau
- Même ID de VLAN pour le subnet de vRack Services et le réseau privé MKS
- Même CIDR pour le subnet de vRack Services et le subnet du réseau privé MKS
- Les IP du pool d'allocation du réseau privé MKS ne se chevauchent pas avec la plage de service des services vRack
Connectivité
- Une passerelle (gateway) est requise pour que les nœuds MKS puissent joindre l'API OVHcloud
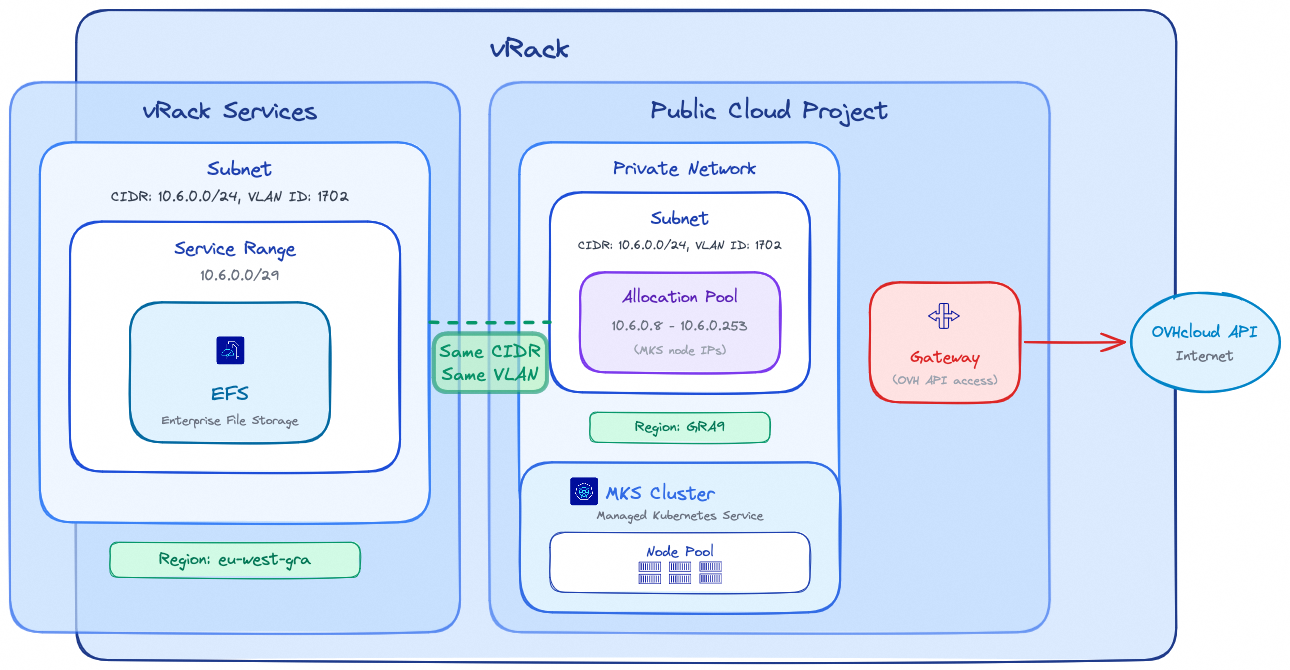
Note : Les régions EFS et MKS peuvent être différentes ; sachez que la latence entre les différentes régions peut impacter les performances de vos charges de travail de stockage.
Il est fortement recommandé de garder les ressources de stockage et les ressources de calcul aussi proches que possible.
En pratique
Configuration IAM (Identity and Access Management)
Trident nécessite un compte de service dédié pour interagir avec l'API OVHcloud et gérer les volumes Enterprise File Storage. Suivez les étapes ci-dessous pour configurer correctement l'IAM.
1. Création du compte de service (OAuth2)
Créez un client OAuth2 avec l'API ou la CLI OVHcloud en utilisant le flux CLIENT_CREDENTIALS.
Utilisez l'appel API suivant :
Avec le contenu de la requête suivant :
L'API répondra avec :
Le Service account peut être créé avec l'OVHcloud CLI et la commande suivante (complétez-la avec vos valeurs) :
La CLI répondra avec les valeurs client ID et client secret :
Note : Conservez précieusement le clientId et le clientSecret. Ils seront requis lors de la configuration du backend Trident.
2. Création de la politique IAM
Configurez une politique IAM qui devra contenir les éléments suivants : le service account à autoriser, le ou les services Enterprise File Storage à inclure ainsi que les actions à accorder qui sont résumées dans le tableau ci-dessous :
| Action | Description |
|---|---|
| storageNetApp:apiovh:get | Lister les services |
| storageNetApp:apiovh:serviceInfos/get | Récupérer les informations d'un service |
| storageNetApp:apiovh:share/accessPath/get | Obtenir le point de montage d'un share |
| storageNetApp:apiovh:share/acl/create | Création d'une ACL |
| storageNetApp:apiovh:share/acl/delete | Supprimer une ACL |
| storageNetApp:apiovh:share/acl/get | Lister les ACLs |
| storageNetApp:apiovh:share/create | Création d'un share |
| storageNetApp:apiovh:share/delete | Suppression d'un share |
| storageNetApp:apiovh:share/edit | Modification d'un share |
| storageNetApp:apiovh:share/extend | Étendre un share |
| storageNetApp:apiovh:share/get | Lister les shares |
| storageNetApp:apiovh:share/revertToSnapshot | Restaurer un snapshot |
| storageNetApp:apiovh:share/snapshot/create | Création d'un snapshot |
| storageNetApp:apiovh:share/snapshot/delete | Suppression d'un snapshot |
| storageNetApp:apiovh:share/snapshot/edit | Éditer un snapshot |
| storageNetApp:apiovh:share/snapshot/get | Lister les snapshots |
Utilisez l'appel API suivant pour créer la politique IAM :
Avec le contenu de la requête suivant :
Dans le champ identities, remplacez xx11111-ovh par votre identifiant de compte OVHcloud (NIC handle) et EU.xxxxxxxxxxxxxxxx par le clientId obtenu à l'étape 1.
L'API répondra avec les détails de la politique créée :
La politique IAM peut être créée avec l'OVHcloud CLI et la commande suivante (complétez-la avec vos valeurs) :
Dans le champ identities, remplacez xx11111-ovh par votre identifiant de compte OVHcloud (NIC handle) et EU.xxxxxxxxxxxxxxxx par le clientId obtenu à l'étape 1.
La CLI répondra avec le retour ci-dessous :
Installation de Trident CSI
L'installation utilise Helm avec des images personnalisées hébergées sur Docker Hub. Ces images incluent un driver supplémentaire ajouté par OVHcloud qui permet la consommation de stockage persistant depuis l'offre OVHcloud Enterprise File Storage.
Créez un fichier trident-values.yaml afin de référencer les images hébergées par OVHcloud :
Lancez l'installation :
Le retour de la CLI devrait montrer que le chart Helm a été déployé :
Une fois l'installation terminée, vérifiez que tous les pods Trident sont en état Running dans le namespace trident avant de poursuivre :
Le retour devrait montrer tous les pods en état Running :
Création du backend Trident
Le backend Trident permet de connecter NetApp Trident au service OVHcloud Enterprise File Storage à l'aide des identifiants IAM créés précédemment.
1. Création d'un secret
Créez un secret contenant les informations de connexion permettant à Trident d'accéder à l'API OVHcloud.
Remplacez les valeurs clientID et clientSecret par les identifiants obtenus à l'étape 1.
Le retour de la CLI confirmera la création du secret :
2. Création du backend Trident
Créez votre backend avec la commande ci-dessous :
Le driver de stockage ovh-efs doit impérativement être utilisé. Remplacez exportRule, location et les autres paramètres par les valeurs correspondant à votre environnement.
Le retour de la CLI confirmera la création du backend :
Vérifiez que le backend a été correctement créé avec la commande ci-dessous :
Le retour devrait montrer le backend en état Bound :
StorageClass et utilisation des volumes
Cette section explique comment exposer Enterprise File Storage aux workloads Kubernetes à l'aide de Trident.
1. StorageClass
Définissez une StorageClass pour activer le provisionnement dynamique via le driver Trident CSI :
Le retour de la CLI confirmera la création de la StorageClass :
Cette StorageClass permet de provisionner les volumes à la demande et de les étendre dynamiquement.
2. Création d'un volume (PVC)
Créez un PersistentVolumeClaim avec un accès ReadWriteMany (RWX) :
Le retour de la CLI confirmera la création du PVC :
Vérifiez que le PVC a été créé avec la commande ci-dessous :
Le retour de la CLI devrait montrer le PVC en état Bound :
Une fois qu'un Pod utilisera ce PVC, le volume sera automatiquement monté via le protocole NFS.
Fonctionnalités avancées
Gestion des snapshots
NetApp Trident permet de créer des snapshots de volumes à la demande sur Enterprise File Storage.
- Définir une
VolumeSnapshotClasspour gérer le cycle de vie des snapshots :
Le retour de la CLI confirmera la création de la VolumeSnapshotClass :
- Créer un
VolumeSnapshotdans le même namespace que lePersistentVolumeClaimsource :
Le retour de la CLI confirmera la création du VolumeSnapshot :
Vérifiez que le VolumeSnapshot a été créé avec la commande ci-dessous :
Le retour devrait montrer le VolumeSnapshot en état READYTOUSE=true :
Le snapshot est créé sur le service Enterprise File Storage et peut être utilisé pour des workflows de sauvegarde ou de restauration.
Dépannage
- Backend non lié : Vérifiez que les identifiants IAM (clientId/clientSecret) sont corrects et que la politique IAM accorde toutes les permissions requises.
- PVC bloqué en Pending : Vérifiez que tous les pods Trident sont en état
Running, que le backend est en étatBoundet que laStorageClassréférence le bon type de backend. Consultez les erreurs dans les logs des pods Trident aveckubectl logs -n trident <nom-du-pod>. - Problèmes de connectivité réseau : Vérifiez que le cluster MKS peut joindre le service Enterprise File Storage via le vRack.
Aller plus loin
Enterprise File Storage - Configuration du réseau privé
Gestion des comptes de service OVHcloud via l'API
Si vous avez besoin d'une formation ou d'une assistance technique pour la mise en oeuvre de nos solutions, contactez votre commercial ou cliquez sur ce lien pour obtenir un devis et demander une analyse personnalisée de votre projet à nos experts de l'équipe Professional Services.
Échangez avec notre communauté d'utilisateurs.

