Premiers pas avec les bases de données Public Cloud (EN)
5008 vues
--- title: Premiers pas avec les bases de données Public Cloud (EN) excerpt: Find out how to order a Public Cloud managed database service using the OVHcloud Control Panel, OVHcloud API, OVHcloud CLI, or Terraform updated: 2026-05-05
Objective
OVHcloud Public Cloud managed databases let you focus on building and deploying cloud applications while OVHcloud handles the database infrastructure and maintenance.
This guide explains how to order a Public Cloud managed database service via the OVHcloud Control Panel, API, CLI, or Terraform.
Requirements
- A Public Cloud project in your OVHcloud account
- Access to the OVHcloud API (API and Terraform methods — create your credentials by consulting the First steps with the OVHcloud API guide)
- Terraform installed (Terraform method only — tested with version v1.14.6)
OVHcloud Control Panel Access
- Direct link: Public Cloud Projects
- Navigation path:
Public Cloud> Select your project
Instructions
Click Databases in the left-hand navigation bar under Databases & Analytics. The adjacent Analytics entry provides access to Kafka, Kafka Connect, Kafka MirrorMaker, Dashboards, and OpenSearch.
Click Create your managed database (or Create a service if your project already contains databases).
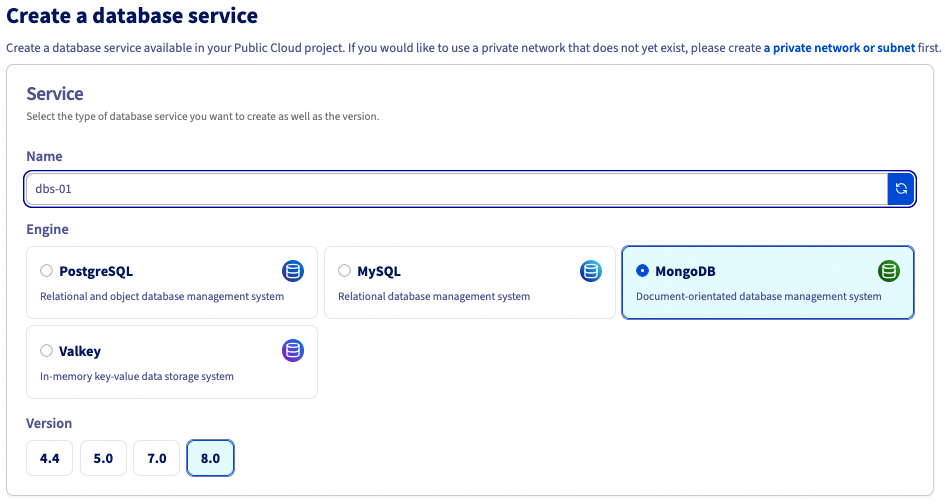
Step 1: Select your engine and version
Optionally rename your service (auto-generated by default), then select the engine and version.
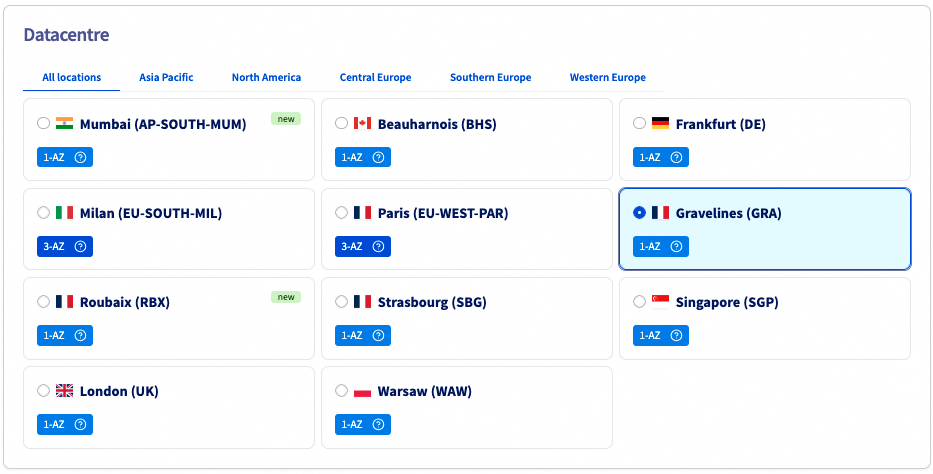
Step 2: Select a datacentre
Choose the geographical region of the data centre in which your database will be hosted.
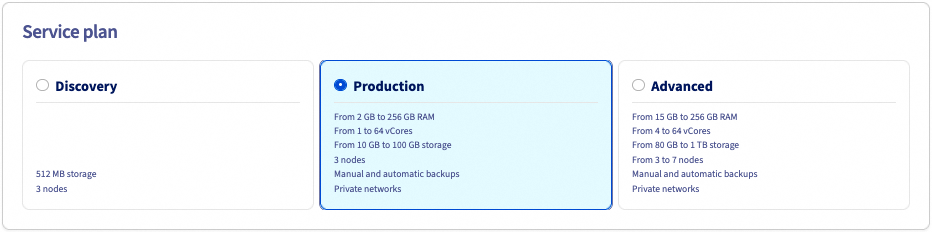
Step 3: Select a service plan
Choose a service plan. You can upgrade it after creation.
See the capabilities page of your selected database type for plan property details.
Step 4: Select your instance
Select the instance. The number of nodes is set by the solution selected above, and cannot be modified in this case.
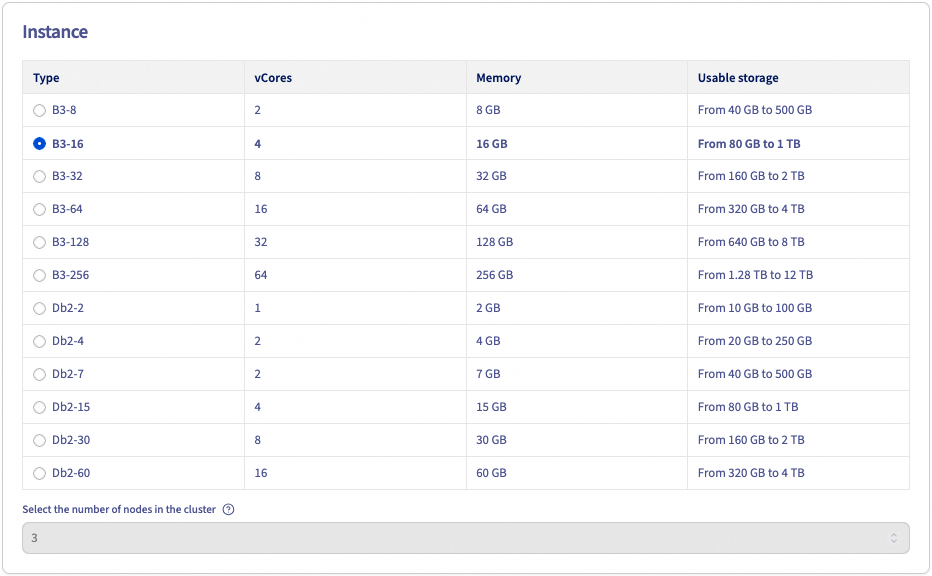
See the capabilities page of your selected database type for hardware and configuration details.
Take note of the pricing information.
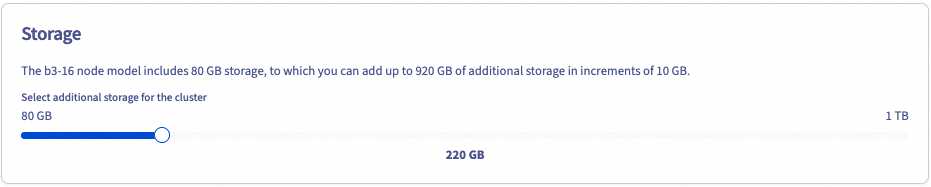
Step 5: Sizing
Additional storage can be ordered and, depending on the engine, the number of nodes in your cluster can be adjusted.
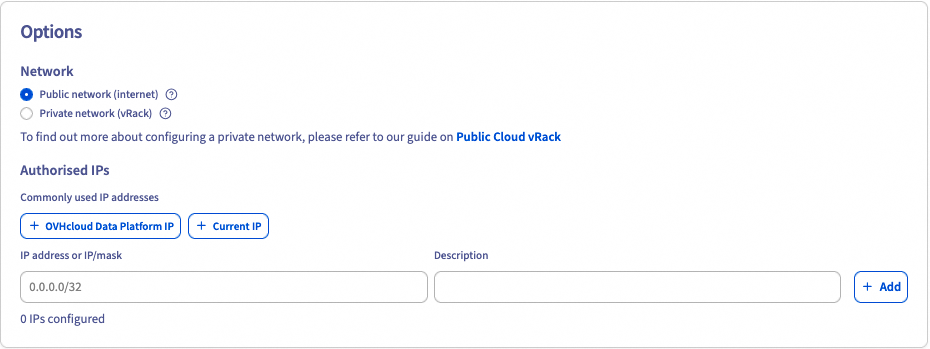
Step 6: Configure your options
Configure the network and authorised IPs.
Connecting a private network (optional)

If you already have a private subnet available, select Private network (vRack) and choose it from the drop-down menu. This option may not be available for the selected service type.
You can be redirected to create a private network or subnet via the corresponding links. In that case, you will need to restart the database order.
For detailed instructions, see the Configuring vRack for Public Cloud guide.
Authorised IPs
Add the IP addresses or address ranges allowed to connect to your service.
For security, the default network configuration blocks all incoming connections. Authorise a suitable IP address to access your database.
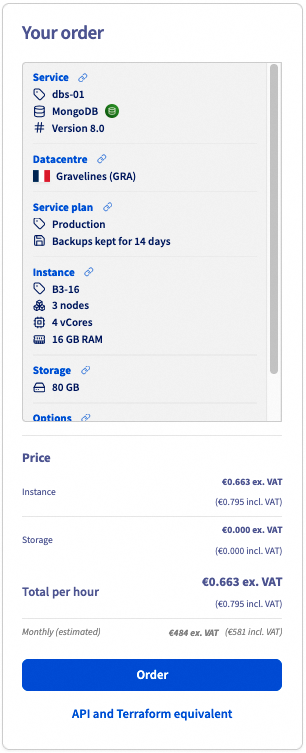
Step 7: Summary and confirmation
The right-hand panel displays a live summary of your order that updates as you make selections. Review it, then click Order to confirm.
To view the equivalent API or Terraform call before ordering, click API and Terraform equivalent.
Your database service deploys within a few minutes. Messages in the OVHcloud Control Panel notify you when the database is ready to use.
To configure your service after installation, see the Configure your instance to accept incoming connections guide for your database type, available in our catalog.
Configuration options vary by database type. Examples are available in the public-cloud-databases-examples repository.
Step 1: Gather the set of required parameters
To create a database service, specify at minimum:
- an engine, and its version (e.g.
MongoDB 8.0) - the plan (e.g.
production) - the nodes of the cluster (e.g. 3 nodes with 4 cores, 15 GiB memory, 100 GiB disk)
List the capabilities
The capabilities endpoint lists the allowed engine, plan, and flavor values.
The call returns an object listing the allowed engines (with versions), plans, and flavors.
Get the availability
The availability endpoint lists the valid parameter combinations. Each entry lists an engine, version, plan, flavor, region, public/private networking support, and min/max node count. Choose the combination that best fits your needs.
Step 2: Create a MongoDB database service
Creating a cluster incurs charges.
- description: a human-readable description for the service.
- plan: the desired plan.
- version: the MongoDB version.
- nodesPattern: specify the flavor, region, and number of nodes.
- nodeslist: leave undefined — use nodesPattern instead for same-region, same-flavor clusters.
- ipRestrictions: IP address blocks allowed to connect.
For security, the default network configuration blocks all incoming connections. Authorise a suitable IP address to access your database.
For private networking, also specify networkId (vRack ID) and subnetId (vRack subnet ID).
The call returns the cluster object. Its status is CREATING. Note the id for the next step.
Step 3: Wait for your database service to be ready
The cluster takes a few minutes to become usable. Check its status using:
Its status transitions to READY when the cluster is available.
Step 4: Reset the primary user password
List your cluster's users to get the admin user ID:
Reset the admin user's password:
Note the new password to connect to the cluster.
This password will not be available later: OVHcloud does not store user passwords.
Step 5: Start using the cluster
The cluster connection information is available in your OVHcloud Control Panel. You can now use the cluster.
All commands require either the --cloud-project <projectId> flag or the OVH_CLOUD_PROJECT_SERVICE environment variable, set to your Public Cloud project ID.
Step 1: Gather the set of required parameters
List available engines, plans, and node flavors:
Step 2: Create a MongoDB database service
Creating a cluster incurs charges.
For security, the default network configuration blocks all incoming connections. Authorise a suitable IP address to access your database.
For private networking, add --network-id <networkId> and --subnet-id <subnetId>.
Step 3: Wait for your database service to be ready
Its status transitions to READY when the cluster is available.
Step 4: Reset the primary user password
This password will not be available later: OVHcloud does not store user passwords.
Step 5: Start using the cluster
The cluster connection information is available in your OVHcloud Control Panel. You can now use the cluster.
Step 1: Gather the OVHcloud required parameters
The OVHcloud Terraform provider requires the following credentials:
- an
application_key - an
application_secret - a
consumer_key
To retrieve them, follow the First steps with the OVHcloud APIs guide. Generate credentials with the following rights:
- GET
/cloud/project/*/database/* - POST
/cloud/project/*/database/* - PUT
/cloud/project/*/database/* -
DELETE
/cloud/project/*/database/* - Generate OVHcloud API tokens (CA)
The service_name is the ID of your Public Cloud project. Retrieve it via the Copy to clipboard button in the Public Cloud section.
Step 2: Gather the set of required parameters
To create a new MongoDB cluster, specify at least:
- the engine (e.g.
mongodb) - the version (e.g.
8.2) - the region (e.g.
EU-WEST-PAR) - the plan (e.g.
production) - the flavor (e.g.
b3-8)
Step 3: Create Terraform files
Create a main.tf file:
Create a variables.tf file:
Use ovh-eu for the OVHcloud Europe API, or ovh-ca for North America.
Create a secrets.tfvars file with your actual values:
Replace <service_name>, <application_key>, <application_secret>, <consumer_key>, and <ip_range> with your actual values.
Create an outputs.tf file:
Step 4: Run
Export the credentials and URI:
Your MongoDB cluster is now ready.
Examples for other engines (MySQL, PostgreSQL) are available in the public-cloud-databases-examples repository.
Go further
Managing a MongoDB service from the OVHcloud Control Panel
Configuring vRack for Public Cloud
Visit our dedicated Discord channel to ask questions, provide feedback, and interact directly with the team that builds our databases services.
If you need training or technical assistance to implement our solutions, contact your sales representative or our Professional Services experts for a quote and a custom analysis of your project.
Join our community of users.

