AI Notebooks - Tutoriel - Créer et entraîner un chatbot Rasa (EN)
789 vues
Objective
The aim of the tutorial is to understand how to create and train a chatbot model with AI Notebooks. We will create and train the chatbot with a Visual Studio Code notebook. At the end of the tutorial, we will have a model and we can speak to our chatbot. There is an another tutorial with which you can train your chatbot with the tool AI Training: How to train a chatbot with AI Training.
We will use the famous open source framework Rasa to build the chatbot.
Requirements
- Access to the OVHcloud Control Panel
- A Public Cloud project created
- The ovhai CLI interface installed on your system (more information here)
- A user for AI Notebooks
Instructions
Create a token to access your AI services
The first step is to create an AI applicative token. With this token, you will be able to securely access all of your AI services.
To do this, launch this command on the terminal once the ovhai CLI is installed:
Here is the reference to install the CLI: CLI Installation.
The token is now created. Don't forget to save the token to use it later.
Now, if you already have trained some Rasa models with AI Training by following our tutorial, you already have created a container with your trained models. You can skip the next part and go directly here.
Understand storage concepts
The obvious goal about using object storage and not the local storage of the AI Notebook is to decorrelate compute and storage, allowing us to stop or delete the notebook while keeping the data safe.
If you want to know more about data storage concept, read this guide: Create an object container.
For the chatbot, we will create one object storage bucket. This bucket will be filled over time by our trained model output. The container in which the model will be saved does not need to be created. When we will launch our notebook, the container will be automatically created.
Now, let's start to create and train our chatbot.
Create and train a chatbot with a Visual Studio Code notebook
In order to do it you will need to create a Visual Studio Code notebook. You can attach one volume if you want to save the model created.
Don't forget to put the model inside the folder trained-models before stopping your notebook. By doing this, your model will be saved in your object container even if you delete your notebook. Here is the command to run:
Explanation of each line:
- Launch a notebook with the Python Miniconda framework in a Visual Studio Code editor.
- Name it "vscode-ovh-chatbot".
- Specify a version for the conda framework (Python 3.9).
- Attach 1 data volume to the notebook, as explained previously.
- Request 10 CPUs. The more we add, the more performant it is.
- Add the token previously created.
- Label this notebook "rasabotRO".
- Optional: The last line is the path to your ssh key on your machine. It is important to set up the key here to connect remotely from VScode. If you don't want to, you can connect directly on the web with the token you created before.
Note that the GitHub repository does not have to be added because it is already present when you create an AI Notebook.
Your notebook is ready, you can access it and log in.
Before training an AI model inside the notebook, you must install all the dependencies of Rasa. To do this, open a terminal by clicking the menu icon > Terminal > New Terminal, and launch the following command:
Once you have installed all the dependencies, you can create and train the chatbot with only one command in your terminal. Run it at the root of your directory:
It will create some folders with basic data for the Rasa chatbot. During the command, you can also train a model and speak with the chatbot at the end. Here is a small example of a conversation with the chatbot.
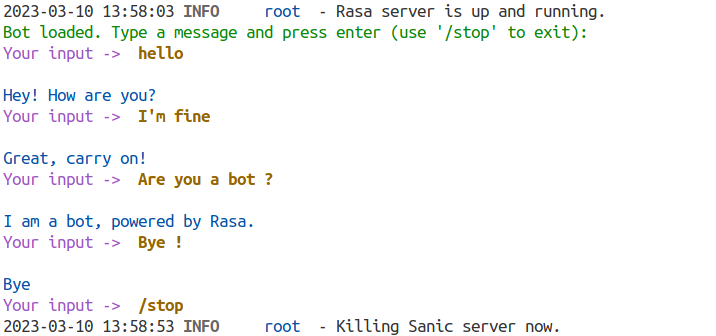
Here, we train a very simple model with few data. There are some frameworks like Chatette that generate some data and permit to create more powerful models.
Go further
If you want to use more functionalities of Rasa, please follow this link. We use Rasa Open Source and not Rasa X.
If you want to deploy your created model with the chatbot, you can follow this tutorial:
If you want to train a Rasa chatbot with the tool AI Training, please refer to this tutorial:
How to train a chatbot with docker and AI Training
If you need training or technical assistance to implement our solutions, contact your sales representative or click on this link to get a quote and ask our Professional Services experts for a custom analysis of your project.
Feedback
Please send us your questions, feedback and suggestions to improve the service:
- On the OVHcloud Discord server

