Encrypt your Secret for OVHcloud Managed Kubernetes with Sealed Secrets (Kubeseal)
278 vues
Objective
When you want to store your Kubernetes resources, as YAML manifest, the common way is to store/keep them in a Git repository. Thanks to that you can also create, edit and delete automatically with Infrastructure as Code and CI/CD your Kubernetes clusters and resources.
In the Kubernetes world, when we want to handle sensitive data, the usage is to store it in a Secret in a Kubernetes cluster. But the problem is that you can't store a Secret in a Version Control because the Secret is not encrypted, it's a question of security.
At OVHcloud, we like to provide you with the best products and services. For us, security is important, that's why we want to help you to discover Sealed Secrets and kubeseal CLI which will help you to encrypt your sensitive informations and deploy them easily in your OVHcloud Managed Kubernetes.
In this guide you will:
- Install Kubeseal CLI
- Deploy Sealed Secrets in your OVHcloud Managed Kubernetes
- Generate and deploy a SealedSecret
You can use the Reset cluster function in the Public Cloud section of the OVHcloud Control Panel to reinitialize your cluster before following this tutorial.
Kubernetes Secrets
Secrets in Kubernetes are used to store sensitive data, like password, keys, certificates and token. Secrets are encoded in base64 and automatically decoded when they are attached and read by a Pod.

A secret in Kubernetes cluster is encoded in base64 but not encrypted!
These data are "only" encoded so if a user has access to your secrets, he can simply execute a base64 decode command to see your sensitive data (kubectl get secret my-secret -o jsonpath="{.data.password}" | base64 --decode).
As the secrets aren't encrypted, it can be unsecure to commit them to your Git repository.
Sealed Secrets
A solution is to use Sealed Secrets, former called Kubeseal, a bitnami tool. Its goal is to encrypt your Kubernetes Secret into a SealedSecret, which is safe to store - even to a public repository. The SealedSecret can be decrypted only by the controller running in the target cluster and nobody else.
How is it working?
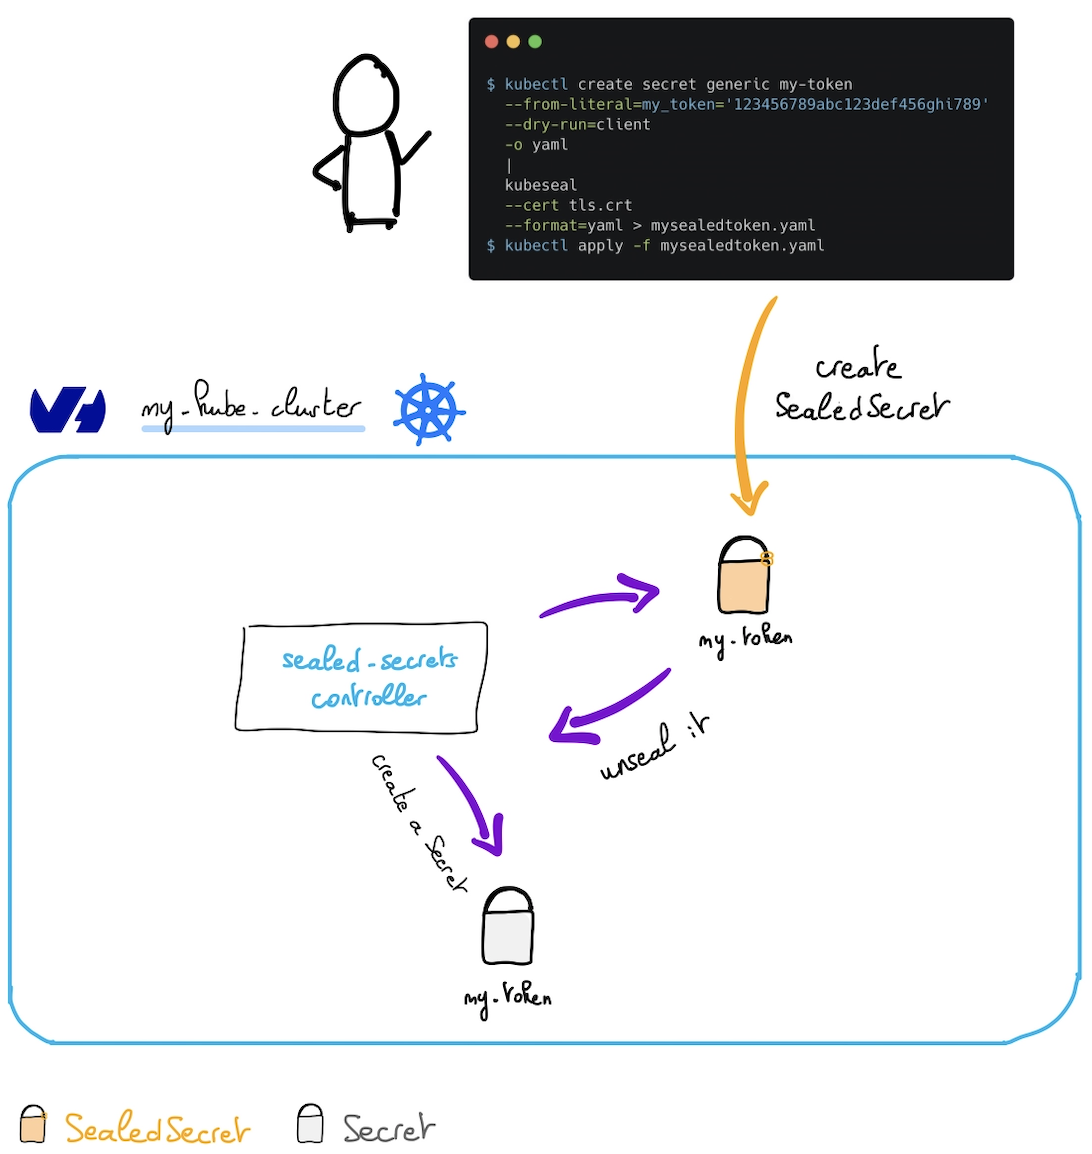
As you can see in the schema, a sealed-secrets-controller runs in the Kubernetes cluster. He listens when a new SealedSecret object appears, unseals it (thanks to known certificates) and creates a Kubernetes secret in the same namespace as the SealedSecret.
If you delete the SealedSecret in your cluster, the generated Secret will be deleted too.
Sealed Secrets are a straightforward application of asymmetric (public key) cryptography. Public key cryptography involves a tightly-linked pair of keys (called "public" and "private"), and anything encrypted with one can only be decrypted by the other.
SealedSecrets and the kubeseal tool are designed to easily fit into automated workflows. Once converted into a SealedSecret, not even the original user will be able to retrieve the original Secret. kubeseal can also be run offline, without access to the cluster - it just needs a copy of the public key available on disk somewhere.
Read more about Sealed Secrets.
Requirements
This tutorial presupposes that you already have a working OVHcloud Managed Kubernetes cluster, and some basic knowledge of how to operate it. If you want to know more on those topics, please look at the deploying a Hello World application documentation.
Instructions
Install kubeseal CLI
The kubeseal utility uses asymmetric cryptography to encrypt secrets that only the controller can decrypt.
With kubeseal CLI you can specify a key certificate for sealing secrets.
In order to install the CLI, follow the instructions depending on your OS.
You can, for example, install it through Homebrew:
Then test if the CLI is correctly installed on your computer:
Output should be like this:
Installing Sealed Secrets
For this tutorial we are using the Sealed Secrets Helm chart.
Add the Sealed Secrets Helm repository:
These commands will add the Kyverno Helm repository to your local Helm chart repository and update the installed chart repositories:
Install the latest version of Sealed Secrets with helm install command:
You can install the tool on a specific namespace, other than kube-system, with --namespace option, but if you do it, you will have to pass it as an argument explicitly at each execution of the kubeseal commands.
This command will install the latest version of Sealed Secrets:
Once you deploy the Hem chart, it will:
- create the SealedSecret CRD
- install the controller into
kube-systemnamespace - create a
sealed-secrets-controllerservice account intokube-systemnamespace - and necessary RBAC roles.
You can check if the sealed-secrets-controller pod is correctly running:
Retrieve the generated keypair
At the start of the sealed-secrets-controller a certificate keypair is generated. It can be useful for you to store it in a secret management tool like Vault.
Execute the following command to retrieve the content of the secret containing the generated keypair:
The output should look like this:
With this information you can now base64 decode the tls.crt and tls.key and store them locally and in your secret management tool in order to use them later to retrieve the sealed secrets.
You can use kubectl view-secret kubectl plugin in order to retrieve the key and the crt easily and store them locally:
Create a sealed-secret
First, you can generate a Kubernetes secret. In this example you will create, in a YAML file, a secret named my-token containing a token named my_token with the value 123456789abc123def456ghi789:
And then you can display the secret:
The output should like this:
Then seal the secret, with the retrieved generated certificate you saved and stored before:
The output should look like this:
Create the new namespace my-namespace and apply the SealedSecret resource inside:
The output should look like this:
Be careful, the SealedSecret and Secret resources must have the same namespace and name. This is a feature to prevent other users on the same cluster from re-using your sealed secrets.
After the SealedSecret creation, the sealed-secrets-controller has created automatically a Kubernetes Secret.
You can check their existance with the following command:
If you already installed the view-secret kubectl plugin, you can also check if the generated Secret contains the good token you sealed:
You should obtain the following output:
Debugging / Troubleshooting
Some issues may appear. If you don't understand why a Secret is never created after a SealedSecret creation, one of the common explanation is that you probably sealed the secret with another certificate than the ones the controller knows.
In order to debug/troubleshoot the behavior of the sealed-secrets-controller, you can watch its logs:
When everything is fine, you should see the following output:
Cleanup
First, remove the namespace my-namespace you created in this guide:
To uninstall Sealed Secrets, as you installed it through Helm, you can use helm uninstall command in order to delete the Sealed Secrets Helm installed chart:
Go further
-
If you need training or technical assistance to implement our solutions, contact your sales representative or click on this link to get a quote and ask our Professional Services experts for assisting you on your specific use case of your project.
-
Join our community of users.

