How to create and import a Lovable website on an OVHcloud VPS
96 visualizaciones
Objective
Lovable is a tool you can use to generate websites from prompts. This guide explains how to import and publish a website generated via Lovable on an OVHcloud VPS.
Requirements
- A Virtual Private Server in your OVHcloud account
- Administrative access (sudo) via SSH to your server
- You must have an account on Lovable
Instructions
Summary
- Step 1: Build your website on Lovable.dev
- Step 2: Export your website via GitHub and retrieve it
- Step 3: Upload the archive to the VPS
- Step 4: Install Node.js and the necessary tools
- Step 5: Unzip and build your website
- Step 6: Deploy your website
- Step 7: Install and configure the web server
- Step 8: Access your website
- Conclusion
- Go further
Step 1: Build your website on Lovable.dev
- Go to https://lovable.dev.
- Create an account if you have not already done so.
- Enter your prompt to build your website.
Step 2: Export your website via GitHub and retrieve it
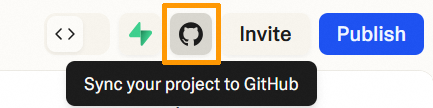
Once your website has been generated by Lovable, export it via GitHub. In the main Lovable interface, click on the GitHub icon (Sync your project to GitHub) in the top-right corner.
To connect your Lovable account to GitHub, follow the official documentation for Lovable.
Once the process is complete, a new repository containing your website’s code is present in your GitHub account.
From this GitHub repository, perform the following actions:
- Click
CodethenDownload ZIP. - This downloads a
.zipfile containing your project. - Unzip it.
Step 3: Upload the archive to the VPS
In your terminal (where the .zip file is located), use this command:
Replace:
my_website.zipby the name of the file downloaded from Lovable<user>by your root username (e.g. debian, root, etc.)<VPS_IP>by the public IP address or DNS name of your VPS
~ refers to the user's home directory.
Step 4: Install Node.js and the necessary tools
Log in to your VPS via SSH:
To build a Lovable website, you must compile the React project into an optimized version using the npm run build command. To do this, you will need the following elements on the VPS:
Node.js: The JavaScript environment required to run React.npm: The JavaScript package manager that installs project dependencies.curl: Allows you to download the Node.js installation script.unzip: Used to extract the.ziparchive from the exported site from Lovable.
Run these commands:
Verify the installation:
Step 5: Unzip and build your website
Unzip the .zip archive into a destination folder (e.g.: lovable-src):
Enter the destination folder:
Install the necessary dependencies:
This will install all React/Lovable libraries defined in the package.json file.
Generate optimized files (production build):
This creates a dist/ folder containing the minified HTML, CSS and JS files.
Step 6: Deploy your website
Create the public folder:
Step 7: Install and configure the web server
For this guide, we choose NGINX, but you are free to install the web server of your choice.
Install NGINX:
Create a configuration file for your website:
Paste the following content:
Replace VPS_IP with your VPS IP address or domain name.
Enable this configuration:
Restart NGINX to apply the configuration:
If the service is already active, use:
Step 8: Access your website
In your browser, enter:
or:
Your Lovable website will then appear.
Conclusion
In just a few minutes, you built your website with Lovable, then put it online on your OVHcloud VPS. If you would like to secure it with HTTPS, please follow our guide on Installing an SSL certificate on a VPS .
Go further
Install a web development environment on a VPS
For specialized services (SEO, development, etc.), contact the OVHcloud partners
Join our community of users.

