How to deploy the 3CX IPBX automatically on OVHcloud Public Cloud

Bases de conocimiento

How to deploy the 3CX IPBX automatically on OVHcloud Public Cloud


Icons/System/eye-open Created with Sketch. 69 visualizaciones 28.07.2023 VoIP

Objective

This guide details how to automatically deploy your 3CX instance on a Public Cloud instance.

At the end of this guide, you will have the basics to manage the deployment of your instance and its configuration automatically.

Requirements

Instructions

OVHcloud provides services that you are responsible for with regard to their configuration and management. It is therefore your responsibility to ensure that they function properly.

This tutorial is designed to help you with common tasks. Nevertheless, we recommend contacting a specialist provider and/or the service’s publisher if you encounter any difficulties. We will not be able to assist you. You can find more information in the "Go further" section of this guide.

We will use a template in XML format so that we can automatically configure the 3CX instance.

This XML file can be very simple, to simply install 3CX and your license.
It can also be very complete, allowing you not only to install the license but also to create your users, trunks and other 3CX features.

In this tutorial, we will use a very simple XML template. For a more complete template, please refer to the 3CX documentation.

Step 1: Complete the template

We will attach a user-data to the instance. When the instance is booted, this file will allow the cloud-init tool to:

  • Create the 3CX configuration XML file.
  • Launch the installation of 3CX packages.

The XML file is included in the template that we will attach to the instance when we create it.

Here is the file to use to follow this tutorial:
#!/bin/bash -e
mkdir -p /etc/3cxpbx
cat > /etc/3cxpbx/setupconfig.xml << "<EOF>"
<?xml version="1.0" encoding="UTF-8"?>
<SetupConfig xmlns:xsd="http://www.w3.org/2001/XMLSchema" xmlns:xsi="http://www.w3.org/2001/XMLSchema-instance">
  <tcxinit>
    <option>
      <code>InstallationType</code>
      <answer>new</answer><!--New install "new", restore Backup  = "restore"-->
    </option>
    <option>
      <code>LicenseKey</code>
      <answer>YourLicenseKey</answer>
    </option>
    <option>
      <code>BackupFile</code><!--If New install skip this-->
      <answer/><!--If you want to restore a backup put a reachable path from where the backup can be downloaded from. Can be actual physical path on local machine or http link-->
    </option>
    <option>
      <code>BackupPassword</code><!--Password for backup file (if backup is encrypted)-->
      <answer/>
    </option>
    <option>
      <code>AdminUsername</code>
      <answer>admin</answer><!--Admin Username-->
    </option>
    <option>
      <code>AdminPassword</code>
      <answer>YourStrongAdminPassword</answer> <!--Admin Pasword, make sure it is complex, Minimum 10 characters, no spaces and must contain at least a Lowercase, and Uppercase and a Digit-->
    </option>
    <option>
      <code>PublicIP</code>
      <answer>auto</answer><!--"auto" means automatically detect the ip address. Useful in most cases. Otherwise you can put "manual" and fill in Manual Public IP below-->
    </option>
    <option>
      <code>ManualPublicIP</code><!--If public IP = "manual" enter ip here. if "auto" skip-->
      <answer/>
    </option>
    <option>
      <code>StaticOrDynamicIP</code>
      <answer>static</answer><!--If your public ip is Static (does not change) use "static" otherwise use "dynamic"-->
    </option>
    <option>
      <code>LocalIP</code><!--Here we ask to choose the local ip of the machine. If you have no nat then the public is taken--> 
      <answer>auto</answer><!--if auto it takes the first ip on the network stack in the list. If you answer with the "manual" option (in multiple nic adapters you will have more interfaces,) then you need to populate the next option ManualLocalIP with the local IP Address you want"-->
    </option>
    <option>
      <code>ManualLocalIP</code><!--Answer only if above question you choose that you want to enter ip manually-->
      <answer/>
    </option>
    <option>
      <code>NeedFqdn</code>
      <answer>yes</answer><!-- enter "yes" to get a 3CX FQDN. enter "no" to use your fqdn (custom domains)-->
    </option>
    <option>
      <code>Hostname</code>
      <answer>contoso</answer><!--enter your hostname example contoso - the company name - This option needs to be filled in if NeedFqdn is yes. Skip if need fqdn is NO-->
    </option>
    <option>
    <!--
        Select Domain Group:
        (1) Africa
        (2) Asia
        (3) Cities
        (4) Continent
        (5) Europe
        (6) Oceania
        (7) Other
        (8) South America
        (9) United States

        List of available suffixes per Domain Group can be found on:https://activate.3cx.com/apiv2/domains  
    -->
      <code>DomainGroup</code>
      <answer>Europe</answer>
    </option>
    <option>
      <code>DnsSuffix</code> <!--This option needs to be selected in NeedFqdn is yes. List of available suffixes per Domain Group can be found on:https://activate.3cx.com/apiv2/domains Skip if need fqdn is NO. -->
      <answer>eu</answer>
    </option>
    <option>
      <code>FullExternalFqdn</code><!--This should be populated if NeedFqdn = "no". -->
      <answer/><!--User selected needfqdn = no. This means you have an fqdn so enter your fully qualified domain here example pbx.contoso.com-->
    </option>
    <option>
      <code>CertificatePath</code><!--Use if NeedFqdn = "no". -->
      <answer/><!--This is the certificate file which can be either a path, http link or just copy and paste the whole contents of the certificate - Including the "BEGIN certificate part"-->
    </option>
    <option>
      <code>CertificatePassword</code><!--Use if NeedFqdn = "no". -->
      <answer/><!--This is the PFX certificate password. Shows only when you select a pfx file"-->
    </option>
    <option>
      <code>CertificateKey</code><!--Use if NeedFqdn = "no". -->
      <answer/><!--This is the certificate key which can be either a path, http link or it can be the whole contents of the pem file.. Including the "BEGIN certificate part Applies to PEM Certs"--> 
    </option>
    <option>
      <code>CertificateKeyPasswordRequest</code><!--Use if NeedFqdn = "no". -->
      <answer/><!-- It could be that the pem file is encrypted, so without the key, setupconfig will download the file but will not be able to decrypt it unless we enter the password request key here.-->
    </option>
    <option>
      <code>HasLocalDns</code><!--"yes" assumes that you have a manageable local dns example windows dns. "no" assumes that you do not have a dns and therefore will fallback to using IP Addresses --> 
      <answer>yes</answer>
    </option>
    <option>
      <code>InternalFqdn</code><!--Used when HasLocalDns = yes. Can be skipped if HasLocalDns = no-->
      <answer>pbx.contoso.local</answer><!--this is the full internal FQDN. If in HasLocalDns  you select "yes", this means you have a managed dns so therefore we need to know the FQDN local. if you select 2 then you can skip this out. "-->
    </option>
    <option>
      <code>HttpsPort</code>
      <answer>5001</answer>
    </option>
    <option>
      <code>HttpPort</code>
      <answer>5000</answer>
    </option>
    <option>
      <code>SipPort</code>
      <answer>5060</answer>
    </option>
    <option>
      <code>TunnelPort</code>
      <answer>5090</answer>
    </option>
    <option>
      <code>NumberOfExtensions</code> <!--How many digits your extensions should have. Default is 3 Digits. Note that the system reserves 30 numbers for system extension. This can not be changed later. -->
      <answer>3</answer>
    </option>
    <option>
    <!--
        Mail Server Configuration. One of values: 3CX, Custom or one of SMTP server names from: https://downloads.3cx.com/downloads/v155/templates/smtp/smtpproviders.html . With free key (3CXPSPBX) you can use only 3CX SMTP provider
        You can use a Gmail account. More info here: https://www.3cx.com/blog/docs/gmail-mail-server/. Select mail server type:
        (1) 3CX SMTP server
        (2) Custom SMTP server
    -->
      <code>MailServerType</code>
      <answer>3CX</answer>
    </option>
    <option>
      <code>MailServerAddress</code> <!-- Email server details to be used for notifications, voicemails and invites. You can use a Gmail account. More info here: https://www.3cx.com/blog/docs/gmail-mail-server/-->
      <answer/>
    </option>
    <option>
      <code>MailServerReplyTo</code>
      <answer/>
    </option>
    <option>
      <code>MailServerUserName</code> <!-- Can be empty -->
      <answer/>
    </option>
    <option>
      <code>MailServerPassword</code> <!-- Can be empty -->
      <answer/>
    </option>
    <option>
      <code>MailServerEnableSslTls</code>
      <answer/>
    </option>
    <option>
      <!-- 
        Continent name one of: 
        North America
        South America
        Europe
        Middle East
        Asia and the Middle East
        Africa
        Australia
      -->
      <code>Continent</code> 
      <answer>North America</answer>
    </option>
    <option>
      <code>Country</code> <!-- Country name from here https://www.3cx.com/wp-content/uploads/2016/11/Time-Zone-Sheet1-1.pdf  -->
      <answer>United States</answer>
    </option>
    <option>
      <code>Timezone</code> <!--get codes from here https://www.3cx.com/wp-content/uploads/2016/11/Time-Zone-Sheet1-1.pdf -->
      <answer>9</answer>
    </option>
    <option>
      <code>OperatorVoicemail</code>
      <answer>999</answer>
    </option>
    <!--
        Available Language values:
        EN = English (US)
        UK = English (UK)
        DE = German
        FR = French
        ES = Spanish
        IT = Italian
        PT = Portuguese
        RU = Russian
        PL = Polish
        ZH = Chinese
    -->
    <option>
      <code>Language</code>
      <answer>UK</answer>
    </option>
    <option>
      <code>Promptset</code>
      <answer>English</answer> <!-- get data from http://downloads-global.3cx.com/downloads/v180/templates/promptsets/promptsets.xml -->
    </option>
    <option>
      <code>LicenseContactName</code>
      <answer>FirstName LastName</answer>
    </option>
    <option>
      <code>LicenseCompanyName</code>
      <answer>MyCompany Ltd.</answer>
    </option>
    <option>
      <code>LicenseEmail</code>
      <answer>admin@maycompany.com</answer>
    </option>
    <option>
      <code>LicensePhone</code>
      <answer>+357</answer>
    </option>
    <option>
      <code>ResellerId</code> <!-- Id of reseller. Can be empty-->
      <answer/>
    </option>
  </tcxinit>
  <HostingConfiguration>
    <HostingAdminLogin/> <!-- Hosting Administrative Login-->
    <HostingAdminPassword/> <!-- Hosting Administrative Password-->
    <HostingAdminEmail/> <!-- Hosting Administrative Email-->
  </HostingConfiguration>
  <extensions>
    <extension>
      <Number>100</Number> <!-- Extension Number -->
      <FirstName>OVH</FirstName>
      <LastName>Test</LastName>
      <EmailAddress>john.smith@example.com</EmailAddress>
      <MobileNumber>801123456</MobileNumber>
      <OutboundCallerId>801123456</OutboundCallerId>
      <AuthPassword>jsz5aOuM3Y</AuthPassword> <!-- Authentication password, enter secure value a-z, A-Z,0-9, minimum 10 characters -->
      <AuthID>3pY48gwjR5</AuthID> <!-- Authentication ID, enter secure value a-z, A-Z,0-9, minimum 10 characters -->
      <AllowLanOnly>false</AllowLanOnly> <!-- true false-->
      <RecordCalls>false</RecordCalls>
      <TemplateFilename>snom.ph.xml</TemplateFilename> 
      <!--http://www.3cx.com/wp-content/uploads/2016/11/Phone-templates-and-Models-Sheet1.pdf -->
      <ProvisioningFilename2>Snom D785</ProvisioningFilename2>
      <!--http://www.3cx.com/wp-content/uploads/2016/11/Phone-templates-and-Models-Sheet1.pdf -->
      <MAC>121212ABABAB</MAC>
      <Codecs> <!-- Codec Priority  - based on phone model - different phones support different codecs-->
        <codec>G711u</codec>
        <codec>G711a</codec>
        <codec>G722</codec>
        <codec>G729</codec>
      </Codecs>
      <Language>English</Language> <!--take languages based on phone model - different phones support different languages-->
      <ProvisionType>LocalLan</ProvisionType> 
      <!-- Available values: LocalLan, RemoteExt, SBC -->                               
    </extension>
    <extension>
      <Number>101</Number>
      <FirstName>Joanne</FirstName>
      <LastName>Davis</LastName>
      <EmailAddress>joanne.davis@example.com</EmailAddress>
      <MobileNumber>801123453</MobileNumber>
      <OutboundCallerId>801123454</OutboundCallerId>
      <AuthPassword>C77j3ZbJwS</AuthPassword> <!-- Authentication password, enter secure value a-z, A-Z,0-9, minimum 10 characters -->
      <AuthID>YclK0y1kQ1</AuthID> <!-- Authentication ID, enter secure value a-z, A-Z,0-9, minimum 10 characters -->
      <AllowLanOnly>false</AllowLanOnly>
      <RecordCalls>false</RecordCalls>
      <TemplateFilename>fanvil.ph.xml</TemplateFilename>
      <ProvisioningFilename2>Fanvil X6U</ProvisioningFilename2>
      <MAC>1234567890AB</MAC>
      <Codecs> <!-- Codec Priority  - based on phone model - different phones support different codecs-->
        <codec>G711U</codec>
        <codec>G711A</codec>
        <codec>G729</codec>
        <codec>G722</codec>
      </Codecs>
      <Language>English</Language>
      <ProvisionType>LocalLan</ProvisionType>
    </extension>
  </extensions>
  <siptrunk>
    <Name>OVH Trunk Keke</Name>
    <TemplateFilename>GenericSIPTrunk.pv.xml</TemplateFilename> <!-- Template file name from C:\ProgramData\3CX\Instance1\Data\Http\Templates\provider -->
    <Host>trunk.link.at</Host> <!-- Registrar/Server/Gateway Hostname or IP -->
    <Port>5050</Port>
    <ProxyHost>proxy.trunk.link.at</ProxyHost> <!-- Outbound Proxy of sip trunk -->
    <ProxyPort>5160</ProxyPort> <!--Proxy port-->
    <SimultaneousCalls>10</SimultaneousCalls> <!-- Number of SIM Calls -->
    <RequireRegistrationFor>InOutCalls</RequireRegistrationFor> 
    <!-- Type of Authentication possible values: "Nothing" - No registration required, "IncomingCalls" - Registration is only required for incoming calls, "OutgoingCalls" - Registration is only required for outgoing call, "InOutCalls"  - Registration is required for both incoming and outgoing calls -->
    <AuthID>456456456</AuthID> <!-- Authentication ID (aka SIP User ID) -->
    <AuthPassword>Authentication_Password</AuthPassword> <!-- Authentication Password -->
    <Use3WayAuth>true</Use3WayAuth> <!-- Use 3 Way Authentication can be true or false -->
    <SeparateAuthPassword>3WayPass</SeparateAuthPassword> <!-- Authentication Password for 3 way authentication -->
    <ExternalNumber>0044870478511004</ExternalNumber> <!-- Main Trunk Number -->
    <OfficeHoursDestinationType>Extension</OfficeHoursDestinationType> 
    <!-- Destination for calls during office hours, possible values: "None" - end call, "Extension", "VoiceMail", "External" - destination is external number, "Fax" - destination is Fax number -->                                                                        
    <OfficeHoursDestination>100</OfficeHoursDestination>  <!-- Destination for calls during office hours (number) -->
    <OutOfOfficeHoursDestinationType>Extension</OutOfOfficeHoursDestinationType>
    <!-- Destination for calls outside office hours, possible values: "None" - end call, "Extension", "VoiceMail", "" - destination is external number, "Fax" - destination is Fax number -->   
    <OutOfOfficeHoursDestination>101</OutOfOfficeHoursDestination> <!-- Destination for calls during out of office hours (number) -->
    <DIDNumbers>0044870478511000,0044870478511001,0044870478511002,0044870478511003</DIDNumbers> <!--enter DID numbers that the provider gave you here in comma separated form.-->
    <OutboundCallerID>0044870478511004</OutboundCallerID>
    <Direction>Both</Direction> 
    <!-- Allow inbound/outbound calls, possible value: 
    Both - Both inbound and outbound calls can be made on this line - default option 
    None - No calls can be made on this line, 
    Inbound - Only inbound calls can be made on this line, 
    Outbound - Only outbound calls can be made on this line, -->    

    <!-- PBX Delivers Audio true / false-->
    <DeliverAudio>true</DeliverAudio> 

    <!--Disallow video calls--> 
    <DisableVideoCalls>true</DisableVideoCalls>

    <!--Supports Re-Invite-->
    <SupportReinvite>false</SupportReinvite>

    <!--Supports Replaces-->
    <SupportReplaces>false</SupportReplaces>

    <!--Put Public IP in SIP VIA Header-->
    <PublicIpInSipViaHeader>1.2.3.4</PublicIpInSipViaHeader> <!-- Optional. Can be empty or absent -->

    <!-- SRTP-->
    <EnableSRTP>false</EnableSRTP> 

    <TimeBetweenReg>120</TimeBetweenReg> <!-- Re-Register Timeout -->
    <!--Select which IP to use in 'Contact' (SIP) and 'Connection'(SDP) fields
    Available options are 
    "Default"
    "Local"
    "Specified"
    -->
    <!--IPcontactsdp 2.2.2.2:5061--> 
    <IPInRegistrationContact>Default</IPInRegistrationContact>
    <SpecifiedIPForRegistrationContact/>

    <Codecs> <!-- Codec Priority adjust depending on what the sip trunk supports-->
      <codec>Speex</codec>
      <codec>PCMU</codec>
      <codec>GSM</codec>
      <codec>iLBC</codec>
      <codec>G722</codec>
      <codec>opus</codec>
      <codec>G729</codec>
      <codec>PCMA</codec>
    </Codecs>
        <InboundRules> <!--creation of inbound rules-->
        <InboundRule>
            <Name>Inbound Rule 1</Name>
            <DID>0044870478511001</DID> <!--select one of the DID's you declared in <DIDNumbers>-->
            <OfficeHoursDestinationType>Extension</OfficeHoursDestinationType>
            <OfficeHoursDestination>100</OfficeHoursDestination> <!--select an extension that exists or that is already declared in this file-->
            <OutOfOfficeHoursDestinationType>VoiceMail</OutOfOfficeHoursDestinationType>
            <OutOfOfficeHoursDestination>100</OutOfOfficeHoursDestination>
            <SpecificHours> <!-- OPTIONAL. If not specified it means use Global Office Hours -->
                <HoursRange>
                    <StartTime>08:00</StartTime><!--Start time in format 00:00-->
                    <EndTime>16:00</EndTime> <!--End time in format 00:00-->
                    <DayOfWeek>Monday</DayOfWeek> <!-- Monday, Tuesday, Wednesday, Thursday, Friday, Saturday, Sunday-->
                </HoursRange>
                <HoursRange>
                    <StartTime>17:00</StartTime> <!--split time - do not overlap times-->
                    <EndTime>22:00</EndTime> <!--split time - do not overlap times-->
                    <DayOfWeek>Monday</DayOfWeek>
                </HoursRange>
            </SpecificHours>
        </InboundRule>
    </InboundRules>
  </siptrunk>
  <siptrunk>
    <Name>Voip Trunk 2</Name>
    <TemplateFilename>GenericSIPTrunk.pv.xml</TemplateFilename> <!-- Template file name from C:\ProgramData\3CX\Instance1\Data\Http\Templates\provider -->
    <Host>trunk.link.at</Host> <!-- Registrar/Server/Gateway Hostname or IP -->
    <Port>5050</Port>
    <ProxyHost>proxy.trunk.link.at</ProxyHost> <!-- Outbound Proxy of sip trunk -->
    <ProxyPort>5160</ProxyPort> <!--Proxy port-->
    <SimultaneousCalls>10</SimultaneousCalls> <!-- Number of SIM Calls -->
    <RequireRegistrationFor>InOutCalls</RequireRegistrationFor> 
    <!-- Type of Authentication possible values: "Nothing" - No registration required, "IncomingCalls" - Registration is only required for incoming calls, "OutgoingCalls" - Registration is only required for outgoing call, "InOutCalls"  - Registration is required for both incoming and outgoing calls -->
    <AuthID>456456457</AuthID> <!-- Authentication ID (aka SIP User ID) -->
    <AuthPassword>Authentication_Password</AuthPassword> <!-- Authentication Password -->
    <Use3WayAuth>true</Use3WayAuth> <!-- Use 3 Way Authentication can be true or false -->
    <SeparateAuthPassword>3WayPass</SeparateAuthPassword> <!-- Authentication Password for 3 way authentication -->
    <ExternalNumber>0044870478512004</ExternalNumber> <!-- Main Trunk Number -->
    <OfficeHoursDestinationType>Extension</OfficeHoursDestinationType> 
    <!-- Destination for calls during office hours, possible values: "None" - end call, "Extension", "VoiceMail", "External" - destination is external number, "Fax" - destination is Fax number -->                                                                        
    <OfficeHoursDestination>100</OfficeHoursDestination>  <!-- Destination for calls during office hours (number) -->
    <OutOfOfficeHoursDestinationType>Extension</OutOfOfficeHoursDestinationType>
    <!-- Destination for calls outside office hours, possible values: "None" - end call, "Extension", "VoiceMail", "" - destination is external number, "Fax" - destination is Fax number -->   
    <OutOfOfficeHoursDestination>101</OutOfOfficeHoursDestination> <!-- Destination for calls during out of office hours (number) -->
    <DIDNumbers>0044870478512000,0044870478512001,0044870478512002,0044870478512003</DIDNumbers> <!--enter DID numbers that the provider gave you here in comma separated form.-->
    <OutboundCallerID>0044870478512004</OutboundCallerID>
    <Direction>Both</Direction> 
    <!-- Allow inbound/outbound calls, possible value: 
    Both - Both inbound and outbound calls can be made on this line - default option 
    None - No calls can be made on this line, 
    Inbound - Only inbound calls can be made on this line, 
    Outbound - Only outbound calls can be made on this line, -->    

    <!-- PBX Delivers Audio true / false-->
    <DeliverAudio>true</DeliverAudio> 

    <!--Disallow video calls--> 
    <DisableVideoCalls>true</DisableVideoCalls>

    <!--Supports Re-Invite-->
    <SupportReinvite>false</SupportReinvite>

    <!--Supports Replaces-->
    <SupportReplaces>false</SupportReplaces>

    <!--Put Public IP in SIP VIA Header-->
    <PublicIpInSipViaHeader>1.2.3.4</PublicIpInSipViaHeader> <!-- Optional. Can be empty or absent -->

    <!-- SRTP-->
    <EnableSRTP>false</EnableSRTP> 

    <TimeBetweenReg>120</TimeBetweenReg> <!-- Re-Register Timeout -->
    <!--Select which IP to use in 'Contact' (SIP) and 'Connection'(SDP) fields
    Available options are 
    "Default"
    "Local"
    "Specified"
    -->
    <!--IPcontactsdp 2.2.2.2:5061--> 
    <IPInRegistrationContact>Default</IPInRegistrationContact>
    <SpecifiedIPForRegistrationContact/>

    <Codecs> <!-- Codec Priority adjust depending on what the sip trunk supports-->
      <codec>Speex</codec>
      <codec>PCMU</codec>
      <codec>GSM</codec>
      <codec>iLBC</codec>
      <codec>G722</codec>
      <codec>opus</codec>
      <codec>G729</codec>
      <codec>PCMA</codec>      
    </Codecs>
        <InboundRules> <!--creation of inbound rules-->
        <InboundRule>
            <Name>Inbound Rule 2</Name>
            <DID>0044870478512002</DID> <!--select one of the DID's you declared in <DIDNumbers>-->
            <OfficeHoursDestinationType>Extension</OfficeHoursDestinationType>
            <OfficeHoursDestination>101</OfficeHoursDestination> <!--select an extension that exists or that is already declared in this file-->
            <OutOfOfficeHoursDestinationType>VoiceMail</OutOfOfficeHoursDestinationType>
            <OutOfOfficeHoursDestination>101</OutOfOfficeHoursDestination>
            <SpecificHours> <!-- OPTIONAL. If not specified it means use Global Office Hours -->
                <HoursRange>
                    <StartTime>08:00</StartTime><!--Start time in format 00:00-->
                    <EndTime>16:00</EndTime> <!--End time in format 00:00-->
                    <DayOfWeek>Monday</DayOfWeek> <!-- Monday, Tuesday, Wednesday, Thursday, Friday, Saturday, Sunday-->
                </HoursRange>
                <HoursRange>
                    <StartTime>17:00</StartTime> <!--split time - do not overlap times-->
                    <EndTime>22:00</EndTime> <!--split time - do not overlap times-->
                    <DayOfWeek>Monday</DayOfWeek>
                </HoursRange>
            </SpecificHours>
        </InboundRule>
    </InboundRules>
  </siptrunk>
   <!-- All following rules will be added to the end of list of existed (if any) rules on target PBX -->
  <OutboundRules>
    <OutboundRule>
      <Name>Outbound Rule 1</Name>
      <Prefix>111</Prefix>
      <DNRanges> <!--Calls from extensions example 100,200-205-->
        <DNRange>
          <To>100</To>
          <From>100</From>
        </DNRange>
        <DNRange>
          <To>205</To>
          <From>200</From>
        </DNRange>
      </DNRanges>
      <NumberLengthRanges>9,10,11</NumberLengthRanges> <!-- can be comma-separated string of lengths as well: 9,10,11 -->
      <DNGroups> <!--add the group or groups here-->
        <Group>Sales</Group>
        <Group>Ceo</Group>
      </DNGroups>
      <OutboundRoutes>
        <OutboundRoute>
          <Gateway>Voip Trunk 1</Gateway>
              <StripDigits>0</StripDigits>
              <Prepend>807</Prepend>
        </OutboundRoute>
        <OutboundRoute>
          <Gateway>Voip Trunk 2</Gateway>
          <StripDigits>1</StripDigits>
              <Prepend>801</Prepend>
        </OutboundRoute>
      </OutboundRoutes>
    </OutboundRule>
  </OutboundRules>
  <!-- Configure the list of Allowed/Denied IP's-->
  <IpBlackList>
    <IpBlackListEntry>
      <Address>1.2.3.4</Address>
      <Mask>255.255.255.255</Mask>
      <Allowed>true</Allowed>
      <Description>Sample Description</Description>
    </IpBlackListEntry>
  </IpBlackList>
</SetupConfig>
<EOF>
apt-get update
dpkg-query -W -f='${Status}' sudo 2>/dev/null | grep -qF "ok installed" || apt-get -y install sudo
dpkg-query -W -f='${Status}' wget 2>/dev/null | grep -qF "ok installed" || apt-get -y install wget
dpkg-query -W -f='${Status}' gnupg2 2>/dev/null | grep -qF "ok installed" || apt-get -y install gnupg2
wget -O- https://repo.3cx.com/key.pub | gpg --dearmor | sudo tee /usr/share/keyrings/3cx-archive-keyring.gpg > /dev/null
echo "deb [arch=$(dpkg --print-architecture) by-hash=yes signed-by=/usr/share/keyrings/3cx-archive-keyring.gpg] http://repo.3cx.com/3cx buster main" | sudo tee /etc/apt/sources.list.d/3cxpbx.list
apt-get update
apt-get -y install nginx
rm -f /etc/nginx/sites-enabled/default
systemctl reload nginx
apt-get -y install 3cxpbx

In this template, there are two elements to modify for a first deployment test:

  • Replace YourLicenseKey with your 3CX license key.
    <option>
      <code>LicenseKey</code>
      <answer>YourLicenseKey</answer>
    </option>
  • Replace YourStrongAdminPassword with your admin account password. This password must be at least 10 characters long, contain numbers and lower-case and upper-case letters:
    <option>
      <code>AdminPassword</code>
      <answer>YourStrongAdminPassword</answer> <!--Admin Pasword, make sure it is complex, Minimum 10 characters, no spaces and must contain at least a Lowercase, and Uppercase and a Digit-->
    </option>

Once your template is complete, you can deploy it using the instructions in step 2.

Step 2: Deploy the instance with the template

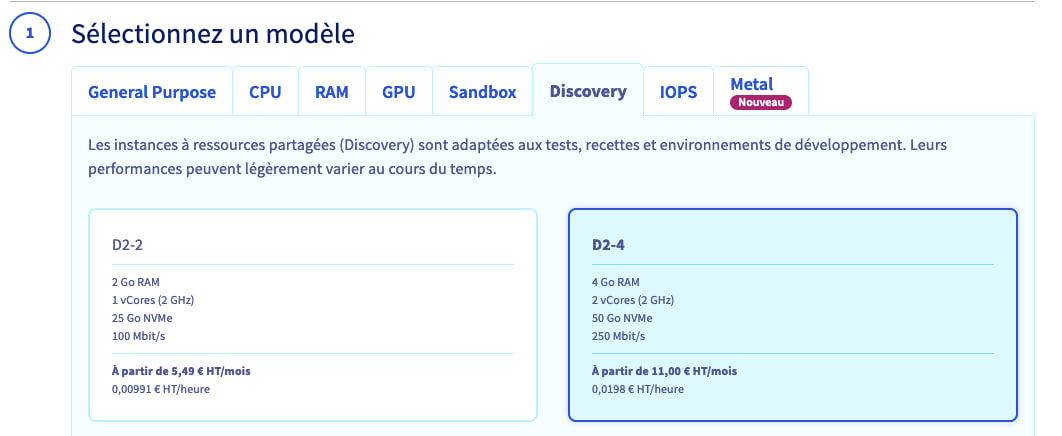
Depending on the version and sizing of your 3CX instance, the instance flavor to use will be different. Please refer to the following link to choose the right instance: https://www.3cx.com/docs/recommended-hardware-specifications-for-3cx/

For our guide, we will use a Discovery D2-4 instance.

Deployment via the OVHcloud Control Panel

Log in to your OVHcloud Control Panel and click on the Public Cloud menu.

Select your Public Cloud project.

On the homepage, click Create an instance. Select your instance flavor and the region you want.

choosing a flavor

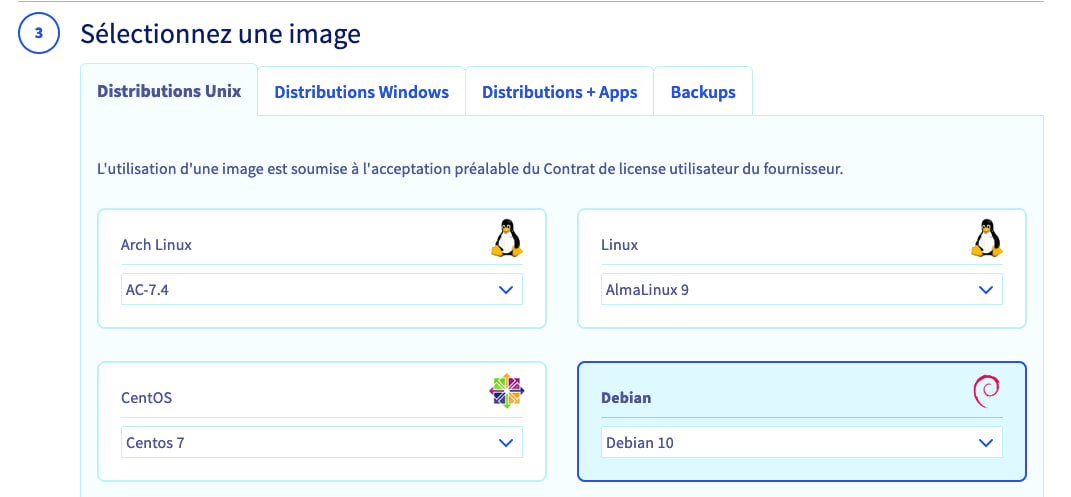
Then select the operating system. To date, 3CX uses Debian 10.

OS selection

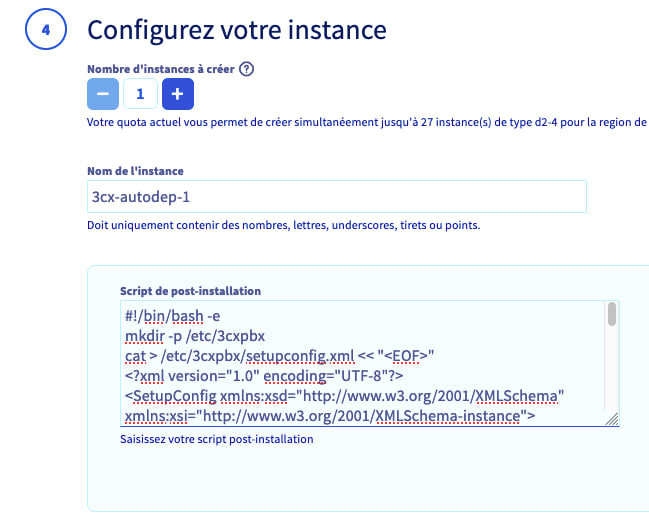
In the next step, called “Configure your instance”, you will be able to attach your template.

Name your instance, then click Add in the Post-installation script box.

In the text box that appears, paste the installation script that was generated earlier.

adding script

Click Next to confirm this step. Finally, choose your network configuration and billing method.

Once the instance has booted, the installation will be launched directly, this will take a few minutes.

You can log in to the machine to check that the logs are correct:

tail -F /var/lib/3cxpbx/Data/Logs/PbxConfigTool.log

Once the deployment is complete, the administration interface will be accessible via the FQDN given when you subscribe to your 3CX license, or via the IP address of your instance: https://instance_public_ip:5001/

Deployment via API

You can also deploy your instance via API, using the following call:

  • Example with a D2-4 flavor, Debian 10 and hourly billing:
curl -X POST "https://eu.api.ovh.com/v1/cloud/project/your_project_id/instance" \
 -H "accept: application/json"\
 -H "authorization: Bearer [Your_Token]"\
 -H "content-type: application/json" \
 -d '{"flavorId":"199060ac-6dde-435a-acab-78456ac337a7","imageId":"60704751-09c2-4ad4-a30f-b3e786348fa0","monthlyBilling":false,"name":"Name-Of-The-Instance","region":"GRA7","sshKeyId":"Your-Ssh-Key-Id","userData":TheTemplateContent"}'

In this JSON, insert the template into userData. Warning: line breaks must be escaped by \n.

Go further

All you need to know to get started with Public Cloud

How to use the Public Cloud interface

Create your first OVHcloud Public Cloud project

Creating and connecting to your first Public Cloud instance

For specialized services (SEO, development, etc.), contact OVHcloud partners.

If you would like assistance with using and configuring your OVHcloud solutions, we recommend referring to our range of support solutions.

Join our community of users.

Artículos relacionados