Object Storage - How to migrate from an S3-compatible object storage provider to OVHcloud Object Storage
71 visualizaciones
Objective
This guide provides detailed steps to help you migrate from a third-party S31-compatible object storage provider to OVHcloud Object Storage using the popular Rclone tool, a command-line tool that can be used to manage cloud storage resources.
OVHcloud provides services which you are responsible for with regard to their configuration and management. You are therefore responsible for ensuring they function correctly.
This guide is designed to assist you in common tasks as much as possible. If you encounter any difficulties performing these actions, please contact a specialist service provider and/or discuss the issue with our community of users. OVHcloud cannot provide you with technical support in this regard.
Requirements
- An S3-compatible source bucket in your current object storage with:
- Your bucket name
- Your associated access and secret keys
- The associated region ID
- An OVHcloud Object Storage destination bucket with:
- Your bucket name
- Your associated access and secret keys
- The associated region ID
- An OVHcloud virtual machine with Rclone installed working as the management workstation in our scenario. To get the best results, within your budget, we suggest at least the following specifications:
- b3-16: 4 v-cores and 16 GB of RAM
- c3-16: 8 v-cores and 16 GB of RAM
OVHcloud Control Panel Access
- Direct link: Public Cloud Projects
- Navigation path:
Public Cloud> Select your project
If this is your first time creating an Object Storage bucket, read our guide Getting Started with Object Storage.
Migration Process
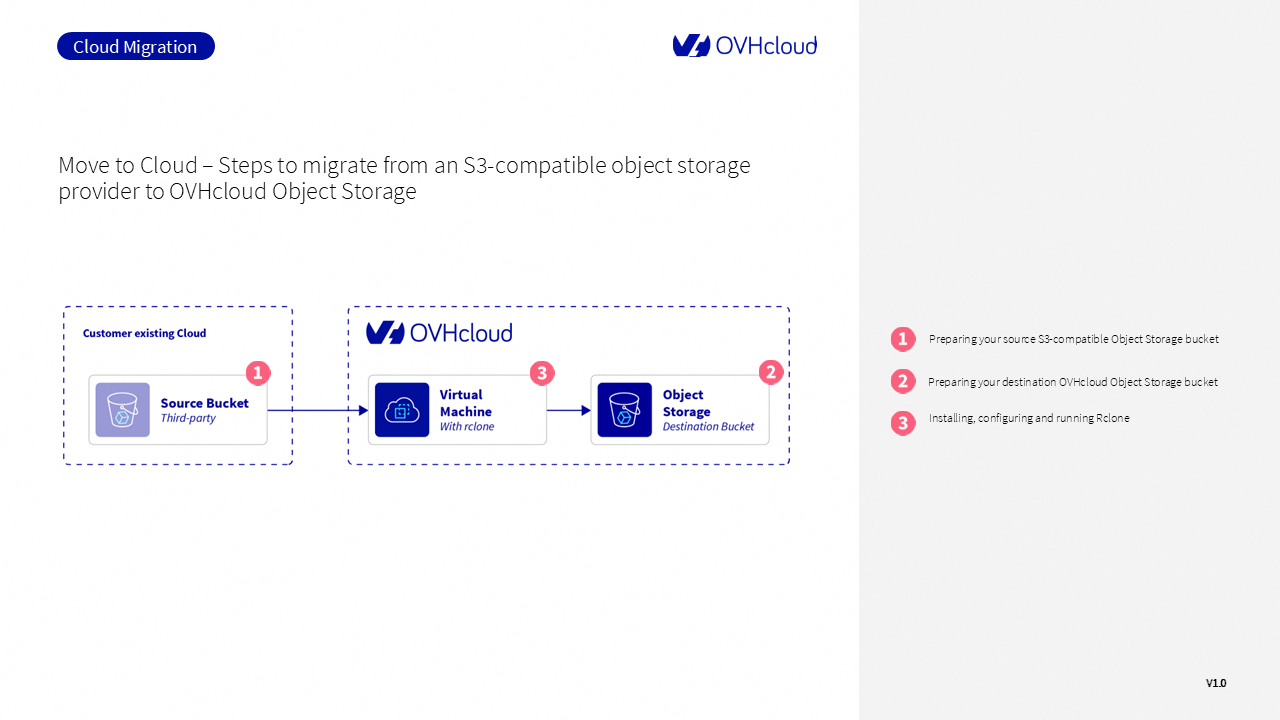
See the diagram above for an illustration of the architecture. An OVHcloud Public Cloud virtual machine acts as an entry point, on which Rclone (installed with SSH and sudo access enabled) moves data to OVHcloud Object Storage.
Considerations
Egress
Egress fees may apply when migrating from your current platform, depending on your provider. The term “egress” describes the volume of data transferred from the provider’s network. We highly recommend reviewing your current provider’s egress pricing before starting the migration.
Migration speed optimisation
Keep in mind that several factors could affect how long migration takes. Consider not only the volume of data you plan to migrate but also the quantity and size of individual objects. Infrastructure and network limitations (bandwidth, computing power, network interfaces, etc.) could also affect performance.
Data volume
This guide mainly focuses on data migration for small to medium volumes (generally under 200 TB). For applications needing migration of hundreds or thousands of terabytes, we suggest contacting our Professional Services team for identifying the best approaches for migrating your data.
Instructions
Step 1 - Preparing your S3-compatible source bucket
As explained earlier, you will need your access key, secret key, and the region ID where your bucket is located. Connect to your source bucket provider console to get those details.
Step 2 - Preparing your OVHcloud destination bucket
Similar to your source bucket, you will need your access key, secret key but also the region ID for your destination bucket. Navigate to the Object Storage section to collect those details.
Step 3 - Installing, configuring and running Rclone
Step 3.1 - Installing Rclone
If you haven’t done it already, install Rclone by following the instructions from its documentation, based on your OS configuration.
Step 3.2 - Configuring Rclone
After installing Rclone on your virtual machine, configure its connection to both the source and destination buckets.
This command opens an interactive configuration menu. For OVHcloud-specific steps, follow the official Rclone guide.
You can also create/modify the configuration file yourself with the following command:
If the configuration file doesn’t exist, you’ll be prompted to add the following configuration using your preferred editor. For example, on Linux you can use nano:
Then, add your configuration blocks:
To get the list of OVHcloud region endpoints, see Object Storage - Endpoints and Object Storage geoavailability.
You can then test your source provider and your OVHcloud connections using the rclone config command:
Step 3.3 - Running Rclone
Depending on your strategy you can use two different commands to start the migration. Either you use the rclone sync command to start the migration of one or all buckets. As detailed in the documentation, the rclone sync command will make source and destination identical. Be careful then when using it.
You can also use the rclone copy command that will copy files from your source to your destination.
In both cases, remember to replace the source and destination values with your own bucket names:
or:
--progress shows progress during transfer.
To use the Rclone web GUI, run:
In this command we added specific flags to optimize and monitor the copy:
--transfersrepresents the number of file transfers to run in parallel (default 4). Test different value based on your use case and your configuration as high values may increase CPU usage for example.--rcenables the remote control server--rc-addr :5572represents the address and the port used to access rclone’s WebUI GUI. Port 5572 is the default port used by Rclone to securely access the WebUI.--rc-web-guilaunches WebGUI on localhost--rc-user <username>--rc-pass <password>are your user and password for authentication. Make sure to enter the right credentials.
Many other flags are available with rclone. You can find them in the Rclone documentation.
With the copy process set up, you can now begin monitoring the migration process using Rclone’s WebUI GUI.
In your preferred web browser, use port 5572 to reach your instance’s address: http://IP-ADDRESS:5572.
You’ll need to log in using your rclone credentials: --rc-user and --rc-pass.
Once you’re logged in, you can track the rclone copy command’s progress: check job status, throughput, bandwidth, object count, and total data volume. From the GUI, you can also manage new remotes and new actions.
Migration status
We recommend comparing the source and destination buckets after migration. Your source and OVHcloud destination buckets can be compared via command line or their respective control panels.
You can check the size of both buckets and number of objects using this command line:
Go further
If you need training or technical assistance to implement our solutions, contact your sales representative or click on this link to get a quote and ask our Professional Services experts for assisting you on your specific use case of your project.
Join our community of users.
1: S3 is a trademark of Amazon Technologies, Inc. OVHcloud's service is not sponsored by, endorsed by, or otherwise affiliated with Amazon Technologies, Inc.

