Configurar la red en Proxmox VE en las gamas High Grade, Scale & Advance (EN)
8239 visualizaciones
The sections related to Advance range servers only apply to third generation Advance servers powered by EPYC 4004 Series processors.
Older Advance generation servers do not rely on the same network infrastructure.
This article is about Additional IPv4 configuration on a public interface. You can also configure IPv6 addresses on your virtual machines using this guide.
Please note that Additional IP addresses can also be configured in a vRack (private network), which allows interconnection over a wide range of OVHcloud services, offering more flexibility.
Learn how to configure Additional IP addresses in a vRack with our guides for IPv4 and IPv6.
As of May 2025, virtual MACs can be used on High Grade & Scale ranges.
If you want to use virtual MACs to configure the network on Proxmox VE on High Grade and Scale servers, you can refer to Configuring Additional IP in bridge mode on your virtual machines.
Objective
Find out two ways to configure an additional IP on Proxmox VE: via the public interfaces and via the private interfaces (vRack).
Requirements
- An OVHcloud dedicated server
- One or more Additional IP addresses
No virtual MAC address must be applied to Additional IPs in the OVHcloud Control Panel.
Instructions
Additional IP in routed mode on public network interfaces
With this configuration, Additional IP addresses must be attached to a dedicated server. If you have multiple Proxmox virtualization servers and you want to migrate a VM from one server to another, you will also need to migrate the Additional IP address to the destination server, via the OVHcloud Control Panel or via the OVHcloud API. You can automate this step by writing a script that uses the OVHcloud APIs.
Target configuration schema
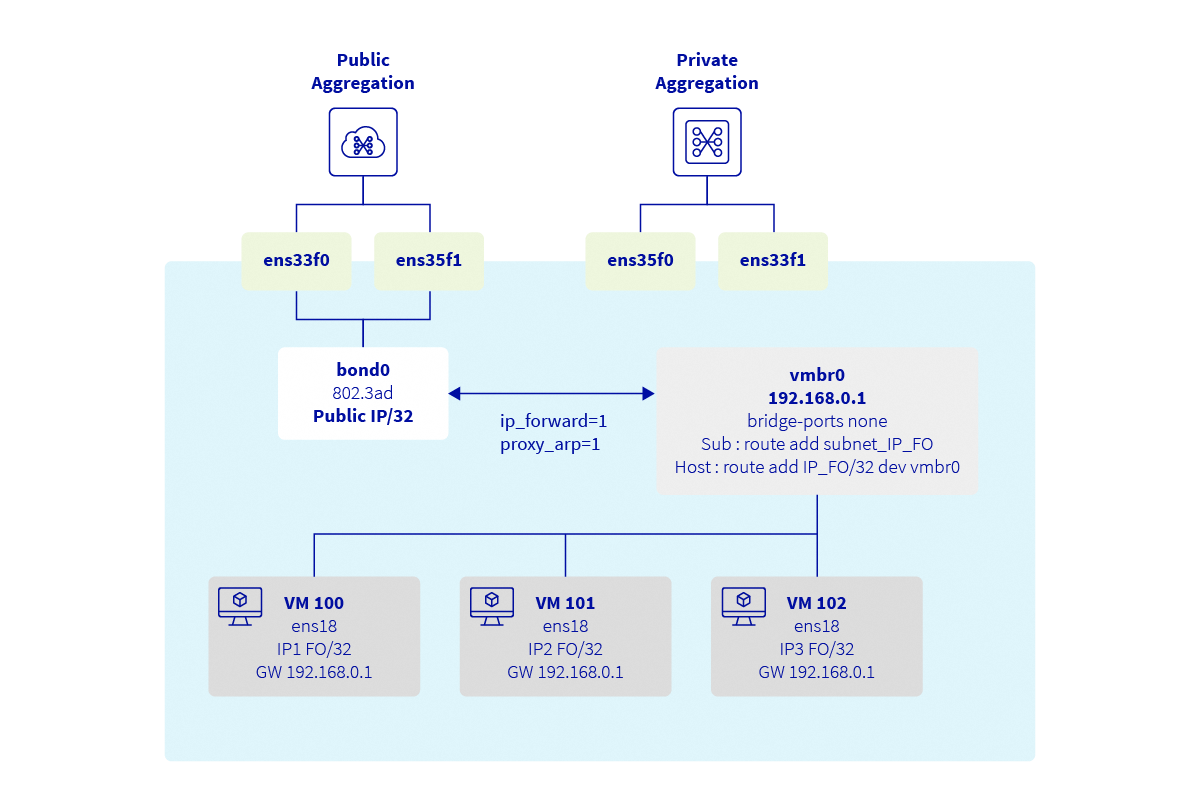
Explanations
Proxmox is a Debian-based distribution which relies on ifupdown2 for network configuration. In this guide, the network configuration will be modified via SSH and not via the Web interface.
We will:
- connect via SSH on Proxmox
- create a bond interface (only for the High Grade & Scale ranges)
- create a bridge interface connected to the bond
- allow packet forwarding between interfaces
- add routes to the additional IPs
Configure the hypervisor
Log in to the Proxmox server via SSH:
Allow packet forwarding
Enable the ip_forward sysctl parameter. To do this, we recommend modifying the sysctl.conf configuration file.
Add the following line to /etc/sysctl.conf:
Next, reload the sysctl configuration:
Configure the network interfaces
At this point, restart the network services:
When the networking service is restarted, VMs are not added back to the bridge. This is because Proxmox disconnects each VM from the bridges and does not reconnect them. To force the VMs to reconnect to the bridges, you can restart the VMs.
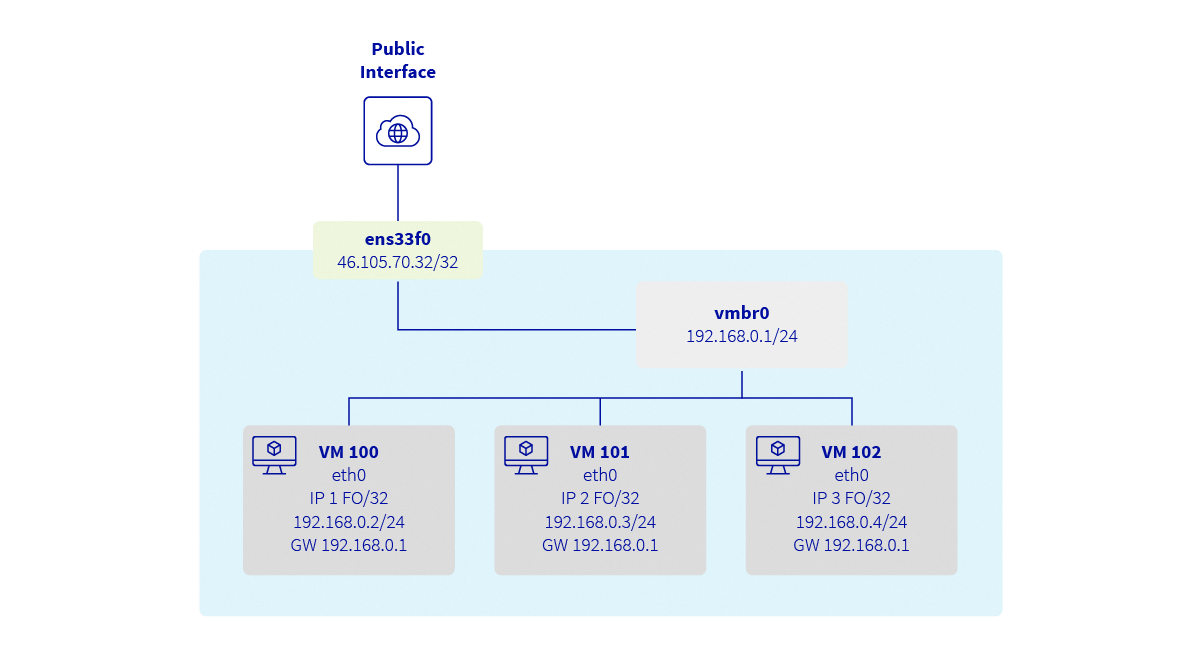
Client VM configuration example
The VM must be attached to the vmbr0 bridge.
Contents of the /etc/network/interfaces file:
Contents of the /etc/netplan/01-netcfg.yaml file:
Testing and validation
From now on, your virtual machines should be able to access the Internet from the additional IPs. They should also be reachable directly from the Internet using their additional IPs. The available bandwidth corresponds to the bandwidth available on your server's public interfaces and will not affect the private interfaces used for the vRack. This public bandwidth is shared with other virtual machines on the same host, as well as the Proxmox host itself.
To check your public IP, from the VM:
You need to restart the VM's network services for the configuration to take effect.
Additional IP via the vRack
This configuration is more flexible as you do not need to associate an Additional IP with a server, but with a vRack. This means that if you have multiple Proxmox virtualization servers and you want to migrate a VM from one server to another, you do not need to perform any action on OVHcloud APIs. The only requirement is for all servers to be connected to the same vRack.
This configuration only works with a block of additional IPs. It is not possible to use a single Additional IP (/32) directly in the vRack. To use an Additional IP, it must be configured on a public interface and cannot be directly integrated into the vRack.
Requirements
- A server compatible with vRack
- A vRack service
- A block of Additional IPs
- Access to the OVHcloud Control Panel
Target configuration schema
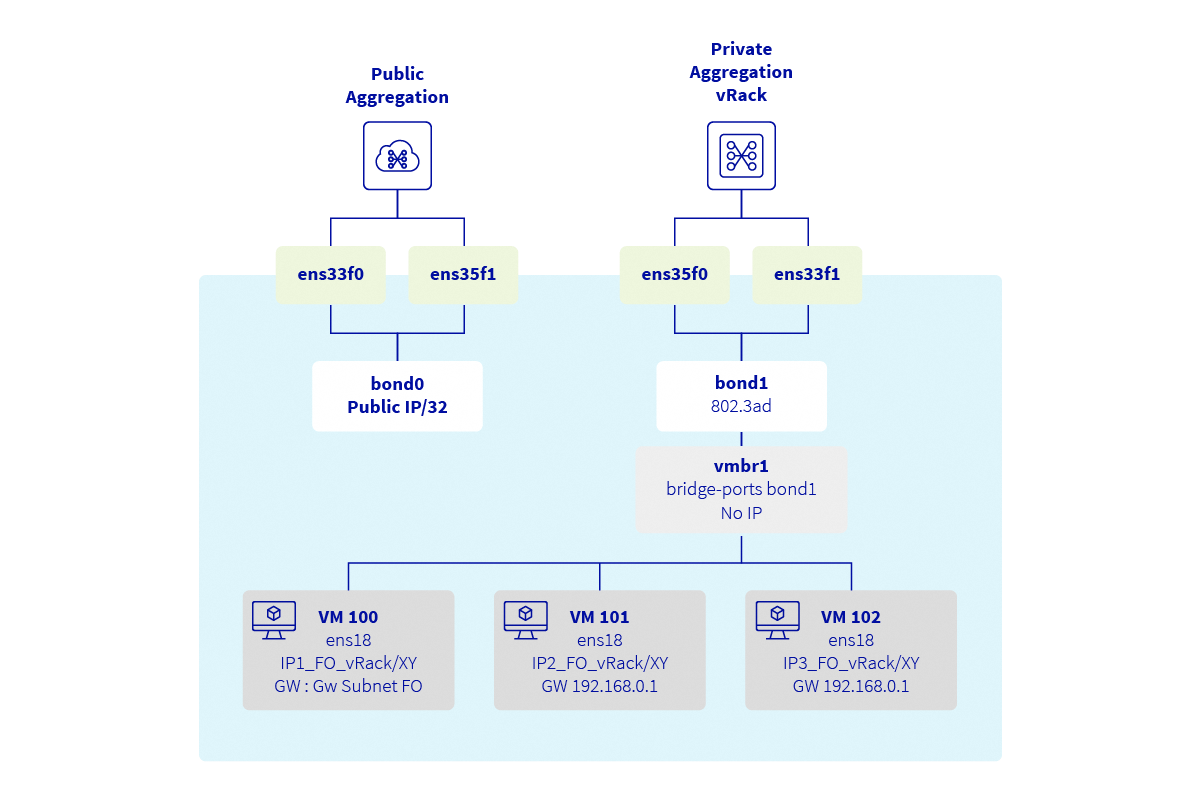
Explanations
Proxmox is a Debian-based distribution which relies on ifupdown2 for network configuration. In this guide, the network configuration will be modified via SSH and not via the Web interface.
We will:
- create a bond interface (only for the High Grade & Scale ranges)
- create a bridge interface connected to the bond
First, add your block of Additional IPs to the vRack. To do so, go to the Bare Metal Cloud section of your OVHcloud Control Panel and open the vRack menu.
Select your vRack from the list to view the list of eligible services. Click on the block of Additional IPs you want to add to the vRack, then click the Add button.
Determine assignable IP addresses
When used in a vRack, the first, penultimate, and last addresses of a given IP block are always reserved for the network address, network gateway, and network broadcast, respectively. This means that the first assignable address is the second address in the block, as shown in the example below for the 46.105.135.96/28 block:
The subnet mask used in this example is appropriate for our block of Additional IPs. Your subnet mask may differ depending on the size of your block. When you purchase your IP block, you will receive an email with the subnet mask to use.
Configure the hypervisor
Log in to the Proxmox server via SSH:
At this point, restart the network services:
When the networking service is restarted, VMs are not added back to the bridge. This is because Proxmox disconnects each VM from the bridges and does not reconnect them. To force the VMs to reconnect to the bridges, you can restart the VMs.
Client VM configuration example
The VM must be attached to the vmbr1 bridge.
Contents of the /etc/network/interfaces file:
Contents of the /etc/netplan/01-netcfg.yaml file:
Testing and validation
From now on, your virtual machines should be able to access the Internet from the additional IPs. They should also be reachable directly from the Internet using their additional IPs.
To check your public IP, from the VM:
You need to restart the VM's network services for the configuration to take effect.
Go further
Join our community of users.

