Web Hosting - How to use SSH access
19205 Views
Objective
OVHcloud web hosting plans provide you with access to a storage space you can use to put your website and application files online. You can access this space via FTP or SSH credentials.
Find out how to connect and use SSH access on an OVHcloud web hosting plan.
Requirements
- An OVHcloud web hosting plan with SSH access.
SSH access to an OVHcloud web hosting plan is possible from the Pro plan and above.
OVHcloud Control Panel Access
- Direct link: Hosting plans
- Navigation path:
Web Cloud>Hosting plans> Select your web hosting plan
Instructions
To log in and use SSH access to your web hosting plan, you will need the following:
- the active SSH user;
- the password associated with this SSH user;
- the SSH server address of your web hosting plan;
- the connection port to your web hosting plan’s SSH server.
1 - Make sure that SSH access is enabled for the SSH user you have chosen
Click on the tabs below to view each of the 3 steps.
Go to the Hosting plans page, then select the web hosting plan concerned.
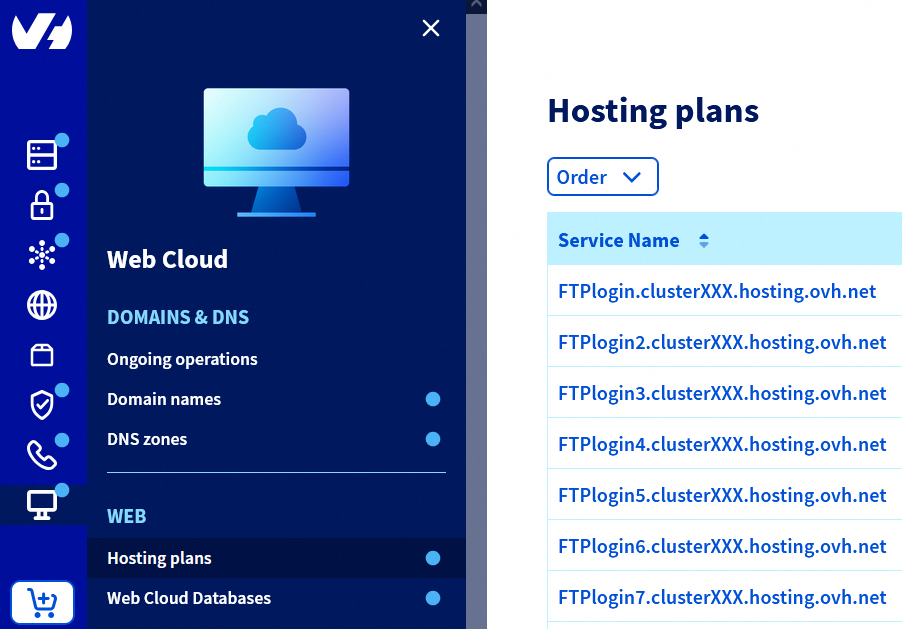
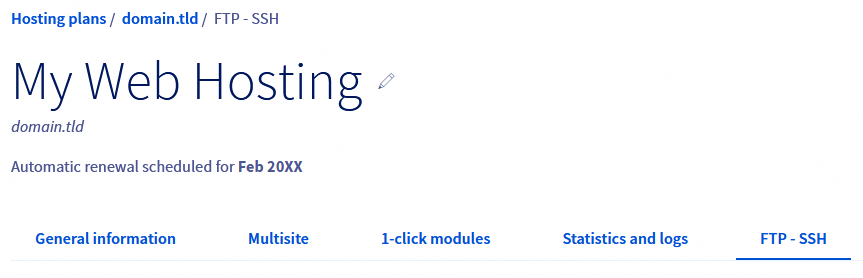
On the page that pops up, click on the FTP - SSH tab.
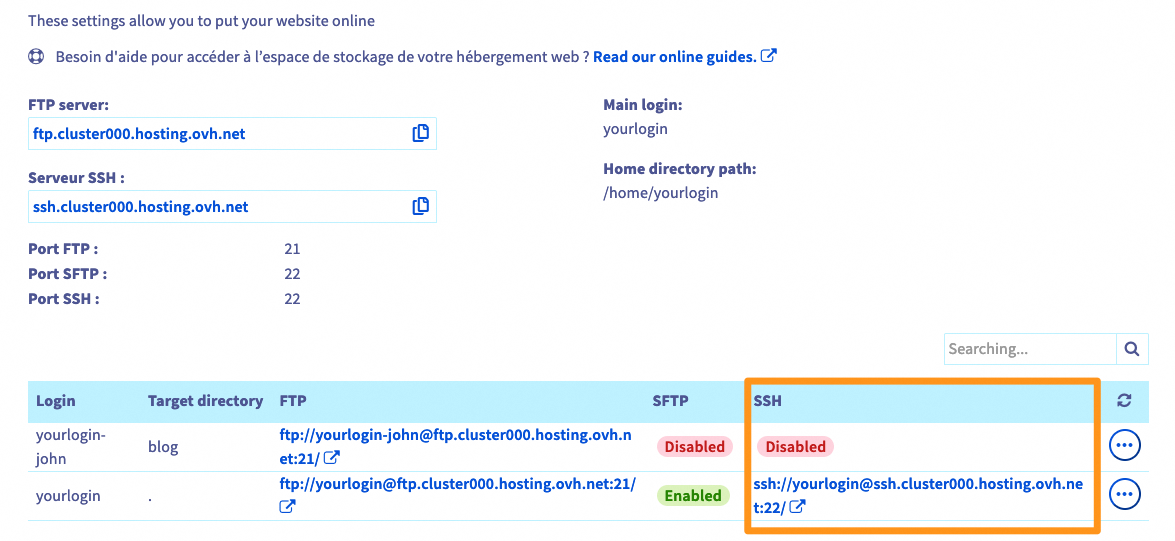
On the new page, the information related to your storage space will appear.
In the table, locate the SSH column to check that the SSH user (in the Login column of the table) concerned has SSH access enabled. If this is not the case, the words Disabled will appear.
If the SSH access of the user concerned is Disabled in the table, perform the following steps:
- 1 : Click the
...button to the right of the user’s line, thenEdit. - 2 : In the window that pops up, in the
Connection protocolssection, select theFTP, SFTP and SSHchoice, then clickNext. - 3: Check the summary of the requested change, then click
Confirm.
If you cannot enable it, please ensure that your OVHcloud web hosting plan has SSH access.
2 - Retrieve the information you need to log in via SSH
Click on the tabs below to view each of the 3 steps.
Go to the Hosting plans page, then select the web hosting plan concerned.
On the page that pops up, click on the FTP - SSH tab.
On the new page, retrieve the elements described in the following table:
| Element | Description |
|---|---|
| SSH server address | Locate SSH server. It is in the form ssh.clusterXXX.hosting.ovh.net (where each of the 3 X corresponds to a number between 0 and 9). |
| SSH server connection port | Locate SSH port. The default SSH port number is 22. |
| Active SSH user | In the table at the bottom of the page, find them in the Login column.As a reminder, this user must have active SSH access. |
| SSH user password | If you have forgotten this password, click the ... button to the right of the row corresponding to the user concerned in the table at the bottom of the page, then Change password. |
3 - Log in to your Web Hosting plan’s storage space via SSH
To connect via SSH, use a terminal to interact directly with your storage space via command lines.
Command terminals are installed by default on macOS, Linux and Windows 10. An older Windows environment will require the installation of software such as PuTTY or the addition of OpenSSH functionality.
There are now two ways of connecting to your web hosting plan via SSH.
Please click on your preferred connection method below to see explanations.
From a terminal
There is no superuser (or root) access via SSH on our shared hosting plans.
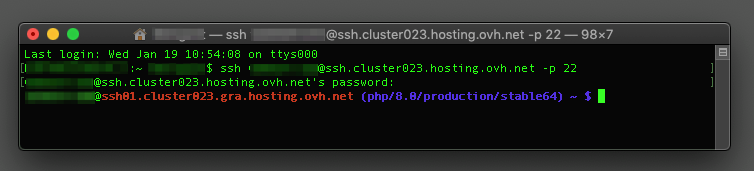
Once the terminal is open, use the following command, replacing the yourlogin, ssh.clusterXXX.hosting.ovh.net and 22 elements with those corresponding to your SSH credentials.
After sending the command, you will be prompted to enter the SSH user password.
From a software application
Once you have opened the software (e.g. PuTTY), enter your SSH connection details. Since this procedure involves several steps, we cannot detail this in this documentation. Here is a reminder of the information you will need to enter:
- SSH server: Enter the SSH server address retrieved in the part 2. Depending on the software you are using, the domain name may look like “Server Address” or “Hostname”.
- Connection port: Enter the SSH connection port retrieved in part 2.
- SSH login: Enter the SSH user. Depending on the software you are using, the domain name may look like “ID”, “Login” or even “Username”.
- SSH user password: Enter the password associated with the SSH login.
Once you have logged in, continue to the next section.
4 - Interact with your storage space via SSH
To interact with your storage space, you will need to use commands. These have a direct meaning derived from English. Use the list below if you need to. Important: this information is not exhaustive.
| Command | Meaning | Description |
|---|---|---|
| pwd | Print working directory | Displays the working directory you are in. |
cd arg | Change directory | Enables you to change the working directory to the one entered, replacing arg. |
cd .. | Change directory | Enables you to change the working directory, one level up in the tree-view of your directories. |
| cd | Change directory | If you do not specify an argument, you can move to the root of your storage space (home). |
| ls | List | Lists the contents of your working directory. Add the attributes to modify the result of the command (like ls -ulhG). |
chmod droit arg | Change mode | Change the rights of the file or directory mentioned as an arg argument. |
mkdir arg | Make directory | Enables you to create a directory with the argument name arg. |
touch arg | Touch | Creates an empty file with the name mentioned in the arg argument, if a file with this name does not already exist. |
rm arg | Remove | Removes the file mentioned in the arg argument. |
rm -r arg | Remove | Removes the directory mentioned as an arg argument, as well as all of its contents, recursively. |
mv arg1 arg2 | Move | Renames or moves an element (specified as arg1) to a new area (specified as arg2). |
You can also launch a script using a specific PHP version. For example, for PHP version 7.1, use the following command. Adapt its elements to your personal situation.
Depending on the PHP version you want to use, the runtime environment may need to be modified for compatibility reasons. Refer to our documentation “Web Hosting - Environment, PHP version, .ovhconfig” to find out more.
Files and/or folders can also be copied using the Secure Copy Protocol (SCP). This protocol uses SSH protocol to securely duplicate content between:
- a local computer/device and a remote server
- two remote servers
Find more information on using the scp command with our OVHcloud web hosting plans in our guide “Web Hosting - Copy files using SCP command”.
Go further
Web Hosting - Environment, PHP version, .ovhconfig
For specialised services (SEO, development, etc.), contact OVHcloud partners.
If you would like assistance using and configuring your OVHcloud solutions, please refer to our support offers.
Join our community of users.

