SAP HANA cluster with SLES on VMware on OVHcloud
213 Views
Objective
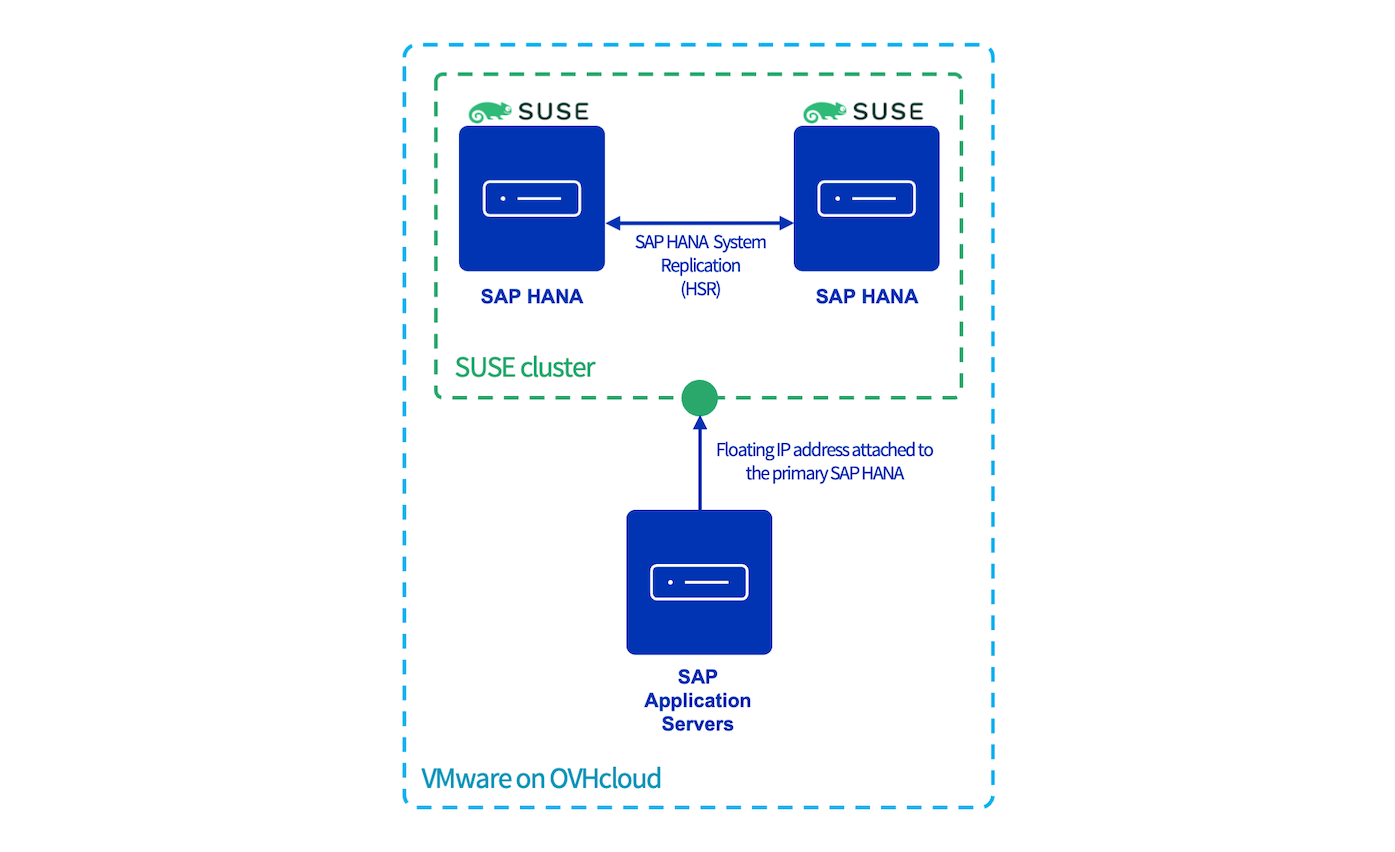
This guide provides instructions for configuring a SAP HANA cluster with SLES using the services Corosync and Pacemaker.
This implementation reduces the Recovery Time Objective (RTO), in case of a virtual machine or ESXi host outage in the same OVHcloud location.
Requirements
- Access to the OVHcloud Control Panel.
- A deployed SAP HANA on Private Cloud solution.
- Two deployed SAP HANA virtual machines with the same SAP HANA version installed .
Instructions
In all console blocks:
- The primary SAP HANA node is named
node1and the secondary SAP HANA node is namednode2. <SID>is the SAP HANA SID.<NI>is the SAP HANA instance number.
The availability of the SAP HANA database might be impacted during this configuration. Please take all precautions before starting this guide.
vSphere user creation
To allow the Corosync service to get information from your SAP HANA nodes, you have to configure a user which has access to the vSphere interface.
We recommend creating a dedicated user with limited permissions to interact with vSphere.
This dedicated user needs only the "Read only" right to the datacenter on which the SAP HANA virtual machines are hosted. To know how to create this dedicated user, please refer to our guide on changing user rights.
SUSE packages
Several packages, including Corosync and Pacemaker binaries, have to be installed on both SAP HANA nodes.
These packages are only available with the SUSE Linux Enterprise High Availability extension. Ensure that it is activated before continuing:
- Expected result:
With any other result, please run the following command in which <ADDITIONAL REGCODE> is a registry code provided by SUSE in your customer portal.
Execute the following commands to install the needed packages:
SAP HANA preparation
Backup
If you execute this configuration on new SAP HANA virtual machines, trigger a backup for the SYSTEMDB and the TENANTDB before continuing on the future primary node. These backups are mandatory to enable the SAP HANA System Replication (HSR).
Python Hook SAPHanaSR
The SAP HANA HA/SR provider hook improves SAP HANA failure detection.
1. Stop SAP HANA services on both SAP HANA nodes:
2. Add this block in the global.ini file on both SAP HANA nodes:
System Replication
1. Start SAP HANA services on the primary SAP HANA node:
2. As the (sid)adm SAP HANA user, enable the SAP HANA System Replication (HSR) on the primary node which will be the source of the replication:
The --name option is mandatory and is used to define the SAP HANA node in the replication system.
3. To authorise the secondary SAP HANA node to be registered on the primary SAP HANA node, you must transfer two files from the primary to the secondary SAP HANA node:
- /usr/sap/
<SID>/SYS/global/security/rsecssfs/data/SSFS_<SID>.DAT - /usr/sap/
<SID>/SYS/global/security/rsecssfs/key/SSFS_<SID>.KEY
4. Once these files have been transferred to the secondary SAP HANA node, you can register the secondary SAP HANA node to the primary SAP HANA node:
To know the differences between each replication mode and operation mode, read the SAP documentation.
In the context of this guide, as both SAP HANA nodes are hosted on the same OVHcloud location and the goal is to reduce the Recovery Time Objective (RTO), we recommend using the following parameters:
| Parameter | Value |
|---|---|
| replicationMode | sync |
| operationMode | logreplay |
5. Start the SAP HANA services on the secondary node. The startup also starts the replication from the primary SAP HANA node to the secondary SAP HANA node:
On the primary SAP HANA node, you can follow the initialisation of the replication with the following commands:
The replication can take some time, depending on the size of your data in the SAP HANA database. Once the replication has finished its initialisation, the system replication status must be ACTIVE.
Corosync
In this chapter, all commands must be executed as root.
1. On the primary SAP HANA node, generate the /etc/corosync/authkey file:
This file is a private key which ensures the authenticity and the privacy of the messages exchanged between the cluster nodes.
2. Create the /etc/corosync/corosync.conf file on the primary SAP HANA node and add the following configuration (replace ip_address_node1 and ip_address_node2 with your IP addresses):
To discover all parameters in this configuration, please refer to the corosync.conf.5 manual page with the command man corosync.conf.5.
3. Transfer these files to the secondary SAP HANA node to share the same configuration and private key :
Pacemaker
1. Start the Corosync and Pacemaker services on both nodes:
2. We advise delaying the start of the Corosync service during the startup of the virtual machine.
a. Edit the Corosync service on both nodes:
b. Insert these lines between line number 3 and 6:
c. Reload the configuration:
d. If the configuration has been correctly loaded, the line -override.conf appears in the Corosync service status:
e. Ensure that the Corosync and Pacemaker services start automatically during the startup of your virtual machine:
3. On the primary SAP HANA node, set the general properties of your SAP HANA SUSE cluster:
4. On the primary SAP HANA node, set the cluster in maintenance mode:
Stonith resource
The following actions must be done on the primary SAP HANA node.
The stonith resource checks the health of the virtual machines via vSphere and can decide to shut down the virtual machine.
The login and password are the credentials created in the vSphere user creation chapter.
- Expected result:
Floating IP address resource
The res_vip_<SID>_HDB<NI> resource manages and monitors the floating IP address which will be the point of entry for all communications with the primary SAP HANA node.
<floating_ip_address>is the floating IP address which will be used by the cluster.- If you have several network cards, you can specify a network card by adding the parameter
nic.
- Expected result :
SAP HANA resources
1. The resource rsc_SAPHana_<SID>_HDB<NI> manages and monitors the SAP HANA services on both SAP HANA nodes.
To discover all parameters for this resource, please refer to the ocf_suse_SAPHana manual page with the command man ocf_suse_SAPHana.
2. The resource rsc_SAPHanaTopology_<SID>_HDB<NI> monitors the SAP HANA replication.
- Expected result:
To discover all parameters for this resource, please refer to the ocf_suse_SAPHanaTopology manual page with the command man ocf_suse_SAPHanaTopology.
If the resource rsc_SAPHana_<SID>_HDB<NI> is shown as failed even though SAP HANA services run fine, execute the following command to refresh the status:
crm resource refresh
3. To avoid an unexpected behaviour, we advise you to unmanage rsc_SAPHana_<SID>_HDB<NI> and rsc_SAPHanaTopology_<SID>_HDB<NI> resources.
4. Exit the maintenance mode:
5. Refresh the cluster on the primary SAP HANA node:
6. Manage the resources previously unmanaged at the step 3:
- Expected result after several seconds:
On the network interface, the floating IP address is attached:
7. Create the /etc/sudoers.d/SAPHanaSR-srHook file and add the following content on both SAP HANA nodes:
- To get the name of siteA and siteB, execute the command
crm status -A1 | grep site. <sid>is the SAP HANA SID in lowercase.
Test failover
To validate the configuration and its behaviour, we recommend running a failover test.
You can simulate the loss of a SAP HANA node in different ways:
- Stopping the virtual machine on vSphere
- Stopping the virtual machine with OS command
- Stopping the SAP HANA services with OS command
- Shutting down the network card
- Simulating the loss of one ESXi host with the OVHcloud API
- Setting in standby the primary SAP HANA node in the cluster
Loss of the primary SAP HANA node
In this case, the expected behaviour is the switch of all resources hosted on the primary SAP HANA node to the secondary SAP HANA node which will become the new primary SAP HANA node.
The node1 is seen as the Master and the node2 as the Slave.
All resources are correctly managed and monitored by the cluster.
The cluster detects the loss of the node1 which was the Master and triggers the takeover to the node2.
The takeover can take several minutes, depending on the size of your SAP HANA database.
The node2 is now the new Master and the node1 is still seen as offline.
Once the issue is fixed on the node1, you have to register the node1 to the node2 and start the SAP HANA services to restore the cluster to a normal situation.
Loss of the secondary SAP HANA node
In this case, the expected behaviour is only the detection of the loss of the secondary SAP HANA node, no action must be done by the cluster.
The node1 is seen as the Master and the node2 as the Slave.
All resources are correctly managed and monitored by the cluster.
The node2 is seen as offline and as the node was the Slave, no action has been taken by the cluster.
Once the issue is fixed on the node2, start the SAP HANA services to restore the cluster to a normal situation.
Go further
If you need training or technical assistance to implement our solutions, contact your sales representative or click on this link to get a quote and ask our Professional Services experts for assisting you on your specific use case of your project.
Join our community of users on https://community.ovh.com/en/.

