Setting up Nutanix Objects
88 Views
Objective
Nutanix Objects implements an Object Storage S3* compatible solution on your Nutanix cluster, using Prism Central. You can read the description on this link.
This guide will show you how to set up Nutanix Objects on your cluster.
This tutorial will show you how to use one or more OVHcloud solutions with external tools, and will describe the actions to be carried out in a specific context. You may need to adapt the instructions according to your situation.
If you encounter any difficulties performing these actions, please contact a specialist service provider and/or discuss the issue with our community. You can find more information in the Go further section of this tutorial.
Requirements
- A Nutanix cluster in your OVHcloud account.
- You must be connected to the cluster via Prism Central.
Instructions
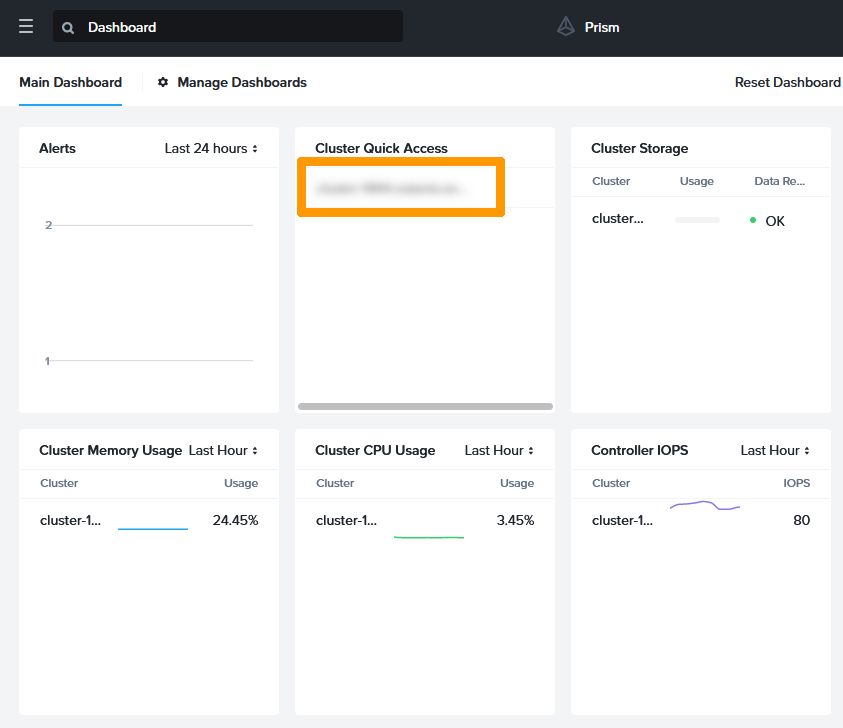
From Prism Central, click your cluster in the Cluster Quick Access widget to connect to Prism Element.
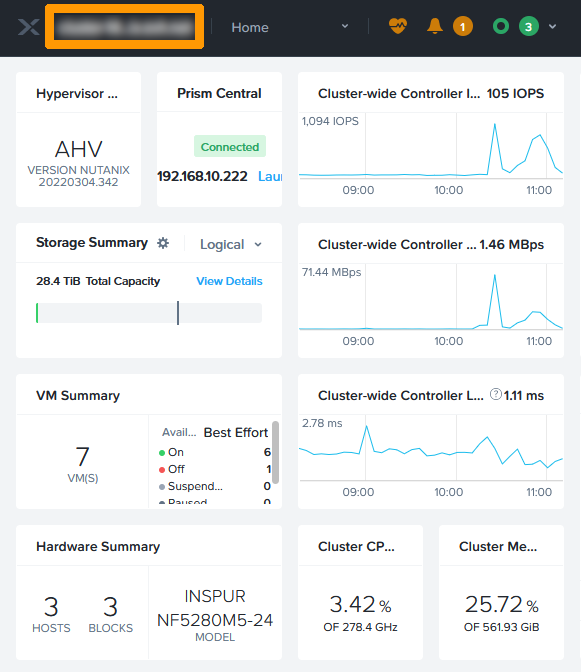
Click your cluster's name in the top left-hand corner next to the X.
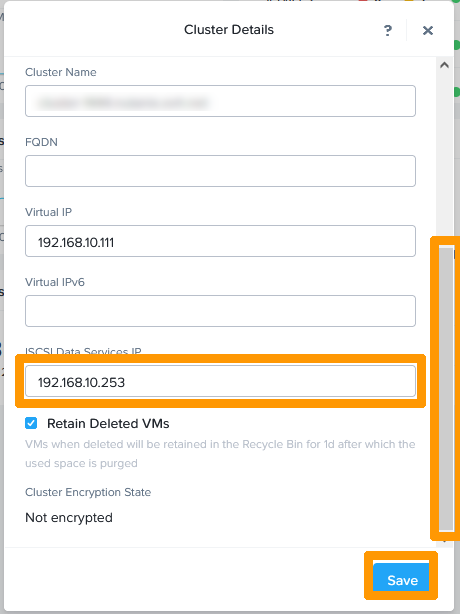
Scroll down the window and check the IP address in the ISCSI Data Services IP section.
Configuring VLANs in Prism Central
You need to create two additional VLANs in your cluster configuration and have these VLANs access Prism Central and Prism Element to configure Nutanix Objects. These two VLANs must be able to distribute IP addresses. IPAM will be enabled on both VLANs.
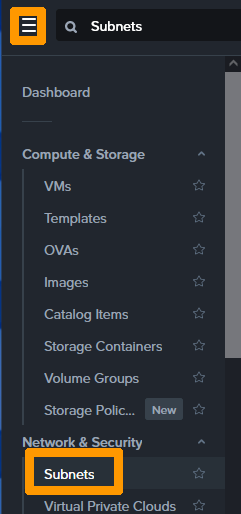
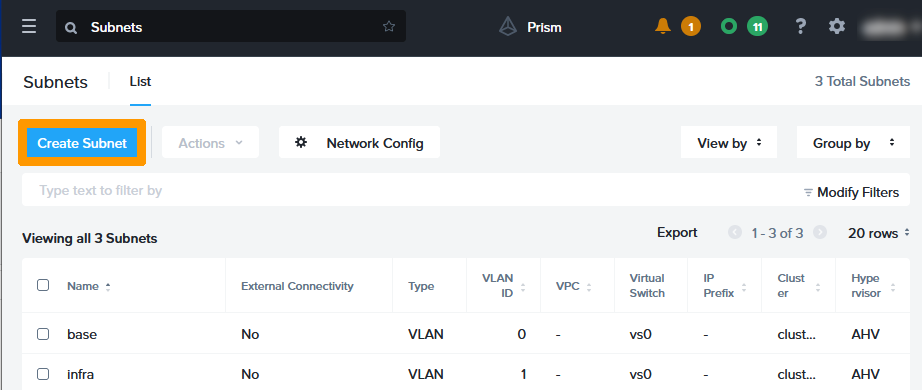
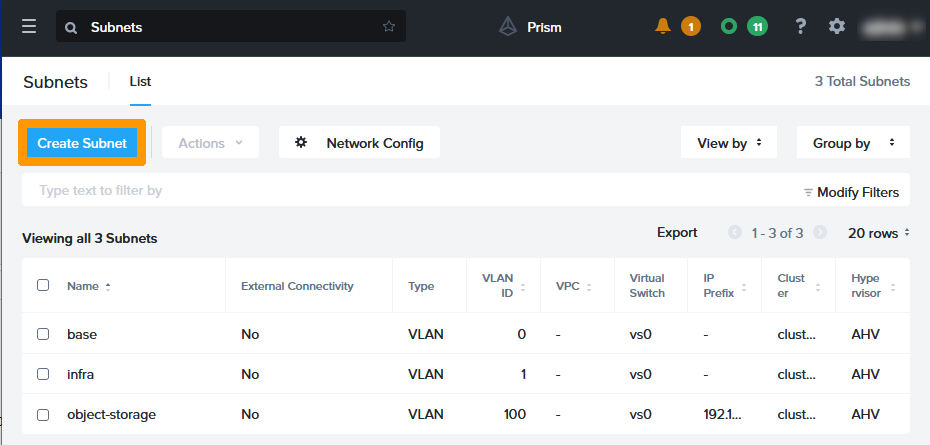
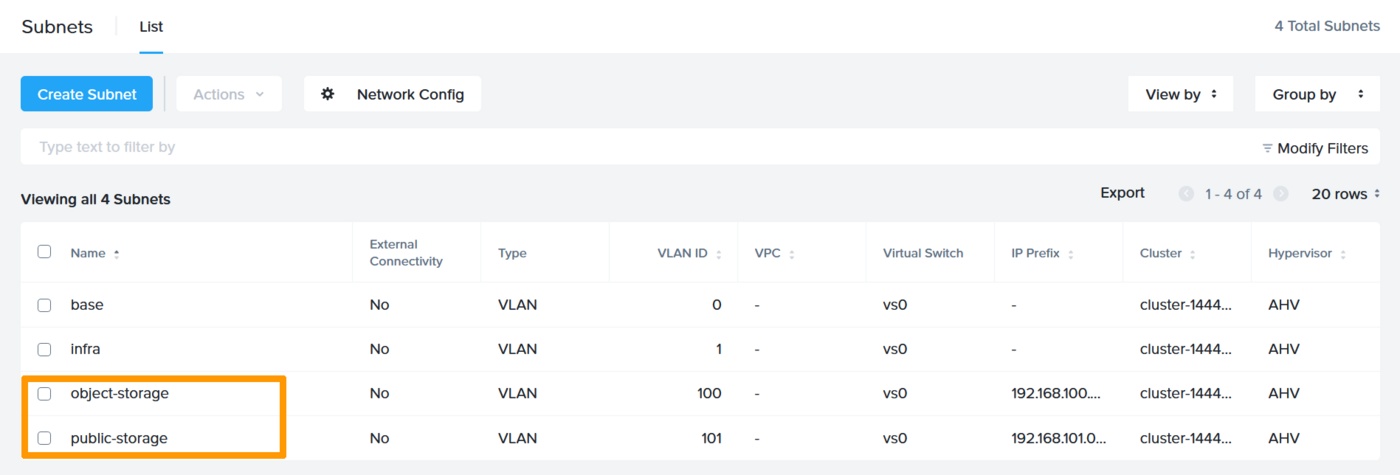
From Prism Central, go to the main menu and click on Subnets in the Network & Security category.
Click Create Subnet.
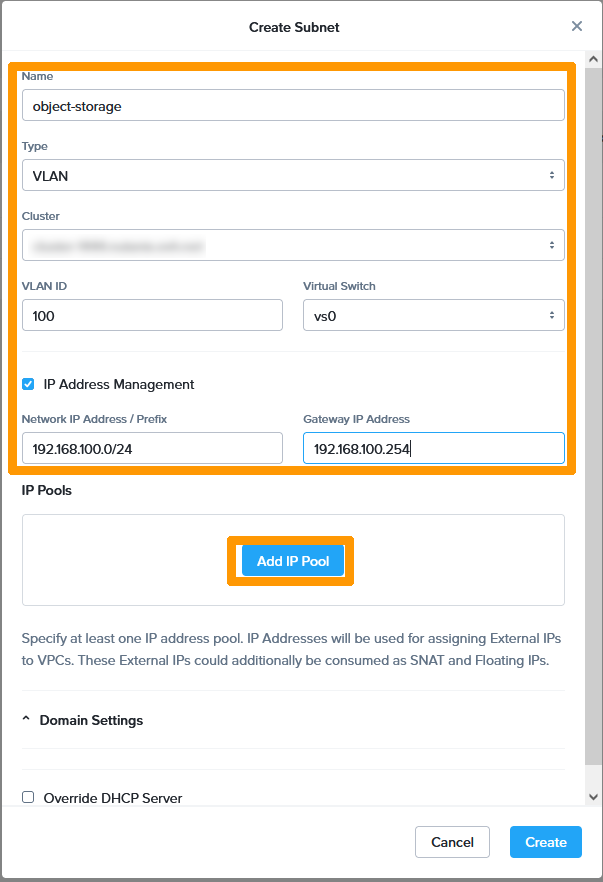
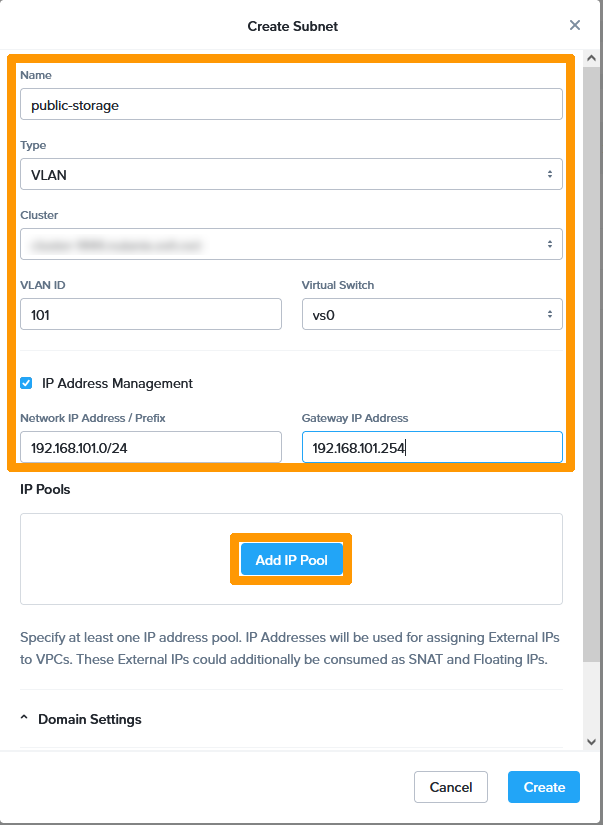
Check the IP Address Management box and fill in this information :
- Name : Type
object-storage. - Type : Select
VLAN. - VLAN ID : Type your VLAN number as
100. - Virtual Switch : Keep
vs0. - Network IP Address / Prefix : Write your subnet
192.168.100.0/24. - Gateway IP Address : Enter the address of your gateway
192.168.100.254.
Then click Add IP Pool.
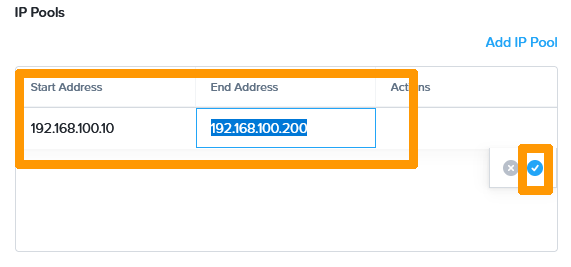
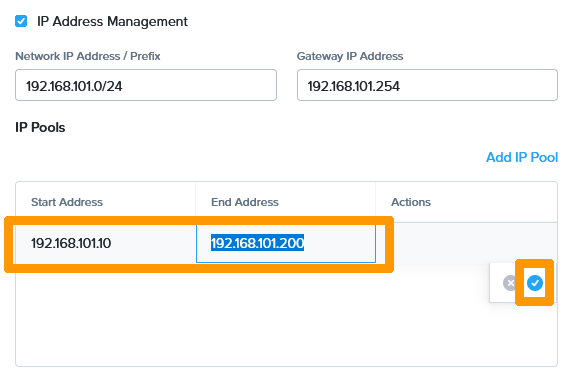
Enter this information :
- Start Address : Start address of your scope as
192.168.100.10. - End Address : End address of your scope as
192.168.100.200.
Then click the blue validation button on the right.
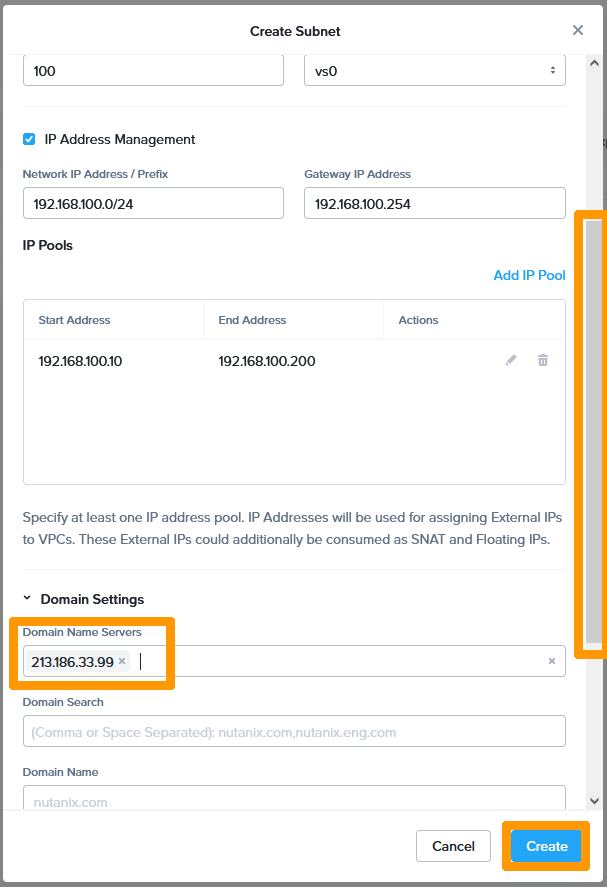
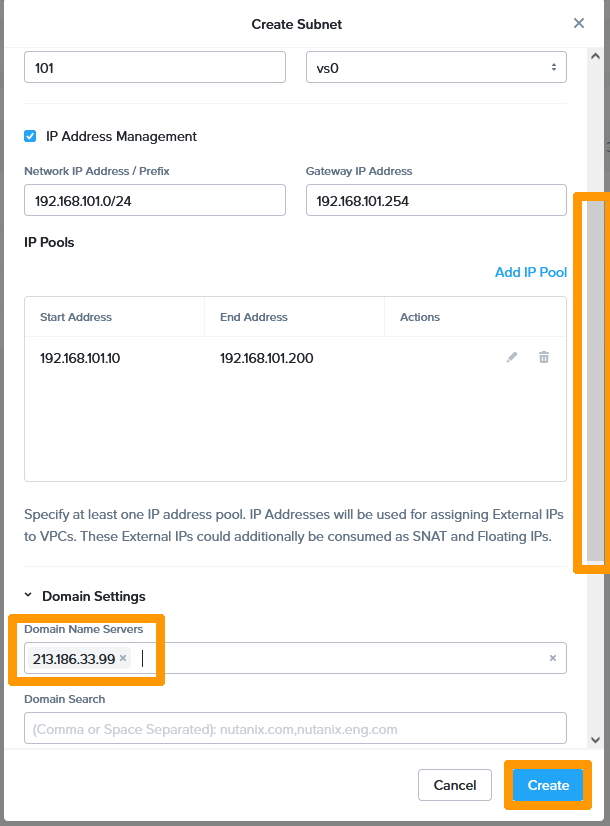
Scroll down and enter the OVHcloud DNS address 213.186.33.99 in Domain Name Servers and click Create.
Your first VLAN is created. We will create the second VLAN, click on Create Subnet.
Check the IP Address Management box and fill in this information :
- Name : Type
public-storage. - Type : Select
VLAN. - VLAN ID : Type your VLAN number as
101. - Virtual Switch : Keep
vs0. - Network IP Address / Prefix : Write your subnet
192.168.101.0/24. - Gateway IP Address : Enter your gateway address
192.168.101.254.
Then click Add IP Pool.
Enter this information :
- Start Address : Start address of your scope as
192.168.101.10. - End Address : End address of your scope as
192.168.101.200.
Next, click the blue validation button on the right.
Scroll down and enter the OVHcloud DNS address 213.186.33.99 in Domain Name Servers and click Create.
Your two VLANs are created, make sure they can connect to Prism Element and Prism Central through your gateway. You can use this guide to replace the default gateway and use your VLANs: OVHgateway replacement.
Enabling Nutanix objects in Prism Central
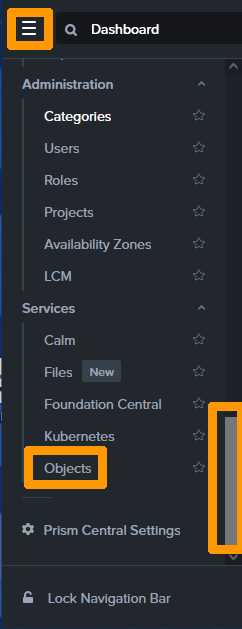
Go to the main menu, scroll to the Services section and click Objects.
Click Enable.
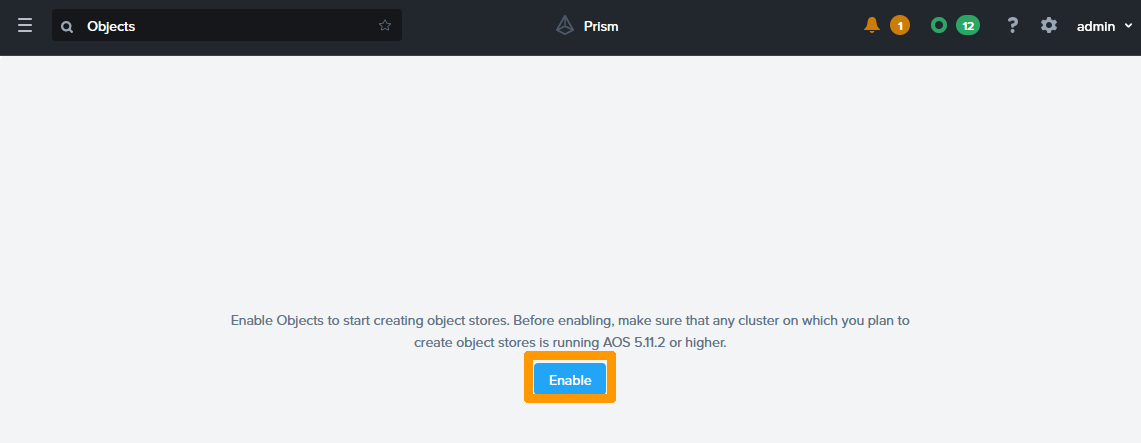
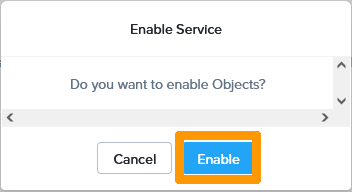
Click Enable to validate the activation of Nutanix Objects.
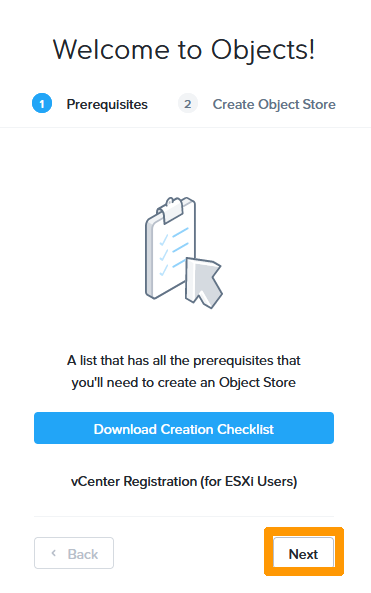
The service checks your system compatibility.

Click Next.
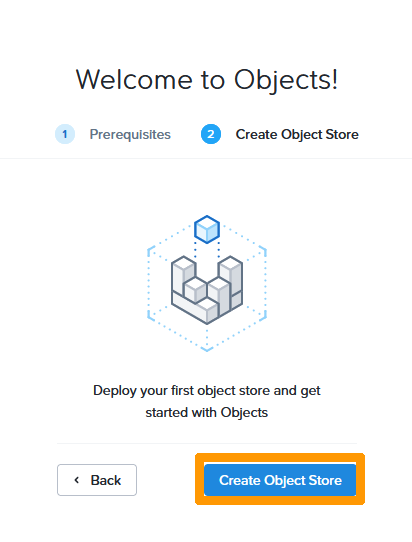
Click Create Object Store.
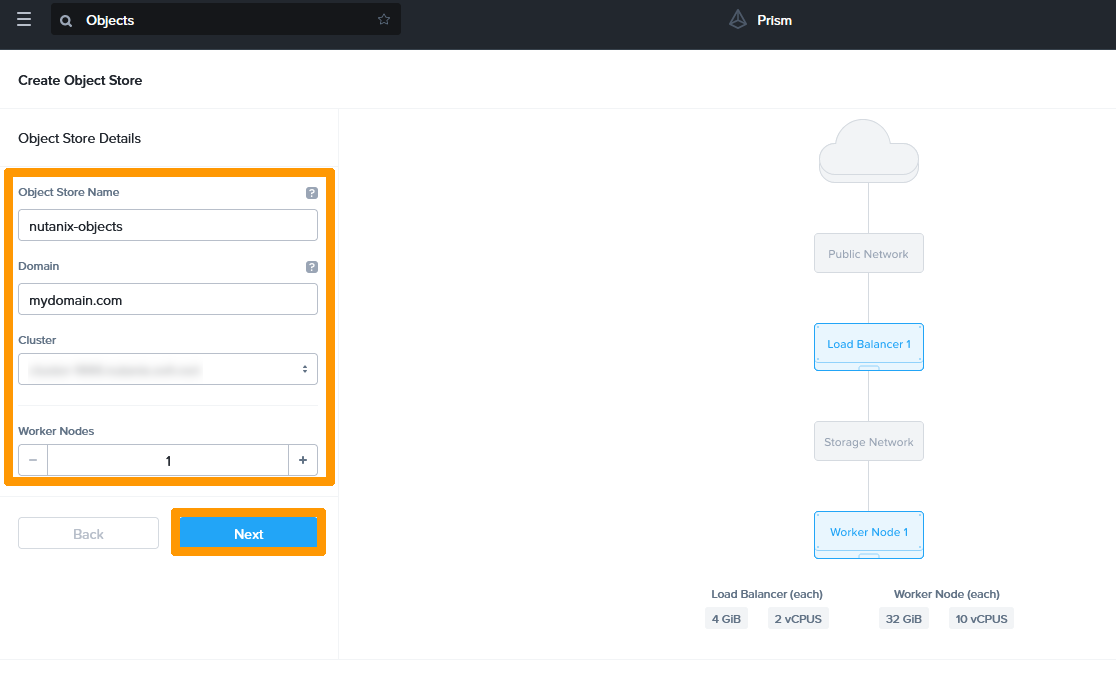
Fill in this information :
- Object Store Name : the name of your object storage, such as
nutanix-objects. - Domain : The domain name that will be used to access your storage, such as
mydomain.com. - Cluster : The cluster that must have Nutanix Objects enabled.
- Worker Nodes : The number of nodes that your Object storage will use, select the number
1.
Then click Next.
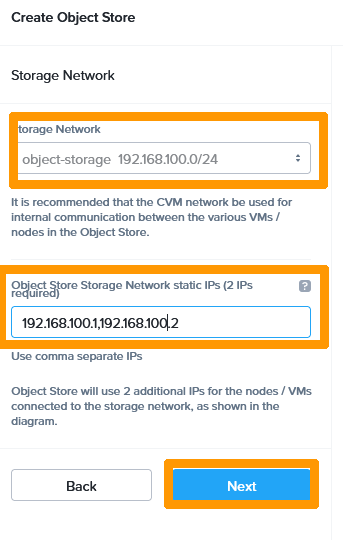
Select the VLAN object-storage in Storage Network and enter these two addresses 192.168.100.1,192.168.100.2 in Object Store Storage Network static IPs (2 IPs required). These addresses must not be within the scope of the VLAN DHCP.
Then click Next.
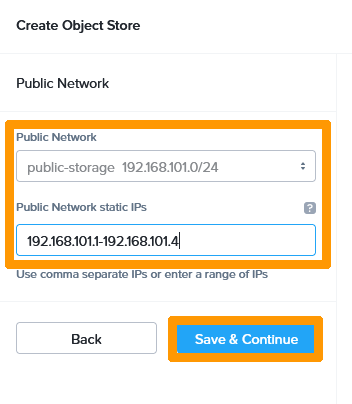
Select the public-storage VLAN in Storage Network and enter this range of four addresses 192.168.101.1-192.168.100.4 in Public Network static IPs. These addresses should not be within the scope of the VLAN DHCP.
Next, click Save & Continue.
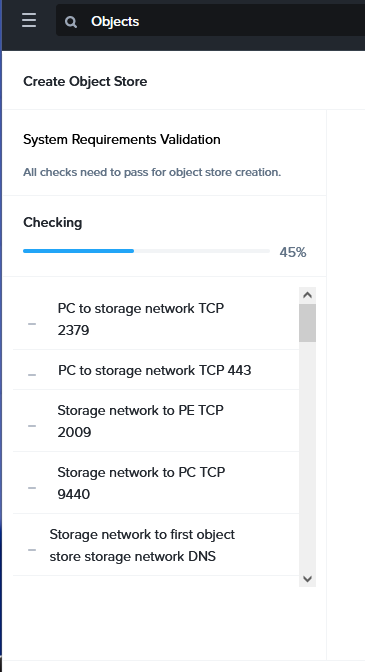
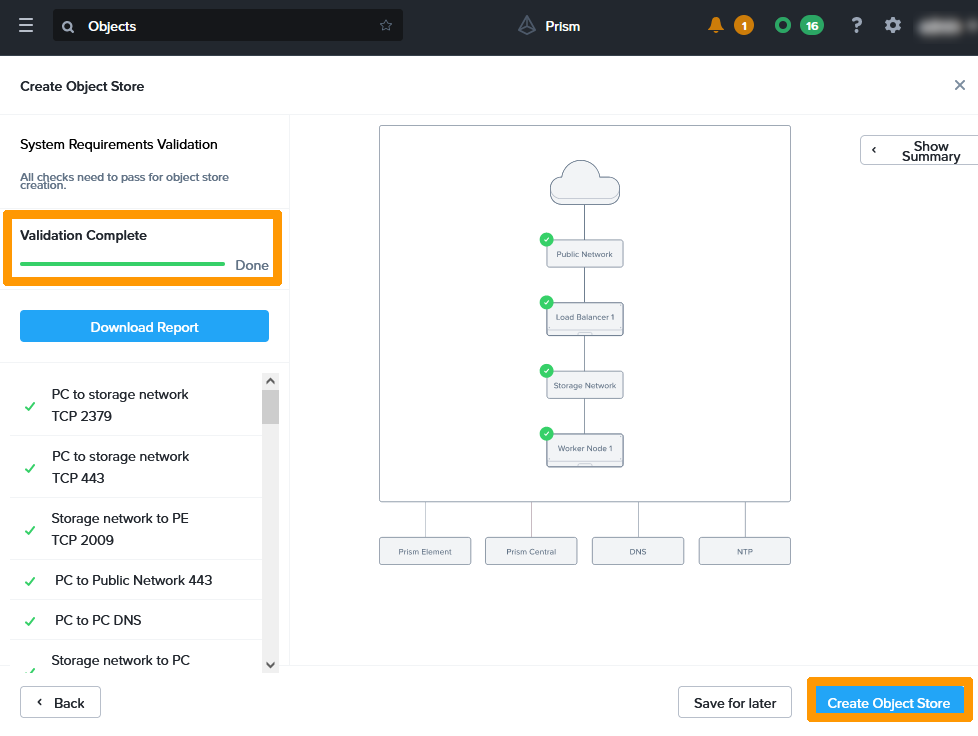
A connection check is performed between the VLANs, Prism Element and Prism Central.
When validation is complete, click Create Object Store.
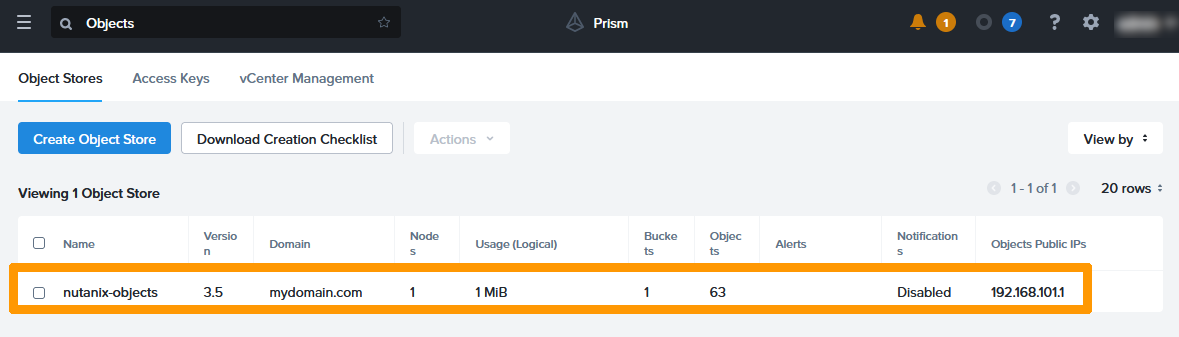
Wait twenty minutes for your Object Storage to be active and accessible through the address 192.168.101.1 that is located in your public-storage VLAN.
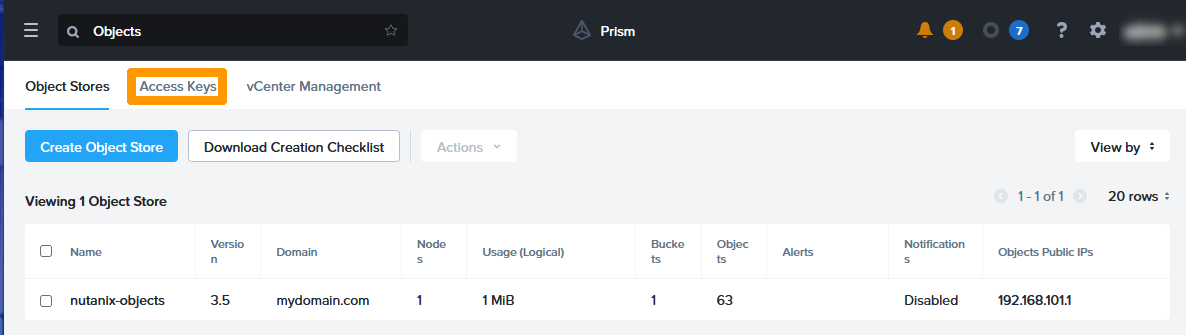
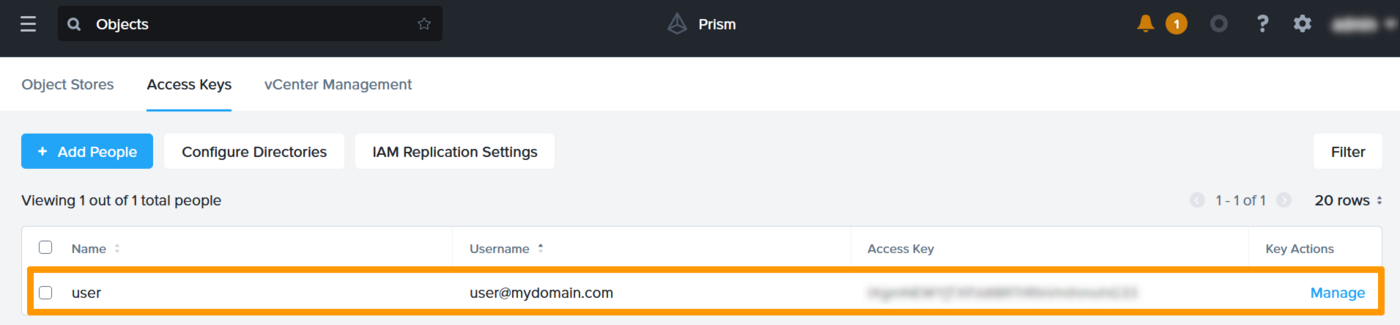
Creating an Access Key to your storage
To be able to use an Object storage, it is necessary to create associated Access Keys.
Go to the Access Keys tab.
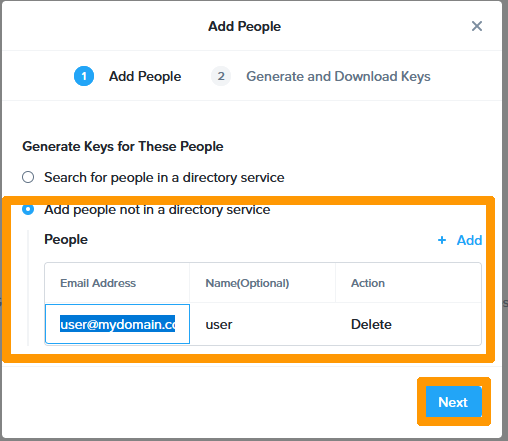
Click + Add People.

Check Add people not in a directory service, type user@mydomain.com in Email Address and click Next.
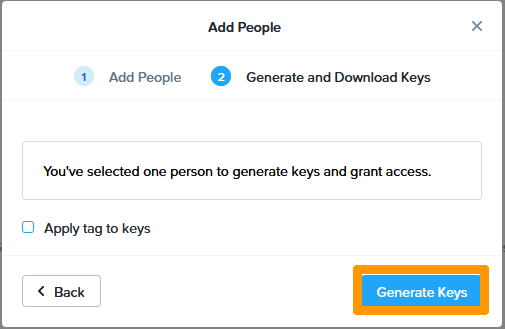
Click Generate Keys.
Click Download Keys.
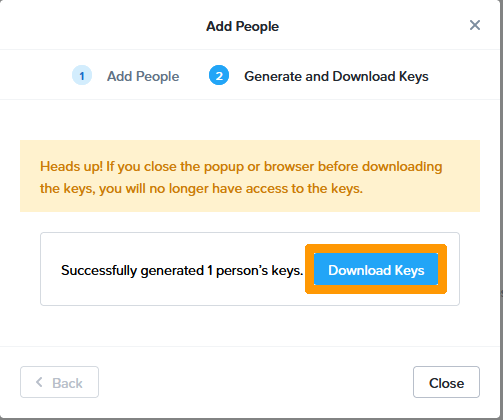
Your access credentials are only displayed once in your web browser. Please note down this information (Access Key and secret Key) before closing this window.

Your user is created with its login details. You can regenerate Access Keys and create a new login.
Validation and functional testing
To confirm that our Object storage is working properly, we will use the AWS awscli command-line tool and create a bucket. You can use this guide for more information.
The awscli tool is available on Windows, Linux and macOS.
Use the following command for help:
After installing awscli, we will create two configuration files on a computer that has access to the public-storage VLAN and use the aws command to create a bucket.
Create a .aws subfolder in your %USERPROFILE% folder on Windows, or $HOME on Linux and macOS.
Add the credentials file and fill it in with this data:
Then add a second file named config with this information :
Then use this command to create a bucket.
The bucket is created with a warning message about the SSL certificate. In a production environment, it is necessary to use an SSL certificate.
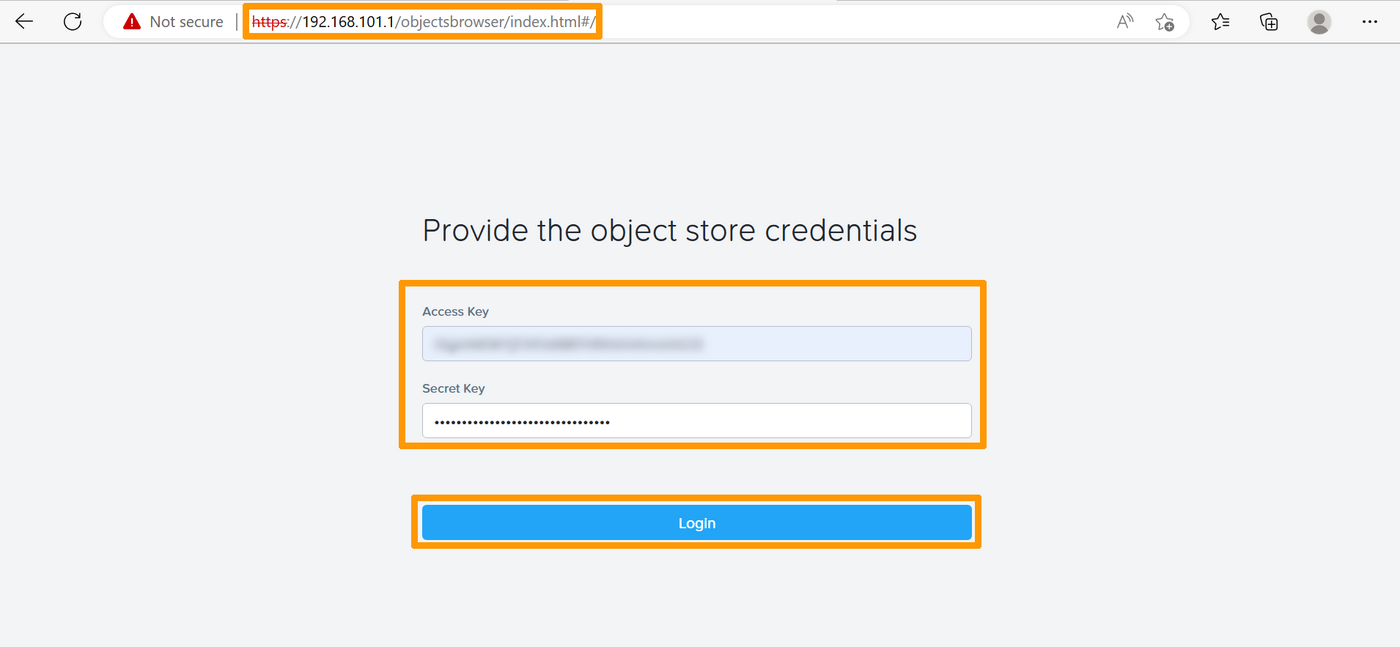
Now that the bucket is created we will use a browser to connect to the web interface provided by Nutanix in order to check the existence of our bucket.
Using a web browser, connect to this URL https://192.168.101.1/objectsbrowser which corresponds to your Nutanix Objects access point and enter your credentials (access_key and secret_key). Then click on Login.
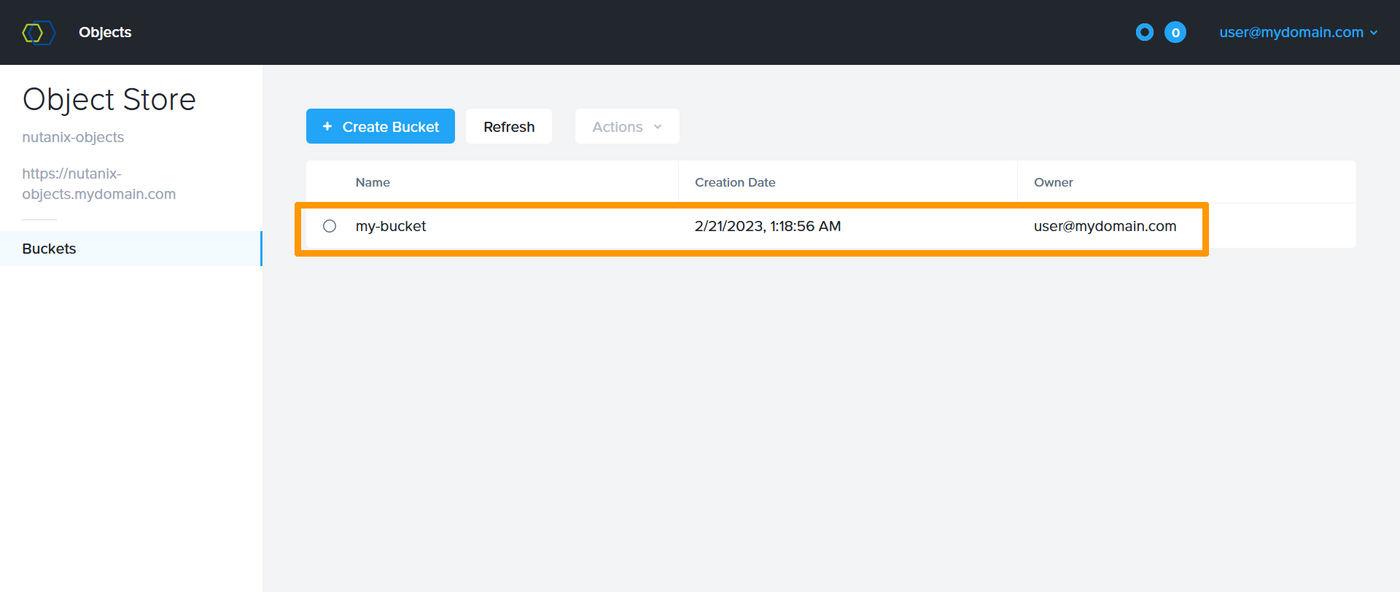
You can see the bucket you created in the command line. You can create and delete buckets or objects in your web interface.
Go further
If you need training or technical assistance to implement our solutions, contact your sales representative or click on this link to get a quote and ask our Professional Services experts for assisting you on your specific use case of your project.
Join our community of users on https://community.ovh.com/en/.
Nutanix Objects documentation.
*: S3 is a trademark of Amazon Technologies, Inc. OVHcloud’s service is not sponsored by, endorsed by, or otherwise affiliated with Amazon Technologies, Inc.

