Mounting HA-NAS via NFS share
5818 Views
Objective
The OVHcloud HA-NAS service allows you to manage file storage that can be accessed over a network.
This guide explains how to access your HA-NAS via NFS on the most common operating systems.
OVHcloud is providing you with services for which you are responsible, with regard to their configuration and management. It is therefore your responsibility to ensure that they function correctly.
This guide is designed to assist you in common tasks as much as possible. Nevertheless, we recommend that you contact a specialist service provider or reach out to our community if you face difficulties or doubts concerning the administration, usage or implementation of services on a server.
Requirements
- An OVHcloud HA-NAS solution
- An OVHcloud service with a public IP address attached to it (Hosted Private Cloud, dedicated server, VPS, Public Cloud instance, etc.)
- An operating system compatible with NFS installed on your server
- A partition created on the service with the NFS protcol enabled
- An ACL entry for the server's IP address
- Administrative access (sudo) to your server via SSH or GUI
OVHcloud Control Panel Access
- Direct link: NAS-HA
- Navigation path:
Bare Metal Cloud>HA-NAS> Select your NAS-HA
Instructions
The following sections contain configuration examples for the most commonly used distributions / operating systems. The first step is always to log in to your server via SSH or connecting to the GUI of your installed OS. The examples below presume you are logged in as a user with elevated permissions.
You will also need the internal name and the IP address of your HA-NAS service which you can find in the email received after the installation or in your OVHcloud Control Panel.
The following notations are used as arguments in the command line sections below. Replace them with the appropriate values when entering the commands.
| Argument | Description |
|---|---|
| IP_HA-NAS | The IP address of the HA-NAS (Example: 10.1.1.1) |
| NFS_PATH | The path to the HA-NAS partition to mount, consisting of the service name and your partitions' name (Example: zpool-123456/partition01) |
| MOUNTING_FOLDER | The local folder for your mounted partition |
The NFS user is root; rights changes with this user can generate conflicts with existing CIFS / SMB rights.
Debian based distributions
Install the package nfs-common:
Then use the following mount command:
Example:
You can now access your mounted partition at the specified folder.
In order to automate the mounting process for each time the server boots, add the following line to the file /etc/fstab:
IP_HA-NAS:/NFS_PATH /MOUNTING_FOLDER nfs rw 0 0
Distributions based on RedHat (CentOS / AlmaLinux / Rocky Linux / Fedora / ...)
Warning!
DNF is the successor to YUM Packet Manager and is commonly used in various Linux distributions based on Red Hat.
Verify that the latest versions of the packages nfs-utils and rpcbind are installed:
If necessary, restart the rpcbind service with the following command:
To mount your partition, use the following command:
Example 1:
You can now access your mounted partition at the specified folder.
In order to automate the mounting process for each time the server boots, add the following line to the file /etc/fstab:
IP_HA-NAS:/NFS_PATH /MOUNTING_FOLDER nfs rw 0 0
Example 2:
Install the package nfs-utils:
Then use the following mount command:
You can now access your mounted partition at the specified folder.
Microsoft Windows - specificity
Ensure that the Windows user who needs to access your NAS-HA has the necessary rights.
The UID/GID pair must be set to "0" (UNIX root rights).
If this is not the case, errors may occur when accessing the NAS-HA. This is because when the NFS protocol is enabled on a Windows machine, a UNIX user is automatically created with a default UID and GID set to "-2" (or 4294967294), which restricts access.
As a workaround, the UID and GID can be forced to "0" on the Windows machine accessing your NAS-HA:
- Open the Registry Editor (regedit) on the client machine.
- Navigate to the following key:
HKEY_LOCAL_MACHINE\SOFTWARE\Microsoft\ClientForNFS\CurrentVersion\Default. - Create the following two DWORD entries: AnonymousUid and AnonymousGid.
- Assign the value "0" to each of these entries.
- Restart the NFS service on the client machine to apply the changes.
All mounting options are available on the Microsoft website.
Proxmox
In the Proxmox administration interface, click on Storage in the vertical menu.
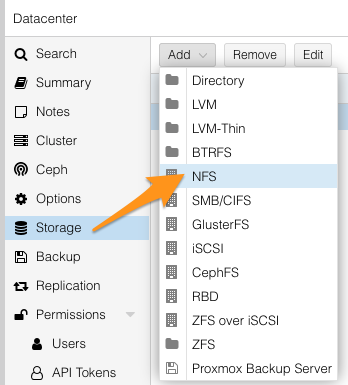
Click on the button Add and select NFS.
In the popup window, enter the following details.
| Detail | Description |
|---|---|
| ID | An identifier for the share |
| Server | The IP address of the HA-NAS (Example: 10.1.1.1) |
| Export | The path to the HA-NAS partition (It should be detected by the automatic scan; select it from the list.) |
| Content | Content types for this NFS share (Disk image, ISO image, Container template, VZDump backup file, Container, Snippets) |
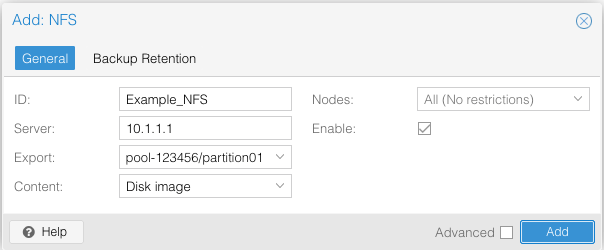
Click on Add to mount your partition.
VMware ESXI
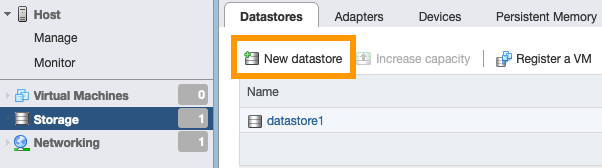
In the VMware ESXI administration interface, click on Storage in the menu on the left.
Then click on the button New datastore to open the assistant.
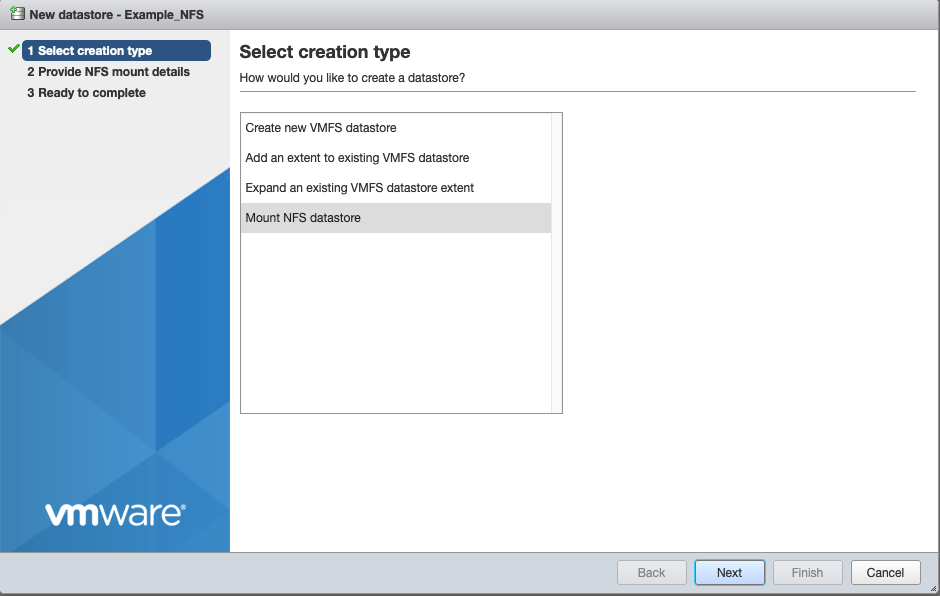
In the new window, select Mount NFS datastore and click on Next.
Complete the form with the following details.
| Detail | Description |
|---|---|
| Name | An identifier for the share |
| NFS server | The IP address of the HA-NAS (Example: 10.1.1.1) |
| NFS share | The path to the HA-NAS partition to mount (Example: zpool-123456/partition01) |
| NFS version | The protocol version to use, you must select the NFS version 3 |
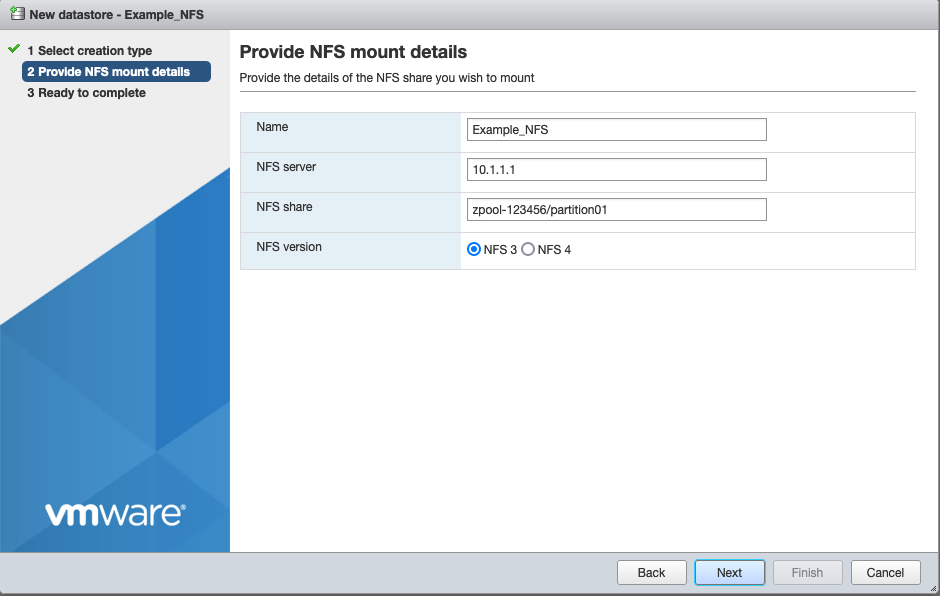
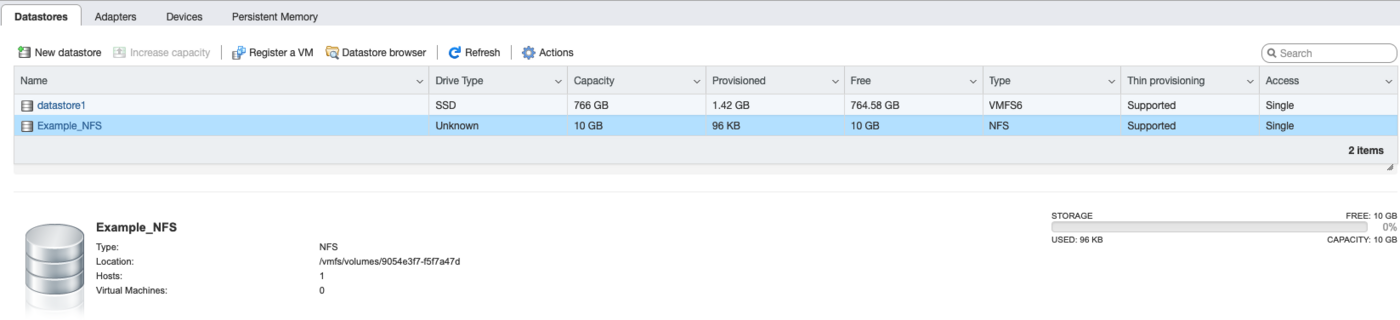
Once done, click on Next. Click on Finish in the last step.
Your HA-NAS partition is now mounted as a datastore.
NFSv3/NFSv4
The HA-NAS solution supports NFSv3 and NFSv4 protocols. This section explains how they are used.
What happens if the NFS version is not specified inside the mount command?
In this case, your NFS client will try to connect directly to the latest version supported by it.
But you can also choose whether you prefer to use NFSv3, NFSv4, NFSv4.1 or NFSv4.2:
To force the use of NFSv3, you must use the following command:
- Example:
To force the use of NFSv4, you must use the following command:
- Example:
You can also use the following command to determine which version is used by the current mount:
In the return, the parameter vers=3 or vers=4 tells you which protocol is used.
Command usage will be similar for CentOS and Fedora.
To force the use of NFSv4.1, you must use the following command:
- Example:
To force the use of NFSv4.2, you must use the following command:
- Example:
You can use this command to check the version of your current mount:
Tips to optimize the performance and/or stability of your NFS connection
In most cases, the default mount options configured in Linux clients are sufficient to achieve acceptable performance. However, in certain situations, it may be useful to enable or disable certain options in order to have better overall performance.
In addition, in order to achieve optimal performance and avoid various bugs identified in the NFS client, we recommend using the most recent Linux kernel possible.
Below are some elements that may help you refine your NFS client configuration.
Some mount options to consider
You can see the mount options applied by your Linux client with the mount -l command.
Example of this command return:
rsize=1048576: Sets the maximum number of bytes of data that the NFS client can receive for each network READ request. This value applies when reading data from a file on an NFS file system. The largest possible size (up to 1048576) guarantees better performance.wsize=1048576: Sets the maximum number of bytes of data that the NFS client can send for each WRITE request over the network. This value applies when writing data to a file in an NFS file system. The largest possible size (up to 1048576) guarantees better performance.hard: Sets the recovery behavior of the NFS client after a query times out, so queries are restarted indefinitely until the HA-NAS responds. This option ensures data integrity.timeo=150: Sets the timeout value that the NFS client uses to wait for a response before retrying an NFS request. Use a value of at least 150, which is equivalent to 15 seconds, to avoid performance issues.retrans=2: Sets to 2 the number of times the NFS client initiates a query before attempting a recovery action.tcp: To speed up the mounting of the file system in NFS v3 (not necessary for NFSv4.x which uses only TCP)._netdev: When this option is present in the /etc/fstab file, it prevents the client OS from attempting to mount the NFS file system until the network is enabled.nofail: if your client's OS must be able to start regardless of the state of your NFS file system, add thenofailoption.actimeo=30: Theactimeospecification defines all parametersacregmin,acregmax,acdirminandacdirmaxat the same value. Using a value less than 30 seconds can alter performance because attribute caches for files and directories expire too quickly.nfsvers: Avoid using version 4.0 of NFS if possible. Use versions 3, 4.1, or 4.2 instead (whenever possible, use the same version of NFS for all clients connected to the same NFS share).nordirplus: In some environments with many directories, where only the information from a small subset of directory entries is used by an NFSv3 client, READDIRPLUS may result in slower performance. The nordirplus option allows you to disable this feature
Force the use of NFSv3 in some cases
- Since NFSv3 is stateless, performance with NFSv3 can be significantly better for some workloads, especially those that make a lot of OPEN, CLOSE, SETATTR, and GETATTR calls.
- If you host a database on your NFS share, please be aware that in the event of network disconnections, the NFS v4.x protocol-specific lock mechanism may cause your application to shut down (see this rfc for more details: https://datatracker.ietf.org/doc/rfc3530/).
- If you host VMware virtual machines on your NFS share, please note that the lock mechanism built into the NFSv4.x version is not compatible with the clustering mode implemented on your HA-NAS (cluster in active/passive mode explained on this page). It is therefore imperative to use the NFSv3 protocol, otherwise you will lose access to your datastore during an incident affecting the primary server, or during a scheduled maintenance operation.
Improve read performance by modifying the read_ahead_kb attribute
Some Linux kernels use a default read_ahead_kb value of 128 KB. We recommend that you increase this value to 15 MB if you have read performance problems. For more information, see this page: https://docs.kernel.org/admin-guide/abi-stable.html?highlight=read_ahead_kb#abi-sys-block-disk-queue-read-ahead-kb.
Go further
If you need training or technical assistance to implement our solutions, contact your sales representative or click on this link to get a quote and ask our Professional Services experts for assisting you on your specific use case of your project.
Join our community of users.

