Securing your OVHcloud infrastructure with Stormshield Network Security
2743 Views
Objective
In today's rapidly evolving digital landscape, securing cloud infrastructures has become a top priority for organizations of all sizes. As businesses increasingly rely on cloud solutions for their operations, ensuring the protection of sensitive data and maintaining network integrity are critical tasks. Stormshield SNS EVA (Stormshield Elastic Virtual Appliance) is a comprehensive security solution designed to protect cloud environments from a wide range of threats.
This guide provides step-by-step instructions for deploying and configuring SNS EVA on the OVHcloud Public Cloud with vRack and public IP routing, covering key features such as network firewalls, IPSec VPNs, and SSL/TLS VPNs. By following this guide, you will enhance the security of your OVHcloud Public Cloud infrastructure and ensure safe and secure operations.
This guide explains how to secure your OVHcloud infrastructure with Stormshield Network Security deployed on Public Cloud.
This guide will show you how to use one or more OVHcloud solutions with external tools, and will describe the actions to be carried out in a specific context. You may need to adapt the instructions according to your situation.
If you encounter any difficulties performing these actions, please contact a specialist service provider and/or discuss the issue with our community. You can find more information in the Go further section of this guide.
Requirements
- A Public Cloud project in your OVHcloud account
- An OpenStack user (optional)
- Basic networking knowledge
- A Stormshield account on the Stormshield website
- Ensure that the vRack is enabled and configured to allow secure communication between the components of the infrastructure.
- An Additional IP block (/29) for ensuring network failover and high availability setup.
- Stormshield Elastic Virtual Appliance licence BYOL (Bring Your Own Licence), obtained through third-party partners or resellers, as you will need to provide it during the installation and configuration process.
OVHcloud Control Panel Access
- Direct link: Public Cloud Projects
- Navigation path:
Public Cloud> Select your project
Instructions
In addition to the installation and configuration of Stormshield Network Security, this tutorial offers different use cases based on your needs:
- Install and configure Stormshield Network Security on your Public Cloud environment
- Use case 1: configure Stormshield Network Security to be used as a gateway
- Use case 2: configure a NAT to access a private HTTP service from outside
- Use case 3: IPsec tunnel (site-to-site)
- Use case 4: SSL/TLS VPN (client-to-site)
Install and configure Stormshield Network Security on your Public Cloud environment
In this tutorial, the installation and configuration of Stormshield SNS EVA is done primarily via the command line. Open a terminal to execute the instructions.
Please note that all sections related to « High Availability » or « stormshield-2 » are optional as well as using vRack network with Additional IP. They are included to demonstrate how to set up the system with two instances in an active/passive mode for high availability. In a minimal version, it can also work with just one instance if that is sufficient for your needs.
In this scenario, we will use a two virtual machines setup for the security appliance to achieve High Availability (HA), and an additional VM for management. This setup ensures failover protection and continuous service availability. For more examples and detailed guidance on scalability options, please refer to the Stormshield documentation.
Configure your vRack
In this step, we are configuring the vRack, a private virtual network provided by OVHcloud. The vRack allows you to interconnect multiple instances or servers within a Public Cloud environment, ensuring network isolation while maintaining secure communication. By adding your Public Cloud project and your Additional IP block to the same vRack, you can enable your SNS EVA instances to communicate securely, while keeping full control over IP address management. Private vRack network also allows you to secure Baremetal Cloud servers or Private Cloud VMs with security appliances deployed on top of Public Cloud.
Add your Public Cloud project and your Additional IP block to the same vRack.
For example purposes in this guide, the IP block is 147.135.161.152/29.
We use the first usable IP 147.135.161.153 for the first SNS EVA instance and temporarily use the second usable IP 147.135.161.154 for the second SNS EVA instance.
The gateway address is 147.135.161.158.
Please refer to the guide Configuring an IP block in a vRack for more information.
Below is the architecture that we are going to set up.
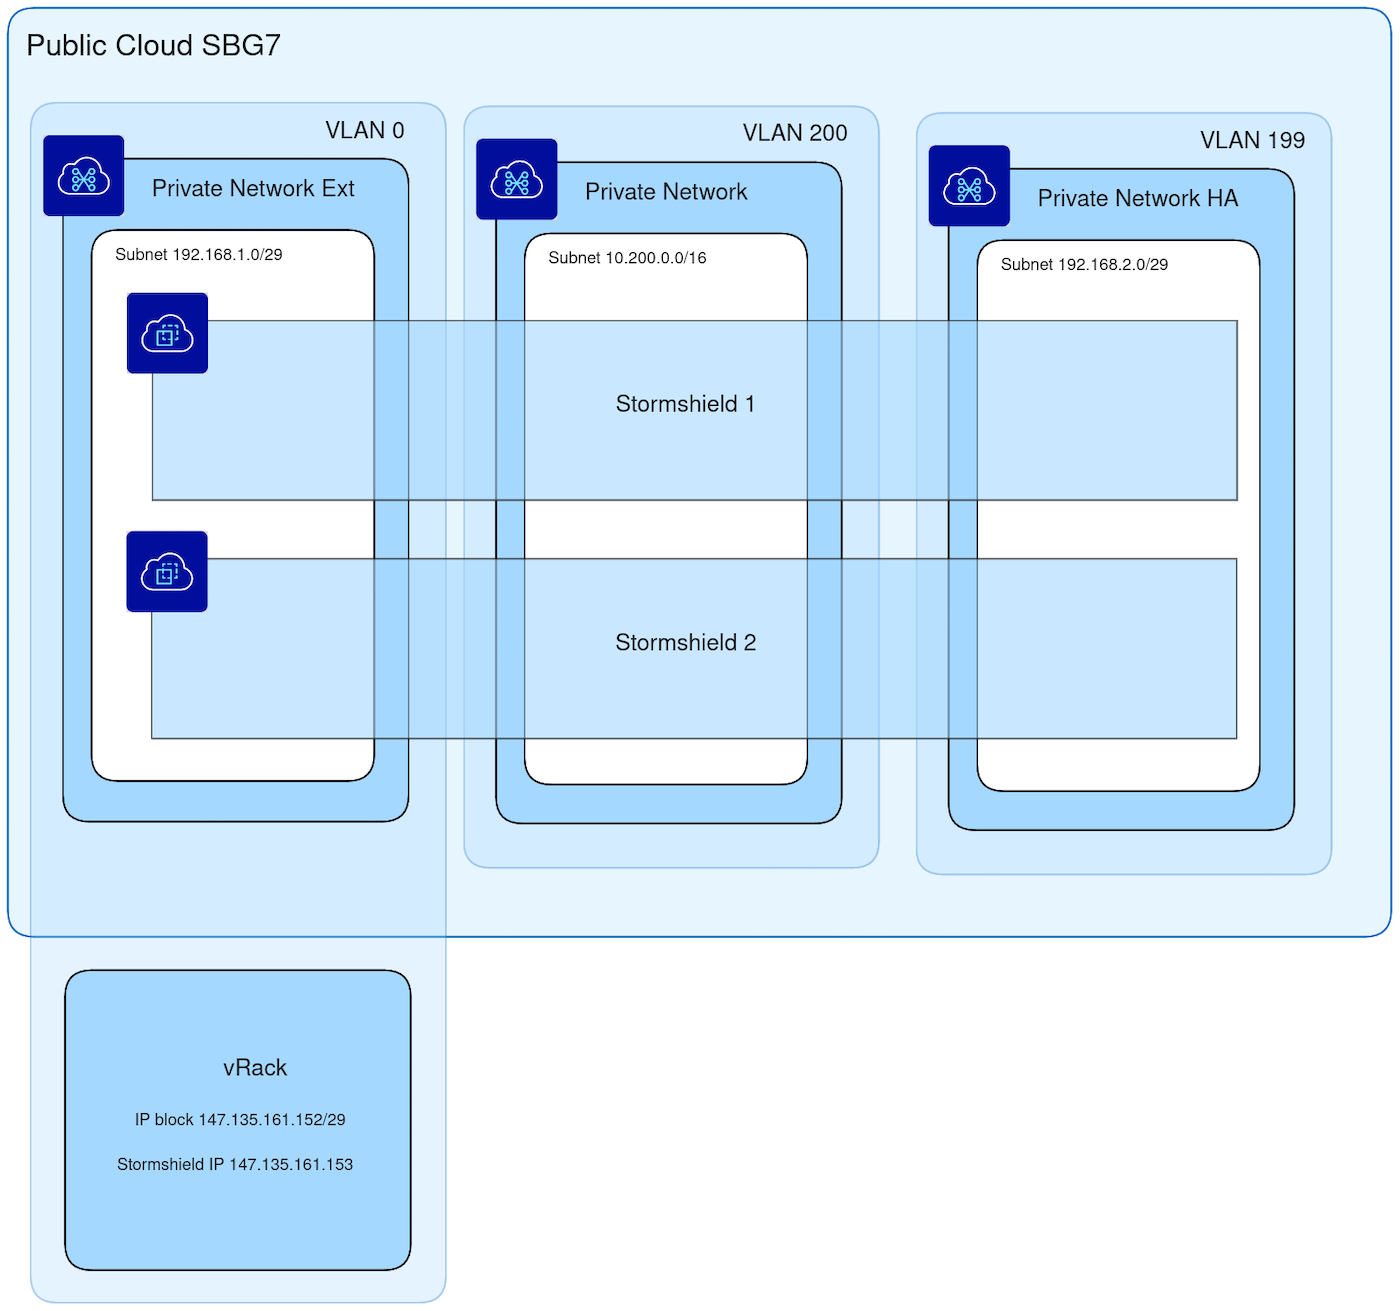
Configure OpenStack networking
Create the private network for the SNS EVA external interfaces:
Create the private network for the SNS EVA internal interfaces:
Create the private network for the SNS EVA HA (High Availability) interfaces:
Deploy the SNS EVA instances
Go to the download section of the official Stormshield website. Log in to your Stormshield account and follow the instructions to download the Stormshield OpenStack image.
Go to the folder where you have downloaded your SNS EVA Openstack image and upload the image (in this tutorial, we use the image utm-SNS-EVA-4.8.3-openstack.qcow2):
Create the SNS EVA instances (in this example, we called them stormshield-1 and stormshield-2):
For performance reasons we suggest using listed VM flavors for given SNS EVA licence types:
- EVA1: B3-8 / B3-16
- EVA2: B3-16 / B3-32
- EVA3: B3-32 / B3-64
- EVA4: B3-64 / B3-128
- EVAU: B3-128 / B3-256
Configure the SNS EVA instances
In the Public Cloud section, select your project. In the left menu, click on Instances under the Compute tab, then find your two SNS EVA instances.
Access the VNC console for both SNS EVA instances and configure the keyboard layout and the password.
Configure the default gateway on the first SNS EVA with our IP block gateway:
Configure the external network interface on the first SNS EVA instance with the first usable IP address of our IP block and the internal network interface with the 10.200.0.1 IP address:
Apply the new network configuration:
Do the same configuration for the second SNS EVA instance but with the second IP address 147.135.161.154 of our IP block for the external interface instead of 147.135.161.153.
Add a different licence on both SNS EVA instances by following the official documentation.
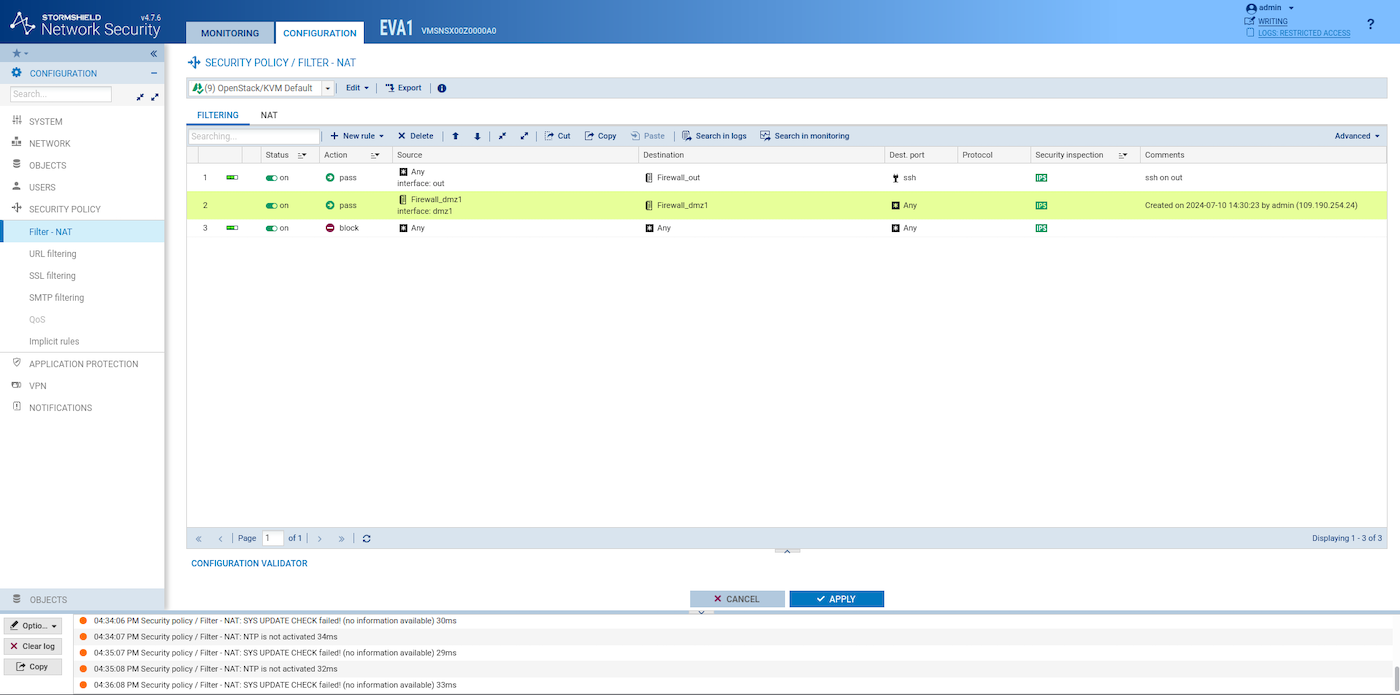
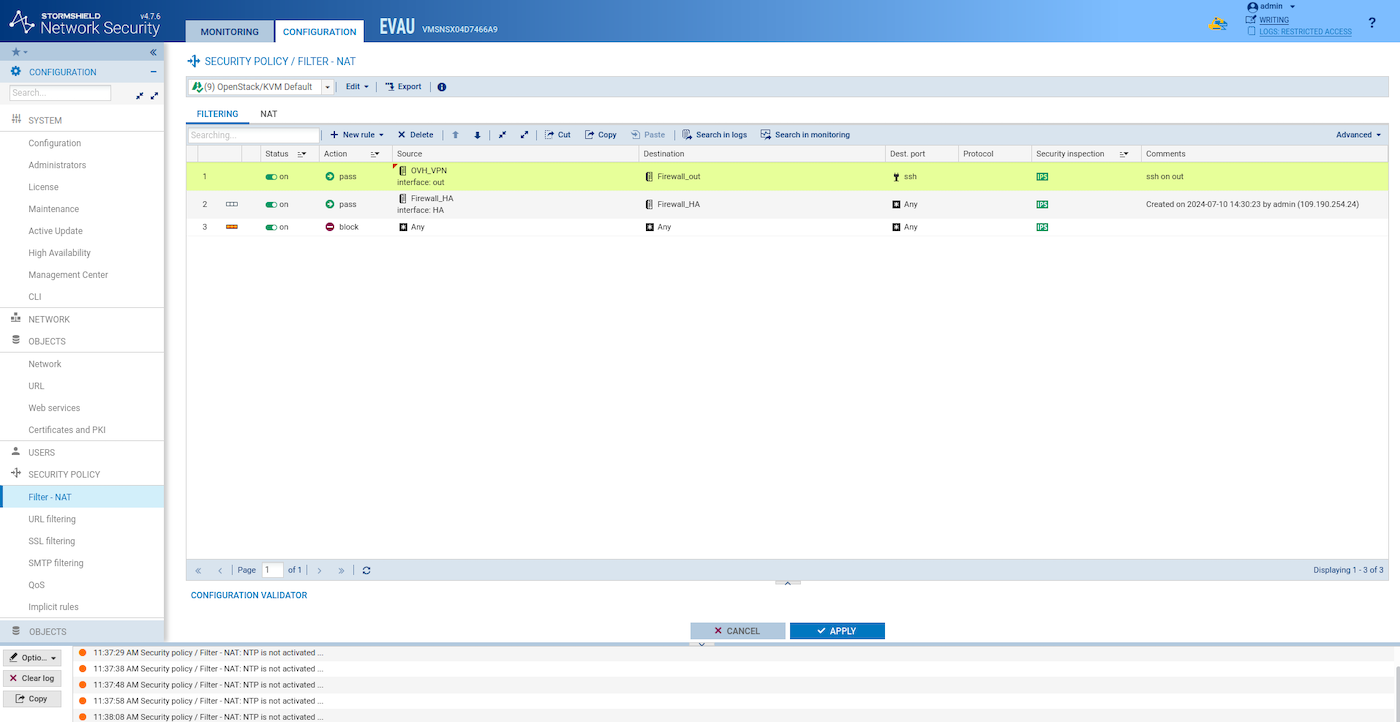
Create a firewall rule similar to this on both SNS EVA intances in the web GUI:
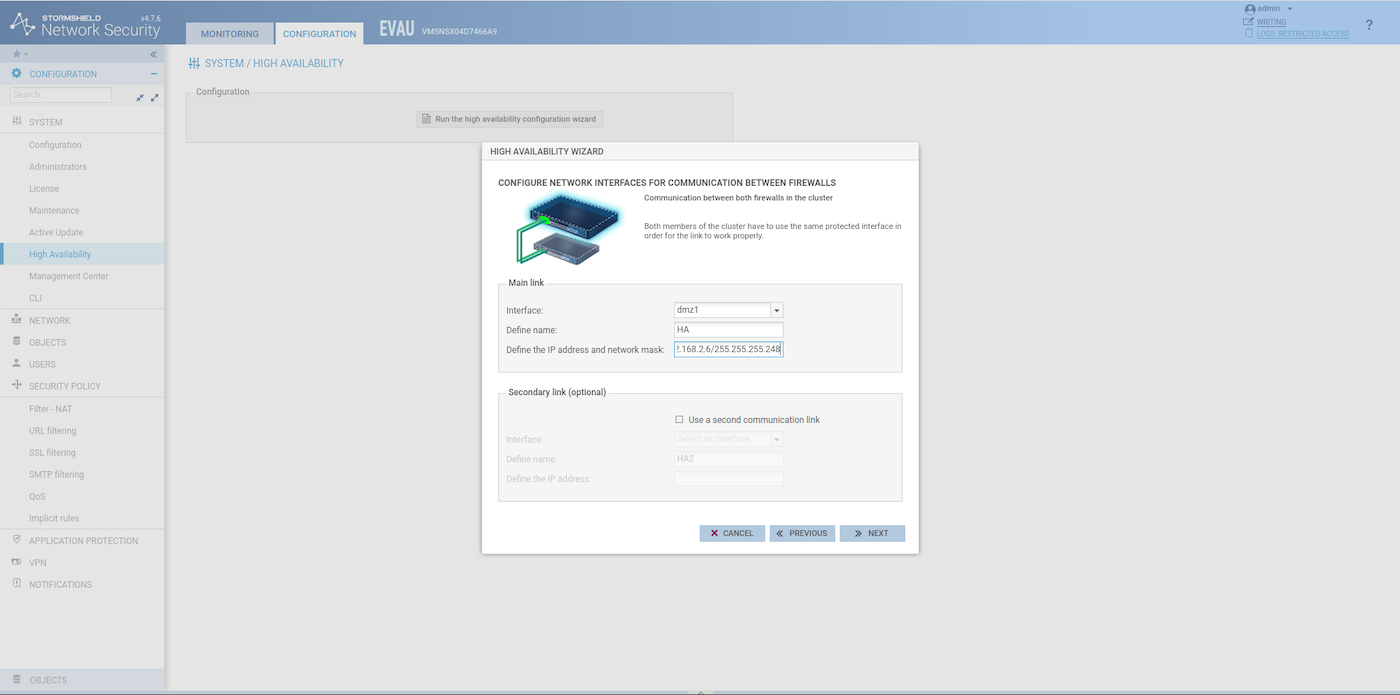
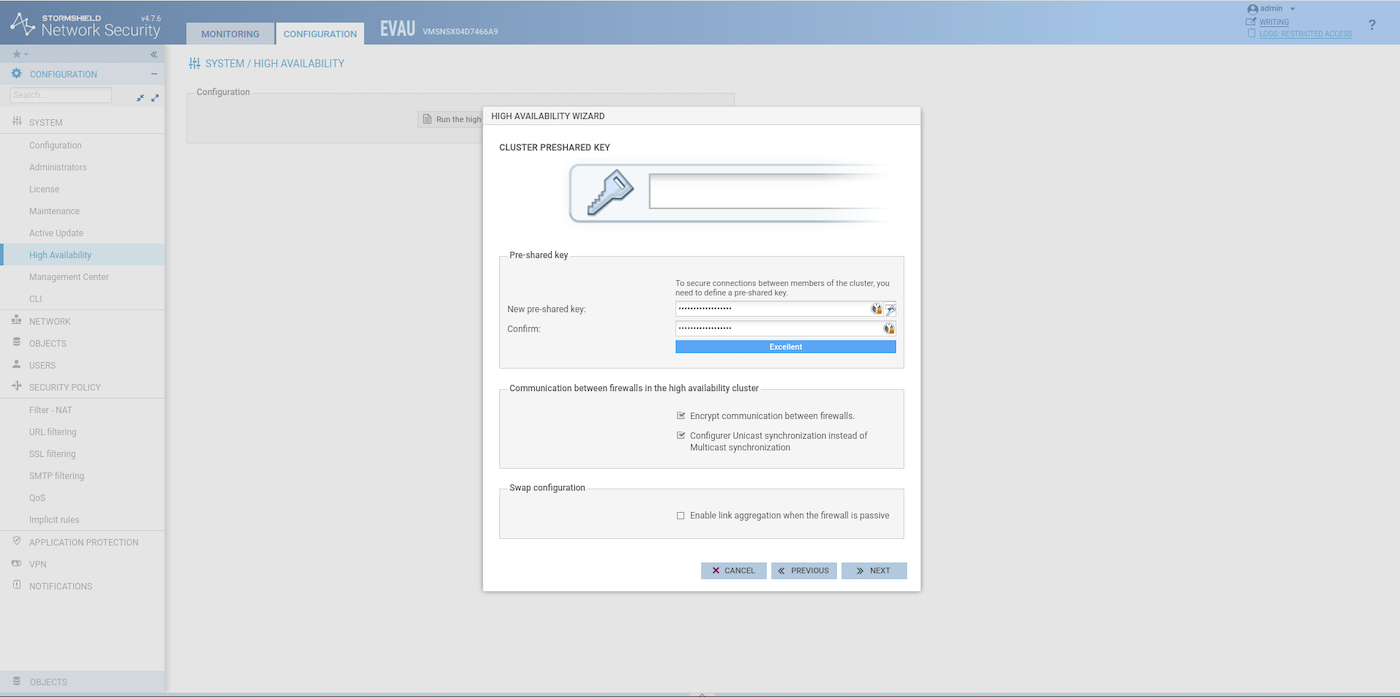
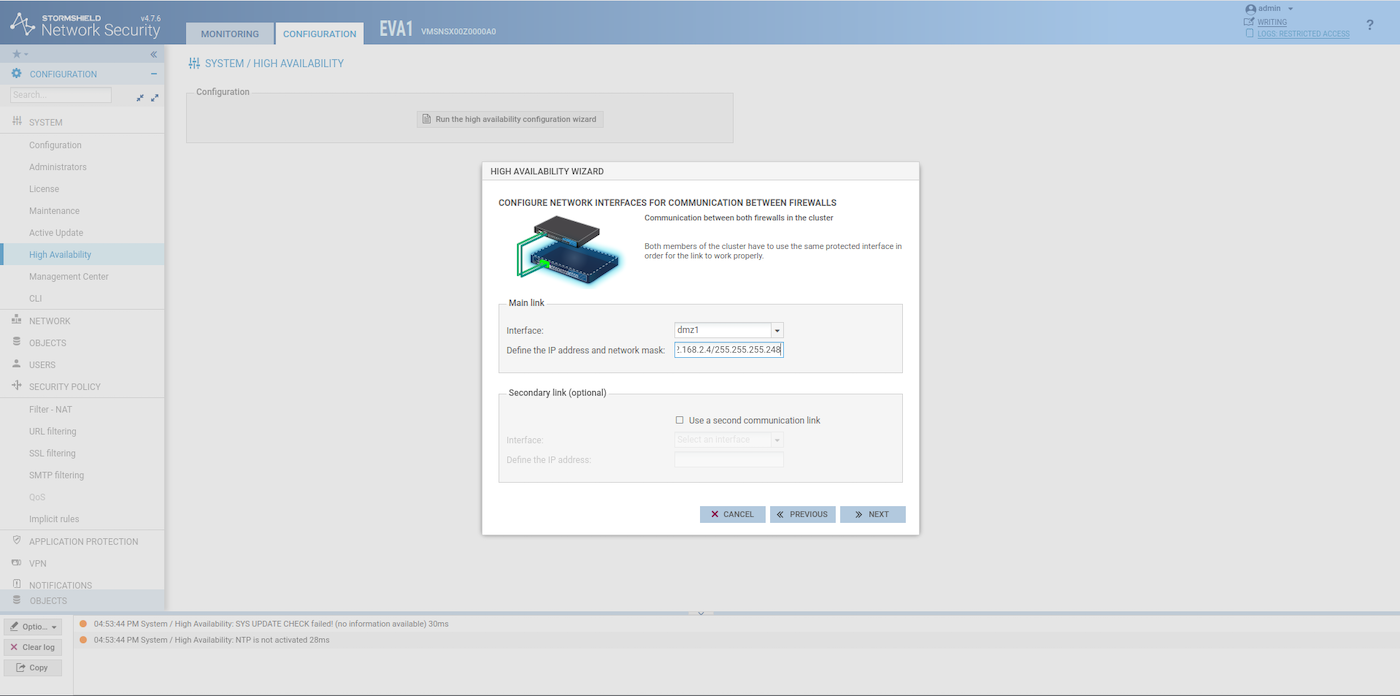
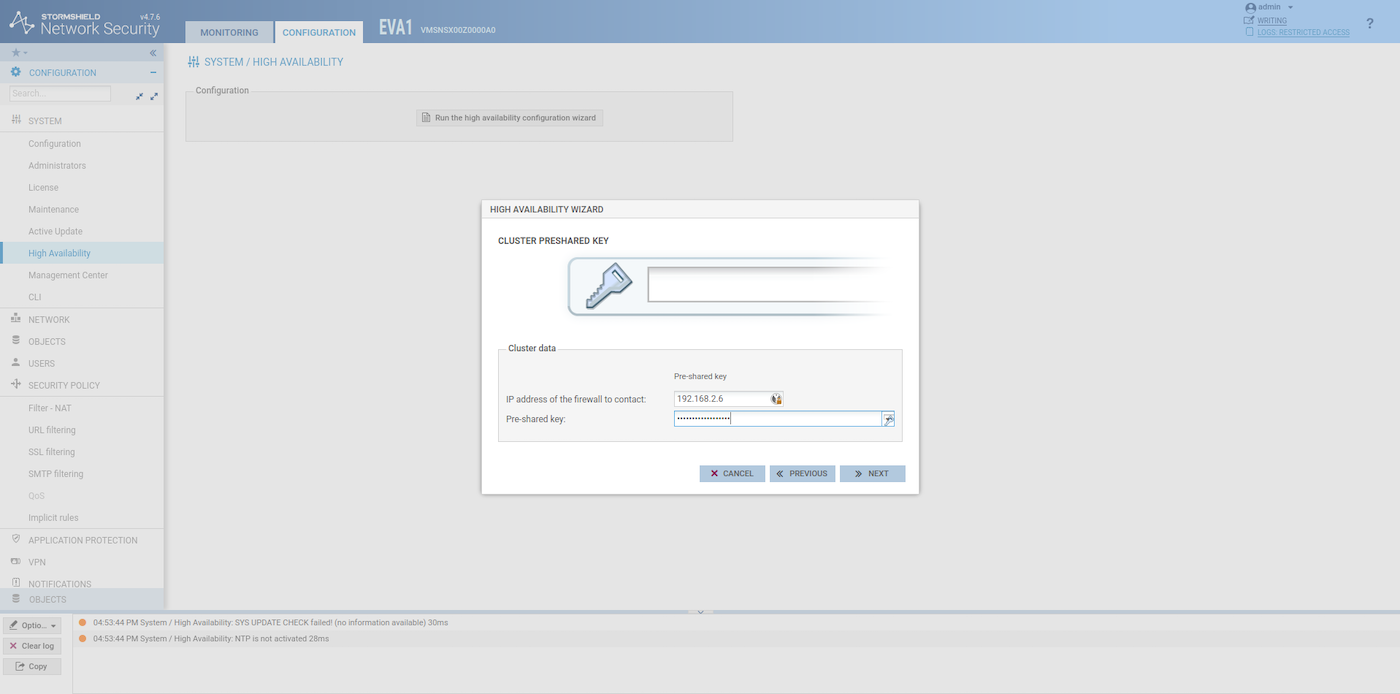
On the first SNS EVA instance, create a group of firewalls (Configuration > System > High Availability). For the IP address, check which IP was assigned to the HA interface by the OpenStack DHCP.
When the configuration of the HA is finished on the first SNS EVA, join the group of firewalls on the second one:
The second SNS EVA external interface will now use the same IP address as the first SNS EVA. Therefore the 147.135.161.154 IP address can be used for something else now.
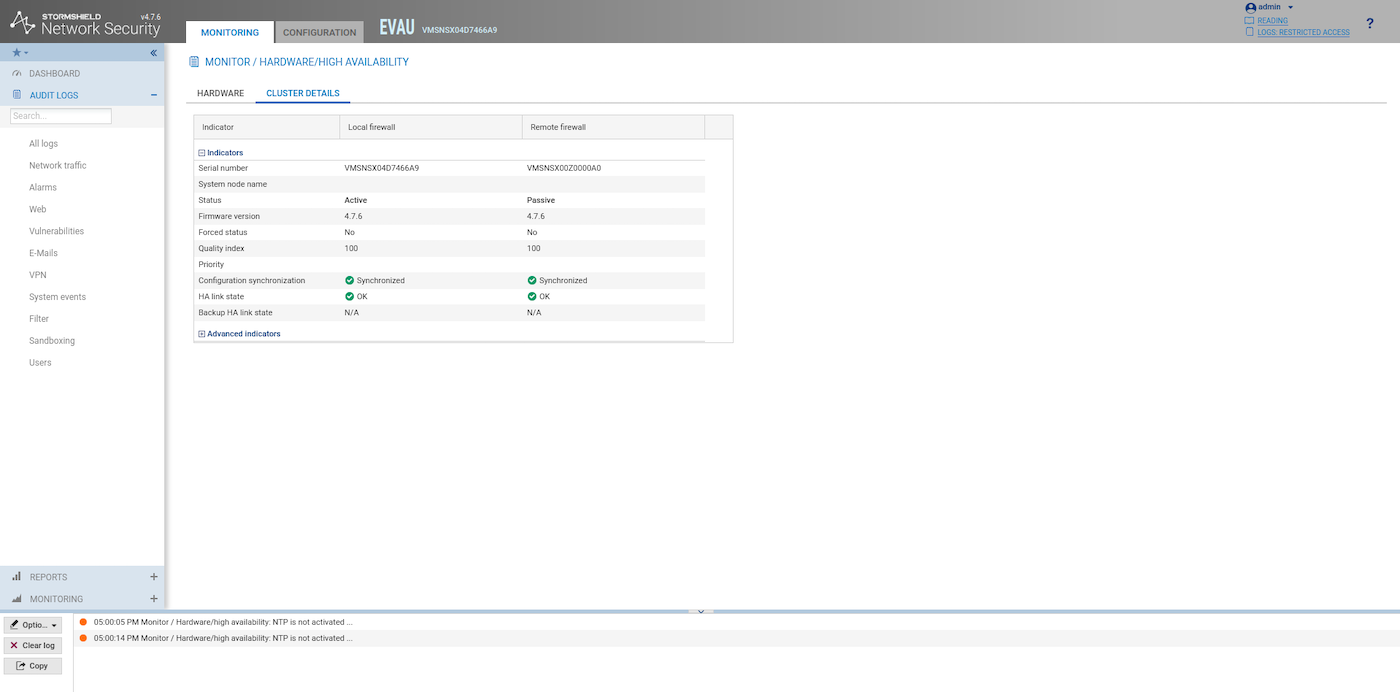
If everything is configured properly, after the reboot of the second SNS EVA, you should see something similar to this in the Health Indicators of the HA Link:
Configure and secure the SNS EVA management
Get your public IP:
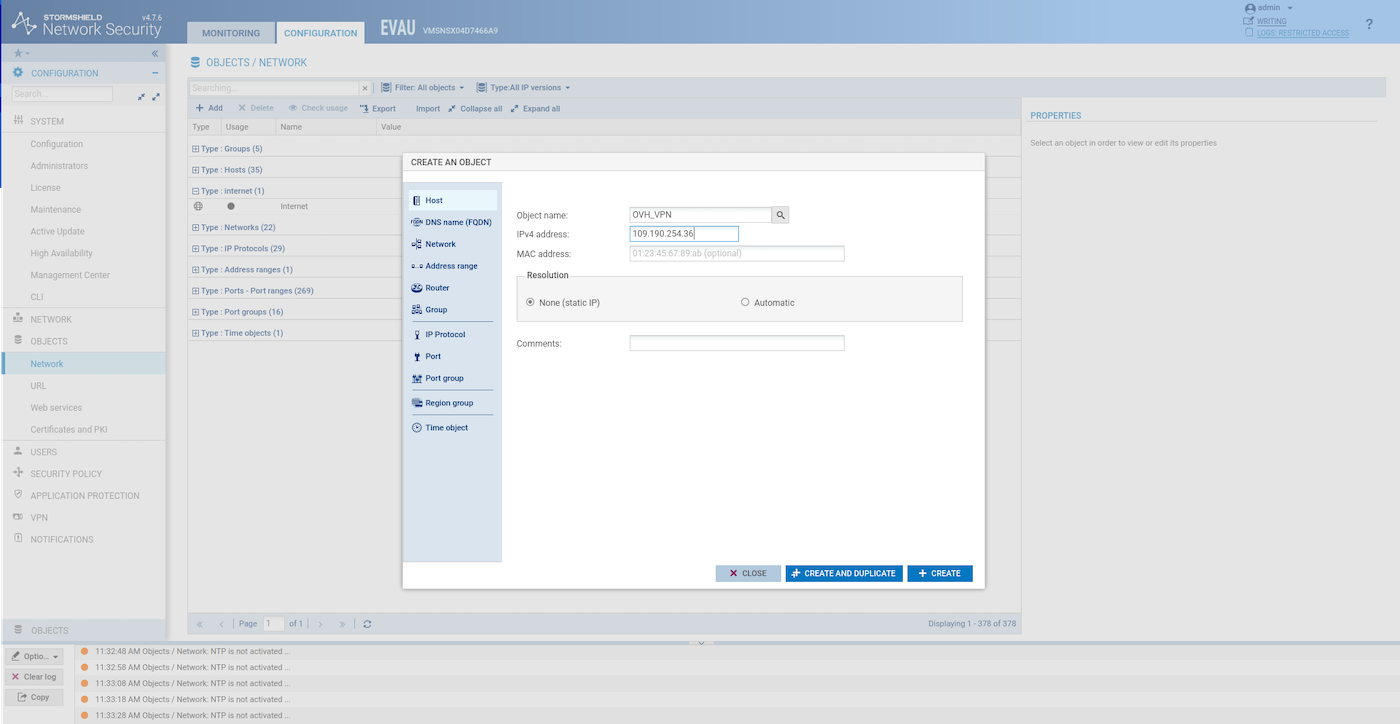
Create a host object for your public IP:
Restrict access to the GUI to your public IP and enable SSH:
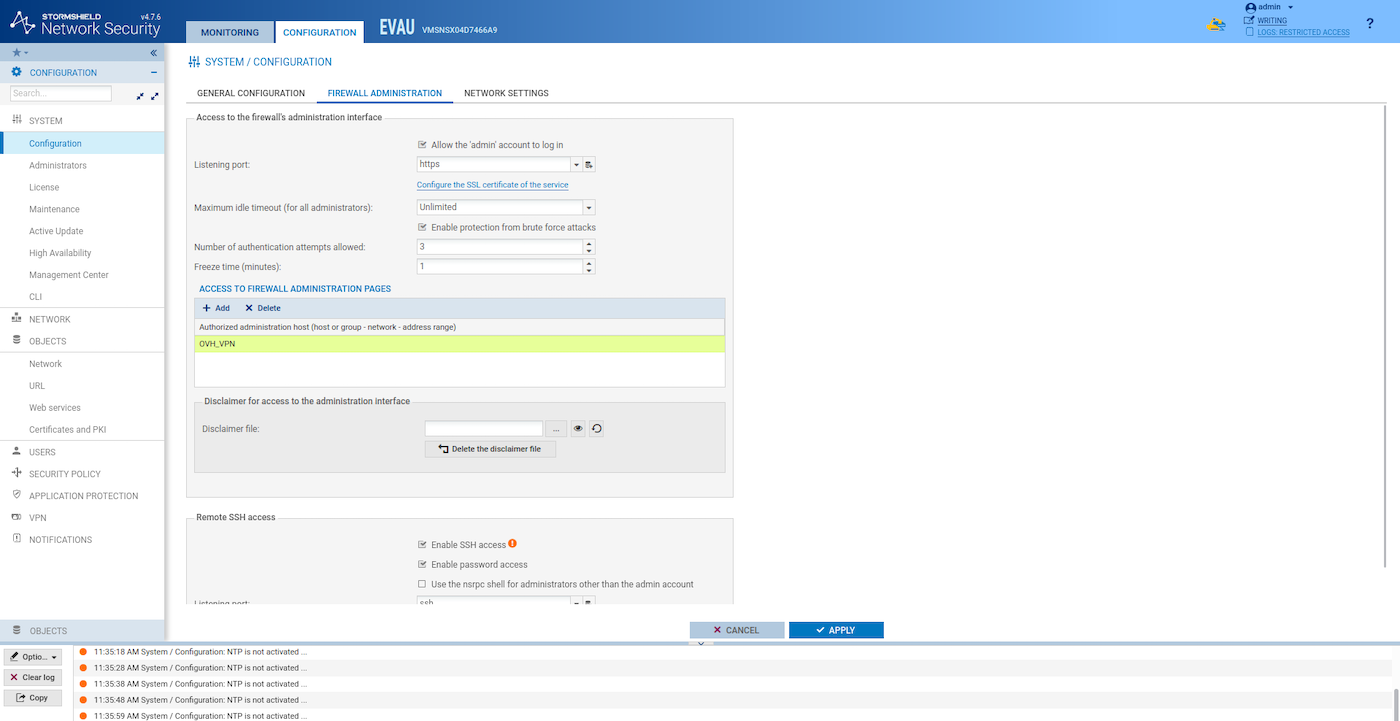
Restrict SSH access to your public IP:
Re-synchronize the HA configuration
The synchronization between the two SNS EVA instances is crucial to ensure that both firewalls are always up to date with the same configuration. This can be done through the SSH command line or directly via the graphical user interface (GUI).
For this example, we use the SSH command line solution. If you prefer to use the GUI for synchronization, refer to the « High Availability screen » section in the Stormshield SNS EVA documentation for detailed steps.
At this point, the two SNS EVA instances should not be in sync anymore as we configured a large number of parameters on the first instance that the second is not aware of.
Log in to the active SNS EVA instance using SSH:
Synchronize the two SNS EVA:
You need to do this each time you update the configuration.
Use cases configuration
After deploying SNS Elastic Virtual Appliance firewall, it can be used in multiple advanced security scenarios such as IPsec VPN, SSL/TLS VPN, network gateways (IN or OUT) as described below. Thanks to the vRack private network, listed VLANs can also be used outside the Public Cloud environment: across Bare Metal or Private Cloud products.
Use case 1: Configure Stormshield Network Security to be used as a gateway
In this example, the virtual firewall will act as a secure gateway for private instances (or any other server) within the VLAN200 of the given vRack network. Such traffic can be a subject for URL filtering on the firewall.

-
Create a network object for the VLAN200 by following this part of the official Stormshield documentation.
-
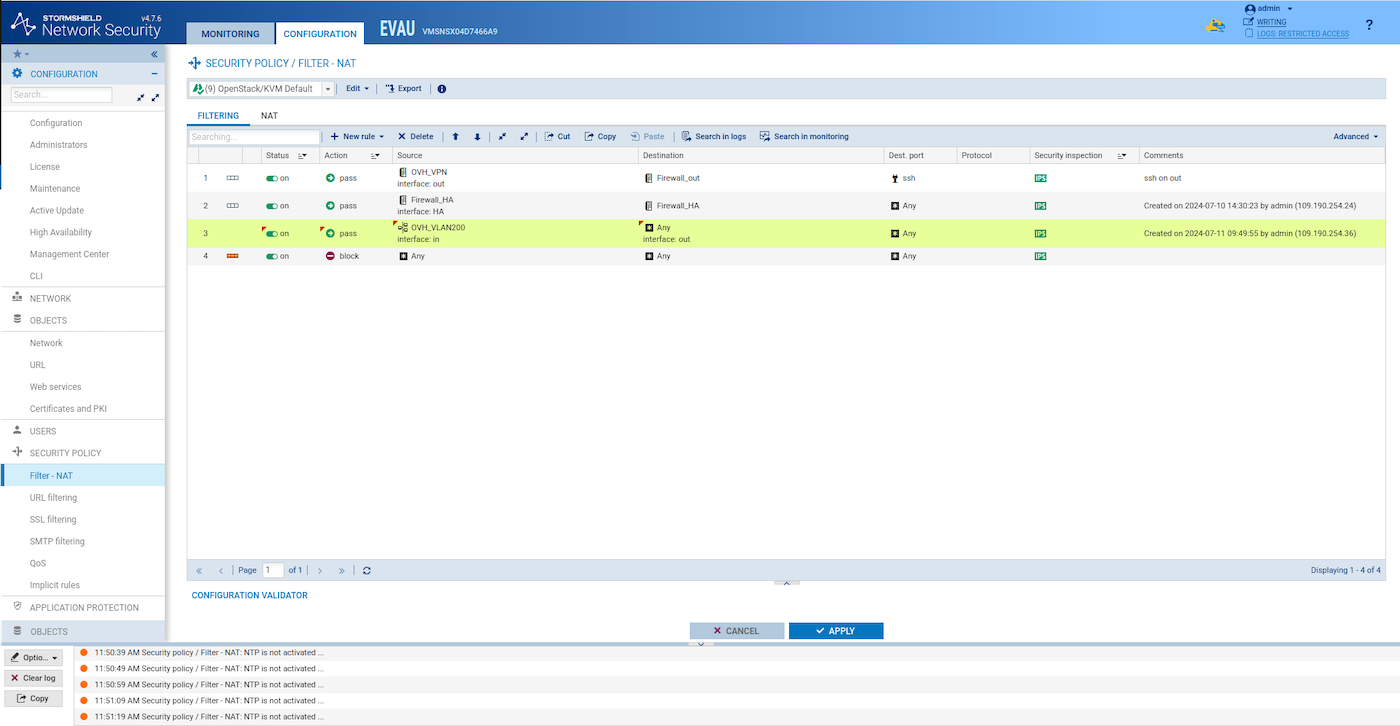
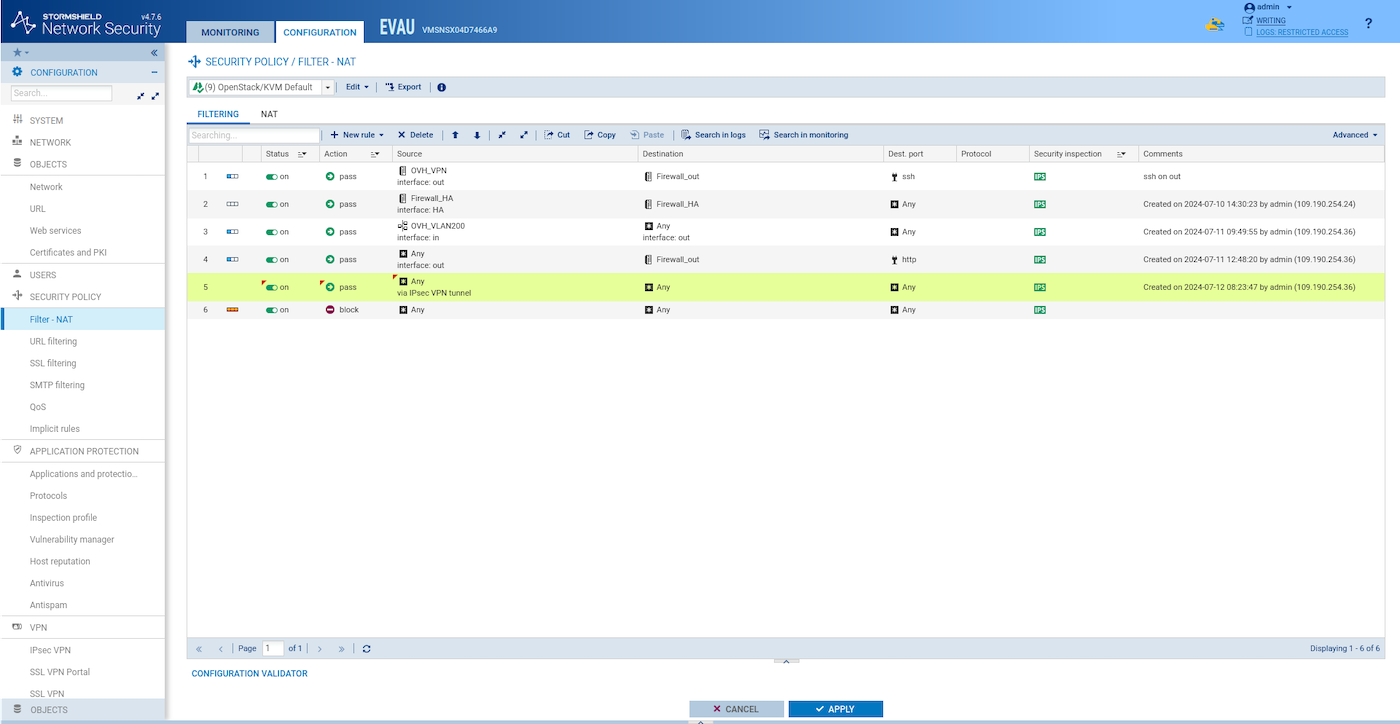
Create a new filter rule similar to this one to allow the traffic coming from VLAN200 to go out:
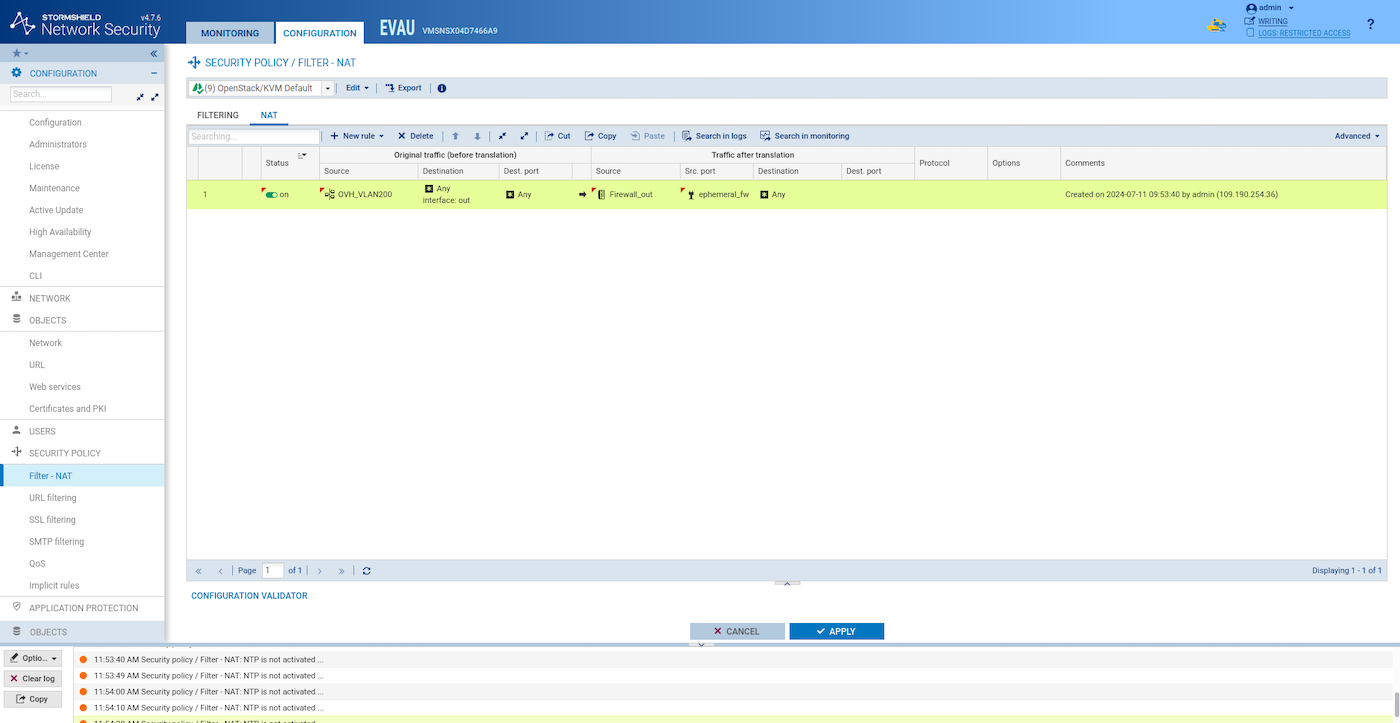
- Create a NAT rule similar to this one:
Synchronize the two HA SNS EVA instances:
Verify if an instance can reach the Internet from VLAN200
Create an instance on VLAN200:
Log-in via SSH to the SNS EVA instance:
From the SNS EVA instance, log-in via SSH to the Ubuntu webserver. Check which IP was assigned to your Ubuntu webserver instance by the OpenStack DHCP:
Test if you can reach a public website:
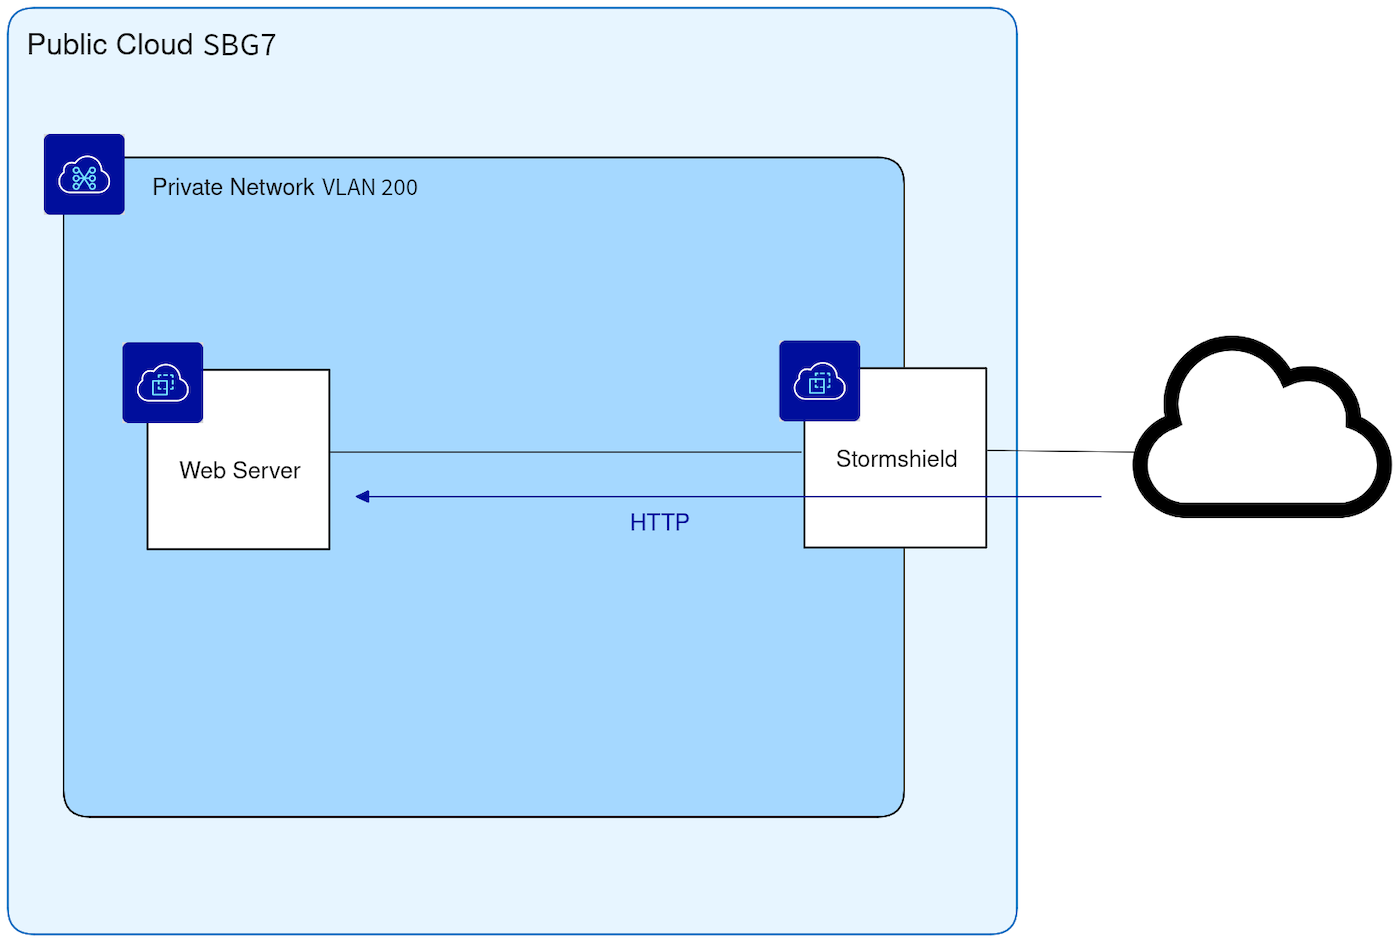
Use case 2: Configure a NAT to access a private HTTP service from the outside
In this example, the Internet should be able to reach the private web server installed in VLAN200. The aim of this configuration is to protect the web server with a network firewall.
Install Nginx on the ubuntu-webserver instance:
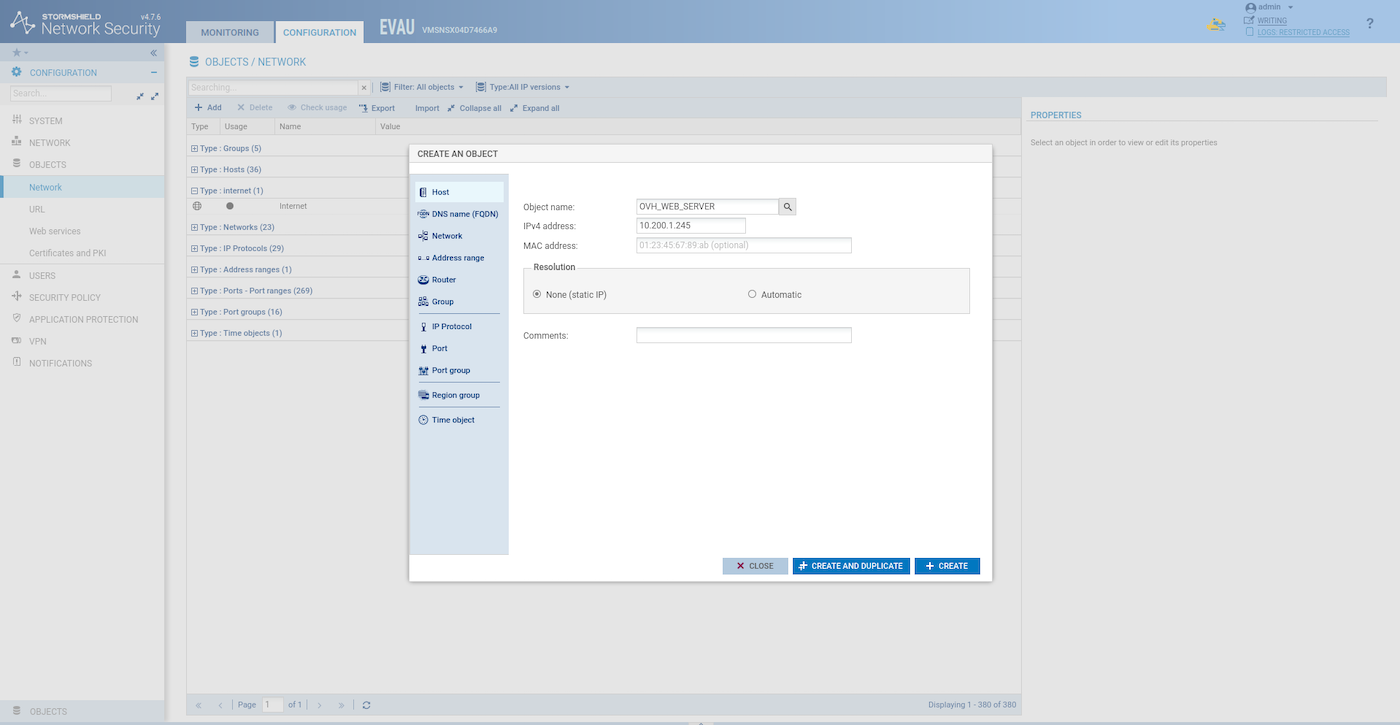
Create a host object for the ubuntu-webserver:
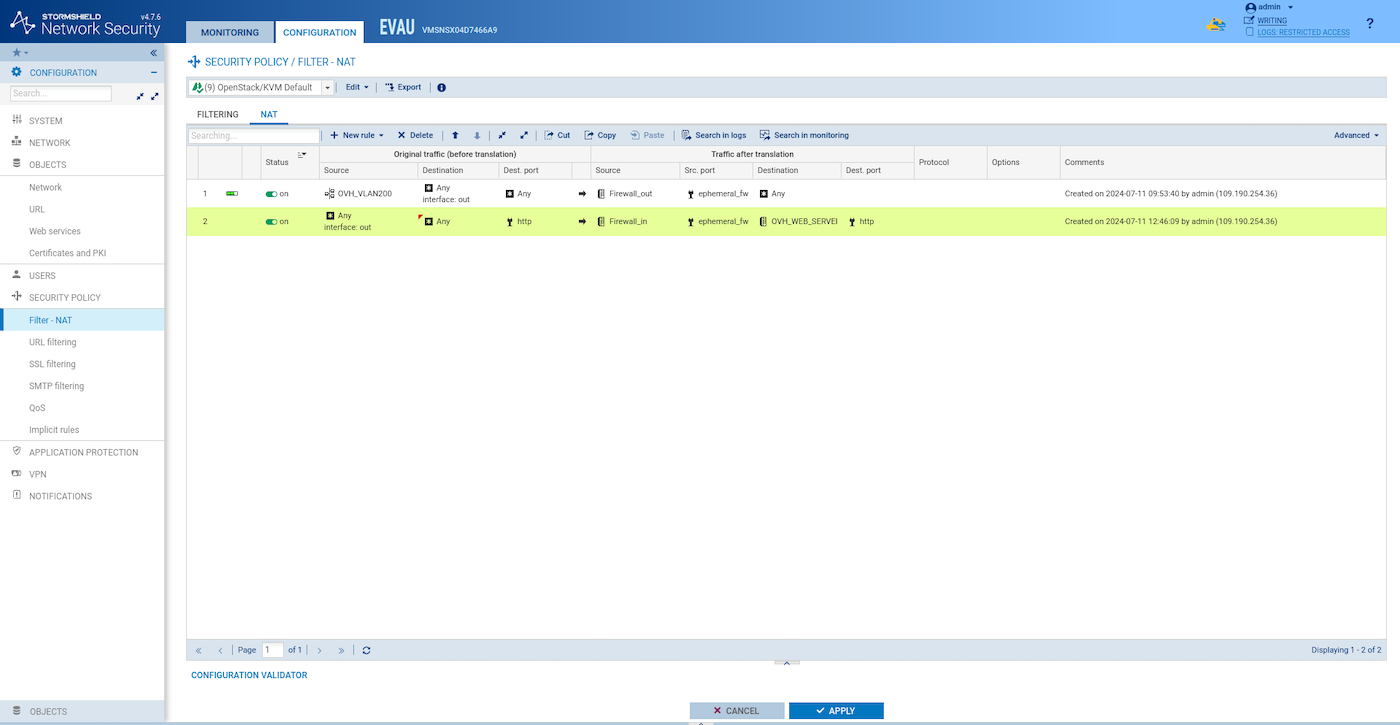
Create a NAT rule like this one:
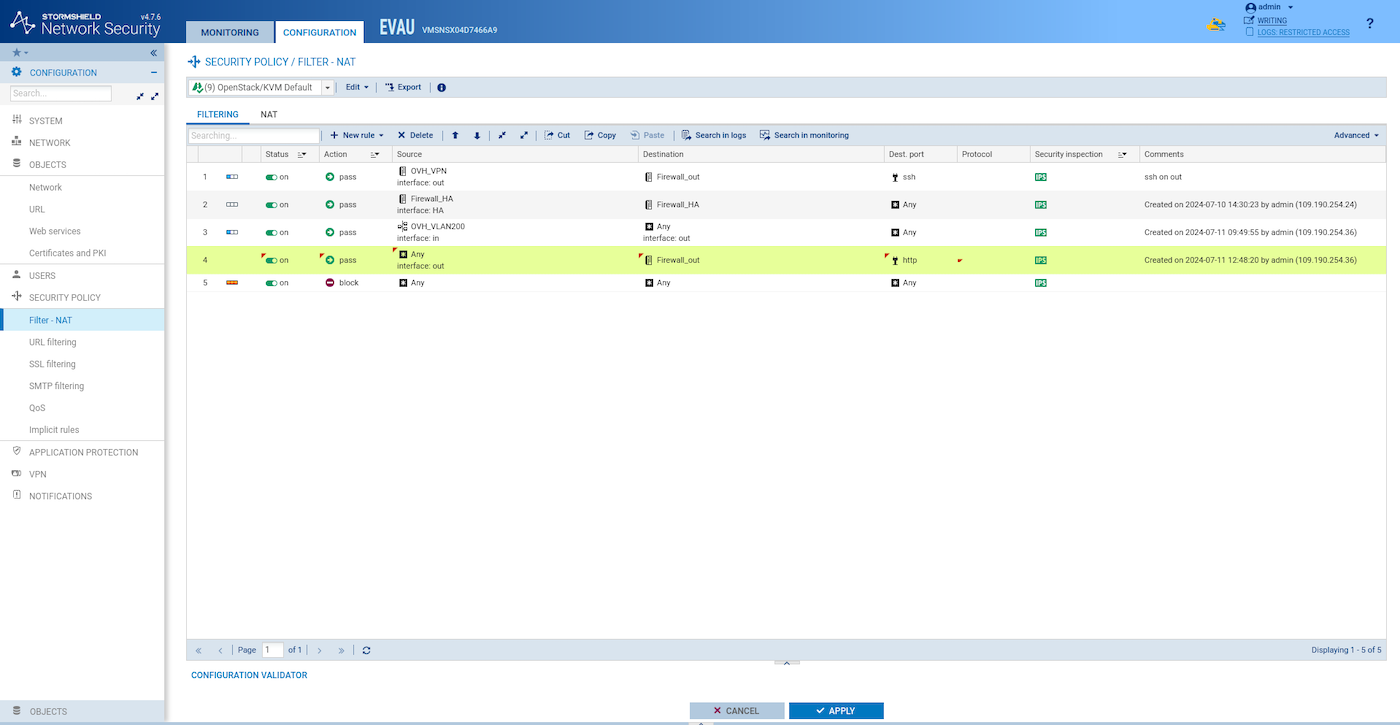
Create a filter rule like this one:
Test to access the website from outside:
Synchronize the two HA SNS EVA instances:
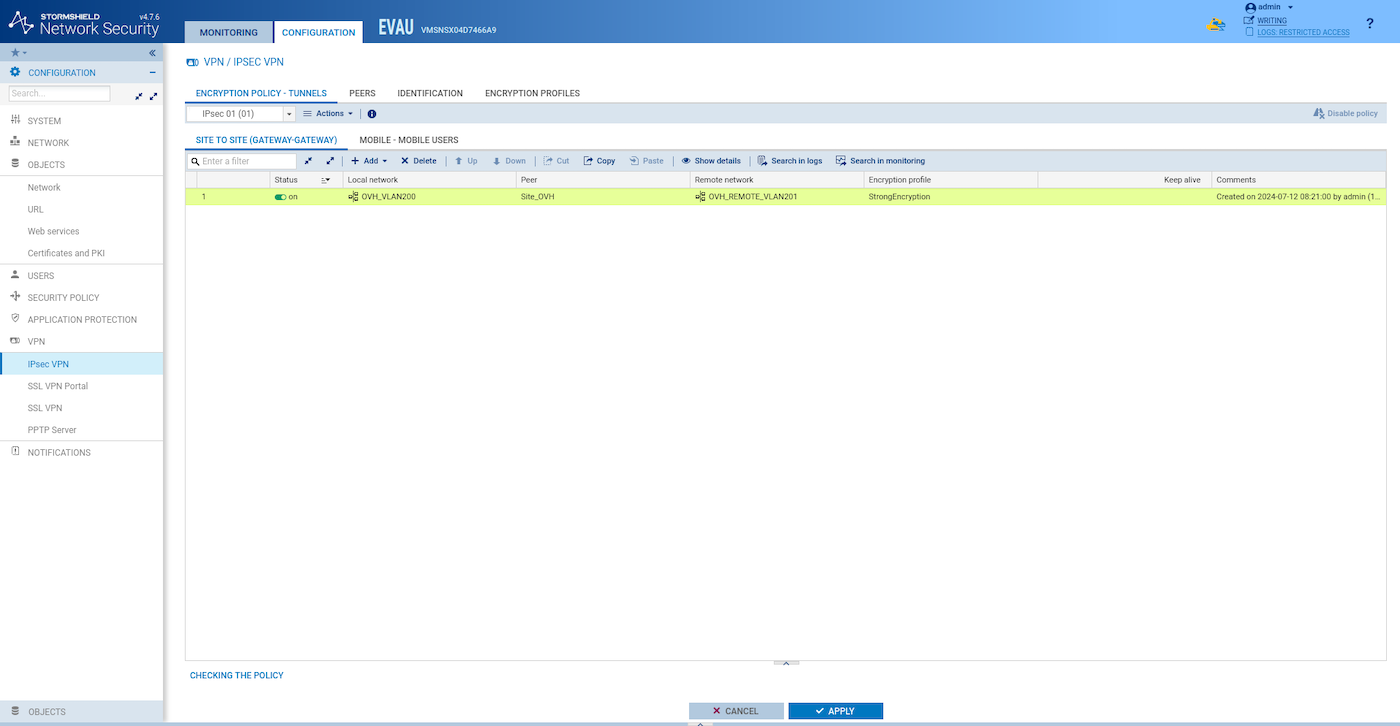
Use case 3: IPsec tunnel (site-to-site)
In this example, IPsec tunnel is configured to interconnect two different PCI regions: SBG7 (network VLAN200) and GRA11 (network VLAN201), but any of these sites could be a remote site such as an office or datacentre.
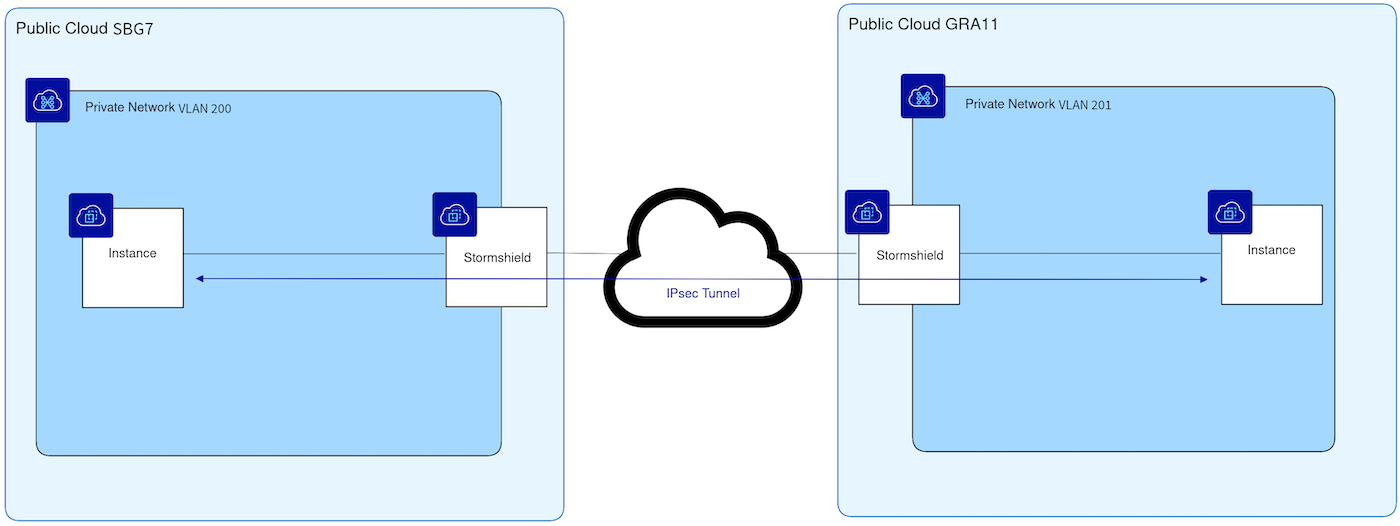
Re-do all the steps in another region using the VLAN 201 instead of the VLAN 200 and different IP ranges for the stormshield-ext and stormshield-ha subnet.
Configure the first site
-
Add a host object for the remote SNS EVA and add a network object for the VLAN201 remote private network.
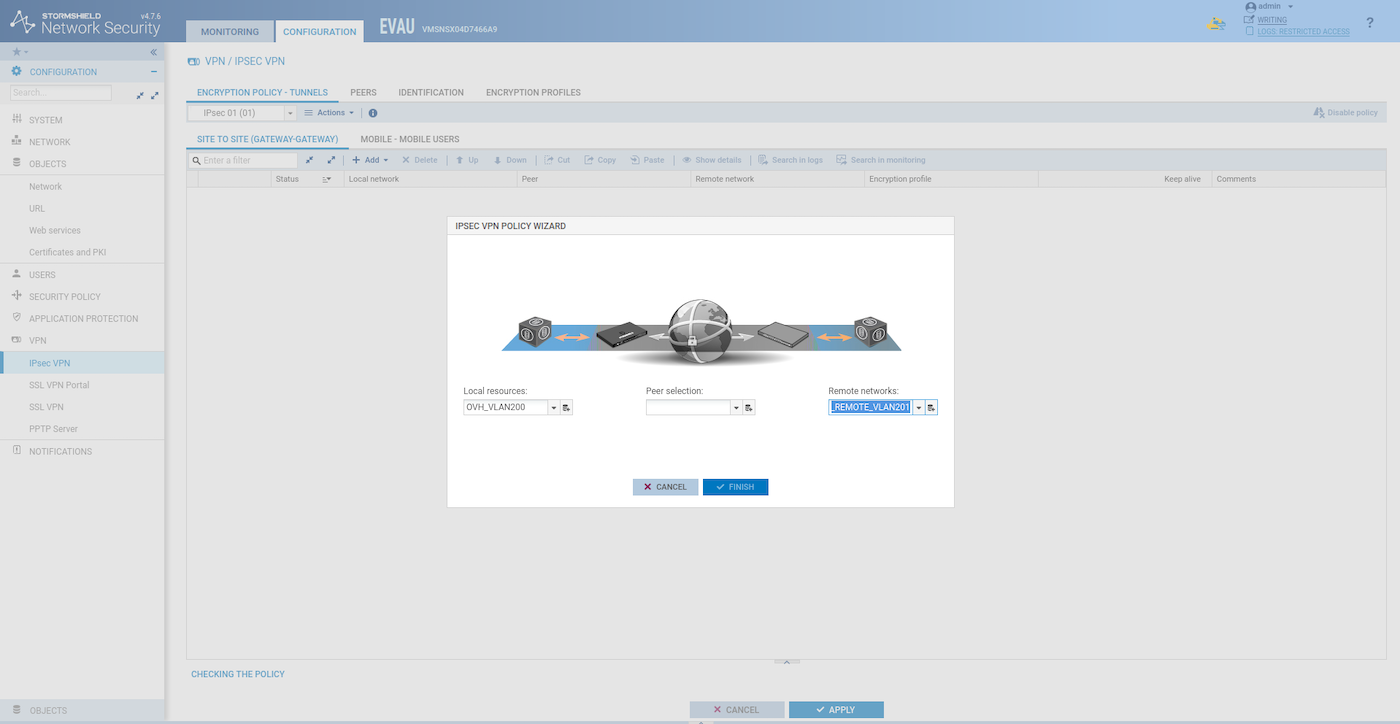
Add the local and the remote private network:
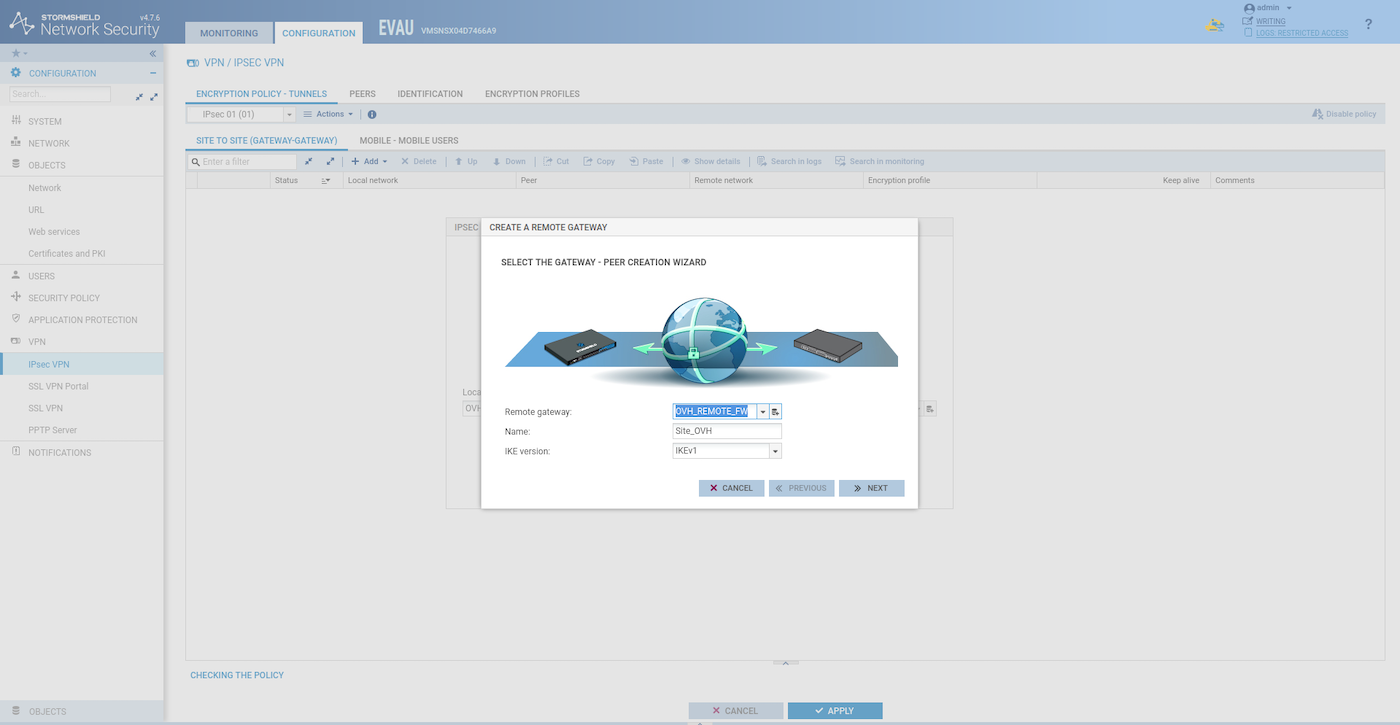
Create the remote gateway:
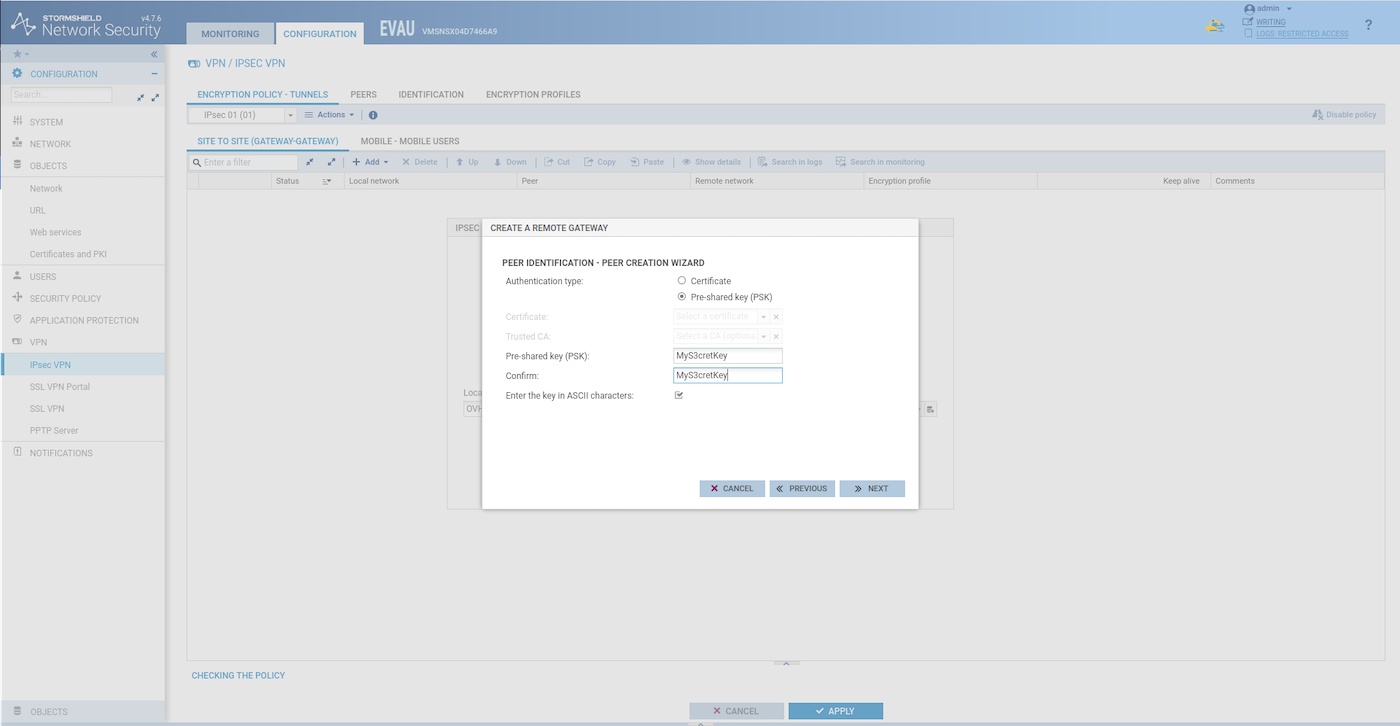
Choose a pre-shared key:
Create and activate the tunnel:
Add a filter rule like this one to allow traffic through the tunnel:
Synchronize the two HA SNS EVA instances:
Configure the second site
Do exactly the same as for the first site, but use VLAN200 for the remote private network and the appropriate IP address for the OVH_REMOTE_FW.
Test the IPsec VPN tunnel
From the first site private webserver instance:
From the second site private webserver instance:
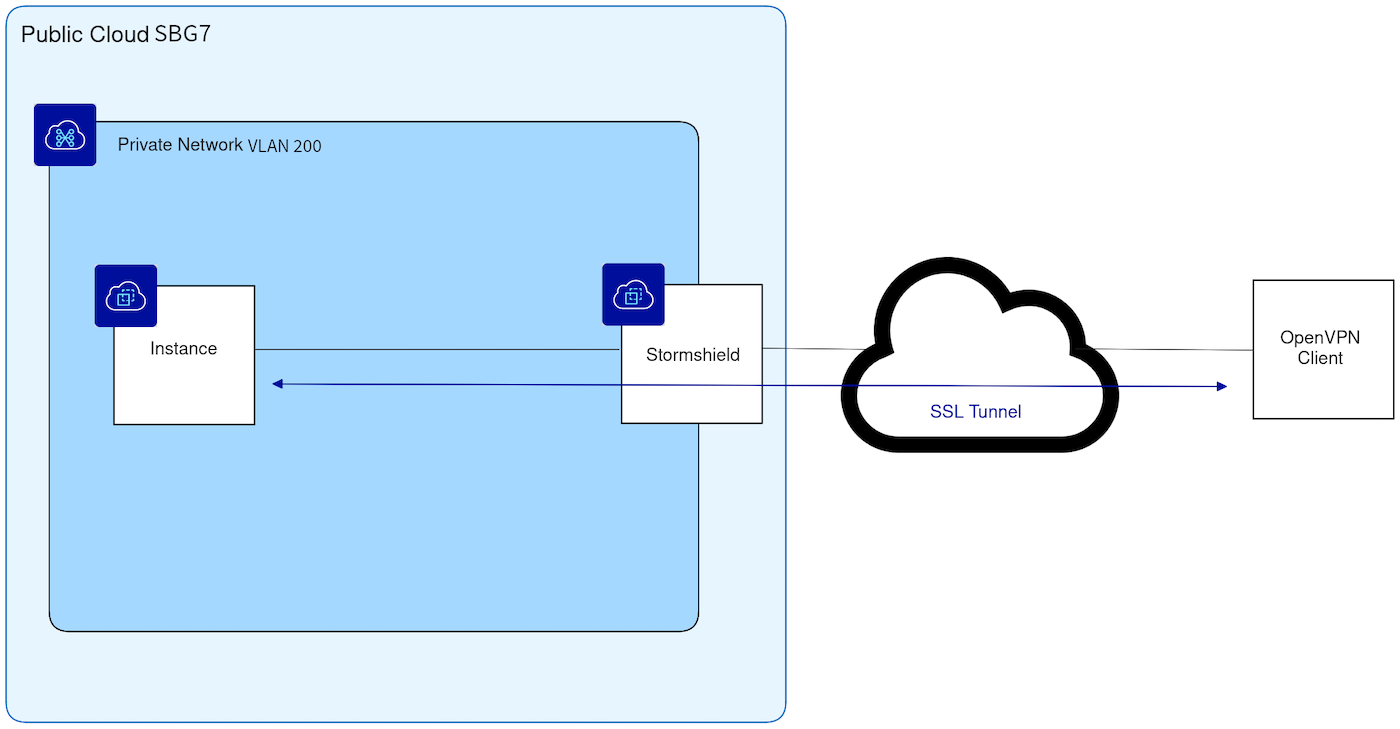
Use case 4: SSL/TLS VPN (client-to-site)
In this example, a remote OpenVPN client will connect to the private network inside VLAN200.
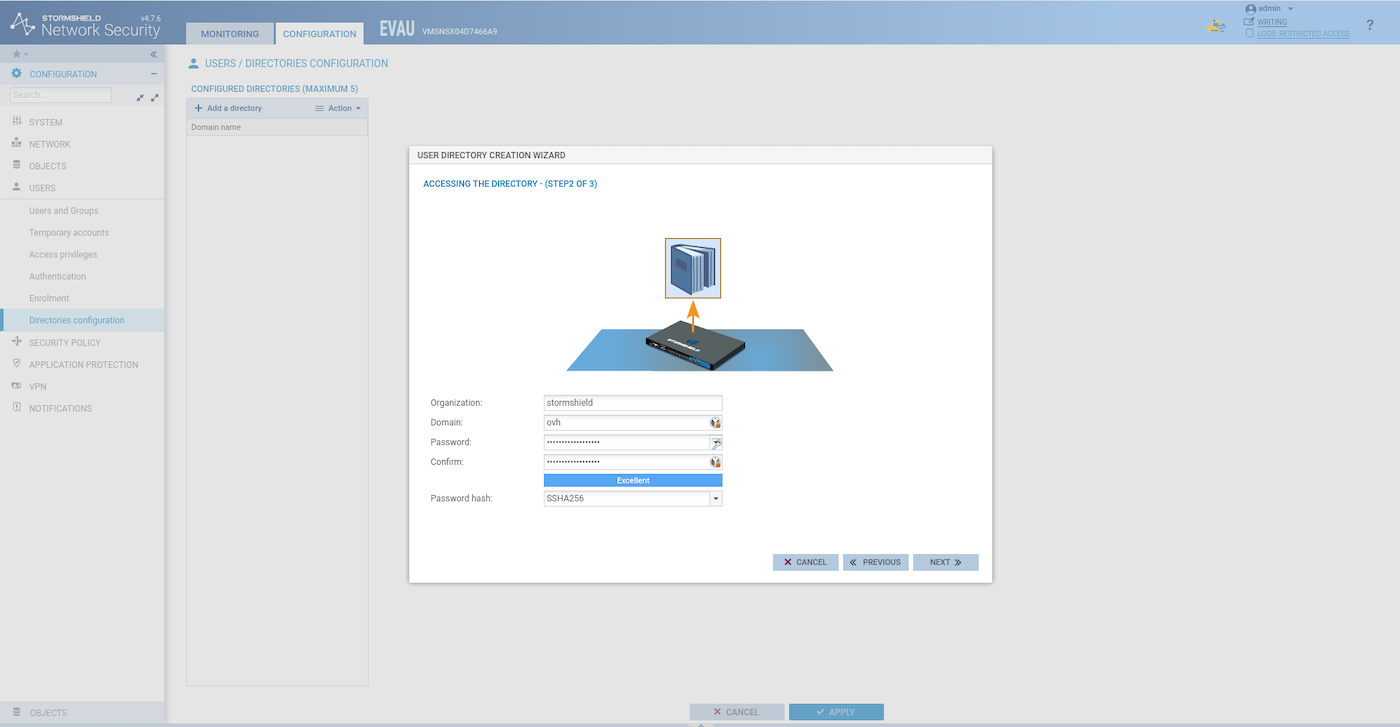
Configuring the LDAP directory
- Create an internal LDAP directory to manage the VPN users.
In a production scenario, this LDAP/AD should be remote and not local.

- Create the user directory:
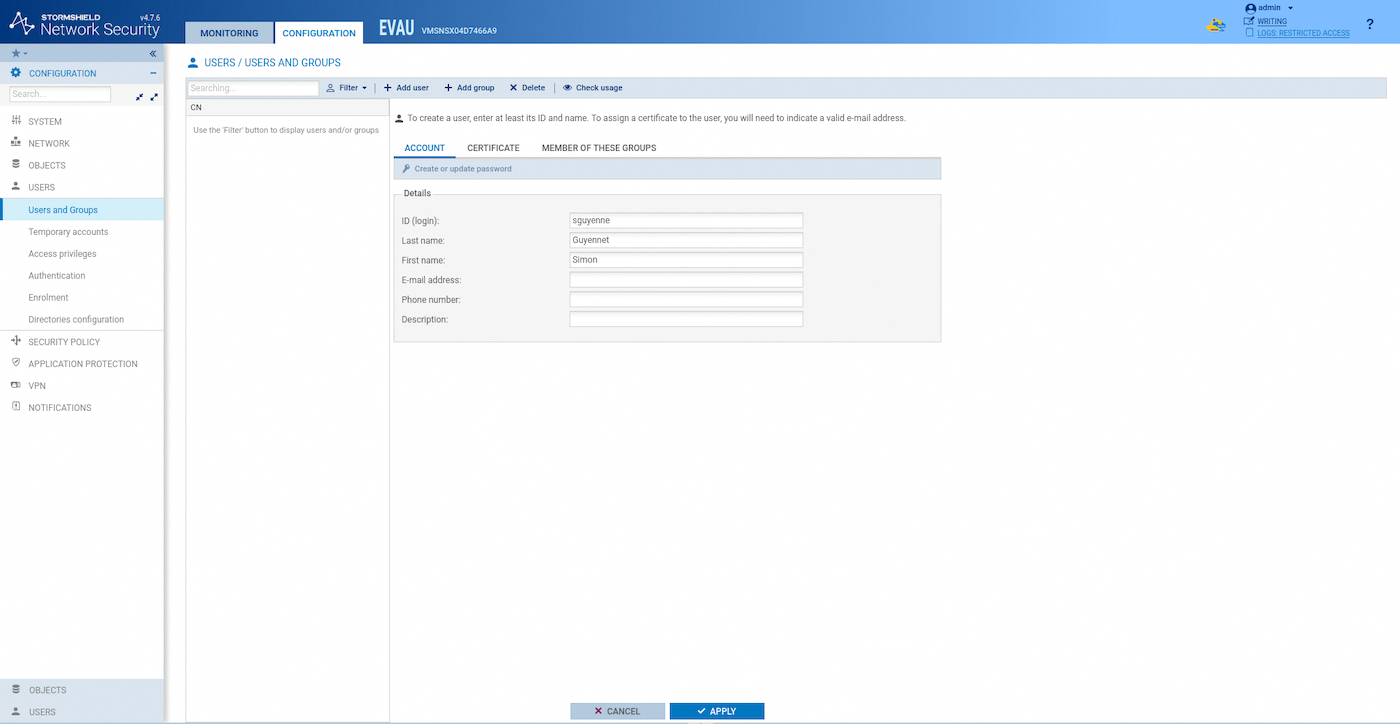
- Add a user to our local directory:
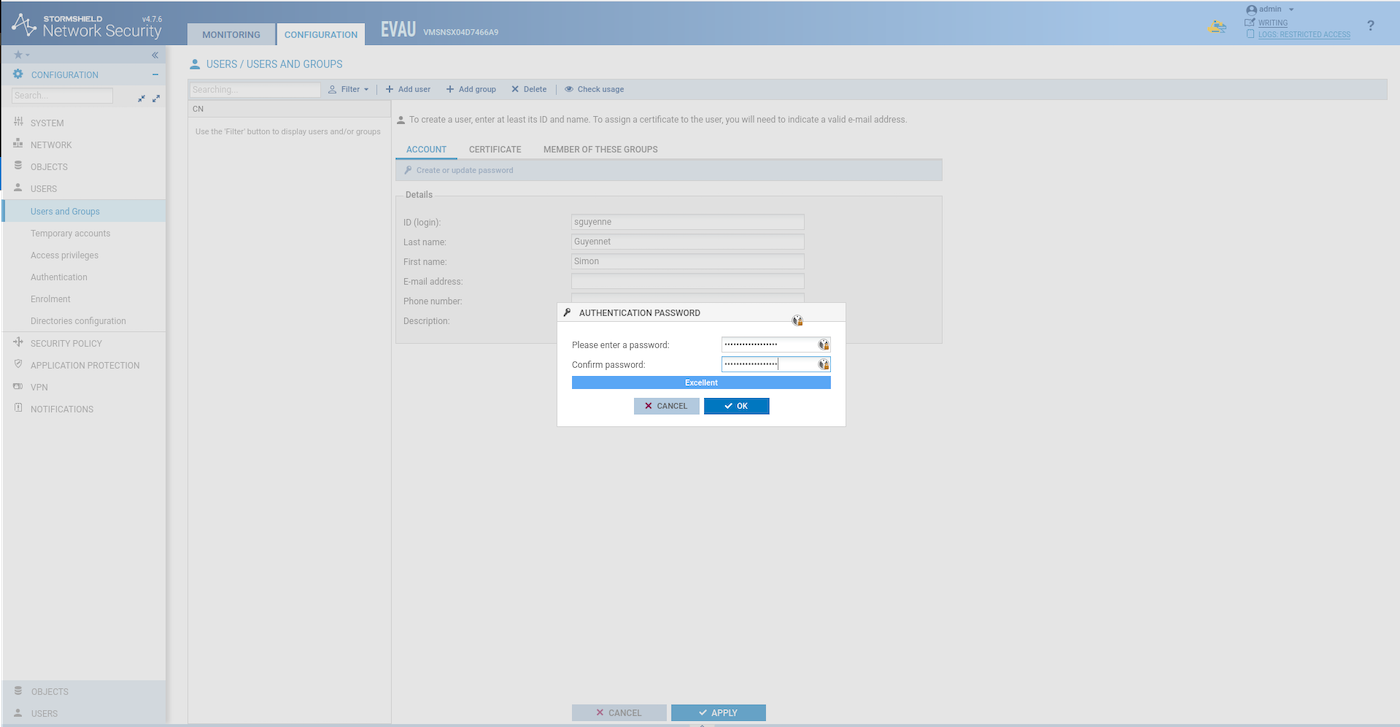
- Choose a password for the new user:
Configuring VPN network objects
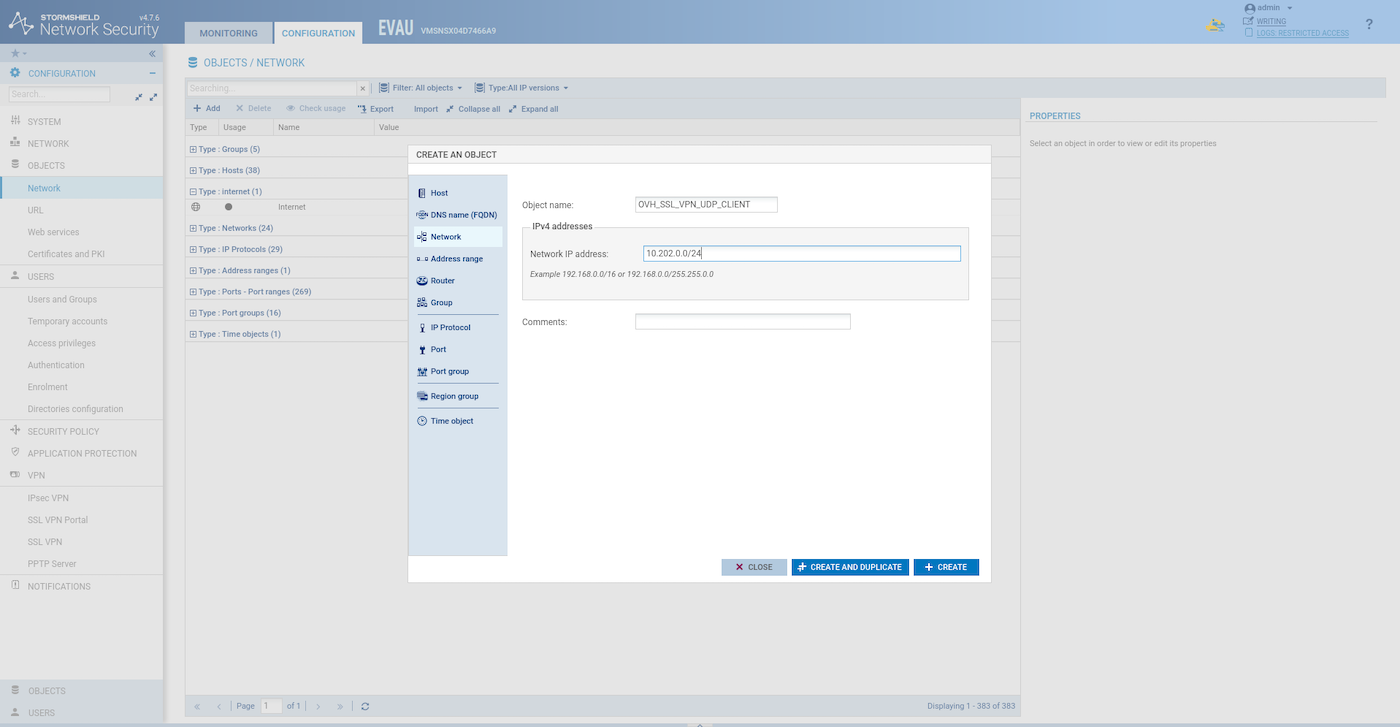
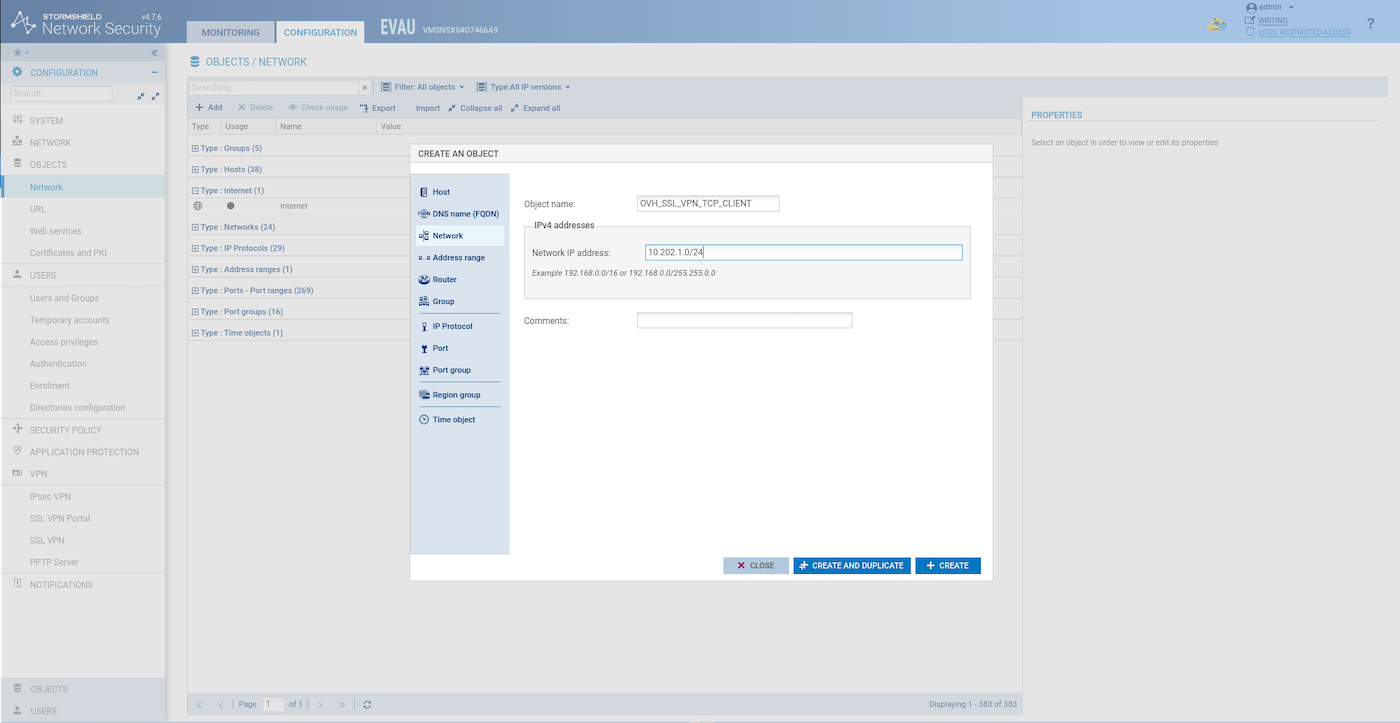
Create two network objects for the SSL VPN client.
UDP client network:
TCP client network:
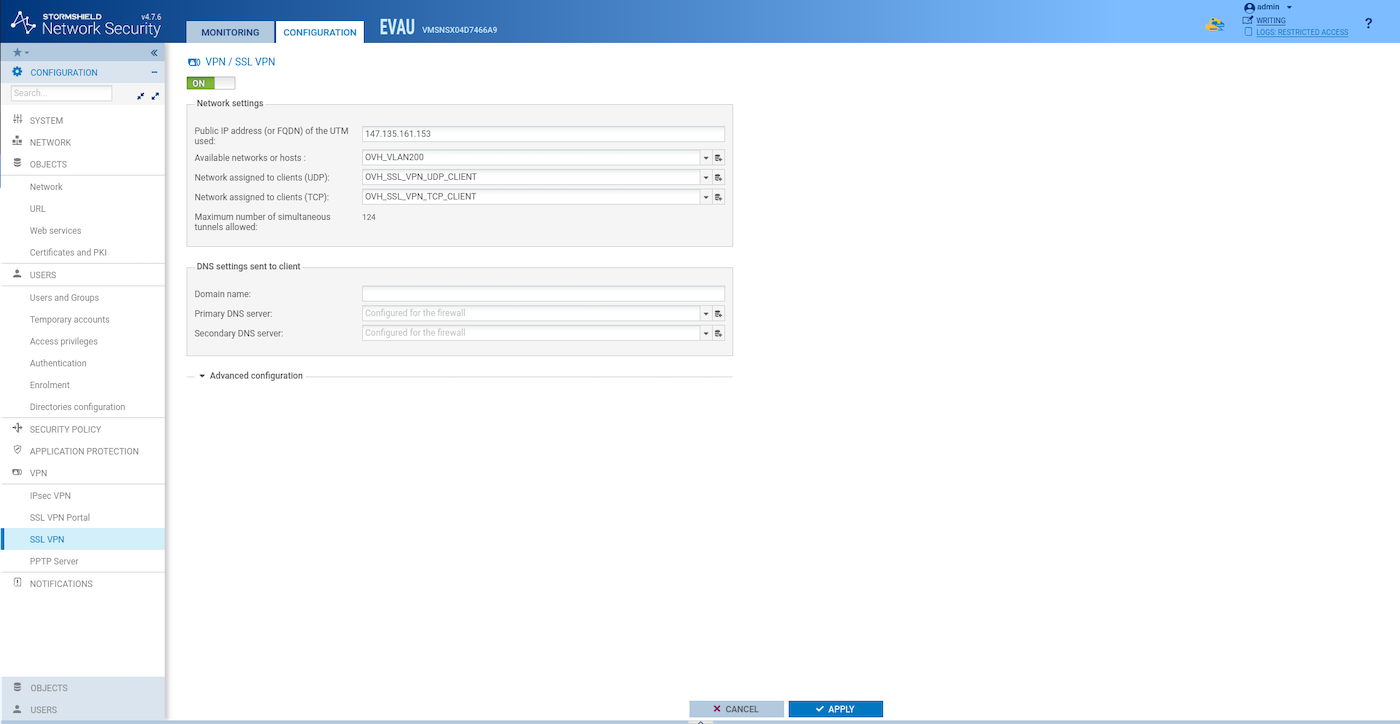
SSL VPN server configuration
Configure the SSL VPN server:
Managing user permissions
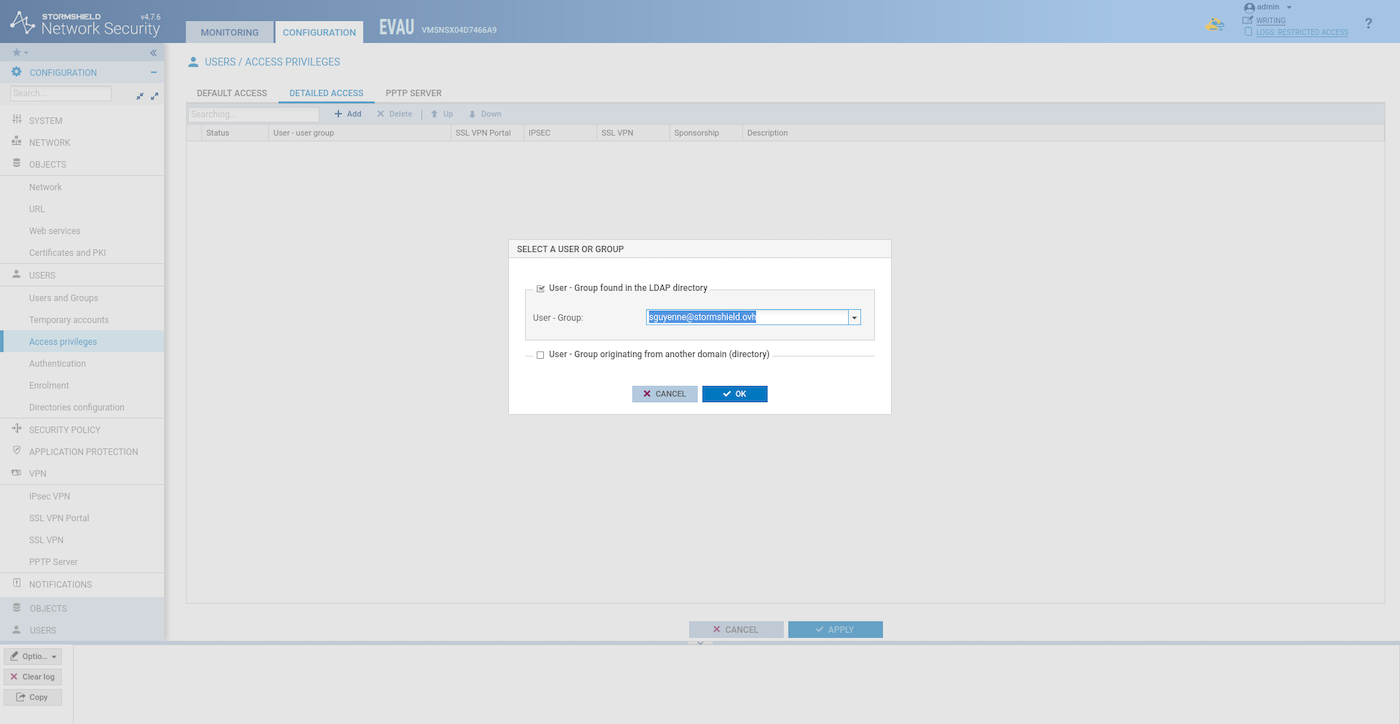
Add permission to your user to use the SSL VPN server (Configuration > Users > Access privileges > Detailed Access > Add)
Search your user:
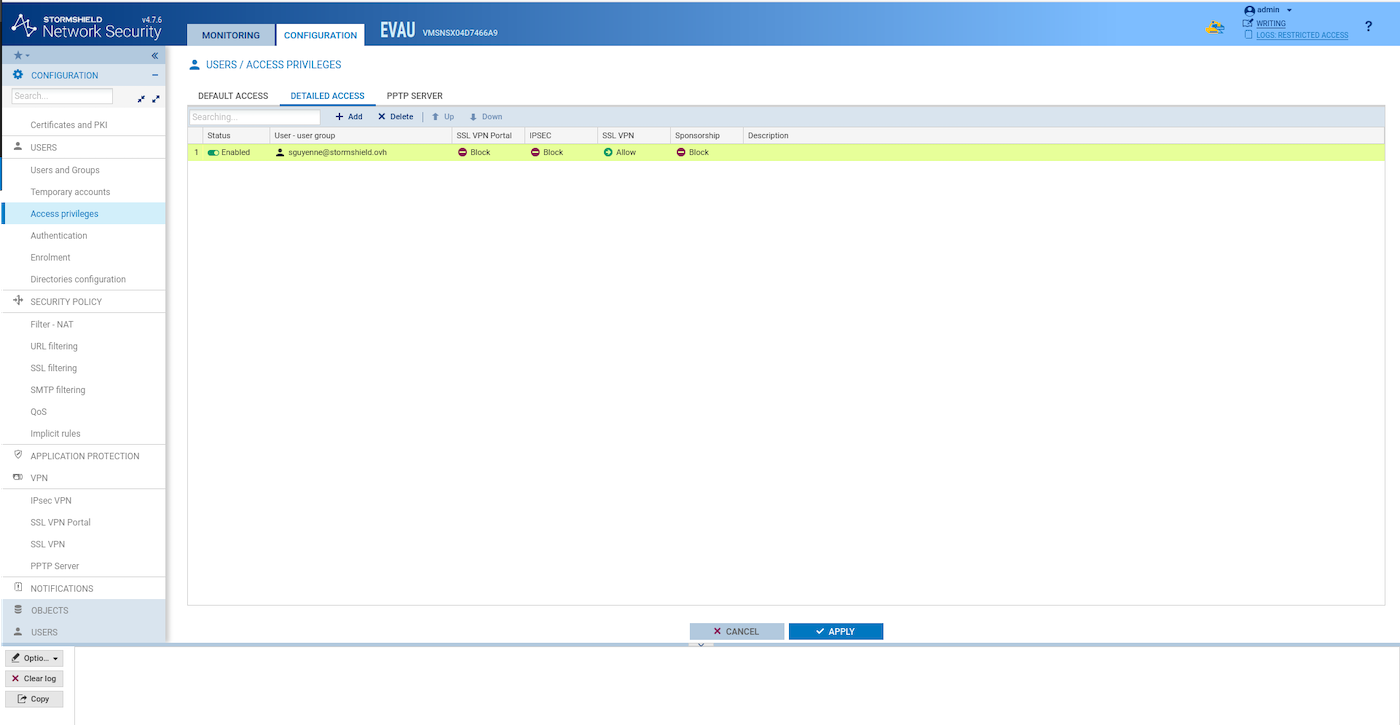
Allow SSL VPN:
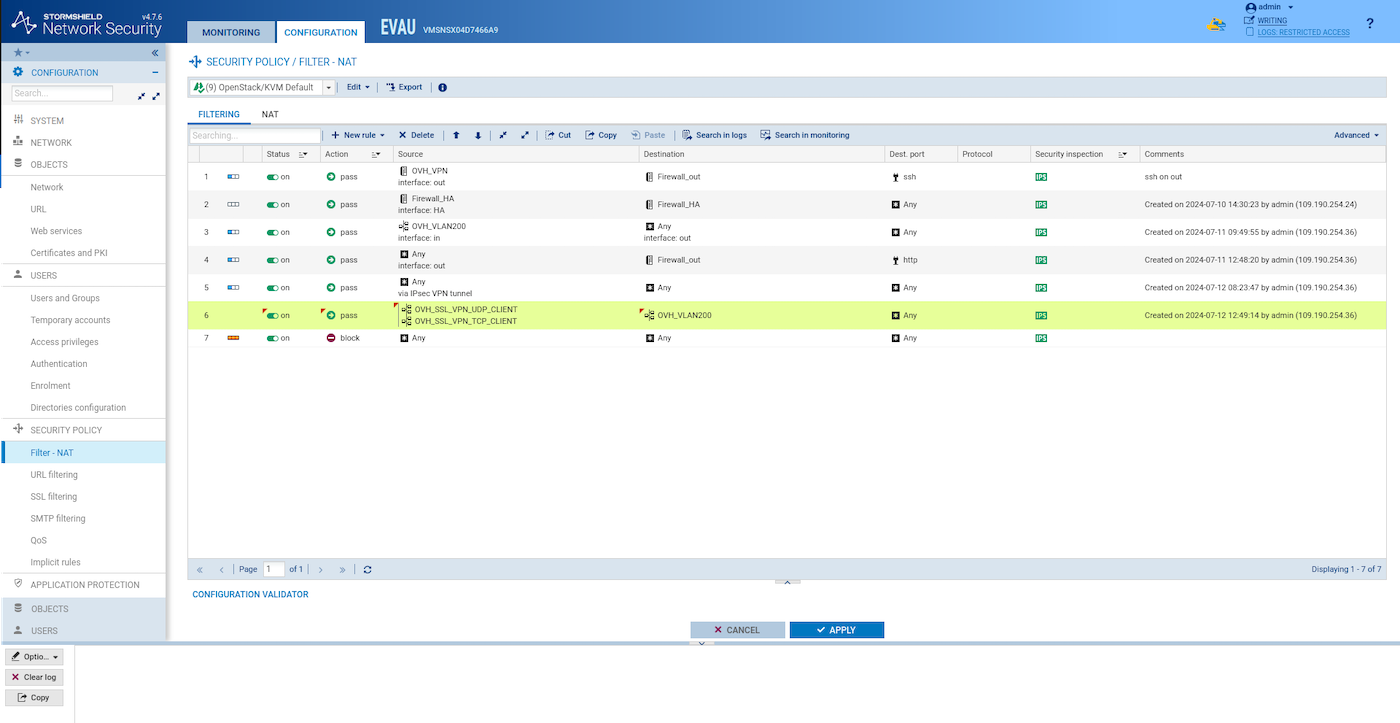
Configuring filter rules
Add a filter rule like this one to let VPN client access the VLAN200:
Synchronization of SNS EVA instances
Synchronize the two HA SNS EVA instances:
Test the SSL/TLS VPN
To test SSL/TLS connectivity, you can use any device with OpenVPN installed. This example includes testing an OpenVPN client on top of an OpenStack instance in another region.
In this example, we use the OpenVPN client, but you can also use the Stormshield packaged version.
Download the VPN configuration file (Configuration > VPN > SSL VPN > Advanced configuration > Export the configuration file).
Create a public OpenVPN client instance in the region of your choice:
Check the IP assigned to the instance and copy the configuration file to it:
Connect to the instance:
Install the OpenVPN client:
Connect to the VPN:
Test to ping the webserver private instance:
Go further
If you need training or technical assistance to implement our solutions, contact your sales representative or click on this link to get a quote and ask our Professional Services experts for assisting you on your specific use case of your project.
Join our community of users.

