How to extend a private OVHcloud network across Public Cloud regions
179 Views
Objective
The objective of this guide is to help OVHcloud users configure and extend a private network across multiple Public Cloud regions, while avoiding IP conflicts and ensuring network stability. It covers best practices for:
- Assigning separate IP pools per region.
- Managing VLANs across regions or other OVHcloud products.
- Using DHCP as a service for additional infrastructure, such as Bare Metal servers.
- Providing step-by-step instructions using the OVHcloud Control Panel, Horizon, OpenStack CLI, and Terraform.
By following this guide, users will be able to deploy a secure and reliable multi-region private network with OVHcloud.
Background and Solution Overview
Challenges
When extending a private network across multiple OVHcloud Public Cloud regions or connecting it to other OVHcloud products through a vRack, a major challenge arises from the way IP addressing is handled.
Public Cloud instances automatically receive their private IP addresses via OpenStack DHCP or cloud-init, and this mechanism cannot be disabled. At the same time, all private networks using the same VLAN inside a vRack must share a common address space. This means that, without proper planning, the same VLAN can end up assigning overlapping or identical IP addresses across regions or between different OVHcloud services.
To illustrate this issue, the following diagram shows an example of what must be avoided:
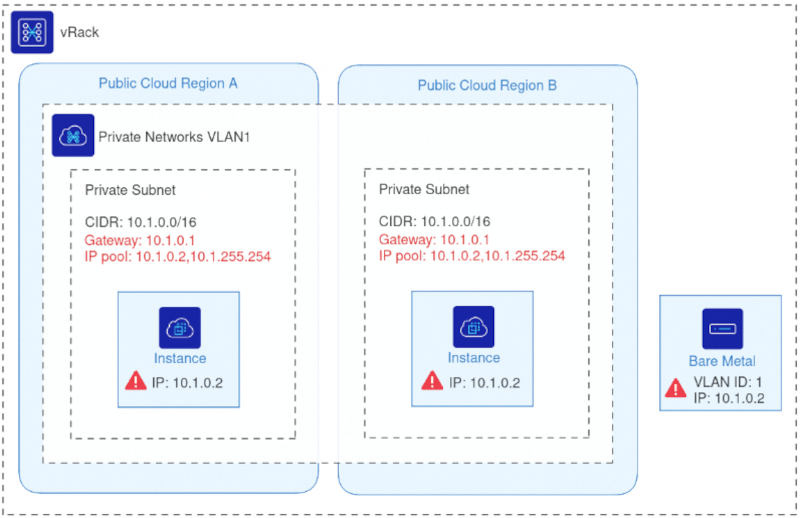
In this example, two Public Cloud instances in different regions and one Bare Metal server all share the same VLAN ID and have been assigned the same IP address.
When multiple machines share the same IP on the same VLAN, the network becomes unstable. Packets cannot reliably determine which machine they should reach. For example, any traffic sent to 10.1.0.2 may land on an unpredictable host, resulting in inconsistent connectivity, routing errors, and service disruption.
This problem becomes more severe as environments scale across multiple regions or products. Therefore, a structured approach to IP allocation such as dividing the subnet into dedicated per-region pools is essential to maintaining a stable, predictable and conflict-free vRack network.
Solution Overview
To prevent IP conflicts and ensure stable communication across a stretched vRack network, each Public Cloud region must use a dedicated IP pool within the same private subnet. By segmenting the subnet into non-overlapping allocation ranges, OVHcloud ensures that OpenStack DHCP services in different regions never assign duplicate IP addresses even when all networks share the same VLAN ID.
The diagram below illustrates the corrected configuration:
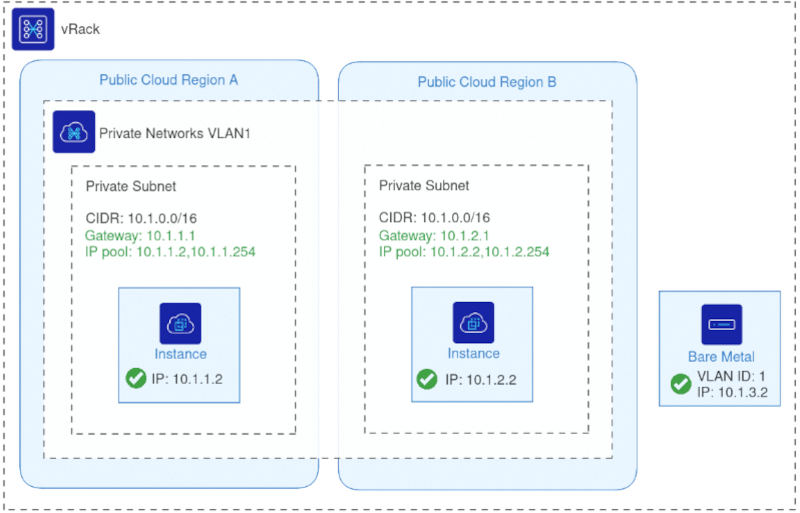
Each region uses the same VLAN ID but draws IPs from a distinct allocation pool within the shared subnet, eliminating any risk of overlap.
With this approach:
- All regions remain part of the same L2 private network through the vRack.
- DHCP continues to function normally in each region, as OpenStack assigns IPs only from its designated pool.
- Additional OVHcloud products (such as Bare Metal, Dedicated Servers, or Private Cloud) can join the same VLAN without creating address conflicts.
- Multi-region workloads, migrations, and hybrid deployments operate reliably on a unified private network.
This solution preserves the flexibility of a single stretched VLAN while enforcing predictable, conflict-free IP management. This guide explains how to configure this setup using the OVHcloud Control Panel, Horizon, OpenStack CLI, or Terraform.
Use case examples
Here are some practical scenarios where extending a OVHcloud private network across regions or integrating with other OVHcloud products can solve real-world challenges.
- Database on Bare Metal & Application on Public Cloud: Connect a Bare Metal database server with applications running in Public Cloud regions using the same VLAN without IP conflicts.
- DHCP as a Service for Bare Metal Servers: Assign IPs from Public Cloud networks to Bare Metal servers via DHCP for seamless integration.
- Migration Between Public Cloud Regions: Move workloads from one region to another while keeping the private network consistent and avoiding IP conflicts.
- Multi-Region Services: Run distributed services across multiple Public Cloud regions with a unified private network for secure communication.
- Integration with Other OVHcloud Products: Connect Public Cloud instances with Private Cloud, Dedicated Servers, or other OVHcloud services through vRack.
Requirements
- A Public Cloud project in your OVHcloud account
- Basic networking knowledge
- Access to the Horizon interface
Instructions
OVHcloud Control Panel Access
- Direct link: Public Cloud Projects
- Navigation path:
Public Cloud> Select your project
This section provides step-by-step instructions to configure a private network stretched across multiple OVHcloud Public Cloud regions. You can use the OVHcloud Control Panel & Horizon, OpenStack CLI, or Terraform.
Configuration for Public Cloud
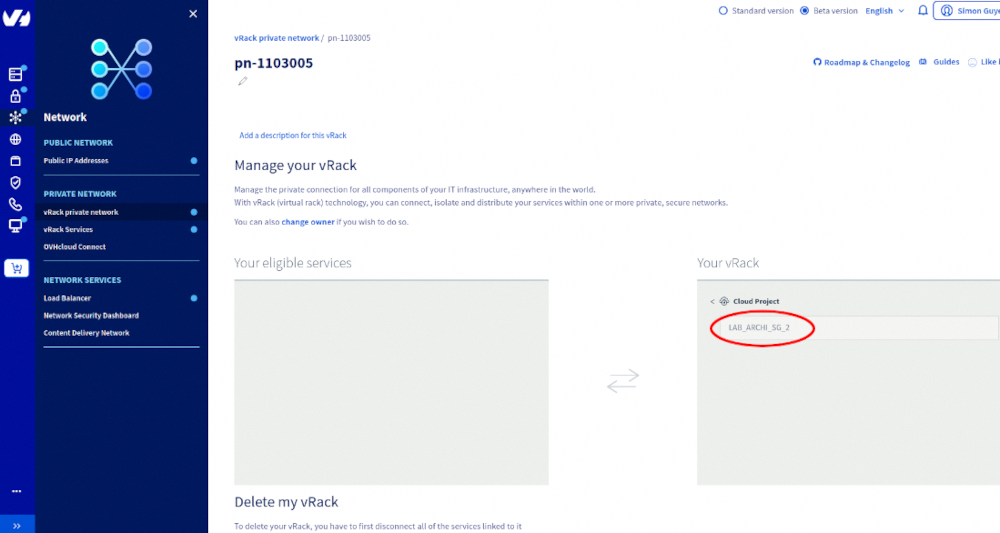
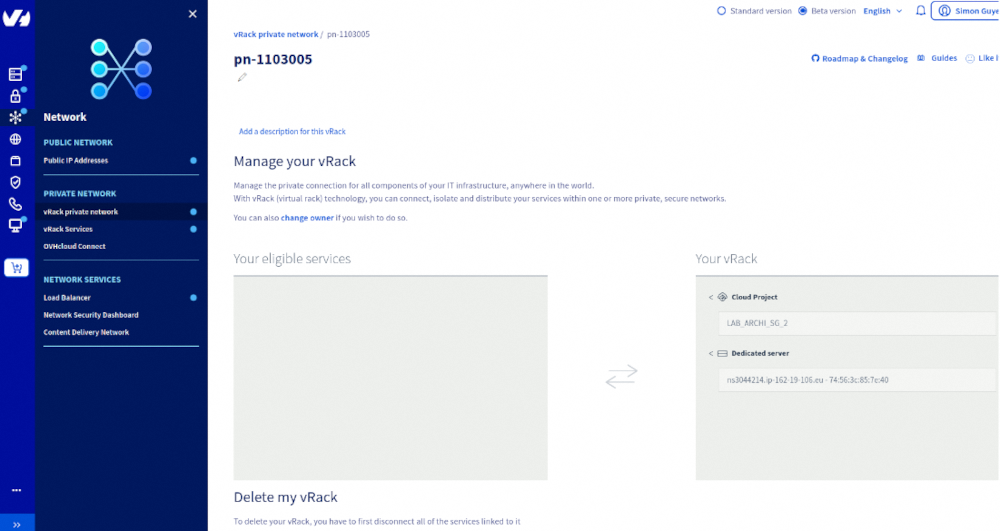
Add the public cloud project to a vRack:
. Create private networks in each region
Create a private network in each desired region using the same VLAN ID.
Note: At this stage, using the same VLAN ID across regions without separate IP pools is exactly what must be avoided.
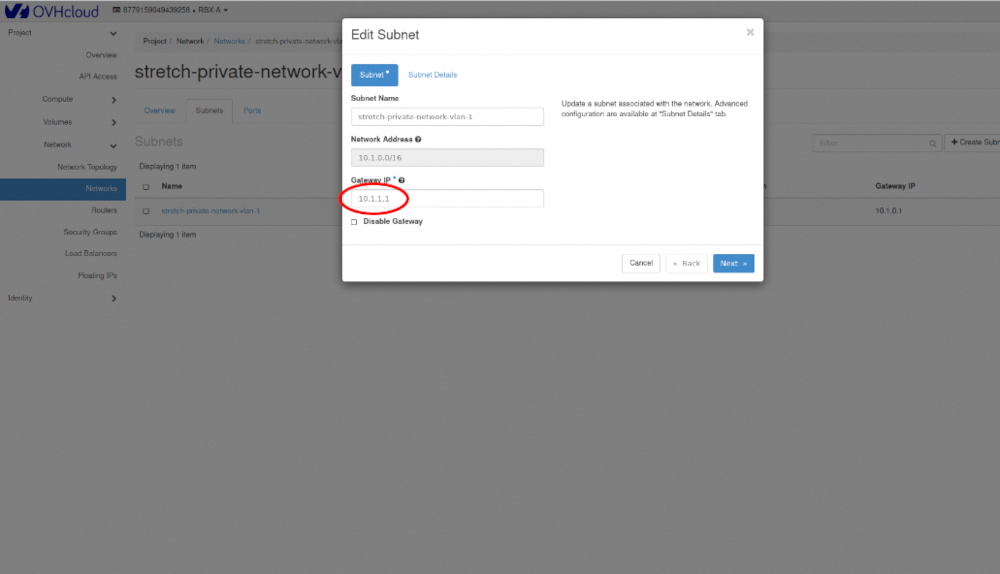
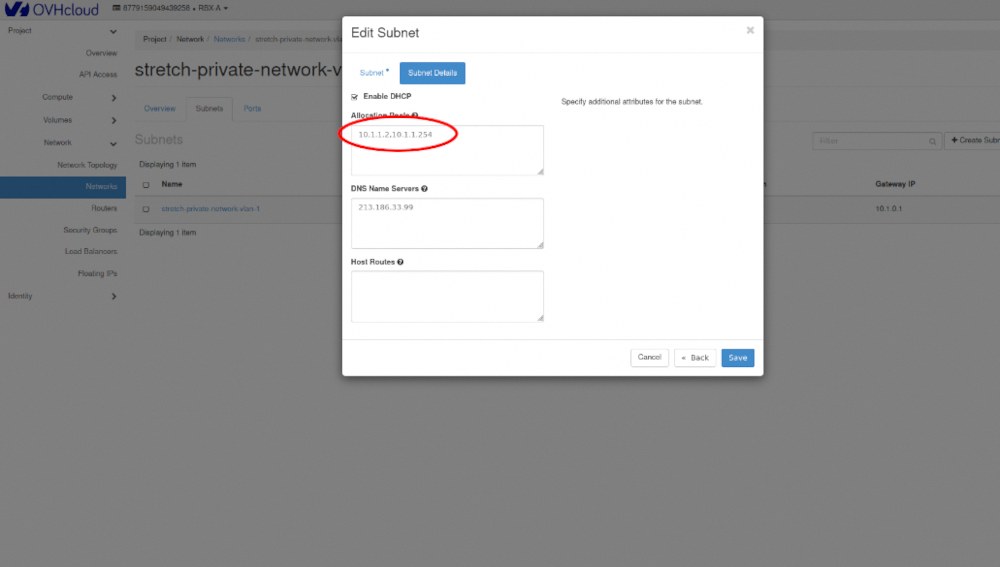
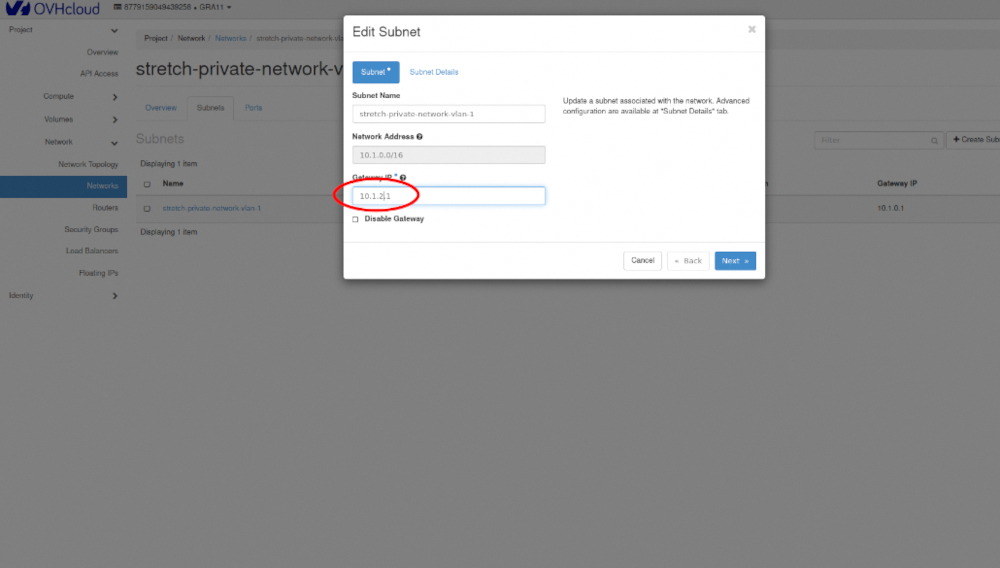
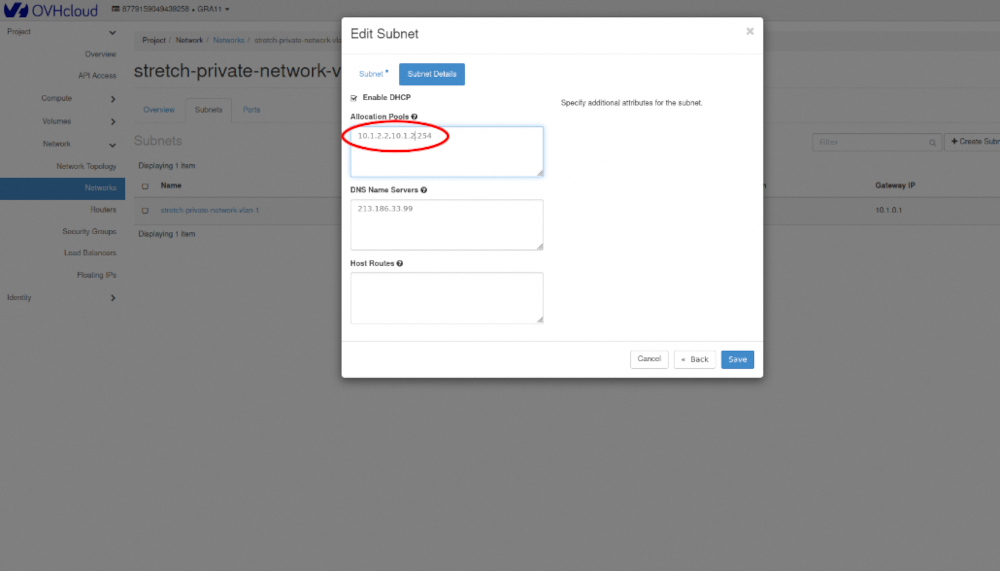
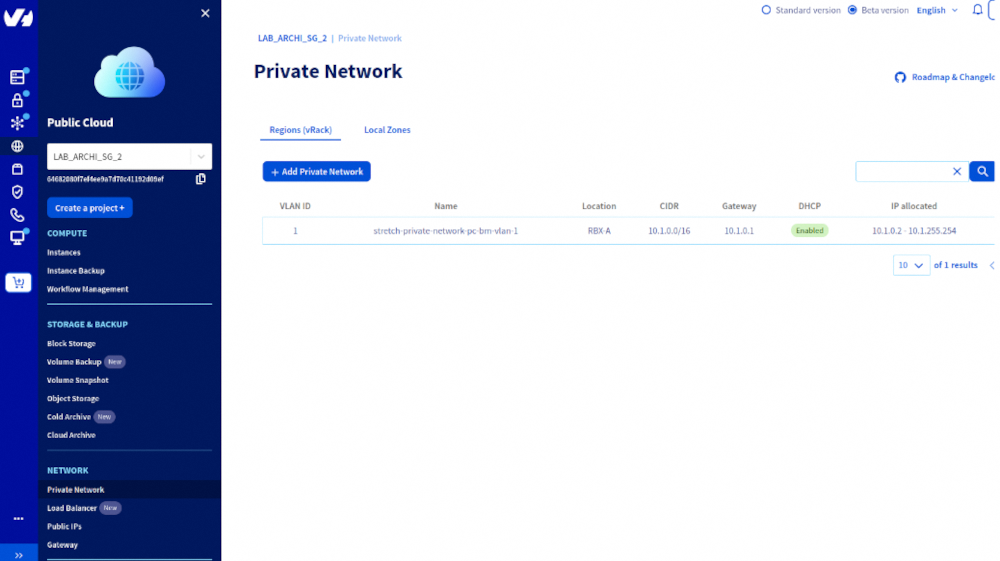
2. Configure subnets and IP pools
Edit each subnet in Horizon, configure the gateway reserved IP and the IP pool.
- First region:
- Second region:
3. Refresh network status
Go back to the OVHcloud Control Panel and refresh the network page.
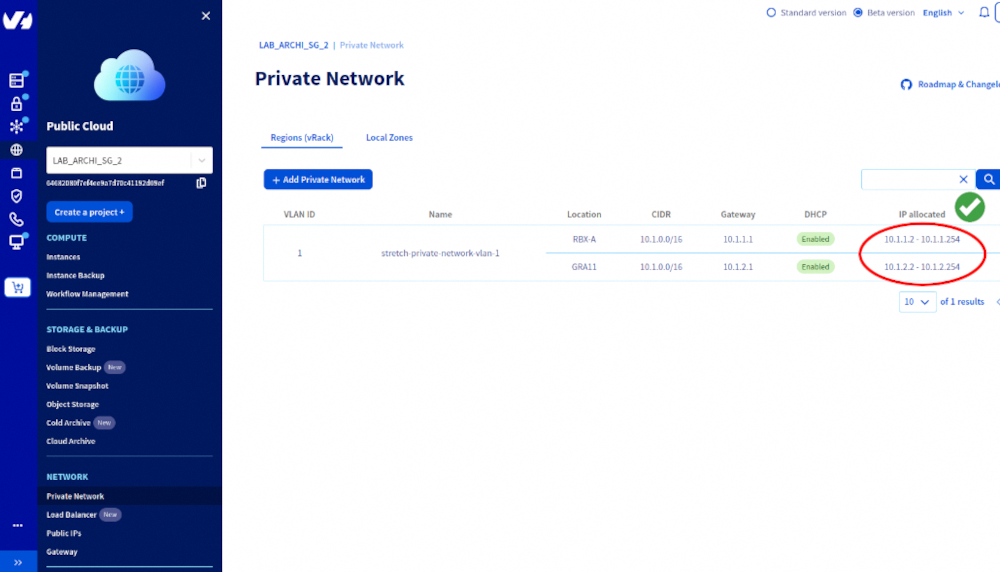
You should now see a single VLAN stretched across multiple regions, each with its own IP pool.
Required: OpenStack authentication configured in your environment variables
1. Load OpenStack credentials:
2. Select the first region
3. Select the second region
Required: OVHcloud application key configured in your environment variables.
1. Create a main Terraform configuration file (e.g., main.tf) with the following content:
2. Create a variables file (e.g., variables.tf) with the following content:
3. Apply the configuration:
Terraform will create the private network, subnets, and IP allocation pools in each region as defined.
DHCP for Bare Metal Servers (DHCP as a Service)
This section explains how to provide Public Cloud DHCP IP addresses to Bare Metal servers by integrating them into a stretched private network.
The Public Cloud project and Bare Metal server must be added to the same vRack:
1. Create a Public Cloud private network
Note: Use the same VLAN ID that will be used for the Bare Metal server.
2. Obtain the MAC address of the Bare Metal server’s private interface.
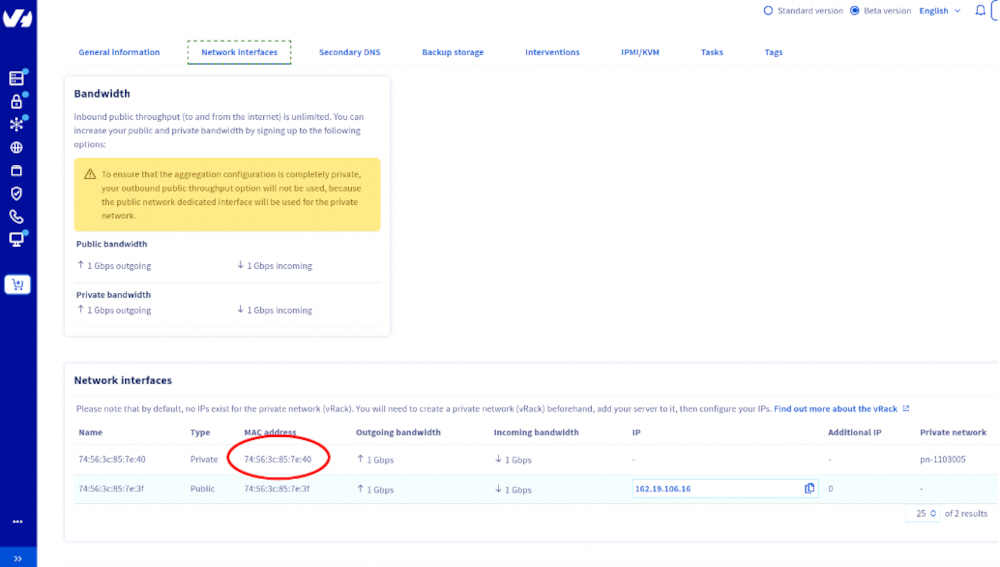
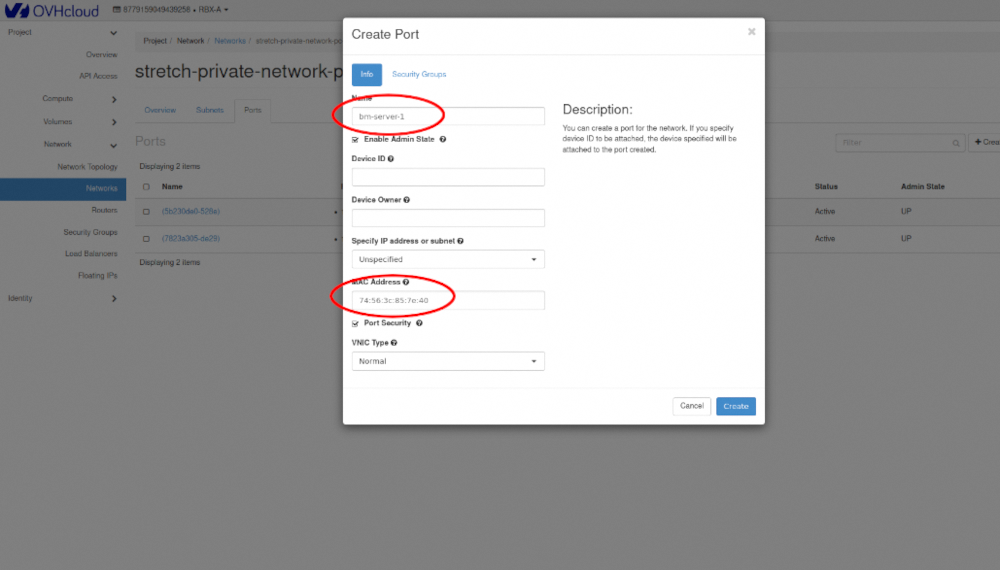
3. Create a virtual port on the Public Cloud private network using the MAC address of the Bare Metal server.
4. Install an operating system on the Bare Metal server (e.g., Ubuntu 24.04).
Note: Post-installation scripts may need to be updated with the correct MAC address and VLAN ID.
Required: OpenStack atuthentication configured in your environment variables.
1. Load OpenStack credentials:
2. Select the region:
3. Create the private network and subnet:
4. Create a virtual port for the Bare Metal server:
5. Install the OS on the Bare Metal server (Ubuntu 24.04 used in this example):
Note: Post-installation scripts may need to be updated with the correct MAC address and VLAN ID.
Required: OVHcloud application key configured in your environment variables.
1. Create Terraform variable file variables.tf
Define all variables needed for the deployment:
2. Create the private network file private-network.tf
This file ensures a private network and subnet are created in the specified region, with DHCP enabled and a dedicated allocation pool.
3. Create the Bare Metal file bare-metal.tf
This configuration attaches the Bare Metal server to the private network via a virtual port and executes a post-installation script to configure networking.
4. Create the post-installation template templates/custom-bare-metal.tftpl
This script creates a netplan configuration for the private VLAN interface, enabling DHCP to assign an IP from the Public Cloud network.
5. Apply the configuration
Running the Terraform script may reinstall your Bare Metal server, so ensure you have backups or are prepared for a reinstall.
Notes / Best Practices
- Verify the VLAN ID matches between the Public Cloud network and Bare Metal server.
- Confirm the Bare Metal server receives an IP from the Public Cloud DHCP service after installation.
- Each server should use a dedicated IP allocation pool to avoid conflicts.
Go further
Join our community of users.

