How to improve email security with an SPF record
27981 Views
Objective
The SPF (Sender Policy Framework) allows the server that receives an email to check that it has been sent from a trusted server.
Why set up the SPF record for your emails?
- It helps prevent potential identity theft via email addresses using your domain name (spoofing).
- You can also use it to authenticate the emails you send.
- The SPF record is added as a record in the domain name’s DNS zone.
This action is made possible by the information entered in an SPF record, which is actually a TXT record in the DNS zone. We can find:
- Server and/or multiple IP addresses: This will identify them as legitimate sending sources.
- A qualifier: It will recommend to the server receiving the emails a way to react to a message considered illegitimate, that is to say from a source that is not listed.
You should therefore ensure that you enter the sending sources you use to send emails with your domain name in the SPF record. These sources can be your own email server, that of your provider, or one of OVHcloud’s email solutions.
Example
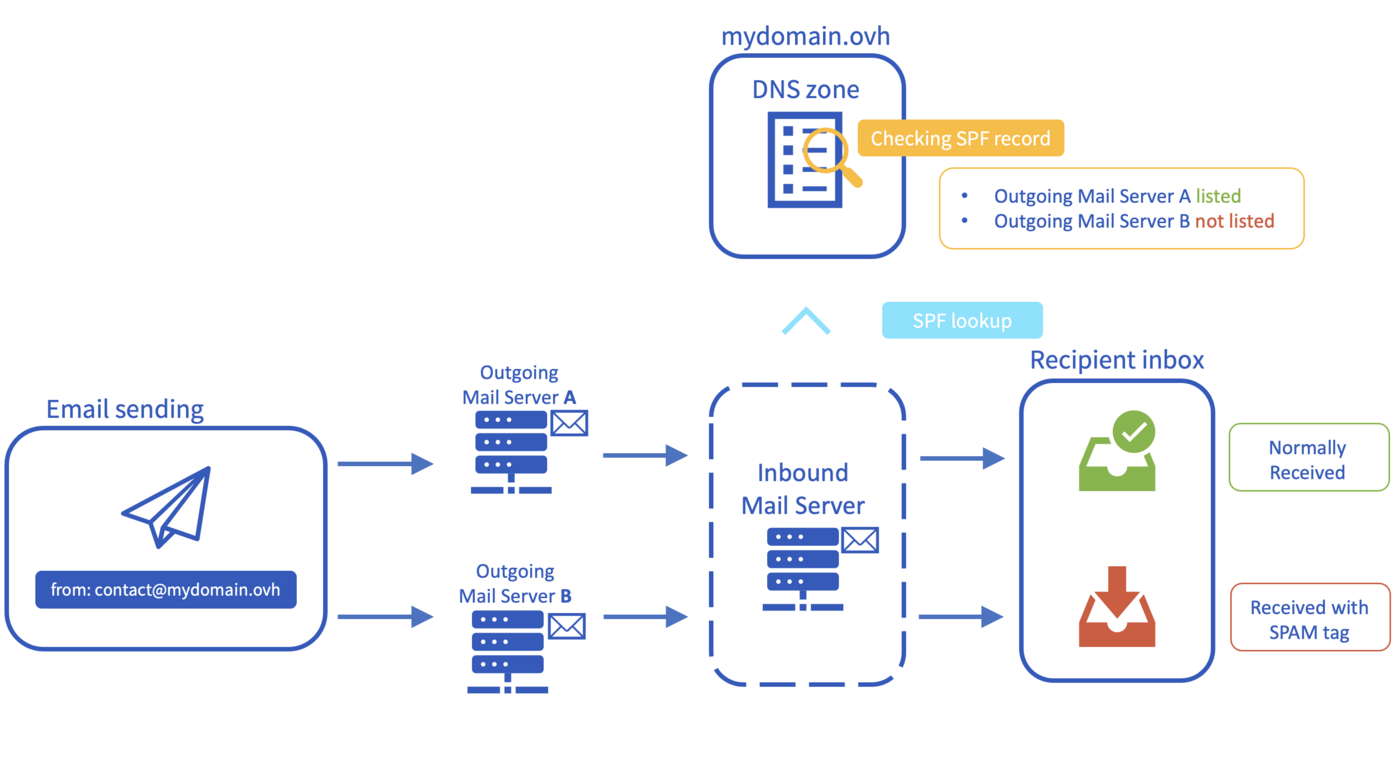
You are sending an email from your address contact@mydomain.ovh.
Only outgoing server A is declared in the SPF record of the name mydomain.ovh.
When the Inbound Mail Server receives the email, it will read the DNS zone of your domain name mydomain.ovh to inspect the SPF record.
- Outgoing Mail Server A is listed in the SPF record, so the email will arrive normally in the recipient's inbox.
- Outgoing Mail Server B is not listed in the SPF record, so the email sent from this server will be marked as suspicious in the inbox. This can result in
[SPAM]being added in the subject of the email, being placed in aJunkmail folder, or being deleted directly, depending on the rules of the receiving server.
The SPF record is only an indication provided to servers that receive emails, including yours. It is up to these servers to apply, or not, what is specified in the SPF record of domain names for which they receive messages.
Find out how to configure an SPF record for your domain name at OVHcloud.
Requirements
- The domain name concerned must use the OVHcloud configuration (i.e. the OVHcloud DNS servers).
OVHcloud Control Panel Access
- Direct link: DNS zones
- Navigation path:
Web Cloud>DNS zones> Select your domain name
If your domain name does not use OVHcloud DNS servers, you will need to modify the SPF record using the interface of the service provider managing your domain name's DNS.
If your domain name is registered with OVHcloud, you can check if it is using the OVHcloud configuration in your Control Panel. Click on the DNS servers tab of your domain name.
Instructions
Checking your current SPF configuration
If your domain name uses OVHcloud DNS servers, you can check if an SPF record is already configured for it.
How do I check an existing SPF configuration?
Log in to the OVHcloud Control Panel and switch to Web Cloud in the top navigation bar. In the Domain names section, select the domain name concerned. Click on the DNS zone tab.
In case of doubt, verify that your domain name is actually using OVHcloud DNS servers from the DNS servers tab.
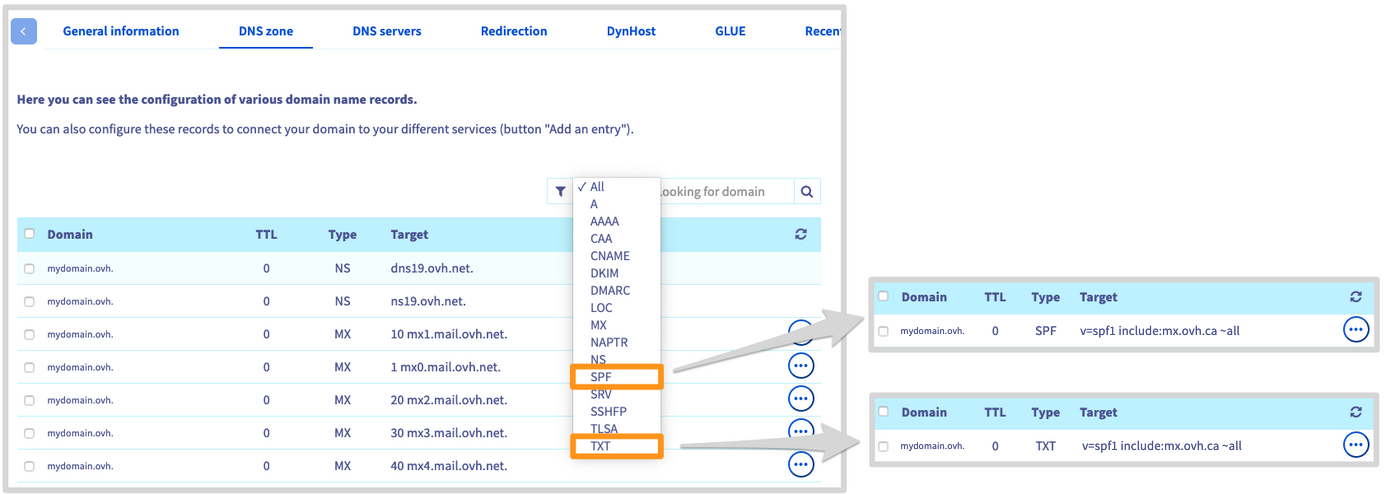
To find the row for the OVHcloud SPF record, a display filter can be applied to the table. Since the record can appear in two different places, select both the TXT and the SPF filter. You will receive one of the follwing results.
-
An SPF record that corresponds to OVHcloud email solutions is displayed: Your domain name currently uses the OVHcloud configuration. If you no longer wish to use it, you must modify it in the next step.
-
An SPF record that does not match the OVHcloud configuration is displayed: Your domain name already uses a custom SPF. If your configuration is incorrect, you will need to modify it. You can modify it or choose the OVHcloud configuration in the next step.
-
An SPF record does not appear in the target column: First check that the record does not actually exist as SPF or TXT by changing the filtering. If no SPF record is displayed in the zone at all, your domain name does not use one. You can add it in the next step.
An SPF record always follows this form: "v=spf1 sources qualifier". For example, the OVHcloud SPF is: "v=spf1 include:mx.ovh.ca ~all".
Configuring a new SPF record
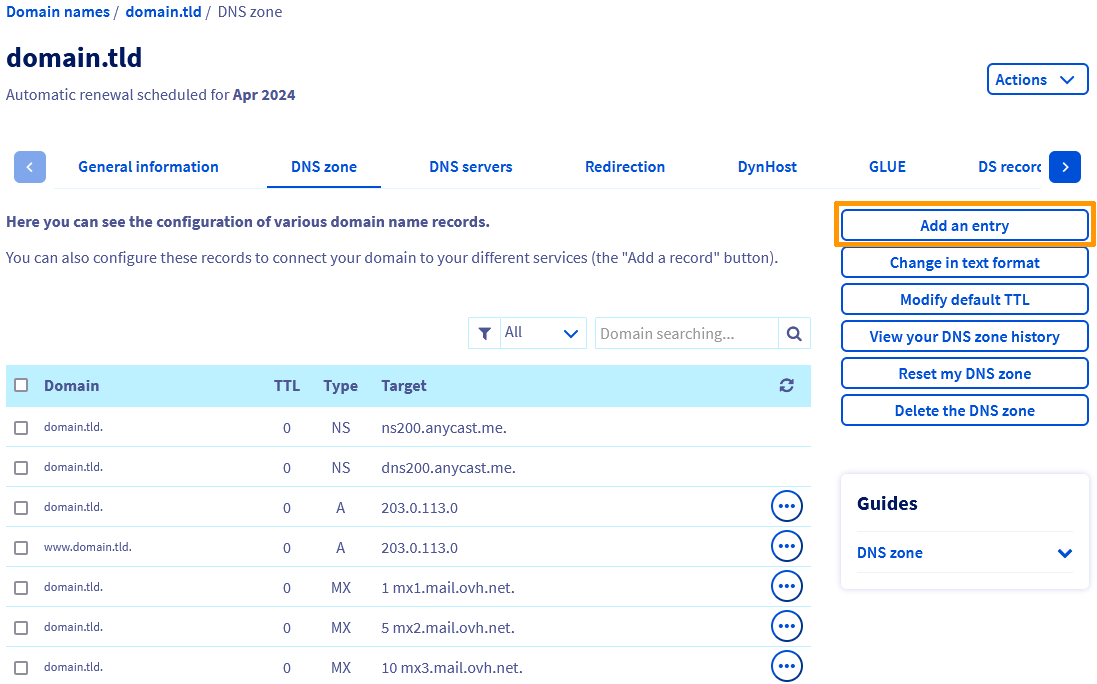
Log in to the OVHcloud Control Panel and switch to Web Cloud in the top navigation bar. In the Domain names section, select the domain name concerned. Click on the DNS zone tab.
To add an SPF record, click on Add an entry in the right-hand menu.
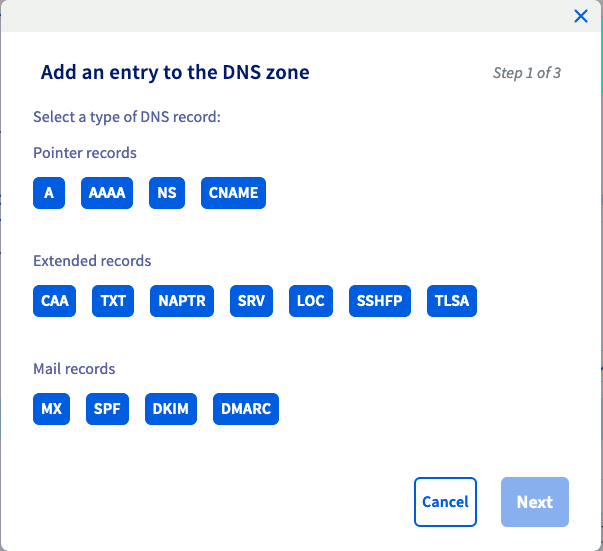
In the window that pops up, the configuration assistant offers several different types of DNS records. There are two ways of adding an SPF record:
- Add an OVHcloud SPF record and use the OVHcloud configuration: For users who only have OVHcloud email offers on their domain name.
- Add an SPF record: For users who do not have the entire record. For example, you only have an IP address or the host name of the email server.
- Add a TXT record: For users who are experienced or already have the full record. For example, your email solution provider will send you the value.
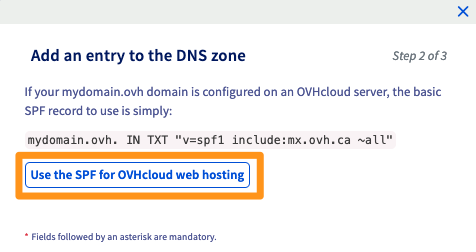
Use OVHcloud SPF record
You have chosen the SPF record and would like to apply the OVHcloud configuration. This means that all of the OVHcloud outgoing email servers are included for the following email offers:
- MX Plan standalone or included in an OVHcloud web hosting plan
- Hosted Exchange
Choose the SPF type record and then click on the button Use the SPF for OVHcloud web hosting. In the following step, click on Confirm to approve the action.
It can take between 4 and 24 hours until the configuration is fully effectual.
Adding an SPF record
The configuration wizard enables you to customise your SPF record according to your needs. In order to apply your settings, answer the questions on this page. Some information requested may be aimed at advanced users.
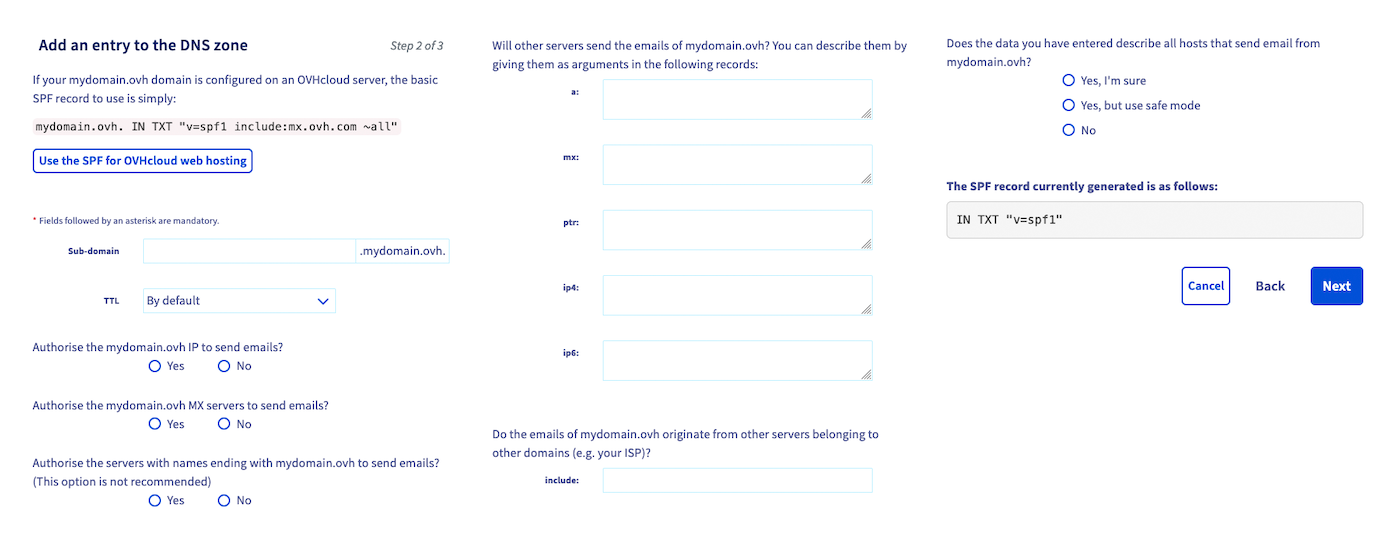
- Subdomain: Fill out if the SPF record must be applied to a subdomain of your domain, i.e. if you send emails from a subdomain.
- TTL: This is the propagation time that will apply to the configuration of this DNS record.
- Authorise an IP address to send emails: Check this box if your website and email addresses are hosted on a server using the same IP address (for example on a dedicated server).
- Authorise the MX servers to send emails: Tick if the servers that receive your emails can also send them.
- Authorise all servers with names ending with your domain name to send emails: This option should be used with caution, as it allows a very wide legitimisation of the sending sources using your domain name.
"Do the emails of your domain name originate from other servers belonging to other domains?"
- a: Enter domain names here to legitimise these servers to send emails with your addresses.
- mx: Enter the servers that receive your emails (MX servers) here if they can also send them. They will thus be identified as a legitimate sending source.
- ptr: Enter the host names for which the reverse path works (using a PTR record in the DNS zone). They will thus be identified as a legitimate sending source.
- ip4: Indicates IP addresses or RIPE blocks (IPv4) authorised to send emails with your addresses.
- ip6: Indicates IP addresses or RIPE blocks (IPv6) authorised to send emails with your addresses.
- include: Enter domain names here that include their own SPF rules. This will enable these for your own domain. For example, OVHcloud uses this method in its SPF configuration: "v=spf1 include:mx.ovh.ca ~all". It allows OVHcloud to manage the SPF of mx.ovh.ca and let customers use it for their services.
"Does the data you have entered describe all hosts that send email from your domain?"
- Yes, I am sure: Specify that servers receiving emails from your domain name should reject them if they come from illegitimate sources (not present in your SPF record).
- Yes, but use safe mode: Specify that servers receiving emails from your domain name should accept them if they come from illegitimate sources (not present in your SPF record), but tag them as potentially not legitimate (as spam, for example).
- No: Specify that servers receiving emails from your domain name should accept them if they come from illegitimate sources (not present in your SPF record), without any particular action. The email header will however be increased.
Once finished, click on Next and verify that the values you have entered are correct by clicking Confirm.
It can take between 4 and 24 hours until the configuration is fully effectual.
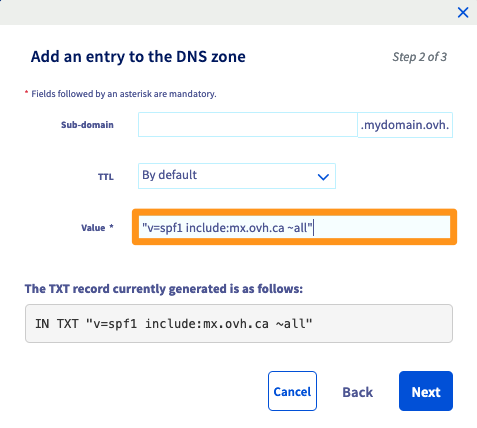
Adding a TXT record
Choose the TXT type record and enter the requested information. In the Value field, enter the full SPF string for your domain.
Click on Next and verify that the SPF you have entered is correct by clicking Confirm.
It can take between 4 and 24 hours until the configuration is fully effectual.
Modifying an SPF record
Log in to the OVHcloud Control Panel and switch to Web Cloud in the top navigation bar. In the Domain names section, select the domain name concerned. Click on the DNS zone tab.
The table on this page displays your domain name's DNS zone at OVHcloud. Each DNS record is represented by a line in the table. Locate your TXT or SPF record in this table and click on the ... button to edit the entry.
Refer to the guide section above if you need more information about editing the SPF record.
OVHcloud SPF configuration for shared email offers
The general OVHcloud SPF configuration applies to the solutions below:
- MX Plan standalone or included in an OVHcloud web hosting plan
- Hosted Exchange
The configuration is as follows:
Go further
Editing the DNS servers for an OVHcloud domain name
Join our community of users.

