How to use the KVM console to access a VPS
121 Views
Objective
The KVM console for VPS available in your OVHcloud Control Panel allows you to open a connection to your VPS in your web browser, independently of additional connection software. KVM in this context stands for "keyboard, video, and mouse", referring to the emulated input/output method of the remote connection.
Note that the KVM console is not a workaround solution if you have lost access to the operating system of your VPS. You will need to use the VPS rescue mode to recover server access in that case.
This guide explains how to use the KVM console to access your VPS.
Requirements
- A Virtual Private Server in your OVHcloud account
OVHcloud Control Panel Access
- Direct link: VPS management
- Navigation path:
Bare Metal Cloud>Virtual private servers> Select your VPS
Instructions
How to open the KVM console via the OVHcloud Control Panel
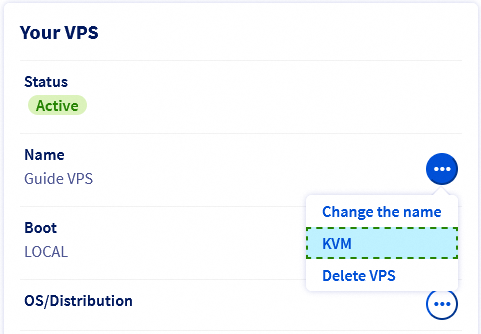
In the tab General information, click the button ... next to the name of your VPS in the section Your VPS.
How to open the KVM console via the OVHcloud API
Unfold this section
If you are not familiar with the API, consult our guide on the basics of using the OVHcloud API.
To retrieve the KVM access URL, open this endpoint:
Enter the internal name of your VPS (vps-x11x11xyy.vps.ovh.net) in the field serviceName.
Click the button EXECUTE.
The access URL will be displayed in the section RESPONSE.
Using the KVM console
If you access the KVM from the OVHcloud Control Panel, it will open in a popup window. To use it in full-screen, click on the link Open in a new window in the bottom right corner. This will usually open a new browser tab.
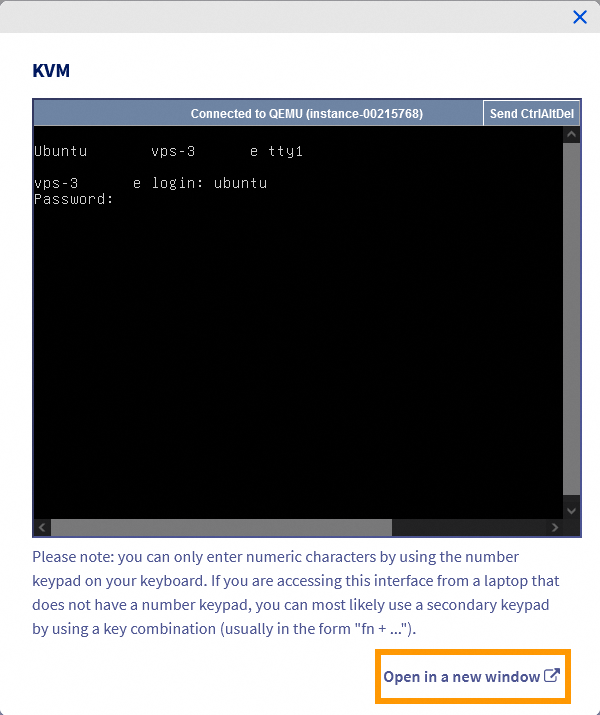
The KVM screen displayed depends on the operating system and the individual state of the VPS. If prompted, log in with the credentials of an active user account.
You can alternatively use a third-party software client to connect.
How to change the keyboard layout
The keyboard of the KVM console may have a different layout from your own. Before entering a password, type some characters to verify the layout, for example with the help of this page.
You can enable your preferred keyboard configuration to make using the console more convenient. Enter the following command:
If necessary, install the package first via your distribution's package manager (sudo dnf install keyboard-configuration or sudo apt install keyboard-configuration).
A graphical menu will open in which you can select a keyboard model.
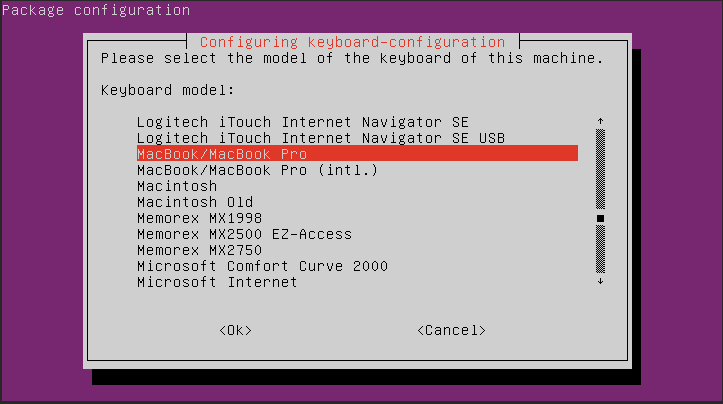
Use the arrow keys to navigate to the option that comes closest to your hardware, then press Enter.
In the next menu, choose your country.

In the third menu, you can specify your actual keyboard layout.
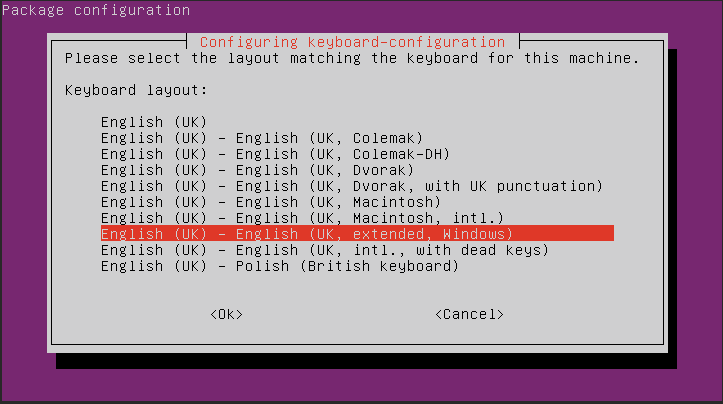
Depending on your selections, there may be further options showing up after the third menu.
Back at the command line, enter the following command to apply the changes:
This change will not persist if the server is rebooted.
Go further
For specialized services (SEO, development, etc.), contact OVHcloud partners.
If you would like assistance using and configuring your OVHcloud solutions, please refer to our support offers.
Join our community of users.

