Prefect - Getting Started
44 Views
Objective
The purpose of this guide is to discover Prefect, an open source workflow management tool, and connect it to the OVHcloud API.
Prefect provides a flexible Python framework to easily combine tasks into workflows, then deploy, schedule, and monitor their execution through the Prefect UI or API.
Requirements
- An active OVHcloud account and its credentials
- Access to the OVHcloud Control Panel
- A Public Cloud project
Instructions
What is Prefect ?
Prefect is an open source tool used to build, schedule and monitor workflows. It can be compared to Apache Airflow for the global approach. A workflow management tool is useful to create and automate pipelines, most often data pipelines or AI pipelines but not only.
Prefect works with a local agent on your execution environment (your own computer, a virtual machine, ...) and a server which will interact with this agent. You can install yourself this server (Self-hosted) or it can be launched via the Prefect cloud offer.
It can be described as follows:

You can find more information on this Prefect security overview.
Key components
Here is a non-exhaustive list of key elements that you will always meet in our Prefect tutorials. Feel free to read their official Prefect documentation for detailed information.
-
Workspace: an isolated environment within Prefect Cloud for your flows and deployments. You can use workspaces to organize or compartmentalize your workflows. Once created, you can launch your flows.
-
Flow: a collection of tasks and dependencies between them that defines your work, such as a data pipeline. Flows in Prefect are designed to be composable and modular, allowing users to build complex workflows by piecing together smaller, reusable building blocks.
-
Task: a unit of computation that performs a specific operation. Tasks can be thought of as the building blocks of a Prefect flow, where each task represents a single step in a larger pipeline.
As an example, if you want to create an AI Pipeline, one task could be a job launch to train a model and another task to deploy the model. With these two tasks, you can create a flow.
Start with Prefect
As explained before, Prefect is an agent-server software. The agent has to be installed on your local execution environment, and the server can be installed manually or just started with the Prefect Cloud offer.
This Prefect installation tutorial may help you to deploy Prefect on a virtual machine. Prefect provides an interface (UI) to see the flows you run and the state of each flow.
Alternatively, you can use the Prefect Cloud version. With this version, you will benefit from the same approach but with more features and support, and everything is managed by Prefect.
For the next tutorials, we will choose this second option.
To configure your Prefect Cloud account, go on their official website and create an account. The Prefect Personal free plan is sufficient for the next steps.
Generate OVHcloud API credentials
Exhaustive information can be found in following guide: First steps with OVHcloud API.
Any application that wants to communicate with the OVHcloud API must be declared in advance.
To do this, click the following link.
Fill in your OVHcloud customer ID, password, and application name. The name will be useful later if you want to allow others to use it.
You can also add a description of the application and a validity period.
The Rights field allows you to restrict the use of the application to certain APIs. You must provide access to the /cloud/ POST and GET requests and the /me GET* request.
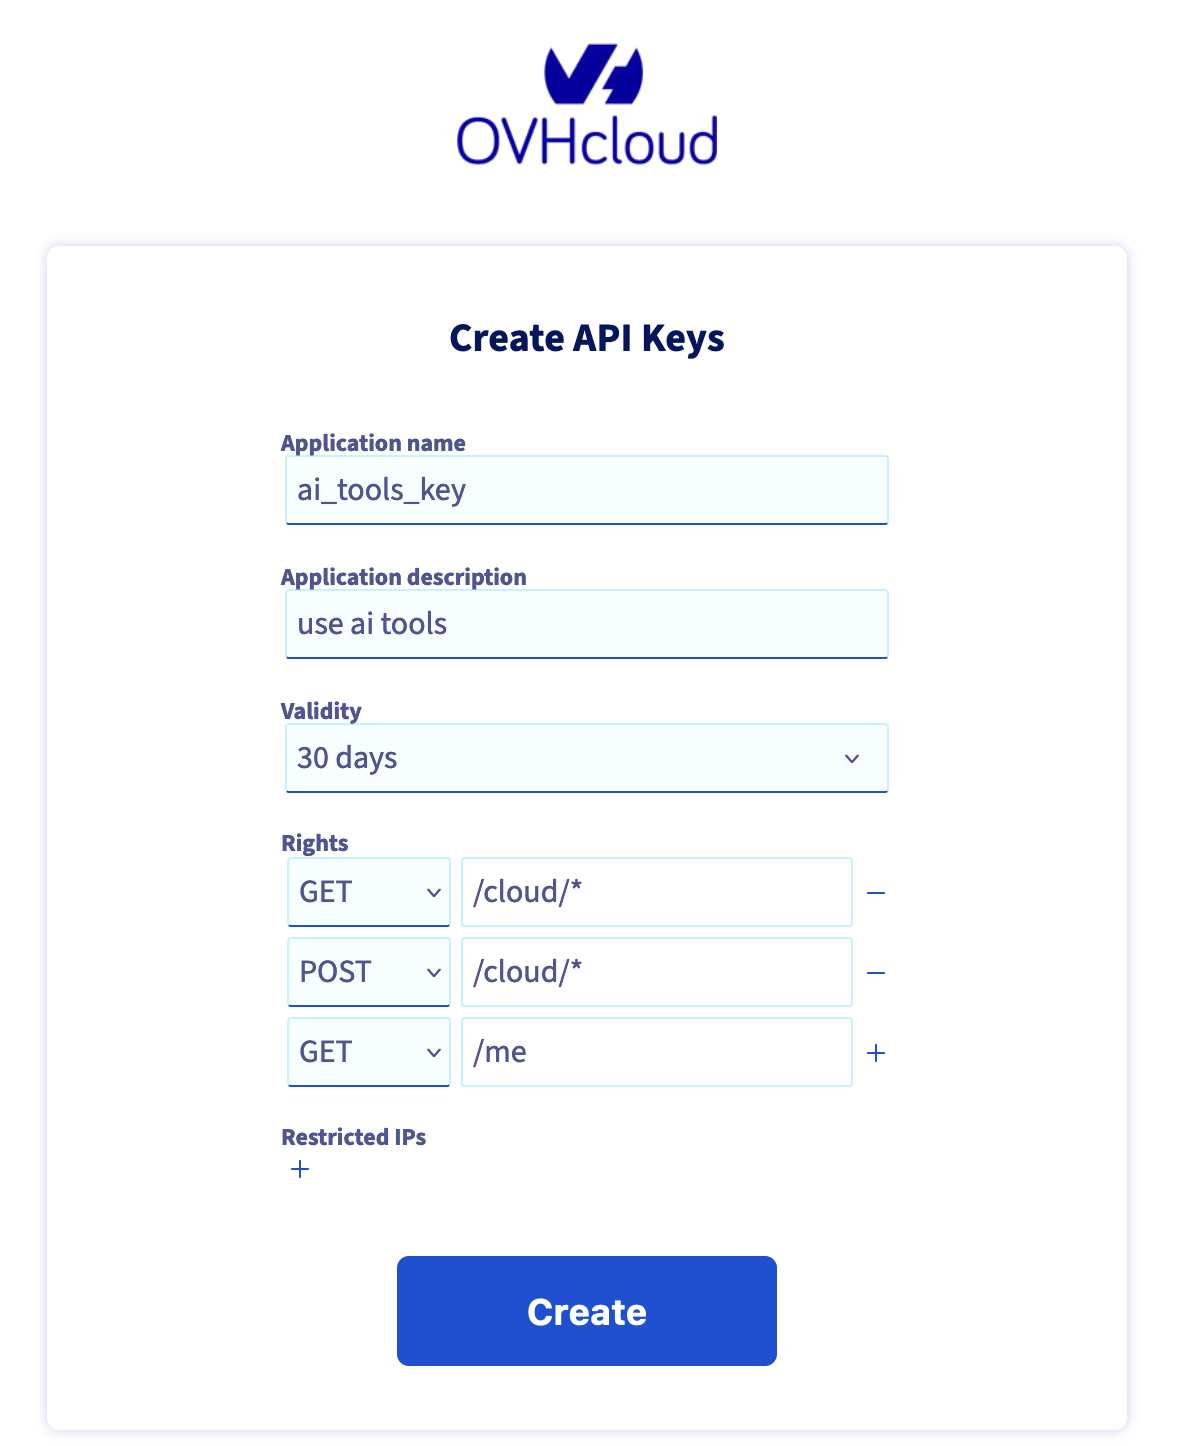
Once you click Create keys, you will be issued with three keys:
- An application key, called AK.
- A secret application key, not to be disclosed, called AS.
- A secret consumer key, not to be disclosed, called CK.
Store them safely.
Store your keys securely in a .env file
API keys are sensitive pieces of information. Hardcoding them directly into your code can expose you to potential security risks. If your codebase is public or shared, your API key could be easily accessed by anyone who views the code. Using a .env file will enable you to create environment variables and store securely your API keys.
In the root directory of your project, create a file named .env.
Add your application key (AK), your secret application key (AS) and your consumer key (CK) as key-value pairs to the .env file, as follows:
You will also need to define an endpoint. You can add it also to the .env file:
The endpoint depends on the API you want to use. A list of available endpoints can be found here.
To access your environment variables, you must install the python-dotenv library:
Prefect cloud variables
Prefect Cloud Variables enable you to store and reuse non-sensitive data. Variables are named, mutable string values, much like environment variables. They are scoped to a Prefect server instance or a single workspace in Prefect Cloud.
Variables are intended for values with infrequent writes and frequent reads.
For example, you can use variables to store the UUID of a Public Cloud project. To do this, go to your workspace on the Prefect website and click on the Variables section.
Then, click the + icon to create your first Prefect variable. Name it project_uuid and assign its value (You can find your Project UUID in the Control panel (UI) or via the API).
Install OVHcloud Python SDK for API
Don't forget to install Prefect with pip: pip install prefect. Git repo
To connect Prefect on an OVHcloud Public Cloud project, we will use the OVHcloud API and python.
In Prefect, you can benefit from multiple native integrations, simplifying your tasks creation.
So far we don't provide native integration for OVHcloud, but The OVHcloud Python SDK will ease the communication with OVHcloud APIs. It enables developers to automate tasks such as managing OVHcloud services, instances, domain names, and user accounts through Python scripts.
In these python scripts, we will create our Prefect flows. These flows will connect to the Public Cloud with the help of the application token you create to access the API.
You can easily install the SDK for the API with pip: pip install ovh. SDK is detailed on this git repository.
Connect Prefect to Public Cloud
Now that Prefect is configured and OVHcloud credentials are generated, we are able to merge everything.
Create a Python file, for example first_flow.py. In this file, put this Python code:
In this python code, we create two tasks:
- The first one is dedicated to the initialization of an OVHcloud client.
- The second is used to get all of our Public Cloud project information, based on our Project UUID that we saved in our Prefect Cloud Variables.
Run your Prefect flow locally
Now that our Python code is ready, let's run it:
We will see in our terminal our project's information. You should see something similar to this:

We can see our flow has been finished and is in state Completed(). This flow has also completed two tasks that we defined before.
Prefect Cloud provides a more precise online interface. Let's go and see what it provides to us (Go to the Flow Runs section).

The graph shows us the execution time of the "first_flow" flow based on the time it was executed.
If you run your flow again, you will see another green point. If the flow had not been completed, the point on the graph would be of a different color.
By clicking your flow, you can get its details (logs, tasks, details, results...).
Go further
- Official Prefect website: Prefect.io
- Send an email with prefect: Send an email through blocks and automation with Prefect
- Run your first AI Training job with Prefect and the OVHcloud API: Create your first AI pipeline with prefect
Feedback
Please send us your questions, feedback and suggestions to improve the service:

