Installing WordPress on an instance
92 Views
Objective
WordPress is a content management system (CMS) which enables you to create and manage websites for multiple purposes, without the need for any programming skills.
This tutorial provides the basic steps for a manual installation of WordPress on a Public Cloud instance: installing a web server and configuring the database, downloading and launching WordPress.
This guide explains how to install WordPress on a Public Cloud instance.
This guide will show you how to use one or more OVHcloud solutions with external tools, and will describe the actions to be carried out in a specific context. Please remember to adapt these actions to fit your situation.
If you encounter any difficulties performing these actions, please contact a specialist service provider and/or discuss the issue with our community. OVHcloud cannot provide you with technical support in this regard.
Requirements
- A Public Cloud project in your OVHcloud account
- A Public Cloud instance with Debian or Ubuntu installed
- Administrative access (sudo) to your instance via SSH
OVHcloud Control Panel Access
- Direct link: Public Cloud Projects
- Navigation path:
Public Cloud> Select your project
Instructions
The following instructions are verfied for Debian 11. Since Ubuntu is based on Debian the tutorial should work for a current Ubuntu distribution as well.
In order to access your installation via a domain name, you need to attach it to your instance. This is done by editing the DNS zone which you can do in your OVHcloud Control Panel, provided OVHcloud is your domain registrar and the domain name uses OVHcloud DNS servers.
Please refer to our guide on Editing your DNS zone for further instructions. If the domain name is currently in use, only configure DNS after the new WordPress is installed and your website is ready.
Step 1: Installing the web server (LAMP)
To be able to serve dynamic web pages with WordPress, a so-called LAMP stack will be installed on the instance. LAMP stands for Linux, Apache, MariaDB and PHP.
After logging in to your instance with SSH, ensure that all packages are up-to-date:
Since software packages are regularly updated, you might need to adjust the following instructions according to the latest versions.
Install the LAMP packages:
Step 2: Configuring the database server
MariaDB provides a script to assist with the initial configuration and to apply some security-related settings.
To run it, enter this command:
Confirm the first prompt by pressing Enter.
Next you can choose a method to secure access to the database server.
It is recommended to use the proposed authentication method (unix_socket) instead of the access via root password. Press y and then Enter. (If you decide to use root user access instead, choose n and then set a root password at the next prompt.)
Type n at the next prompt:
Since the subsequent prompts concern security measures, confirm them all with y until the script is finished.
If you have configured MariaDB access in the recommended way (unix_socket), you now have automatic admin access (root) to it whenever you are logged on to the server as a user with elevated permissions (sudo).
Open the MariaDB shell:
Create the database for WordPress:
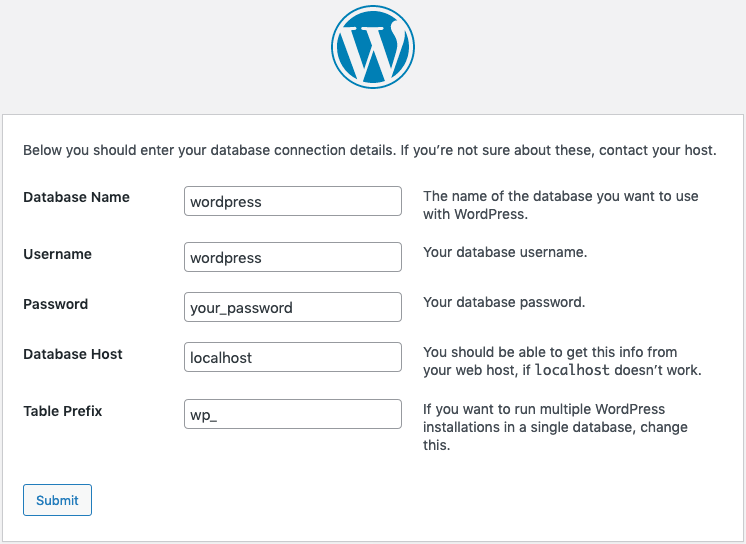
Next, grant a new user "wordpress" all rights on this database. This user will access the database and carry out all operations for the WordPress CMS. Replace your_password with a strong password for this user.
You will need these credentials later when installing WordPress.
The database is now ready for use with WordPress. Ensure the changes are applied for the next steps and then exit the MariaDB shell:
Step 3: Configuring the firewall
Configuring a firewall (iptables) will enhance the security of your WordPress instance. This process can be simplified by using the frontend "Uncomplicated Firewall" (UFW) and its preset of profiles. Install UFW:
In the list of available UFW applications, the profiles corresponding to a web server are labeled “WWW” on a Debian instance and “Apache” on an Ubuntu instance. These profiles allow you to open the necessary ports for HTTP and HTTPS traffic in a simple and secure way.
By choosing "WWW Full", both secure connections (port 443) and not-secured http requests (port 80) to the web server will be allowed.
To see which ports are affected by a particular profile, enter sudo ufw app info "profile name".
By entering the following command, the ports defined by the profile "WWW Full" will be opened:
Since all ports not explicitly allowed will be blocked after enabling the firewall, make sure to allow SSH connections (port 22 in a default configuration) as well:
Finally, activate the firewall rules and verify the configuration:
You can go further with UFW, for example if you want to restrict denial of service (DOS) attacks or prevent requests by certain IP address ranges. Please refer to the official UFW documentation.
Step 4: Installing WordPress
Visit the official WordPress website to retrieve the download URL for the latest version (in the "tar.gz" format). Then download the file:
Uncompress the downloaded archive:
Your Apache server should be ready to use at this point. You can verify with the following command.
You can also open http://ip_of_your_instance in a web browser. The "Apache2 Debian Default Page" should appear.
The following steps will install WordPress by replacing the Apache default folder for web pages.
Instead of using the default folder, you can also create a new Virtual Host for the WordPress installation. This is useful for hosting multiple websites which is not relevant for this tutorial.
Delete the existing folder:
Replace the default web server folder with the WordPress folder:
Give the web server write permissions for the folder:
The web server is now ready for the initial WordPress configuration.
Step 5: Configuring WordPress
Open a web browser and log in to your WordPress website by entering your instance's IP address (or the domain name if you have attached one to the instance yet). Choose a language on the first page.
Use the WordPress configuration assistant to enable access to your database. Enter the details you have configured previously.
In the next step, you can pre-configure your website's general information and create your WordPress admin user.
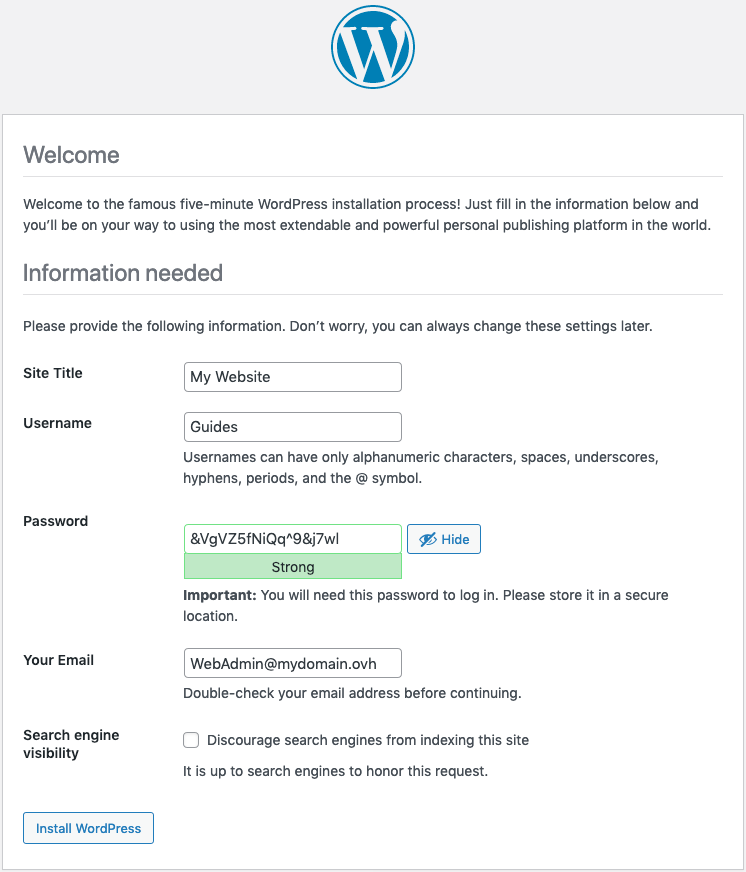
Once this is confirmed, you will be able to log in to your website's administation panel with the user credentials defined in the previous step.
In order to establish secure connections (https), the web server has to be secured via a Certificate Authority such as "Let’s Encrypt" which offers free certificates. You will need to install a client tool (such as "Certbot") and configure Apache. Without this step, your website can only accept http requests.
Step 6 (optional): Enabling secure connections with Let’s Encrypt
First make sure that your domain name has the correct records in the DNS zone, i.e. is pointing to the IP address of your instance.
The following command will install a functioning but outdated version of Certbot (certbot 1.12.0). In order to install the latest version, the additional package manager snappy must be used. You can find installation instructions on the Certbot website.
Install the necessary packages for the Certbot client:
Obtain the certificate for your domain name and the "www" subdomain:
You will need to enter a valid email address and accept the terms of service.
Certbot will automatically renew the certificates. There are no further steps required. However, you can look into the available options to learn about the capabilities of Certbot.
Go further
Join our community of users.

