Manage your OKMS access certificate

Knowledge Base

Manage your OKMS access certificate


Icons/System/eye-open Created with Sketch. 34 Views 18.09.2025 Key Management Service (KMS)

Objective

The purpose of this guide is to show you the steps to follow to configure and manage the OKMS access certificate for your Data Security products.

Requirements

Instructions

OKMS access certificate description

To communicate with your OKMS domain, you will need to create an access certificate.

Access certificate to an OKMS domain are used for the Key Management Service (KMS). This will be used for any interaction with the domain, either to create encryption keys or to carry out operations with them.

An access certificate is only valid for the domain for which it was generated.

Create an access certificate from the KMS

From the Control Panel

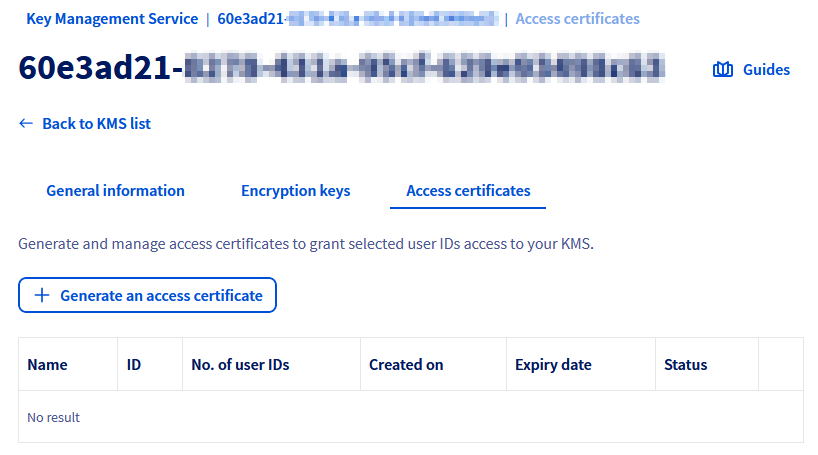
It's possible to create this certificate from the dedicated entry of the KMS. For that, log in to the OVHcloud Control Panel and access the administration console Identity, Security & Operations. Click on Key Management Service, then on Generate an access certificate.

Create a certificate

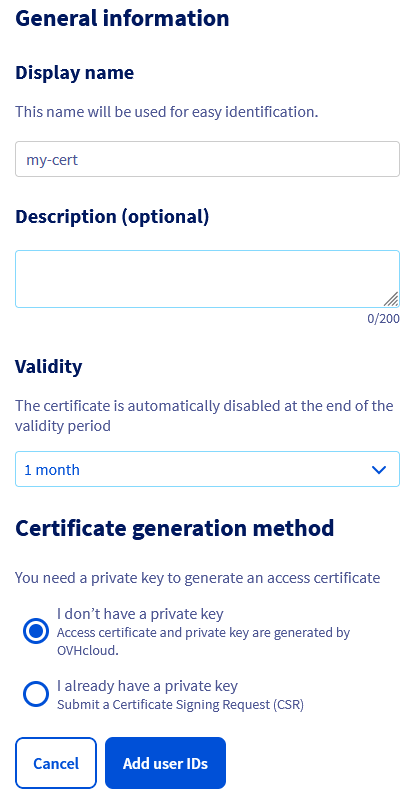
The first part of the form allows you to precise its validity duration, choose signature algorithm, and providing or not your Certificate Signing Request (CSR) in case you have your own private key.

Without providing a private key:

If you do not provide a CSR, OVHcloud will generate the certificate and a private key as well.
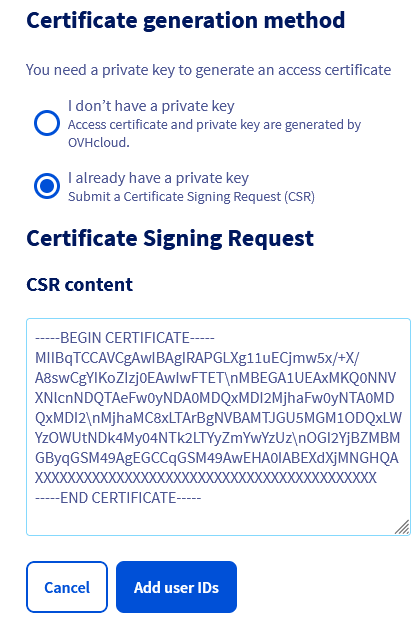
Create a certificate

With a CSR:

If you own your own private key, it's possible to use it with a CSR.

Create a certificate

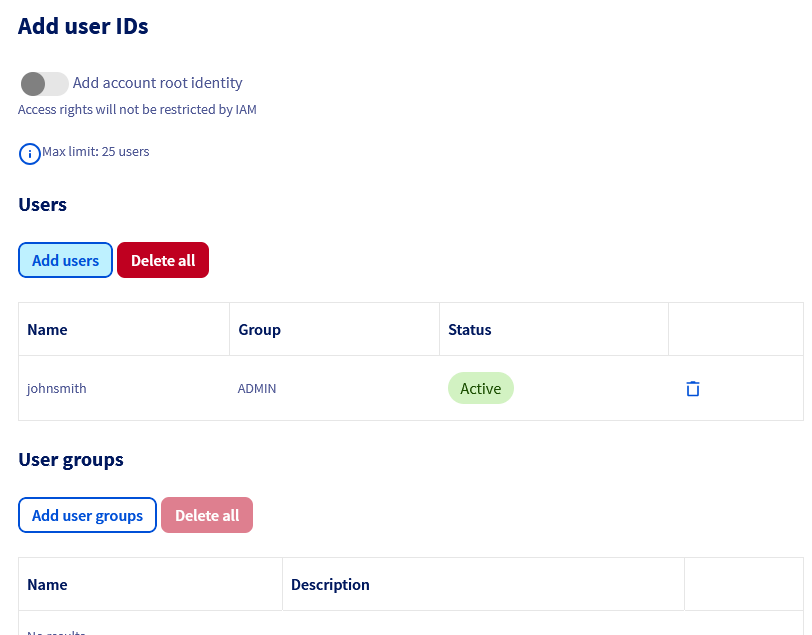
The second part of the form allows you to specify the OVHcloud identities associated with the certificate used to calculate access rights via the OVHcloud IAM.

It is possible to add the root identity to the certificate so as not to be constrained by the OVHcloud IAM.

Create a certificate

You then need to download the private key of the certificate.

The private key will no longer be accessible at a later stage. If you lose it, you will need to regenerate a certificate.

The privateKeyPEM field needs to be edited so that all instances of \n are replaced by carriage returns.

Create a certificate

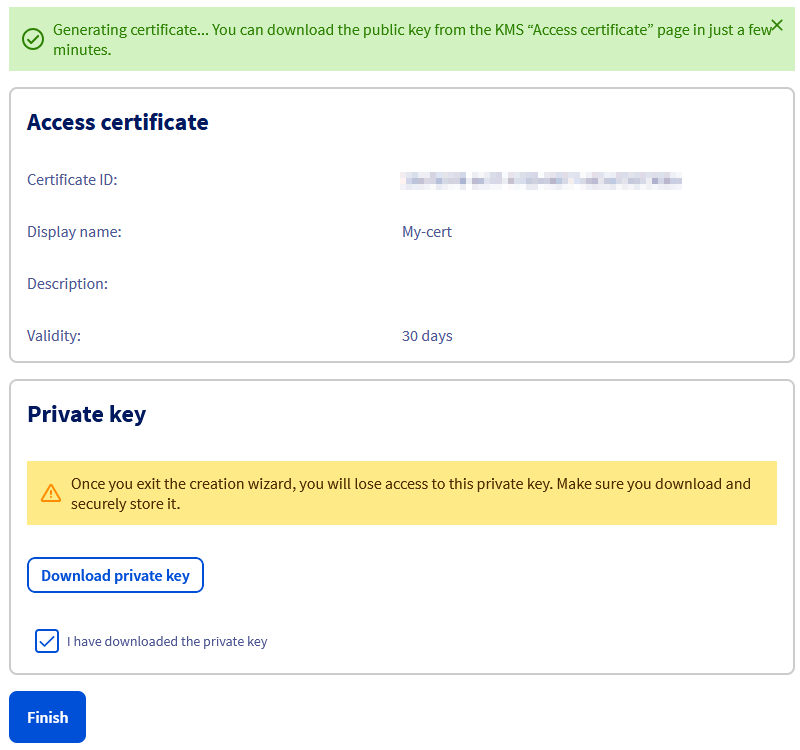
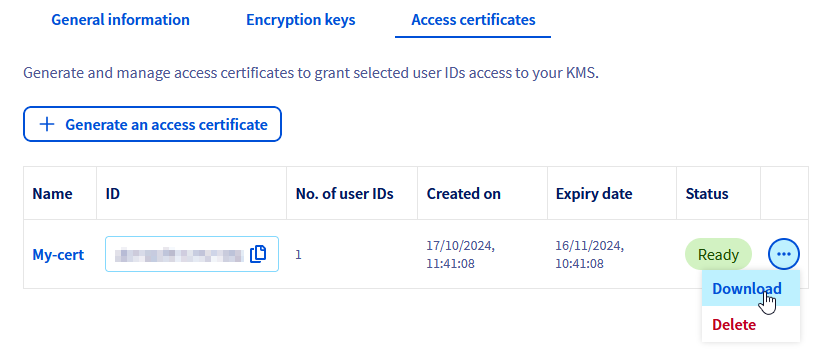
Finally it's possible to download the public key of the certificate from the dashboard.

Create a certificate

From the API

You can generate this certificate by letting OVHcloud generate the private key, or by providing your Certificate Signing Request (CSR) in case you have your own private key.

Without providing a private key

If you do not provide a CSR, OVHcloud will generate the access certificate along with a private key.

You can generate a certificate via the following API call:

The following information is required:

  • name: the name of the certificate
  • identityURNs: list of OVHcloud identities in URN format that will be provided to the IAM for calculating access rights
  • description: certificate description (optional)
  • certificateType: certificate signature algorithm (ECDSA or RSA) - ECDSA by default (optional)
  • validity: certificate validity duration in days - 365 days by default (optional)

Example of certificate creation with root account:

{
  "description": "My root access credential",
  "identityURNs": [
    "urn:v1:eu:identity:account:xx1111-ovh"
  ],
  "name": "root",
  "validity": 30
}

Example of certificate creation with local user:

{
  "description": "My access credential",
  "identityURNs": [
    "urn:v1:eu:identity:user:xx1111-ovh/john.smith",
    "urn:v1:eu:identity:group:xx1111-ovh/my_group"
  ],
  "name": "John Smith",
  "validity": 30
}

The API then returns the certificate creation status:

{
  "id": "f18b5e0d-75b8-40a3-9b0e-XXXXXX",
  "name": "John Smith",
  "description": "My access credential",
  "identityURNs": [
    "urn:v1:eu:identity:user:xx1111-ovh/john.smith",
    "urn:v1:eu:identity:group:xx1111-ovh/my_group"
  ],
  "certificateType": "ECDSA",
  "status": "CREATING",
  "fromCSR": false,
  "privateKeyPEM": "-----BEGIN EC PRIVATE KEY-----\nMHcCAQEEIDOfWuMVQxl5quoURzThF4zTI9YYTmylSaPjneLBwP+2oAoGCCqGSM49\nAwEHoUQDQgAERd1eMw0YdAD+E9oSymGc4bCL1mfJl0EZwoM2ya/uKFFVFnGMnckg\nXXXXXXXXXXXXXXX==\n-----END EC PRIVATE KEY-----\n",
  "createdAt": "2024-04-04T12:26:28.856619+02:00",
  "expiredAt": "2025-04-04T12:26:28.856616+02:00"
}

Copy the value of the privateKeyPEM field to a domain.key file

The private key will no longer be accessible at a later stage. If you lose it, you will need to regenerate a certificate.

The privateKeyPEM field needs to be edited so that all instances of \n are replaced by carriage returns.

Then copy the certificate ID and access its details via the API:

The API returns the certificate in PEM:

{
  "id": "f18b5e0d-75b8-40a3-9b0e-XXXXXX",
  "name": "John Smith",
  "description": "My access credential",
  "identityURNs": [
    "urn:v1:eu:identity:user:xx1111-ovh/john.smith",
    "urn:v1:eu:identity:group:xx1111-ovh/my_group"
  ],
  "status": "READY",
  "fromCSR": false,
  "certificateType": "ECDSA",
  "certificatePEM": "-----BEGIN CERTIFICATE-----\nMIIBqTCCAVCgAwIBAgIRAPGLXg11uECjmw5x/+X/A8swCgYIKoZIzj0EAwIwFTET\nMBEGA1UEAxMKQ0NNVXNlcnNDQTAeFw0yNDA0MDQxMDI2MjhaFw0yNTA0MDQxMDI2\nMjhaMC8xLTArBgNVBAMTJGU5MGM1ODQxLWYzOWUtNDk4My04NTk2LTYyZmYwYzUz\nOGI2YjBZMBMGByqGSM49AgEGCCqGSM49AwEHA0IABEXdXjMNGHQA/hPaEsphnOGw\ni9ZnyZdBGcKDNsmv7ihRVRZxjJ3JICEusleqD4lE27DAAdzbRdqAhpCqsTks+sSj\nZzBlME4GA1UdEQEB/wREMEKgQAYKKwYBBAGCNxQCA6AyDDBva21zLmRvbWFpbjpl\nOTBjNTg0MS1mMzllLTQ5ODMtODU5Ni02MmZmMGM1MzhiNmIwEwYDVR0lBAwwCgYI\nKwYBBQUHAwIwCgYIKoZIzj0EAwIDRwAwRAIgdWGYm1UQMg0sTIgROFH5mWiAh/lk\nDlyP5HhrWyFB9BICIDl5wtUWgCmo6TjOqXXXXXXXXXXXXXX\n-----END CERTIFICATE-----",
  "createdAt": "2024-04-04T12:26:28.856619+02:00",
  "expiredAt": "2025-04-04T12:26:28.856616+02:00"
}

Copy the value of the certificatePEM field to a client.cert file.

The certificatePEM field needs to be edited so that all instances of \n are replaced by carriage returns.

With a CSR

If you have your own private key, it is possible to use it by providing a CSR.

You can generate a certificate via the following API call:

The following information is required:

  • name: the name of the certificate
  • identityURNs: list of OVHcloud identities in URN format that will be provided to the IAM for calculating access rights
  • description: certificate description (optional)
  • validity: certificate validity duration in days - 365 days by default (optional)
  • csr: the content of the CSR

The CSR must be in JSON format. The CSR file must be edited so that there are no carriage returns; instead, \n will have to be inserted where the line breaks were previously (see the example below). You can also use third-party tools available online to adjust content into the correct JSON format.

Example of certificate creation:

{
  "csr": "-----BEGIN CERTIFICATE REQUEST-----\nMIICvDCCAaQCAQAwdzELMAkGA1UEBhMCVVMxDTALBgNVBAgMBFV0YWgxDzANBgNV\nBAcMBkxpbmRvbjEWMBQGA1UECgwNRGlnaUNlcnQgSW5jLjERMA8GA1UECwwIRGln\naUNlcnQxHTAbBgNVBAMMFGV4YW1wbGUuZGlnaWNlcnQuY29tMIIBIjANBgkqhkiG\n9w0BAQEFAAOCAQ8AMIIBCgKCAQEA8+To7d+2kPWeBv/orU3LVbJwDrSQbeKamCmo\nwp5bqDxIwV20zqRb7APUOKYoVEFFOEQs6T6gImnIolhbiH6m4zgZ/CPvWBOkZc+c\n1Po2EmvBz+AD5sBdT5kzGQA6NbWyZGldxRthNLOs1efOhdnWFuhI162qmcflgpiI\nWDuwq4C9f+YkeJhNn9dF5+owm8cOQmDrV8NNdiTqin8q3qYAHHJRW28glJUCZkTZ\nwIaSR6crBQ8TbYNE0dc+Caa3DOIkz1EOsHWzTx+n0zKfqcbgXi4DJx+C1bjptYPR\nBPZL8DAeWuA8ebudVT44yEp82G96/Ggcf7F33xMxe0yc+Xa6owIDAQABoAAwDQYJ\nKoZIhvcNAQEFBQADggEBAB0kcrFccSmFDmxox0Ne01UIqSsDqHgL+XmHTXJwre6D\nhJSZwbvEtOK0G3+dr4Fs11WuUNt5qcLsx5a8uk4G6AKHMzuhLsJ7XZjgmQXGECpY\nQ4mC3yT3ZoCGpIXbw+iP3lmEEXgaQL0Tx5LFl/okKbKYwIqNiyKWOMj7ZR/wxWg/\nZDGRs55xuoeLDJ/ZRFf9bI+IaCUd1YrfYcHIl3G87Av+r49YVwqRDT0VDV7uLgqn\n29XI1PpVUNCPQGn9p/eX6Qo7vpDaPybRtA2R7XLKjQaF9oXWeCUqy1hvJac9QFO2\n97Ob1alpHPoZ7mWiEXXXXXXXXXXXXX\n-----END CERTIFICATE REQUEST-----",
  "description": "My access credential",
  "identityURNs": [
    "urn:v1:eu:identity:user:xx1111-ovh/john.smith",
    "urn:v1:eu:identity:group:xx1111-ovh/my_group"
  ],
  "name": "John Smith",
  "validity": 30
}

The API then returns the certificate creation status:

{
  "id": "f18b5e0d-75b8-40a3-9b0e-XXXXXX",
  "name": "John Smith",
  "description": "My access credential",
  "identityURNs": [
    "urn:v1:eu:identity:user:xx1111-ovh/john.smith",
    "urn:v1:eu:identity:group:xx1111-ovh/my_group"
  ],
  "status": "CREATING",
  "fromCSR": true,
  "certificateType": "ECDSA",
  "createdAt": "2024-04-04T12:26:28.856619+02:00",
  "expiredAt": "2025-04-04T12:26:28.856616+02:00"
}

Copy the ID of the certificate and access its details via the following API call:

The API returns the certificate in PEM:

{
  "id": "f18b5e0d-75b8-40a3-9b0e-XXXXXX",
  "name": "John Smith",
  "description": "My access credential",
  "identityURNs": [
    "urn:v1:eu:identity:user:xx1111-ovh/john.smith",
    "urn:v1:eu:identity:group:xx1111-ovh/my_group"
  ],
  "status": "READY",
  "fromCSR": true,
  "certificateType": "ECDSA",
  "certificatePEM": "-----BEGIN CERTIFICATE-----\nMIIBqTCCAVCgAwIBAgIRAPGLXg11uECjmw5x/+X/A8swCgYIKoZIzj0EAwIwFTET\nMBEGA1UEAxMKQ0NNVXNlcnNDQTAeFw0yNDA0MDQxMDI2MjhaFw0yNTA0MDQxMDI2\nMjhaMC8xLTArBgNVBAMTJGU5MGM1ODQxLWYzOWUtNDk4My04NTk2LTYyZmYwYzUz\nOGI2YjBZMBMGByqGSM49AgEGCCqGSM49AwEHA0IABEXdXjMNGHQA/hPaEsphnOGw\ni9ZnyZdBGcKDNsmv7ihRVRZxjJ3JICEusleqD4lE27DAAdzbRdqAhpCqsTks+sSj\nZzBlME4GA1UdEQEB/wREMEKgQAYKKwYBBAGCNxQCA6AyDDBva21zLmRvbWFpbjpl\nOTBjNTg0MS1mMzllLTQ5ODMtODU5Ni02MmZmMGM1MzhiNmIwEwYDVR0lBAwwCgYI\nKwYBBQUHAwIwCgYIKoZIzj0EAwIDRwAwRAIgdWGYm1UQMg0sTIgROFH5mWiAh/lk\nDlyP5HhrWyFB9BICIDl5wtUWgCmo6TjOqXXXXXXXXXXXXXX\n-----END CERTIFICATE-----",
  "createdAt": "2024-04-04T12:26:28.856619+02:00",
  "expiredAt": "2025-04-04T12:26:28.856616+02:00"
}

Copy the value of the certificatePEM field to a client.cert file.

Go further

Using the OVHcloud KMS with your data.

Join our community of users.

Related articles