Customising a domain name's DNS servers (Hosts)
93 Views
Objective
DNS servers host the DNS configurations for domain names: DNS zones.
These DNS zones consist of technical information: DNS records. In standard usage, DNS records allow you to:
- Display your website with your domain name, using your hosting server's IP address (DNS records of the types A and AAAA).
- Redirect emails received at your domain name's custom email address(es) (DNS records of the type MX).
- Configure security/authentication information for your services (web hosting, email server, etc.) associated with your domain name (DNS records such as SPF, DKIM, DMARC, etc.).
For more information on these topics, see the following guides:
- Everything you need to know about DNS servers.
- Everything you need to know about DNS zones.
- How to edit an OVHcloud DNS zone.
Depending on your needs, you can customise your OVHcloud domain name's DNS servers using "Hosts".
Find out how to customise your OVHcloud domain name's DNS servers.
Requirements
- A domain name registered with OVHcloud.
OVHcloud Control Panel Access
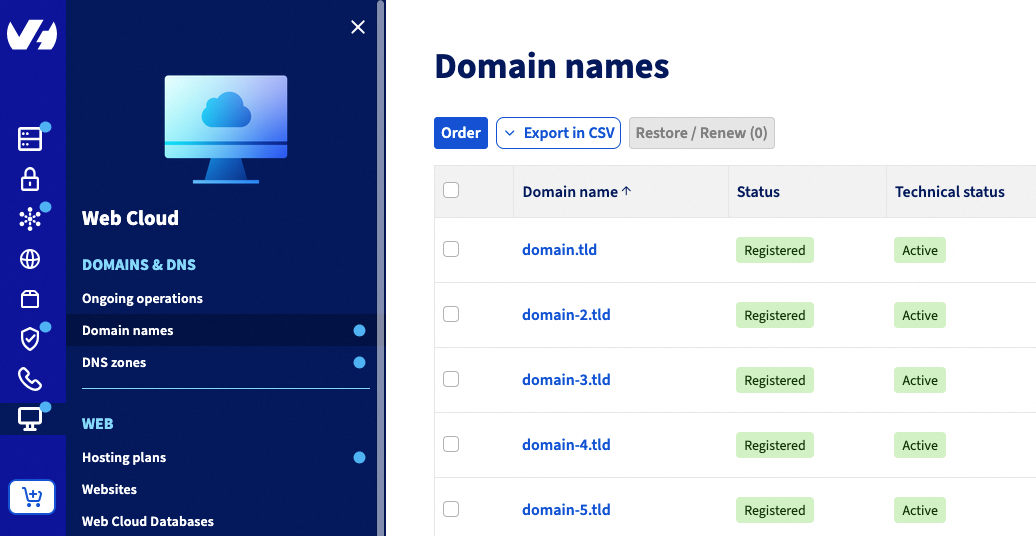
- Direct link: Domain names
- Navigation path:
Web Cloud>Domain names> Select your domain name
Instructions
Customising a domain name's DNS servers is a sensitive procedure: an inappropriate change can prevent access to your website and/or interrupt the reception of new emails on your email addresses. Follow the parts described below carefully, or contact a specialist provider if you have any doubts.
1 - General rule
Some registries, such as Verisign (which manages the .com, .net extensions as well as other TLDs), use a technical model called host objects.
In some cases, this model requires that a specific record be created in advance for a DNS server before it can be used by a domain name.
Other registries do not require this record and directly accept the DNS server name.
In general, OVHcloud automatically creates the host objects when they are related to a domain name managed by OVHcloud.
The "Hosts" tab is only required in one specific case: the DNS server belongs to a domain name managed by OVHcloud and must be used by another domain name that is not managed by OVHcloud but is governed by the same registry (for example, two .com domain names).
Possible cases
| DNS server domain name | Domain name to configure | Host creation by OVHcloud | Manual action required in the "Hosts" menu | Example |
|---|---|---|---|---|
| Managed by OVHcloud | Managed by OVHcloud | Automatic | No | ns1.example.com (domain example.com managed by OVHcloud) is used as the DNS server for the domain test.com (managed by OVHcloud) |
| Managed by OVHcloud | Managed by OVHcloud | Automatic | No | ns1.example.com (domain example.com managed by OVHcloud) is used as the DNS server for the domain test.fr (managed by OVHcloud) |
| Managed by OVHcloud | Other registrar | Automatic configuration not possible | Yes | ns1.example.com (domain example.com managed by OVHcloud) is used as the DNS server for the domain test.com (managed by another registrar, same .com extension) |
| Managed by OVHcloud | Other registrar | N/A | No | ns1.example.com (domain example.com managed by OVHcloud) is used as the DNS server for the domain test.fr (managed by another registrar) |
| Not managed by OVHcloud | Managed by OVHcloud | Out of scope | No | ns1.example.net (domain managed by another registrar) is used as the DNS server for the domain test.com (managed by OVHcloud) - the host must be created with the registrar managing example.net |
The third row of the table above is the only scenario where manual creation of the host in the "Hosts" tab is required.
2 - Retrieving the DNS servers currently used by your domain name
You can retrieve the DNS servers currently used by your domain name using the online DNS tool Zonemaster.
To do this, go to https://zonemaster.net, enter your domain name without www (example: domain.tld), then tick the Options button located just below the domain name entry form.
In the available options, click on the Fetch NS from parent zone button.
A result is displayed:
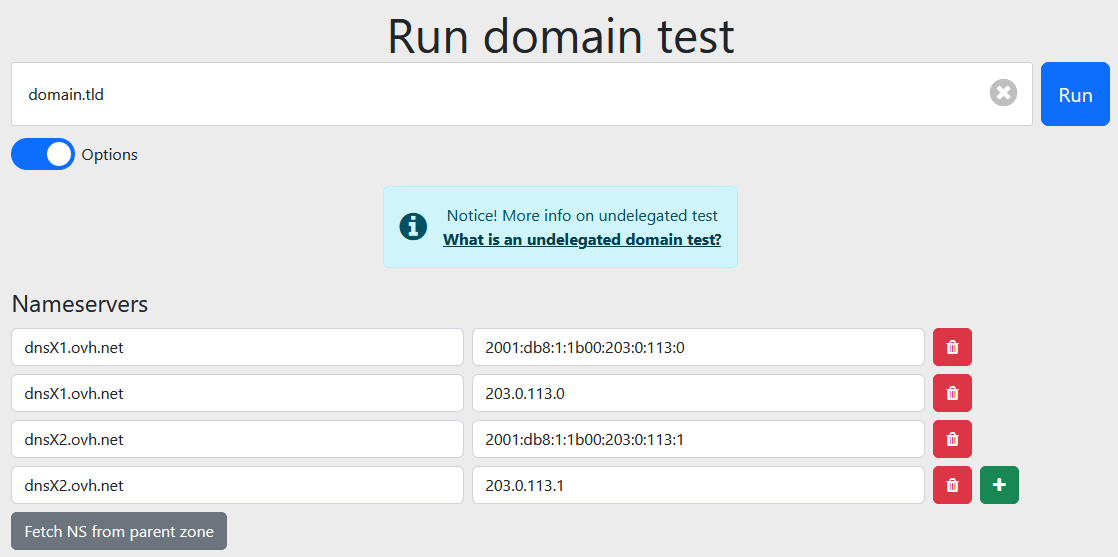
Retrieve the DNS servers and keep all their associated IPv4 addresses (in the form X.X.X.X where X is a number between 0 and 255) and IPv6 (other IPs that are not IPv4). You will need them for the rest of this guide.
In our example shown above, the domain.tld domain currently uses the following DNS servers:
- dnsX1.ovh.net associated with IPv4 203.0.113.0 and IPv6 2001:db8:1:1b00:203:0:113:0.
- dnsX2.ovh.net associated with IPv4 203.0.113.1 and IPv6 2001:db8:1:1b00:203:0:113:1.
If you need more information, please read our tutorial on the Zonemaster tool.
3 - Adding the host records
The registries for the extensions .eu, .it, .be and .de do not consider host records to be "objects", but rather "attributes".
Therefore, for these extensions, skip directly to step 4 of this guide without completing step 3.
Before you begin, be aware that:
-
You can create custom DNS servers directly on the domain name that will use them. For example, you can create the custom DNS servers dns1.domain.tld and dns2.domain.tld for the domain name domain.tld.
-
You can also create custom DNS servers on a domain name to use them with another domain name. For example, you can create the custom DNS servers dns1.domain1.tld and dns2.domain1.tld for the domain name domain2.tld. You will need to retrieve the DNS servers and their associated IPs for domain2.tld. In addition, domain1.tld must be registered with OVHcloud to set up the hosts.
Click on the tabs below to view each of the 3 steps.
Go to the Domain names page, then choose the domain name concerned.
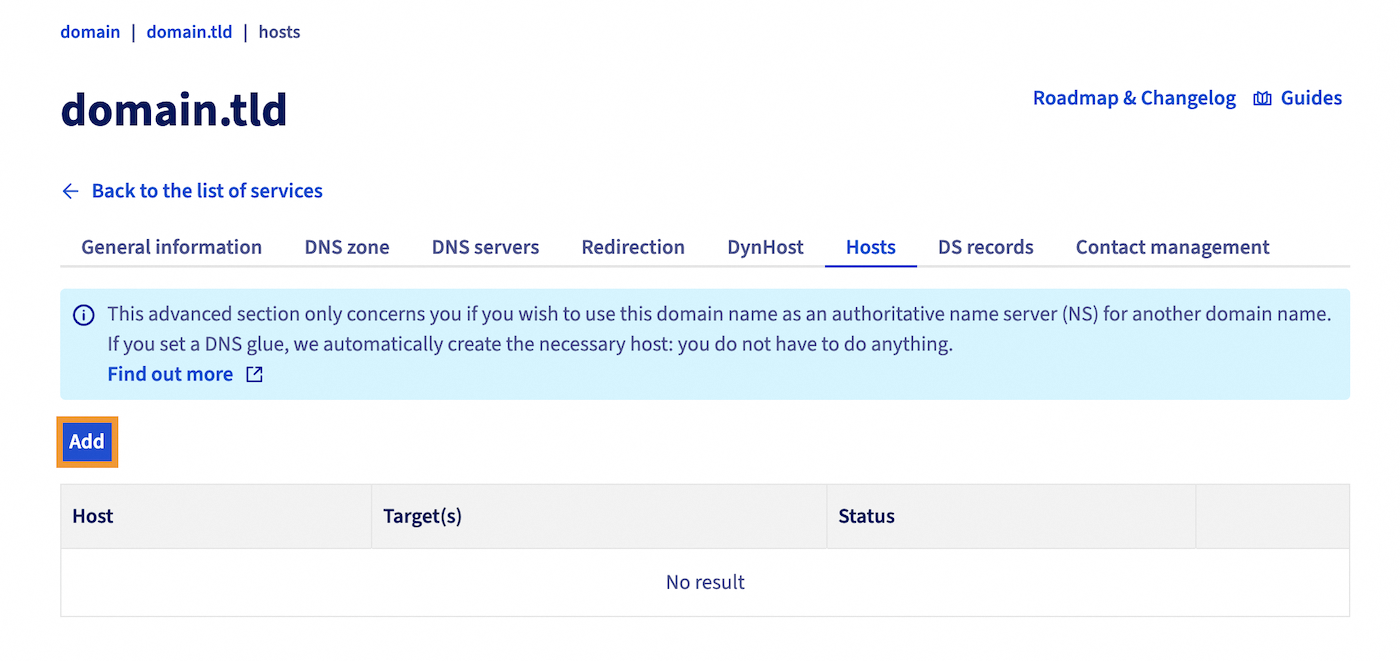
Once you are on the domain name concerned, click on the Hosts tab.
The table that appears will display the host records currently configured at OVHcloud for your domain name, if any. To add a new record, click the Add button.
In the window that opens on your screen, fill in the requested information:
| Information | Details |
|---|---|
| Host name | Customise the host name you want to use as a custom DNS server. |
| Target IP(s) | Enter the IP address(es) (IPv4 and/or IPv6) to which the host name should be linked. This is the IP address(es) of the DNS server currently used by your domain name. If you need to enter multiple IP addresses, separate them with commas. |
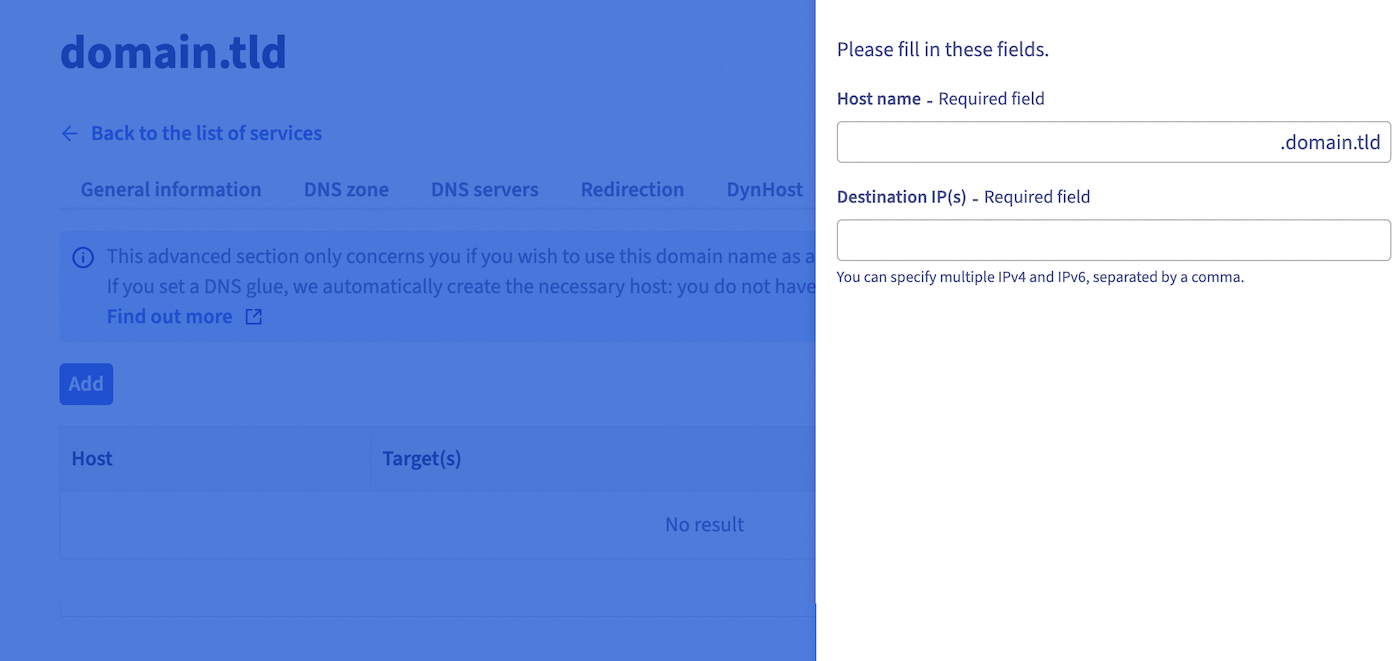
In the image above, taking the example from step 2, the host to be added here (from the domain name domain.tld) is dns1.domain.tld.
For this host, the following target DNS server IP addresses are specified: 203.0.113.0 (IPv4) and 2001:db8:1:1b00:203:0:113:0 (IPv6). These IPs correspond to one of the two DNS servers currently used for domain.tld (dnsX1.ovh.net).
This host is added so that dns1.domain.tld will ultimately replace the DNS server name dnsX1.ovh.net currently used by the domain name domain.tld.
Once you have filled in the information, click the Add button. Read the information displayed, then click Confirm. Repeat this operation as many times as necessary, depending on the number of DNS servers used by your domain name.
In our example, you will need to repeat the operation to create the dns2.domain.tld host. This will subsequently replace the DNS server dnsX2.ovh.net currently associated with IPv4 203.0.113.1 and IPv6 2001:db8:1:1b00:203:0:113:1.
4 - Creating the A and AAAA DNS records corresponding to the custom DNS servers
You must create the A and AAAA records for the host names that you defined in the previous step. The A and AAAA records must target the destination IP address corresponding to the host name created earlier.
This is done via the interface of the provider managing your domain name's DNS configuration. There are two possibilities:
Click on one of the 2 options to view its content.
Your domain name does not use an active DNS zone at OVHcloud
Contact the provider managing it. Once the change has been made, proceed to the next step.
Your domain name uses an active DNS zone at OVHcloud
Click on the tabs below to view each of the 4 steps.
Click Add an entry.
Select the entry of type A or AAAA depending on the type of associated IP you want to add.
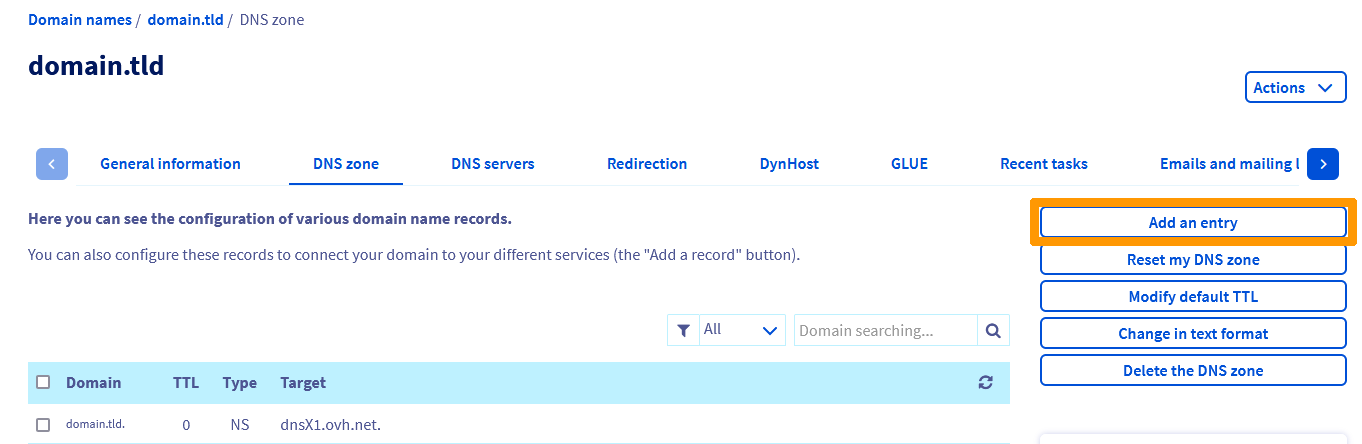
Enter the subdomain and the IPv4 (A) or IPv6 (AAAA) address, then proceed until the addition has been validated. If necessary, refer to the instructions in our guide "How to edit an OVHcloud DNS zone".
In all cases, a propagation delay of 4 to 24 hours is required for the DNS zone modification to take effect across the entire DNS network. We recommend waiting for this period before continuing.
If we go back to our previous example, the host records to be added (from the domain name domain.tld) are dns1.domain.tld and dns2.domain.tld. The goal is to replace the current DNS servers dnsX1.ovh.net and dnsX2.ovh.net.
As a result, the following records are added to the active DNS zone of the domain name domain.tld:
- An A DNS record for the subdomain dns1.domain.tld to the IP 203.0.113.0 (IPv4 of the DNS server dnsX1.ovh.net).
- An AAAA DNS record for the subdomain dns1.domain.tld to the IP 2001:db8:1:1b00:203:0:113:0 (IPv6 of the DNS server dnsX1.ovh.net).
- An A DNS record for the subdomain dns2.domain.tld to the IP 203.0.113.1 (IPv4 of the DNS server dnsX2.ovh.net).
- An AAAA DNS record for the subdomain dns2.domain.tld to the IP 2001:db8:1:1b00:203:0:113:1 (IPv6 of the DNS server dnsX2.ovh.net).
Wait for the DNS propagation to complete.
5 - Replacing the NS records in your domain name's active DNS zone
For the DNS server customisation to be visible on the DNS network (by performing a Whois, a dig ns or through a DNS configuration analyser), you will need to replace the NS records in your domain name's active DNS zone.
This is done via the interface of the provider managing your domain name's DNS configuration. There are two possibilities:
Click on one of the 2 options to view its content.
Your domain name does not use an active DNS zone at OVHcloud
Contact the provider managing it to make the change.
Your domain name uses an active DNS zone at OVHcloud
Click on the tabs below to view each of the 3 steps.
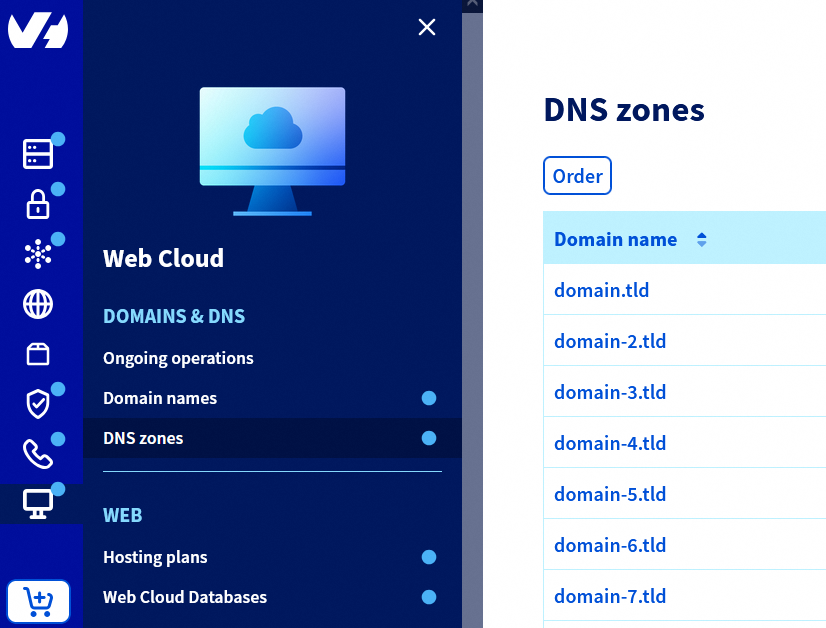
Go to the DNS zones page, then choose the domain name for which you have customised the DNS servers.
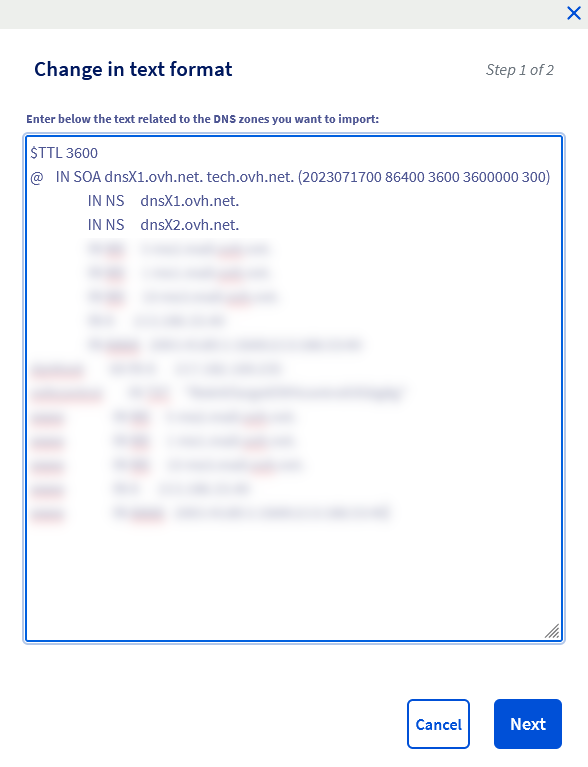
Click Change in text format.
A window containing your DNS zone in text mode will appear:
As a reminder, making an inappropriate change in text mode in your DNS zone can prevent access to your website and/or interrupt the reception of new emails on your email addresses. Contact a specialist provider if you have any doubts.
In this window, replace only in the NS type records the DNS server names with your own custom DNS server names, making sure to increment the first numeric value of the SOA line by "1". Once you have made your changes, click Next then Confirm.
The change will not be visible immediately. Wait around twenty minutes for your changes to take effect.
A propagation delay of 4 to 24 hours is required for the changes made in the DNS zone to take effect across the entire DNS network.
To better understand this step, let's take our example with the domain name domain.tld and its DNS zone in "text" mode visible in the image above.
The following elements are observed:
- The first numeric value of the SOA line is: 2023071700.
- There are two NS records for the domain name domain.tld.
- The NS records still target the two DNS servers dnsX1.ovh.net and dnsX2.ovh.net.
To continue the customisation of the DNS servers for the domain name domain.tld, you will need to:
- Increment the first numeric value of the SOA line by "1": 2023071701 (note that if the first numeric value was 2023071704, you would increment by "1" and get the following result: 202307170**5).
- Replace the target dnsX1.ovh.net. with dns1.domain.tld. only for the line that starts with IN NS.
- Replace the target dnsX2.ovh.net. with dns2.domain.tld. only for the line that starts with IN NS.
Once the modifications are made, the result of our example will be the following:
For the domain name domain.tld, the DNS servers displayed after the DNS modification and propagation have been processed will be dns1.domain.tld. and dns2.domain.tld..
If necessary, refer to the instructions in our guide "How to edit an OVHcloud DNS zone".
If you have customised your DNS servers directly on the domain name that will use them, the DNS zone may not display the domain name in the targets of the NS records, but only the subdomain.
For example, instead of displaying the following records:
- domain.tld IN NS dns1.domain.tld.
- domain.tld IN NS dns2.domain.tld.
The DNS zone may display the records as follows:
- domain.tld IN NS dns1.
- domain.tld IN NS dns2.
Rest assured, this is the same result and this configuration will work perfectly. This phenomenon is caused by the presence of the same domain name on both sides of the NS record.
6 - Modifying your domain name's DNS servers
You must modify your domain name's DNS servers by replacing the old DNS servers with the custom DNS servers you created previously.
To do this, click on the tabs below to view each of the 4 steps.
Go to the Domain names page, then choose the domain name for which you want to customise the DNS servers.
Select the DNS servers tab, then click Modify DNS servers.
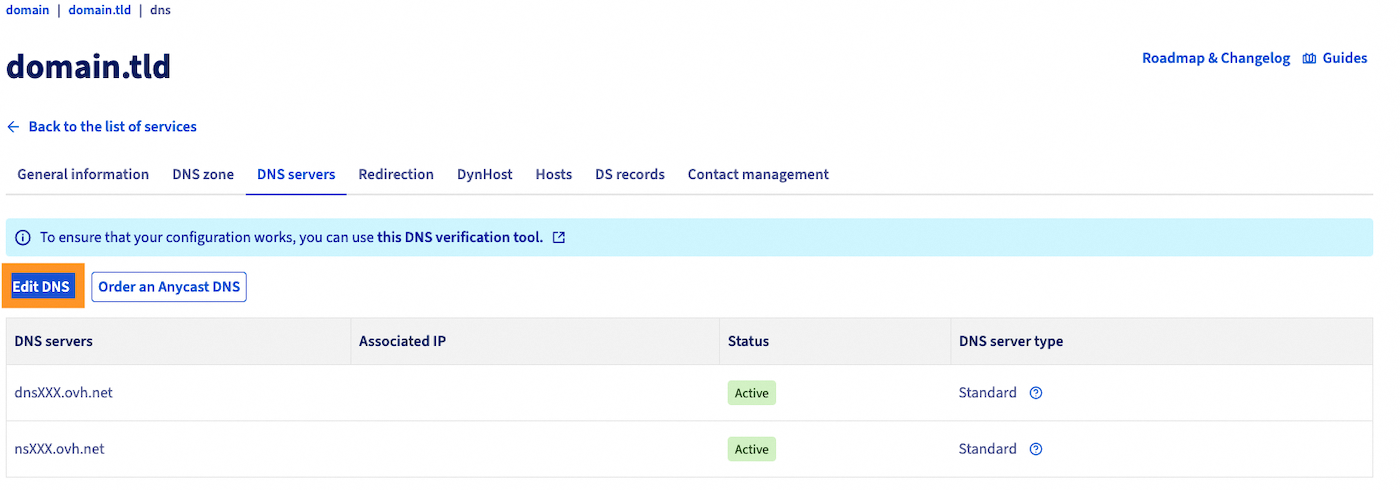
Replace your current DNS servers with those you want to use as custom DNS servers.
If your custom DNS servers have been created with the extensions .eu, .it, .be or .de, you must enter the associated IP address for each of your custom DNS servers respectively.
Without this, the custom DNS servers will not be registered correctly and will not work with your domain name.
Finalise the steps and, if necessary, refer to the instructions in our guide "Modifying an OVHcloud domain name's DNS servers".
If you have customised DNS servers on a domain name for use with another domain name that is not registered with OVHcloud, contact the provider where your other domain name is registered to modify the DNS servers.
A propagation delay of 24 to 48 hours is required for the change of DNS servers to take effect across the entire DNS network.
In our example of customising the DNS servers for the domain name domain.tld, we replace the DNS server dnsX1.ovh.net with dns1.domain.tld and the DNS server dnsX2.ovh.net with dns2.domain.tld, then wait for the DNS propagation to complete.
Go further
General information on OVHcloud DNS servers
How to edit an OVHcloud DNS zone
For specialised services (SEO, development, etc.), contact OVHcloud partners.
If you would like assistance using and configuring your OVHcloud solutions, please refer to our support offers.
Join our community of users.

