How to migrate an MX Plan email address to an OVHcloud Zimbra account
409 Views
Objective
As part of the gradual transition from MX Plan accounts to Zimbra, you can anticipate this migration and carry out the email account transfer yourself before OVHcloud implements an automated tool. This guide will show you how to migrate manually.
This guide explains how to migrate an MX Plan email address to an OVHcloud Zimbra account.
Requirements
- You have an MX Plan email address (via the MX Plan solution, or included in an OVHcloud web hosting).
- You have an OVHcloud Zimbra email account.
- No redirection is applied to the MX Plan email address you want to migrate.
OVHcloud Control Panel Access
- Direct link: Zimbra
- Navigation path:
Web Cloud>Zimbra Mail
Instructions
If your email account manages sensitive information, or if you experience any issues during the migration, we recommend waiting for the automation tool to be set up in the OVHcloud Control Panel.
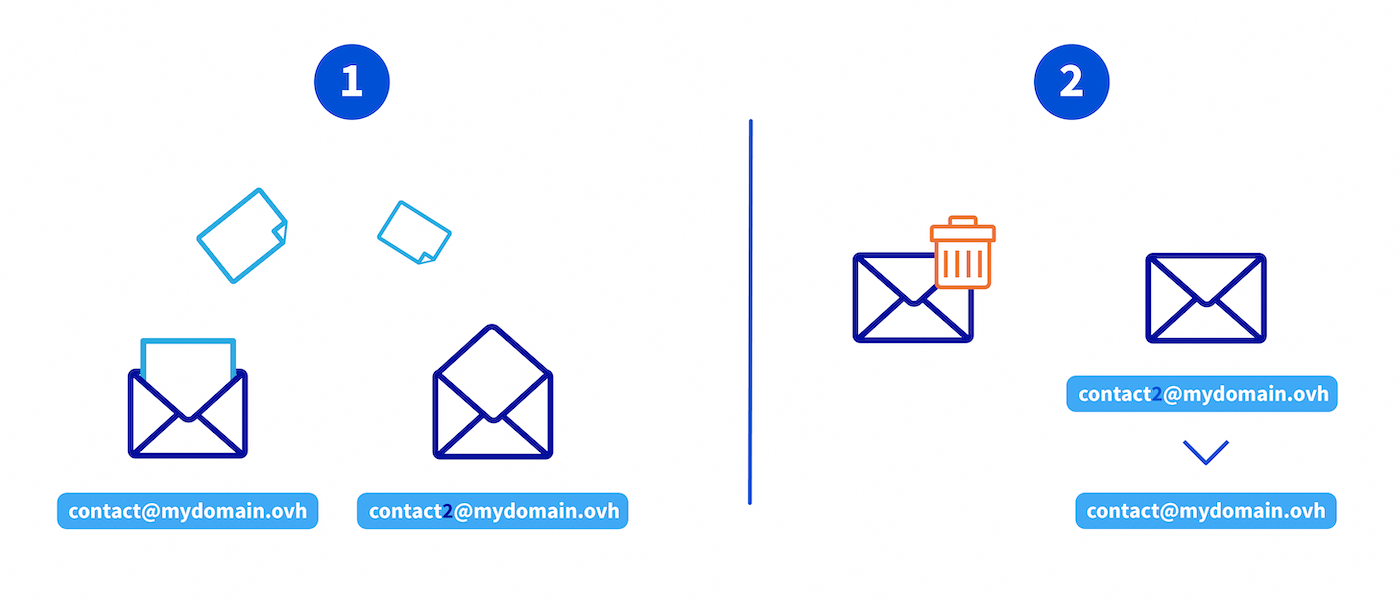
You can migrate an MX Plan email account to a Zimbra email account in 2 steps. To avoid cutting off the receipt on the original email address, it is necessary to follow the following process:
- Transfer the contents of the MX Plan account to a Zimbra account
- Delete the original MX Plan account and reassign its address to the Zimbra account
In the example below, we are migrating the address contact@mydomain.ovh. To do this, we will create the Zimbra account under the name contact2@mydomain.ovh.
1.1 - Creating a Zimbra email address
If you already have a Zimbra email address, go to Migrate emails with OVHcloud Mail Migrator.
First, create an email address with a temporary name. For example, you can create the address contact2@mydomain.ovh if you need to migrate the address contact@mydomain.ovh.
To create a Zimbra email address, please read the “Create an email account” section of our guide Getting started with the Zimbra solution.
1.2 - Migrating emails with OVHcloud Mail Migrator
Use the migration tool OVH Mail Migrator (OMM) to transfer the contents of the original MX Plan account to the new Zimbra destination account, using the example shown in the diagram above.
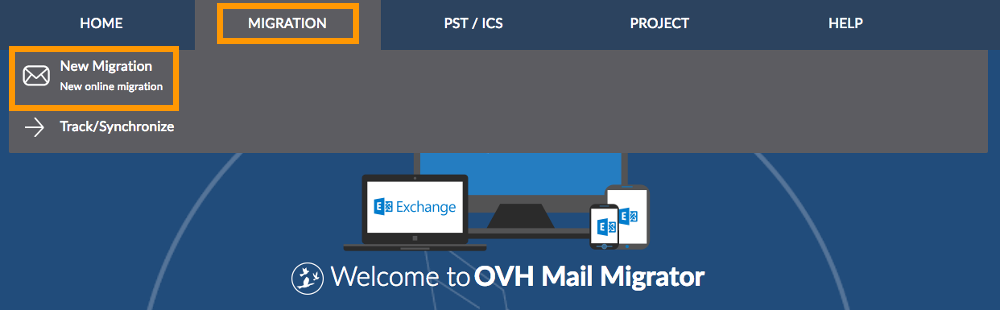
Step 1: Access the OVHcloud Mail Migrator
Go to OVHcloud Mail Migrator.
On the OMM page, in the Migration tab, click New Migration.
Step 2: Enter the migration information
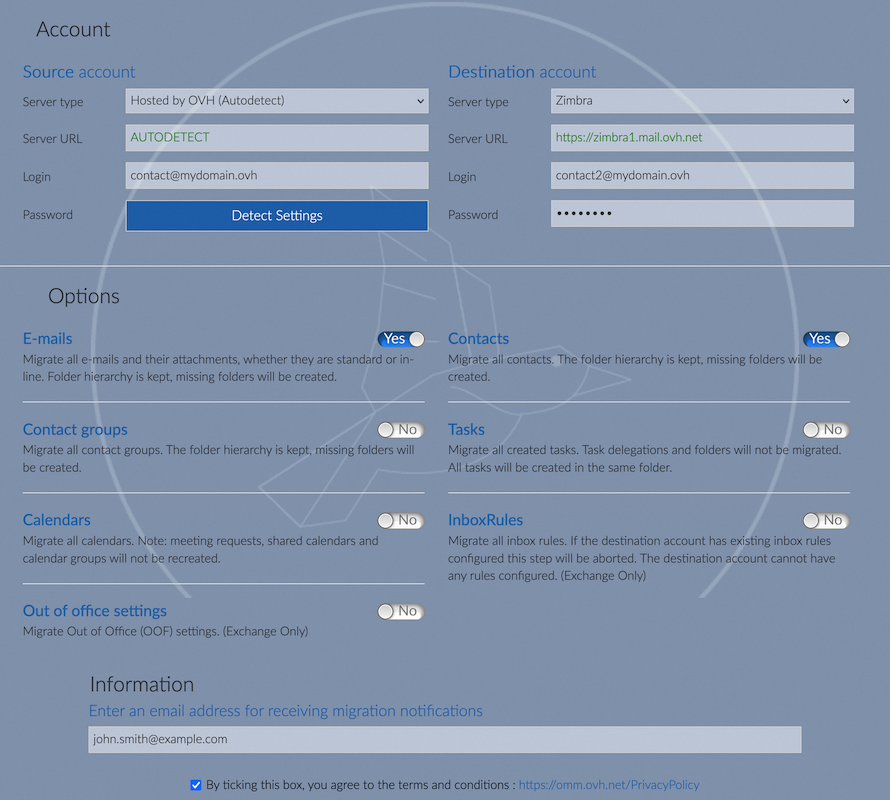
Account
- Source Account:
- Server type: Selecting
Hosted by OVHcloud (Autodetect)allows you to automatically fill in the information, with the exception of the password. - Server URL: This field is filled in automatically.
- Login: Enter the full email address of the account to be migrated (e.g.:
contact@mydomain.ovh). - Password: Enter the password for the email account concerned.
- Server type: Selecting
- Destination Account:
- Server type: Select
Zimbrafor the destination server type. - Server URL: Enter the Zimbra server address https://zimbra1.mail.ovh.net.
- Login: Enter the full email address of the target Zimbra account (e.g.:
contact2@mydomain.ovh). - Password: Enter the password for the target Zimbra account.
- Server type: Select
Options
Select the items you want to migrate. Some content may be unavailable, depending on the server type you have chosen.
Information
Enter an email address to be notified about the migration progress. Select the checkbox at the bottom of the page to accept the OMM terms and conditions.
Step 3: Launch the migration
Verify that all the information is correct, then click Start migration. The page that appears will detail the migration status. Keep the “Migration ID” displayed and wait for the process to complete. This delay can vary depending on the number of elements to be migrated.
Step 4: Track the migration
There are two ways to track a single migration:
- Via the email you receive notifying you of the migration progress.
- From the OMM page. In the
Migrationtab, clickTrack/Synchronize. Enter theMigration IDas well as theSource accountconcerned.
On the page that opens, you can track the progress of your migration. You will see a message indicating whether the process will begin, is in progress, or has been completed. Depending on this status, there are several possible interactions:
Stop the process: Allows you to cancel the migration. Items that have already been migrated will remain in the destination account.Delete migrated elements: Enables you to delete elements that have already been migrated to the destination account. You can clear items from a specific synchronization point.Synchronize: Used to retrieve new elements that were not migrated during a previous synchronization between the source account and the destination account. We consider this action as a migration of the missing elements on the destination account from the source account.
To migrate by file or multiple files, please read the “Migrate by file” and “Migrate and track multiple migrations (project mode)” sections of our guide on Migrating email accounts via the OVHcloud Mail Migrator.
The migration time varies depending on the volume of data, and can range from a few minutes to several hours. Once the migration is complete, check that all emails have been migrated.
1.3 - Source account email backup (optional)
Before deleting your MX Plan account, back up your emails to avoid any data loss.
Use the export options of your email client. In our guide on Migrating your email address manually, you can find the details for manually exporting an email account from an email client.
2.1 - Deleting the old MX Plan email address
To delete the MX Plan email address (e.g. contact@mydomain.ovh), follow our guide Delete an email account.
If you are migrating from an MX Plan account using Zimbra webmail, wait 5 minutes for the deletion to take effect before renaming the second email account.
2.2 - Rename Zimbra email address
In your OVHcloud Control Panel, access your Zimbra Starter service and rename your Zimbra email account address with the name of the migrated email account (e.g.: contact2@mydomain.ovh to contact@mydomain.ovh).
Conclusion
Your email account is now fully migrated to Zimbra Starter. You can now use Zimbra to manage your email.
Go further
Configuring your Zimbra email address on an email client
For specialized services (SEO, development, etc.), contact the OVHcloud partners.
If you would like assistance with using and configuring your OVHcloud solutions, we recommend referring to our range of support solutions.
Join our community of users.

