Using email aliases and redirections
4860 Views
Objective
In this guide, you can find information and help on configuring your redirections and alias emails, such as sending emails received from address A to address B.
This guide explains how to manage aliases and email redirections.
What is an email redirection?
You can use redirections to change the routing of an email sent to an email address, forwarding it to one or more other email addresses.
For example, you may want emails sent to contact@mydomain.ovh forwarded to john.smith@otherdomain.ovh. This way, you can automatically send emails received by contact@mydomain.ovh to john.smith@otherdomain.ovh.
What is an email alias?
Unlike redirection, an alias address is not an actual email account, but functions as a secondary address for the email account associated with it.
By creating an alias for your email account, you can give your contacts a "masking" address instead of revealing your personal email address to them. An email account can have multiple aliases.
For example, your email address is john.smith@mydomain.ovh and your alias is information@mydomain.ovh. You can then send your contacts the address information@mydomain.ovh and receive emails on john.smith@mydomain.ovh, without the sender knowing the address john.smith@mydomain.ovh.
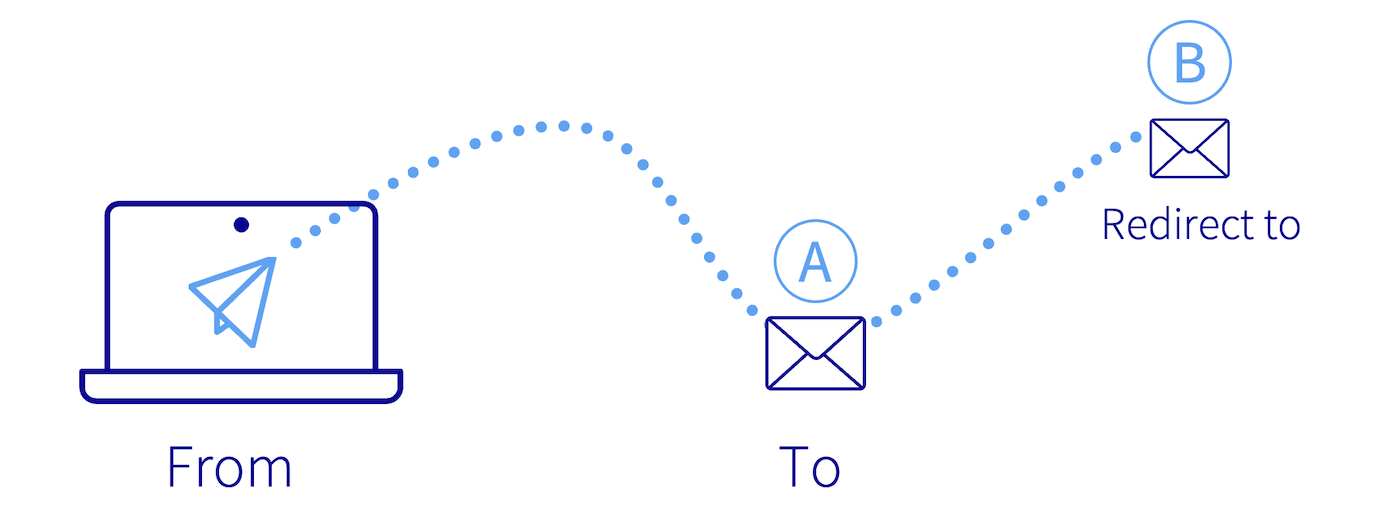
Redirection and alias in pictures
Click on the tabs below for an illustrated explanation of how aliases and redirections work.
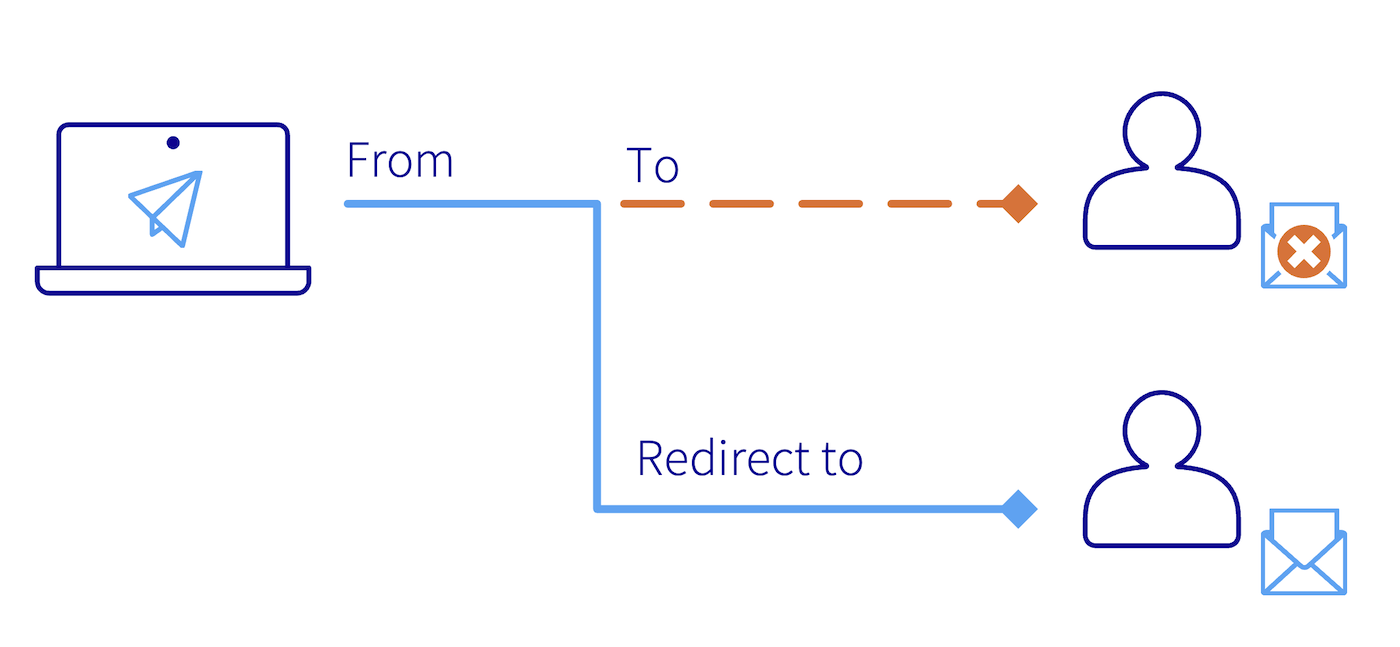
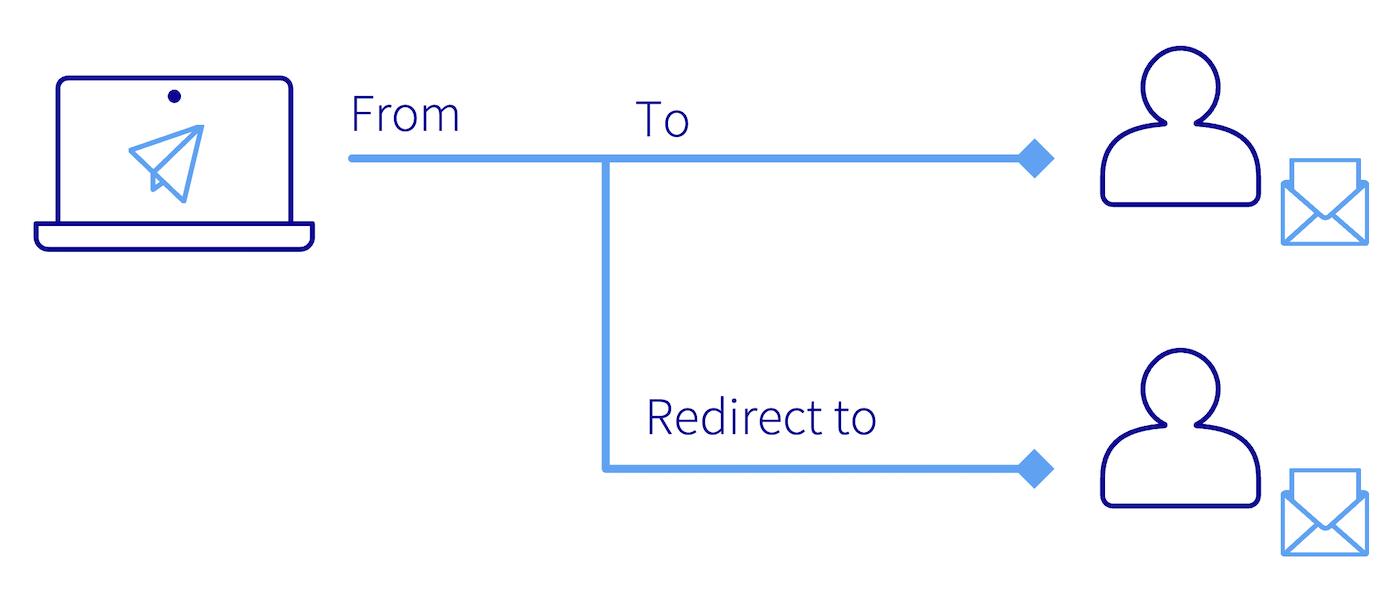
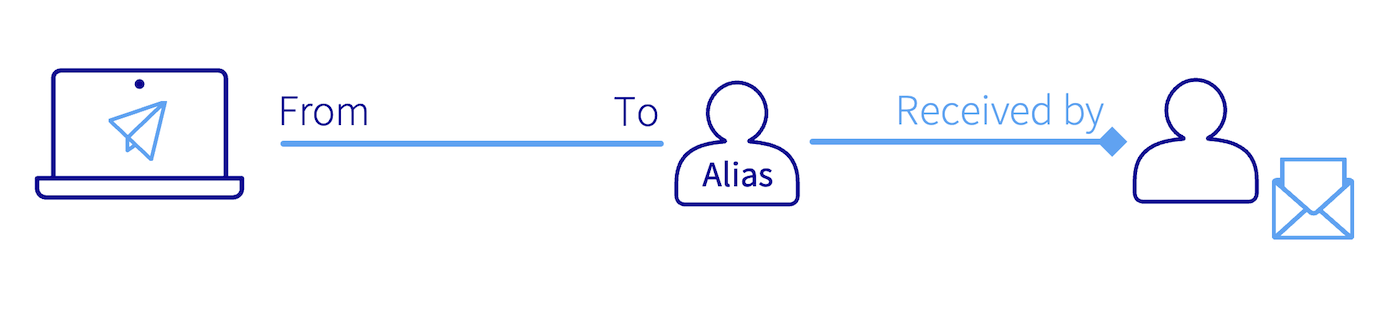
Fromis the sender's address.Tois the address of the recipient.Redirect torefers to the redirection email address that has been configured.
The email is sent directly to the redirection address, the original recipient does not receive the email.
Both the original recipient and the redirection email account will receive the email.
The email is sent to the alias address and received by the email account on which the alias has been configured. Received by means the email account that receives the email.
Note that you can configure redirections to multiple email addresses. To do this, the redirections to each recipient must be created individually.
Requirements
- A preconfigured OVHcloud email solution:
- MX Plan available with a web hosting plan, or included in a 100M free hosting.
- Exchange.
- Email Pro.
- Zimbra.
OVHcloud Control Panel Access
MX Plan:
- Direct link: MX Plan
- Navigation path:
Web Cloud>MX Plan> Select your MX Plan service
Zimbra:
- Direct link: Zimbra
- Navigation path:
Web Cloud>Zimbra Mail
Email Pro:
- Direct link: Email Pro
- Navigation path:
Web Cloud>Email Pro> Select your platform
Exchange:
- Direct link: Exchange
- Navigation path:
Web Cloud>Exchange> Select your platform
Instructions
This guide covers all of our email solutions. Depending on the solution, you can manage aliases and redirections from the OVHcloud Control Panel, or via webmail. For clarity, we mention the types of email solutions concerned in each chapter of this guide. Here are the different types of OVHcloud email solutions:
- MX Plan Roundcube: Corresponds to the MX Plan solution using Roundcube webmail.
- MX Plan Zimbra: Corresponds to the MX Plan solution using Zimbra webmail.
- MX Plan OWA: Corresponds to the MX Plan solution using the Outlook Web App (OWA) webmail.
- Exchange: Applies to Hosted, Private and Dedicated Exchange solutions using the Outlook Web App (OWA) webmail.
- Email Pro: Exchange-based email solution using the Outlook Web App (OWA) webmail.
- Zimbra: Dedicated solution using Zimbra webmail.
- Redirect: This free solution is automatically available if you have a domain name in your Control Panel without an attached email solution. You can use it to create email redirections.
The email technology for your MX Plan solution may vary depending on the activation date of your solution, or if a migration has recently taken place. This technology is mainly distinguished by the interface of its webmail. To identify it via the OVHcloud Control Panel, follow this process:
From your MX Plan service, in the General Information tab, note the technology used under Webmail in the Subscription box.

Contents
Creating a redirection
Via the OVH Control Panel
Currently, only the MX Plan and Redirect plans have a redirection management interface via the OVHcloud Control Panel.
MX Plan / redirect
From your MX Plan service, select the domain concerned.
In our example, this is a redirection with a local copy (see diagram 2 at the beginning of this guide). If this is what you need, follow the steps below by clicking on the tab corresponding to the webmail technology used by your MX Plan:
By default, you are in the General information tab of your MX Plan. Click on the Emails tab, then on the right-hand side on the Manage redirections button.
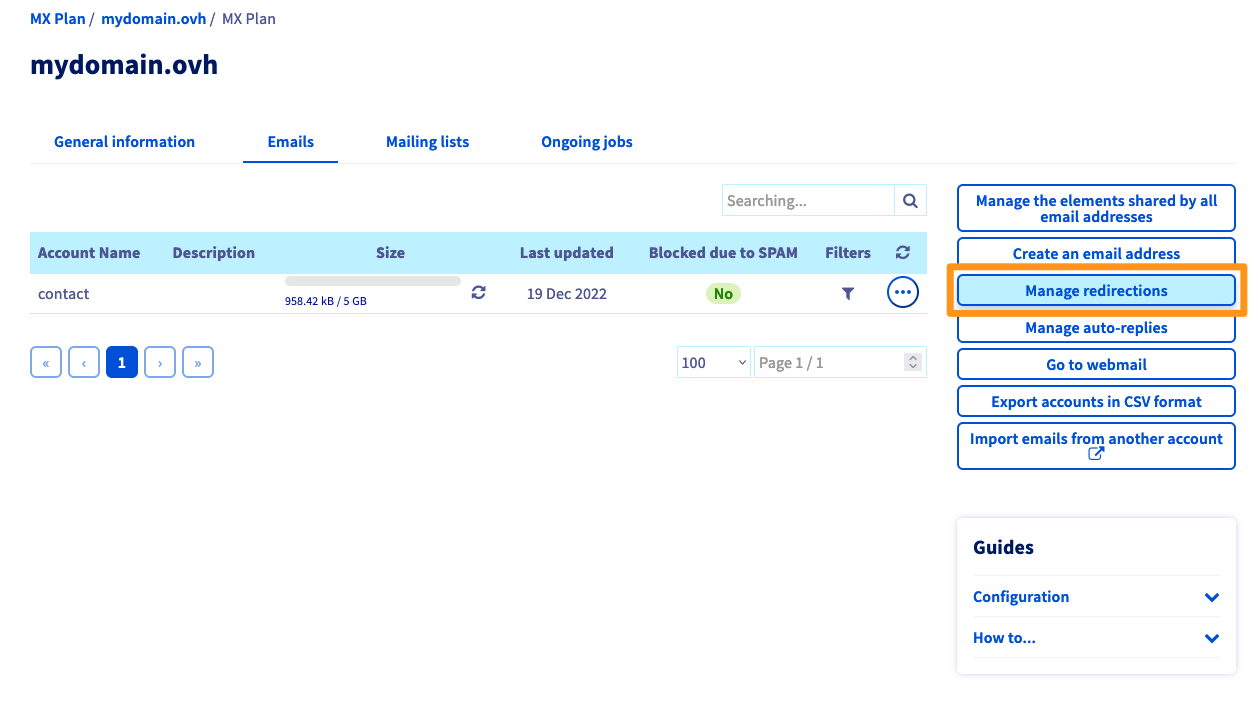
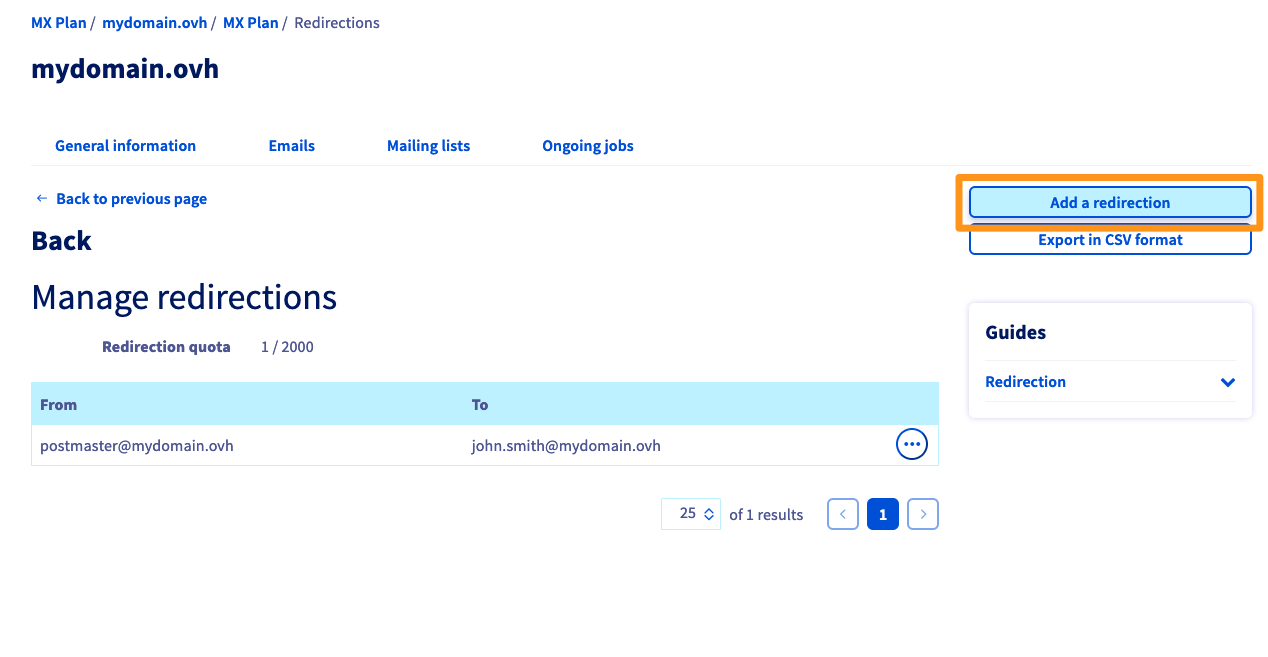
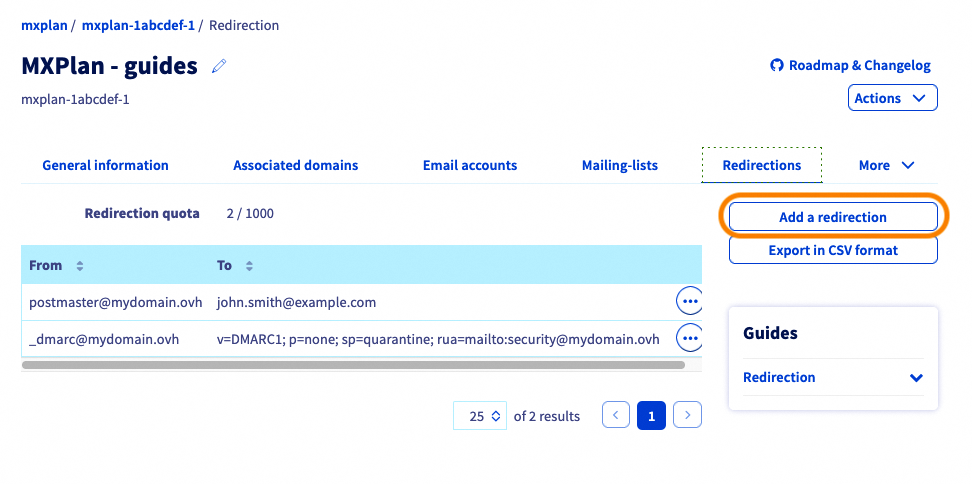
The table of redirections that are already active appears. On the right, click Add a redirection.
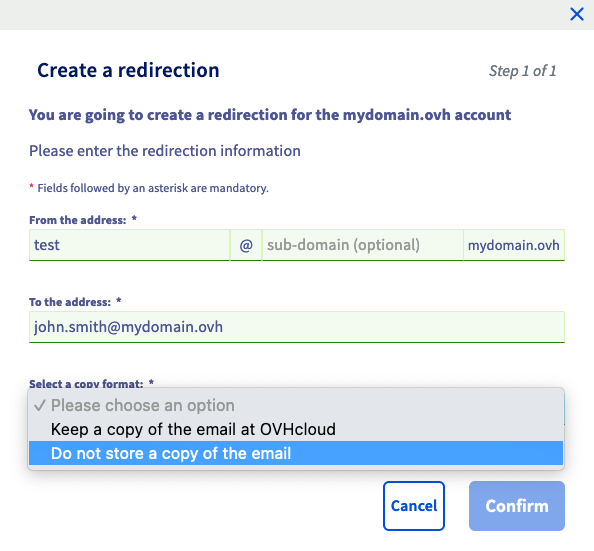
In the form Create a redirection, enter the following information:
- From address: Enter the email address you would like to redirect.
- To the address: Enter the destination address for your redirection here. This can be one of your OVHcloud email addresses, or an external email address.
- Choose a copy mode: Choose if you want to:
- Keep a copy of the email with OVHcloud: Receive the email on your main address as well as the redirection address (see diagram 2 at the beginning of this guide).
- Do not store a copy of the email: Send directly to the redirection address without the primary address receiving it (see diagram 1 at the beginning of this guide).
Then click Confirm to confirm the addition of this redirection.
To modify the destination address or delete a redirection, click ..., to the right of the redirection concerned.
By default, you are in the General information tab of your MX Plan. Click on the Redirections tab.
The table of redirections that are already active appears. On the right, click Add a redirection.
In the Create a redirection form, enter the following information:
- From address: Enter the email address you would like to redirect.
- To the address: Enter the destination address for your redirection here. This can be one of your OVHcloud email addresses, or an external email address.
- Choose a copy mode: Choose if you want to:
- Keep a copy of the email with OVHcloud: Receive the email on your main address as well as the redirection address (see diagram 2 at the beginning of this guide).
- Do not store a copy of the email: Send directly to the redirection address without the primary address receiving it (see diagram 1 at the beginning of this guide).
Then click Confirm to confirm the addition of this redirection.
When you choose the "Keep a copy of the email with OVHcloud" copy mode, a redirection from the email address to itself is created automatically in the redirections list, and it materializes this local copy.
Via webmail
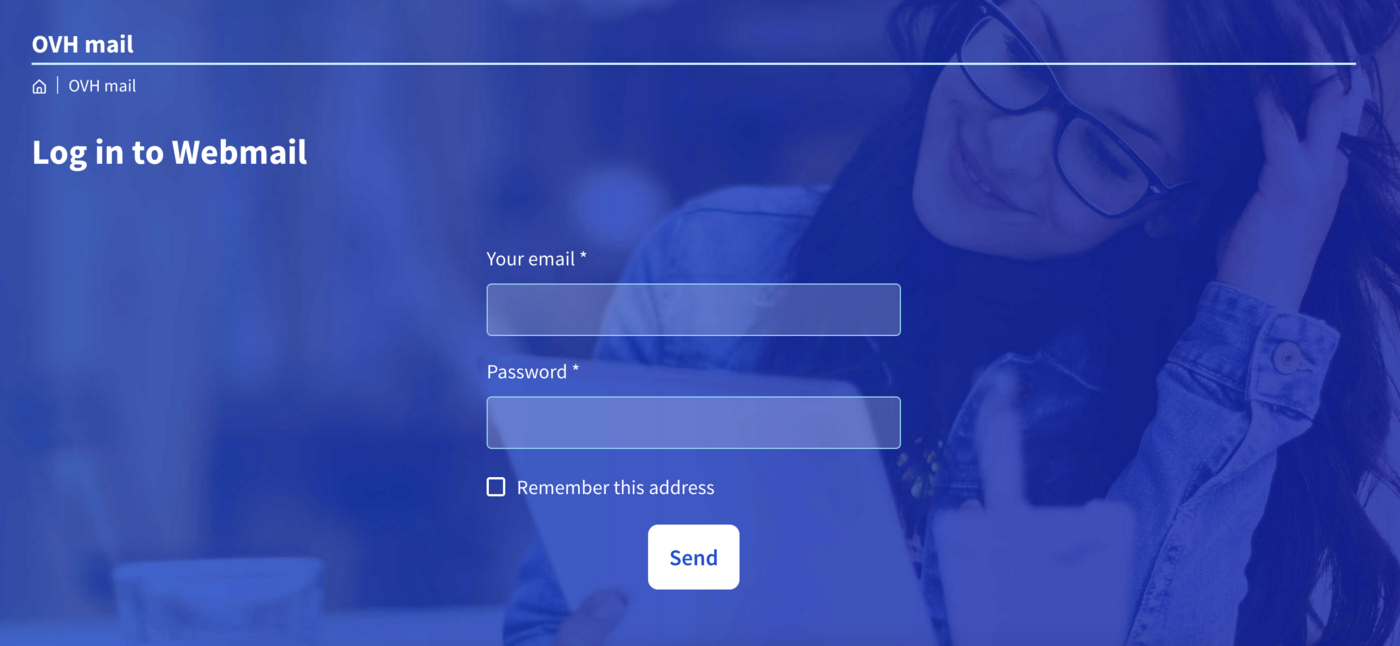
Go to webmail. Enter the email address and the password to log in.
You can create a redirection using inbox rules, also called "filters" in webmail. These rules, which are applied when an email is received, allow an incoming email to be forwarded or redirected.
Outlook Web App (OWA)
This chapter covers the following offers:
- MX Plan OWA.
- Exchange.
- Email Pro.
Outlook Web App is an interface used for our Exchange, Email Pro offers, and some MX Plan accounts.
Browse the tabs below to set up your redirection via Outlook Web App:
Once you have logged in to your email address via webmail, click on the cogwheel in the top right-hand corner, then Options.
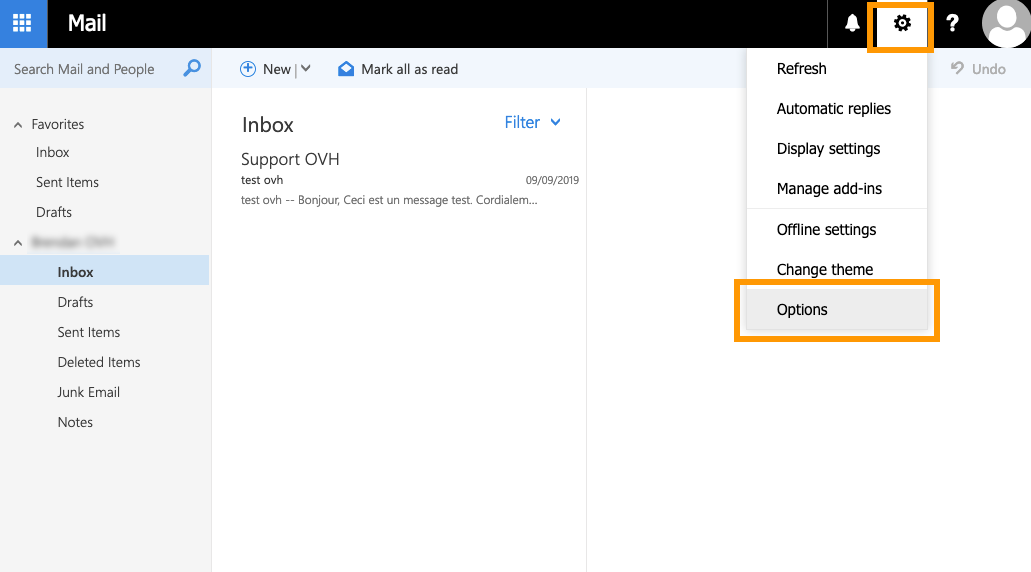
From the Options window, in the left-hand column, go to the Automatic processing category in the Mail section, then click Inbox and storage rules.
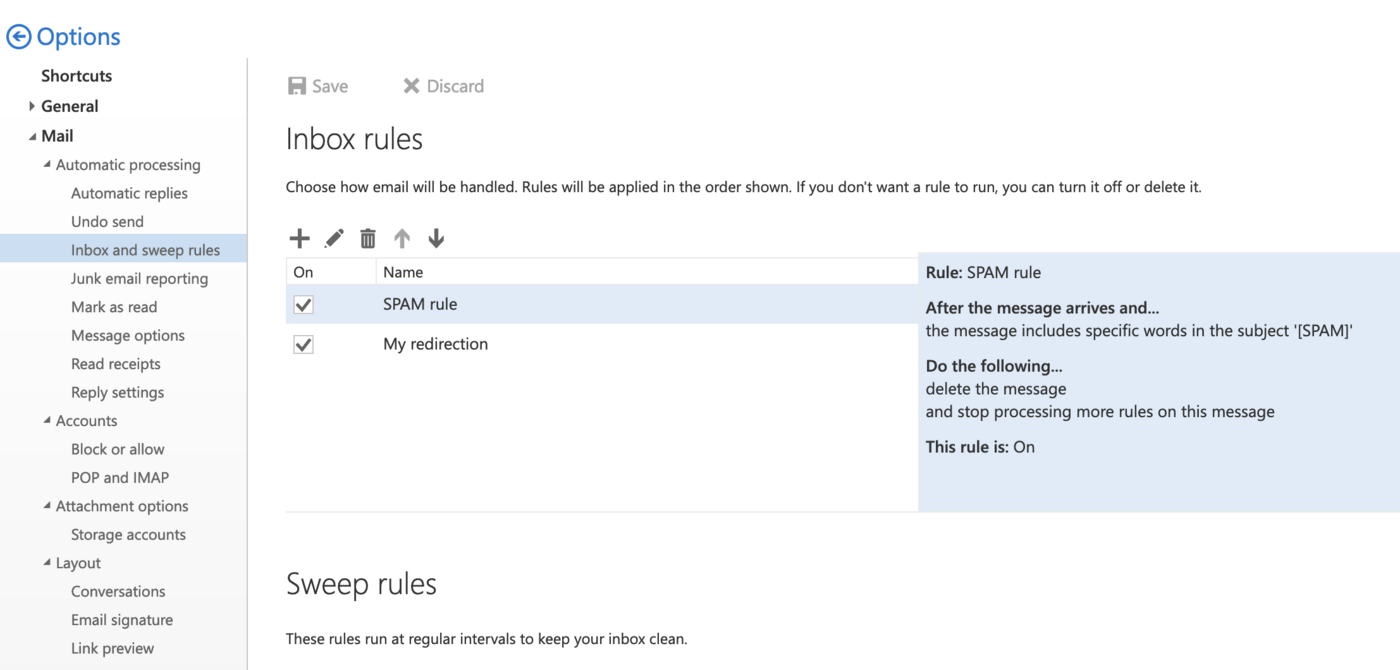
Use this window to manage your redirections and apply filters on all incoming emails.
Once you have opened the window for managing Inbox rules, click the + icon in the top left-hand corner.

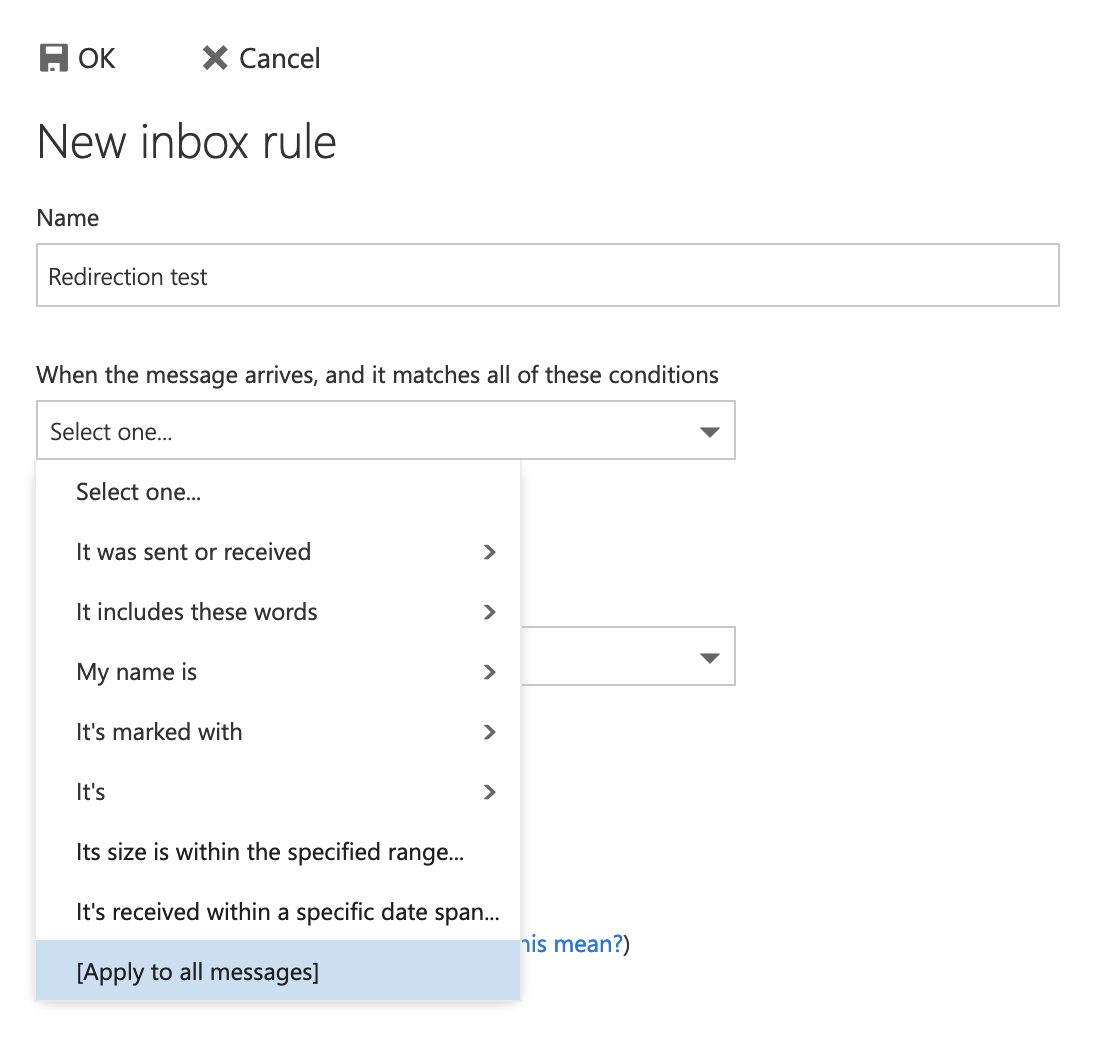
In the window that pops up, enter the following information:
- Name: Define the name of your redirection.
- When the message arrives and meets all these conditions: If your redirection applies to all messages, select [Apply to all messages].
Then, in the same window:
Do all of the following: This is where you apply the redirection. Select Forward, redirect or send then Redirect the message to....
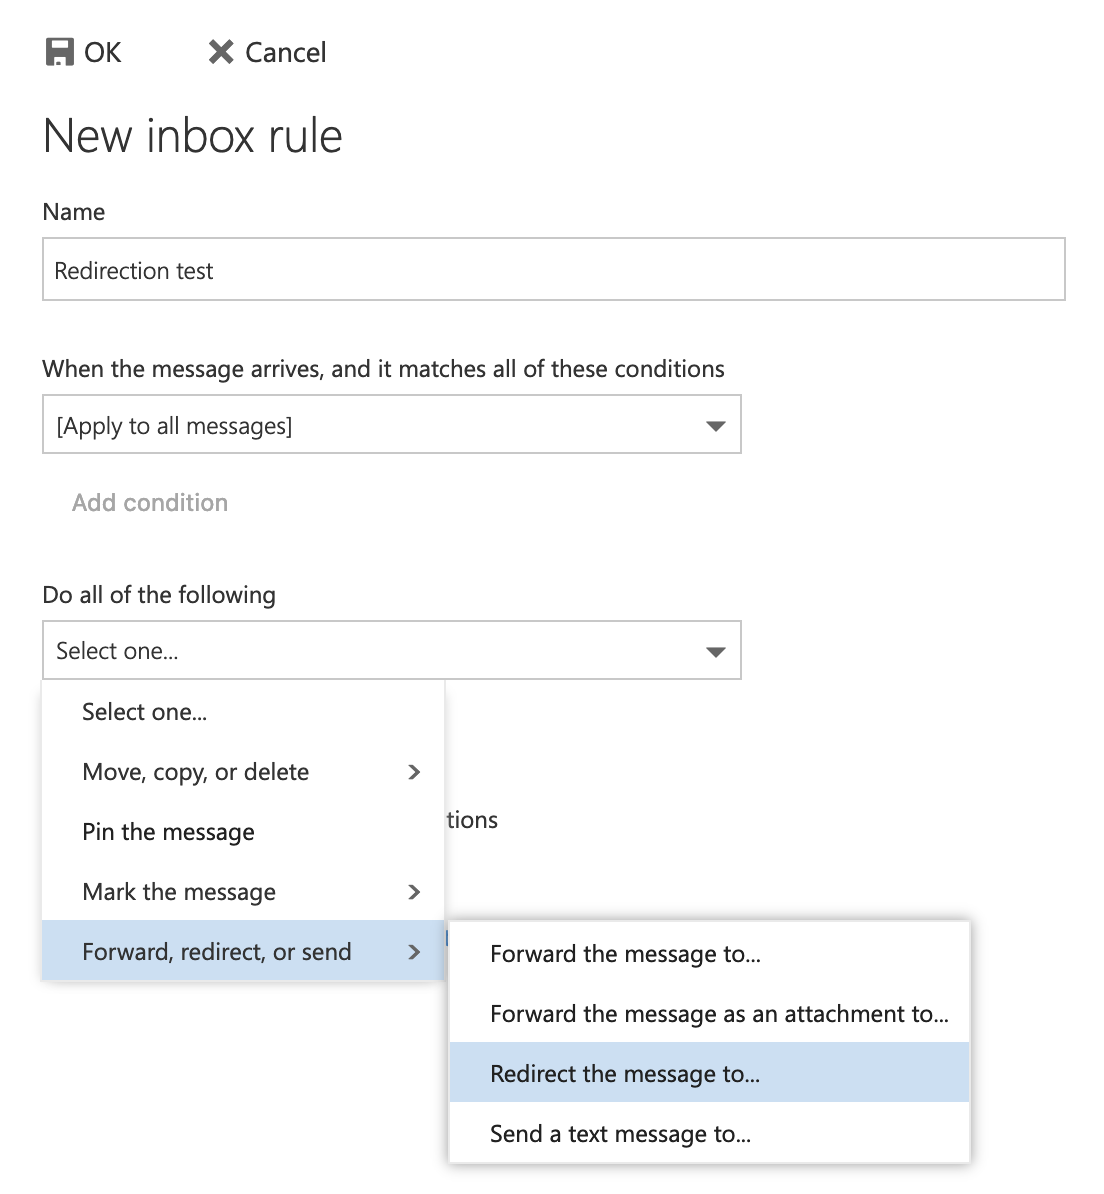
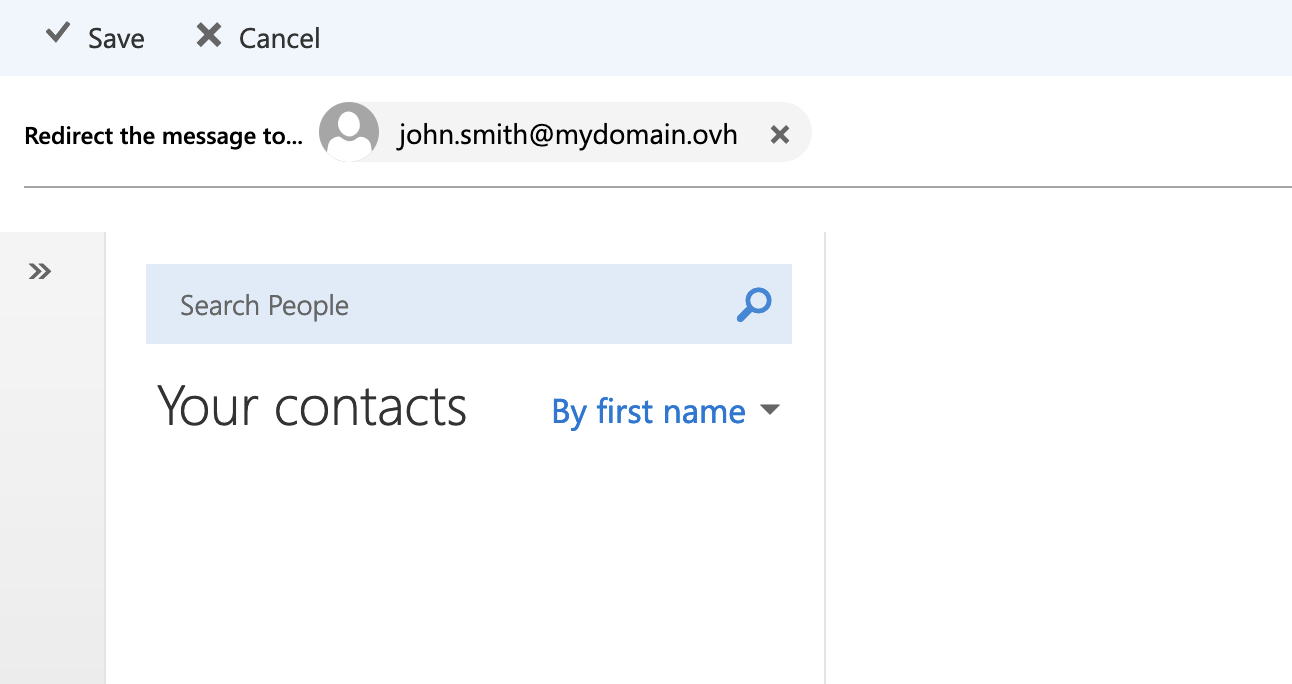
Then enter the email address you would like to redirect the email to in "Redirect the email to...", then click Save. Finally, click OK (floppy disk icon) to complete your redirection.
To apply a simple redirection (see diagram 1 at the beginning of this guide), add an additional rule to your redirection with a local copy from this window. Click Add an action (box 1), then Move, copy or delete, then click delete message. This rule moves the message directly to the trash, after redirecting the message to the redirection address.

Zimbra
This chapter covers the following offers:
- MX Plan with zimbra for webmail.
- Zimbra.
To redirect emails from your Zimbra account to another email address, we will apply a transfer rule.
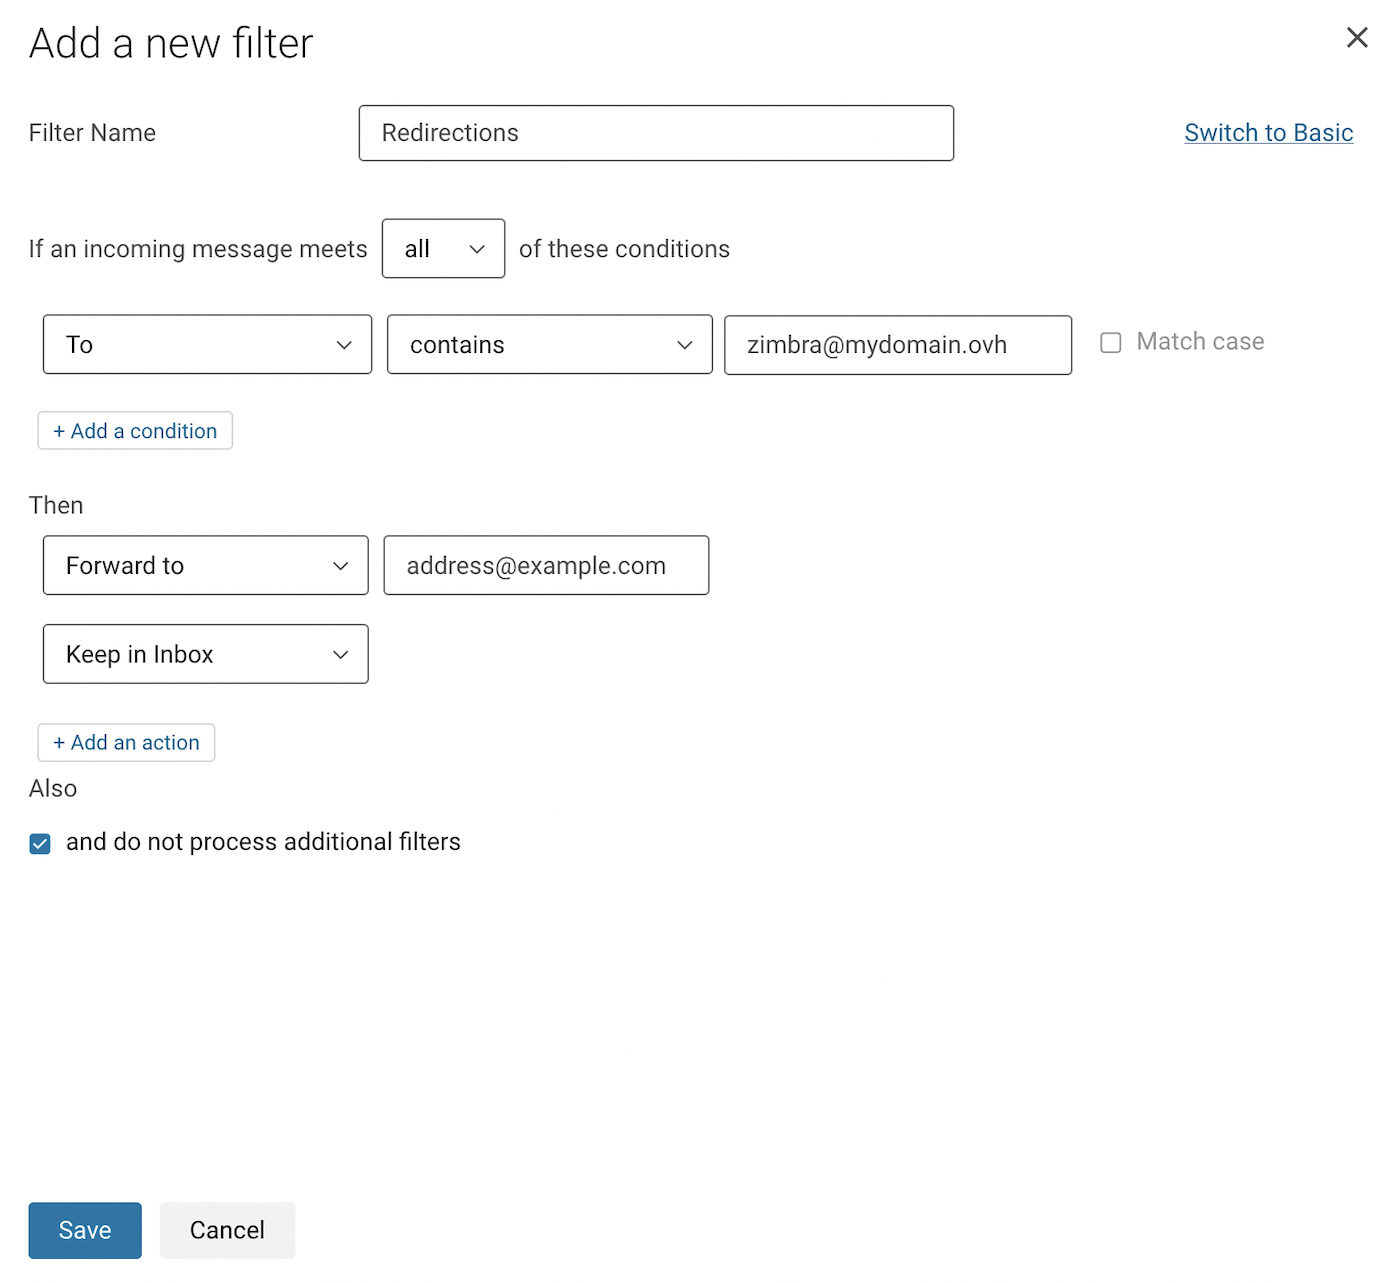
In our example below, we have chosen to redirect all incoming emails to another email address. To understand the example in the screenshots, we are logged on to the address zimbra@mydomain.ovh and we would like to redirect emails from this account to the address address@example.com.
Follow the steps below by clicking on the tabs to set up your redirection:
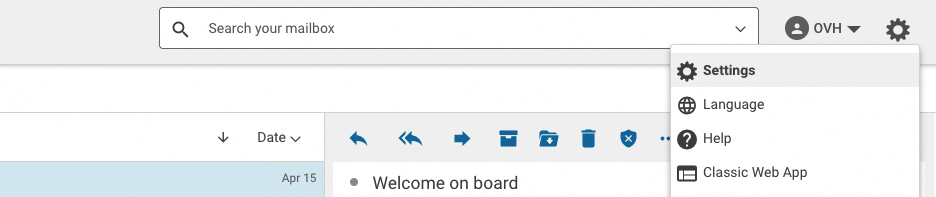
Click the ⚙ button in the top right-hand corner of your webmail window, then click Settings.
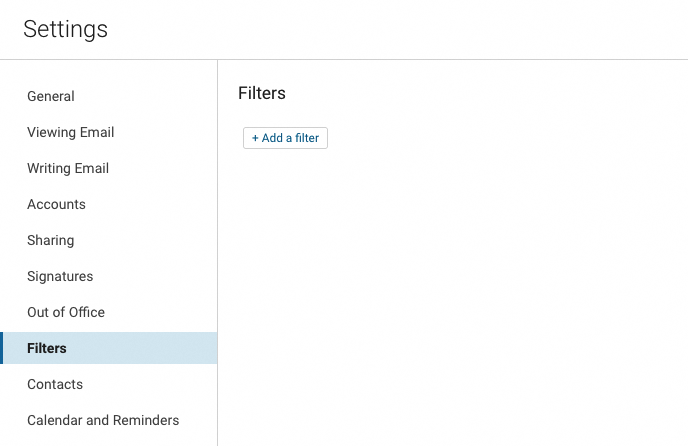
Click the Filters section in the settings window, then click the Add a filter button.
- First click Advanced Mode in the top right-hand corner to set up this rule.
- Enter a name for your filter in the
Filter namebox. - Leave the dropdown menu on
allin the sentence "If an incoming message meets ... of these conditions". - In the first dropdown menu of the rules, choose
To, leavecontains, then enter the email address you are logged in to in the box to the right. - Under "Then", select
Forward tofrom the drop-down menu and enter the destination email address. - Click
+ Add an actionbelow, then selectMove to receive folder(Keep in Inbox). - Click
Savefrom your filter window and also from the settings window.
For more details on using Zimbra webmail, please read our guide on Using Zimbra webmail.
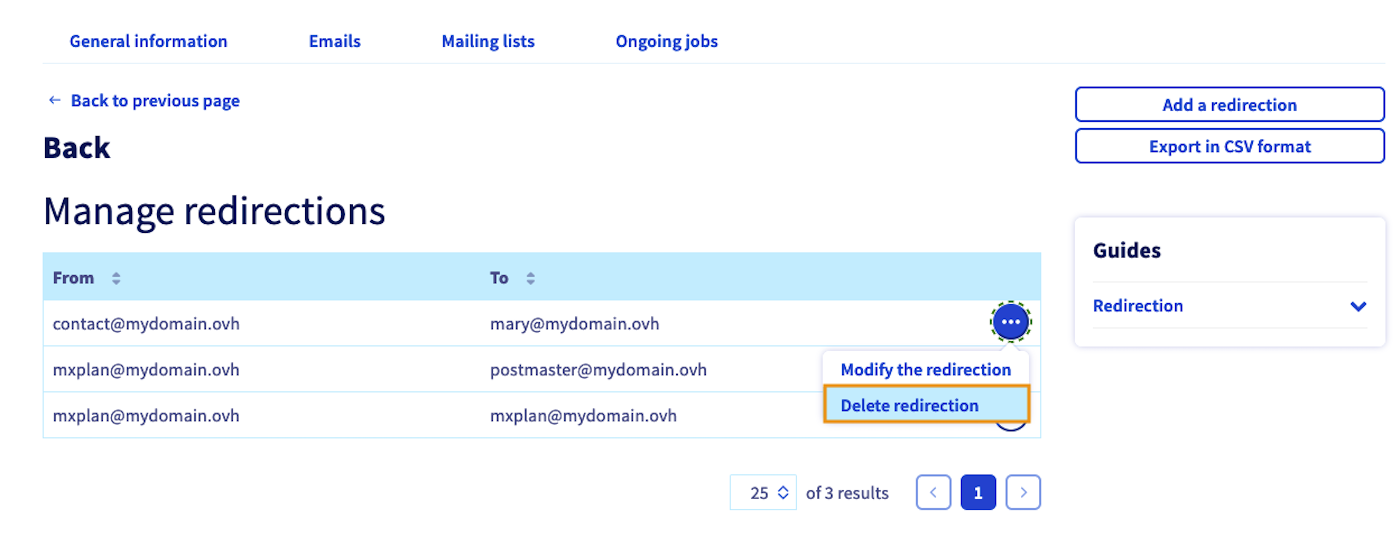
Delete a redirection
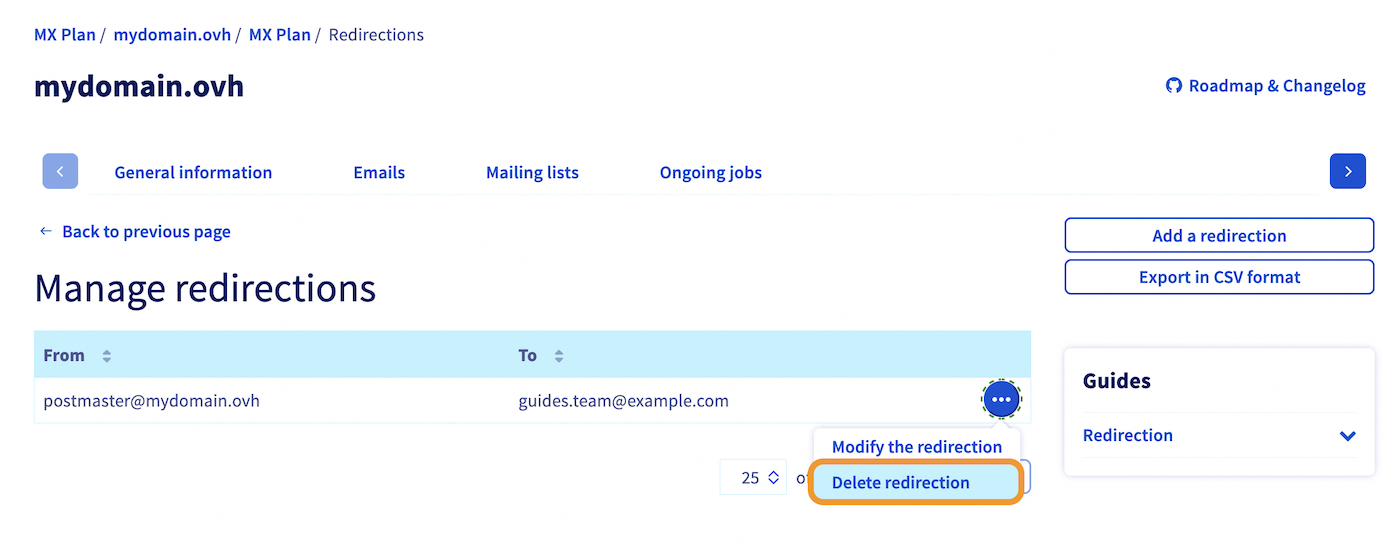
MX Plan via the OVHcloud Control Panel
From your MX Plan service, select the domain concerned.
Select the tab below for the email technology used by your MX Plan service:
- By default, you are in the
General informationtab of your MX Plan. - Click the
Emailstab, then on the right-hand side theManage redirectionsbutton.
- Click
..., to the right of the redirection concerned, thenDelete redirection.
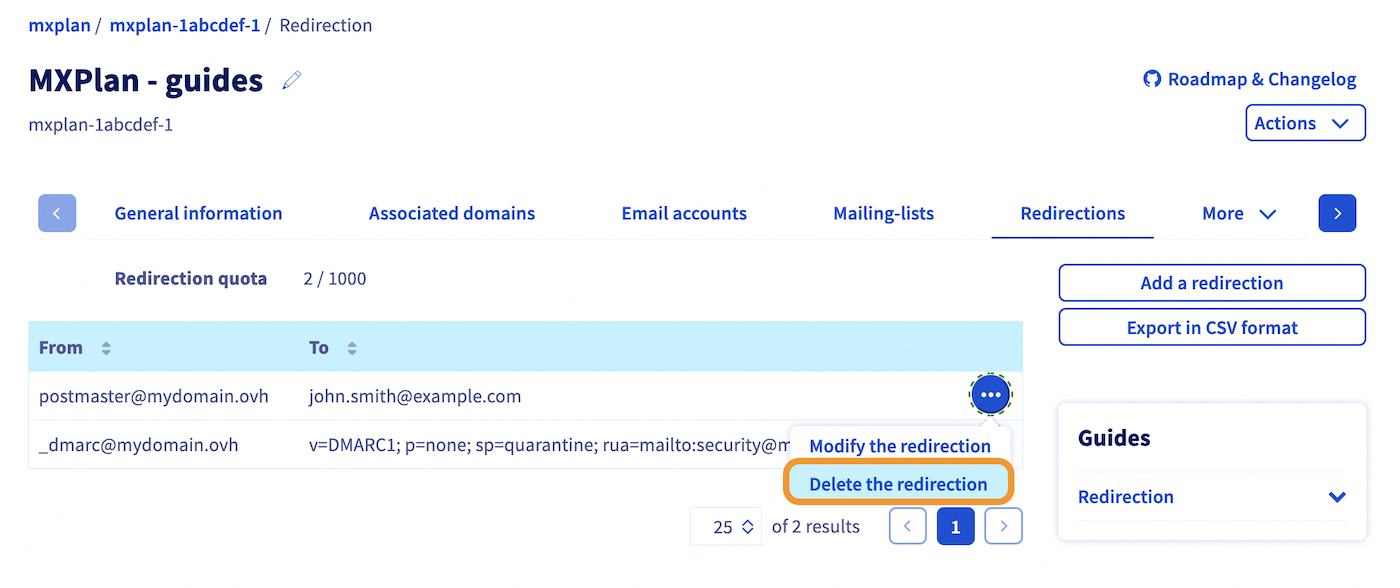
- By default, you are in the
General informationtab of your MX Plan. - Click the
Redirectionstab. - Click on
..., to the right of the redirection concerned, thenDelete redirection.
Outlook Web App (OWA)
Go to webmail. Enter the email address and the password to log in. From the OWA webmail interface, follow the steps by clicking on the tabs below:
Once you have logged in to the OWA webmail interface, click the cogwheel icon in the top right-hand corner, then Options.
From the Options window, in the left-hand column, go to the Automatic processing category in the Mail section, then click Inbox and storage rules.
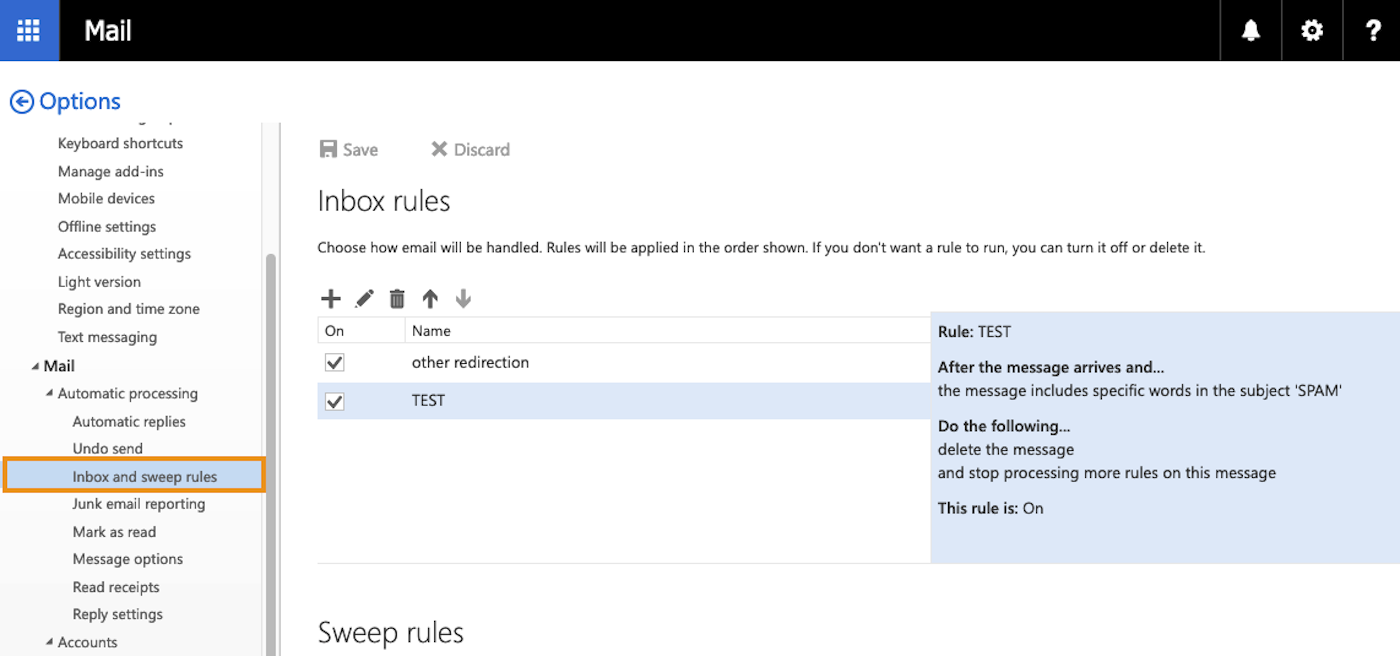
You will find the window you can use to manage your redirections and filters.
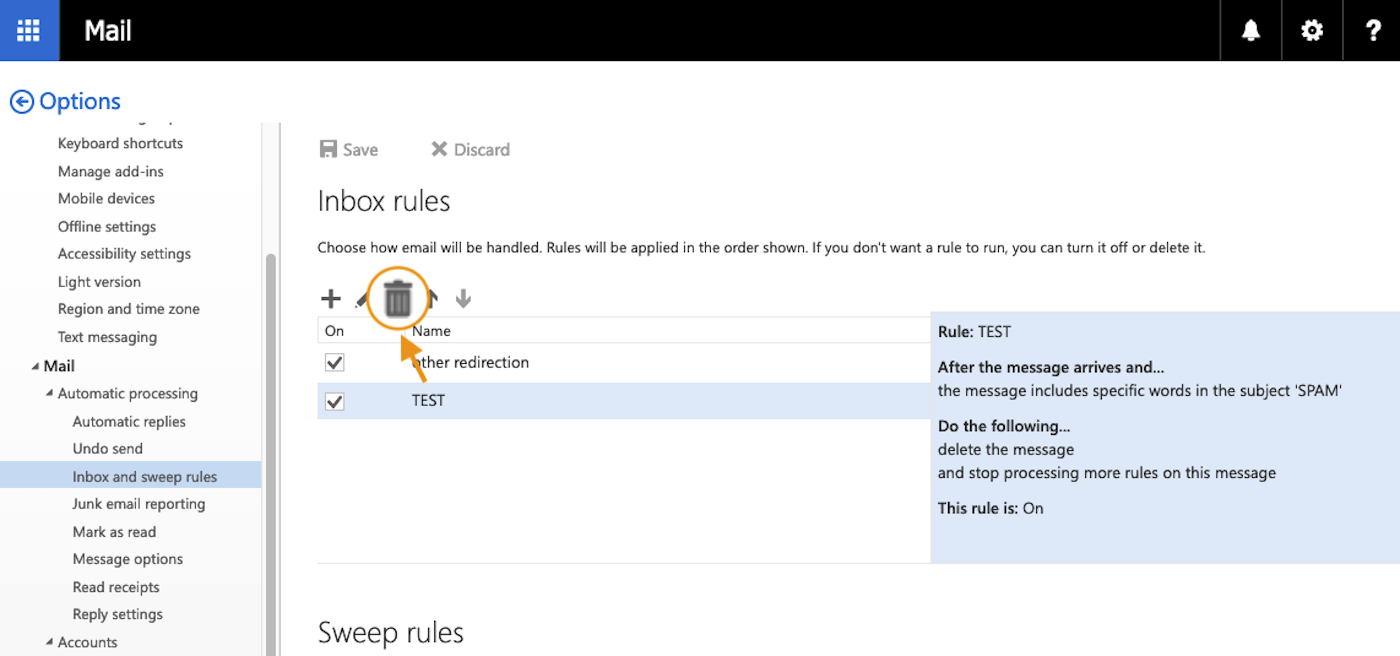
Once in the window for managing Inbox rules, click on the redirection you want to delete, it must be highlighted. Then click the recycle bin icon.
Zimbra
Go to webmail. Enter the email address and the password to log in. From the Zimbra webmail interface, follow the steps by clicking on the tabs below:
Once you have logged in to the Zimbra webmail interface, click the ⚙ button in the top right-hand corner of your webmail window, then click Settings.
Click on the Filters section in the settings window.
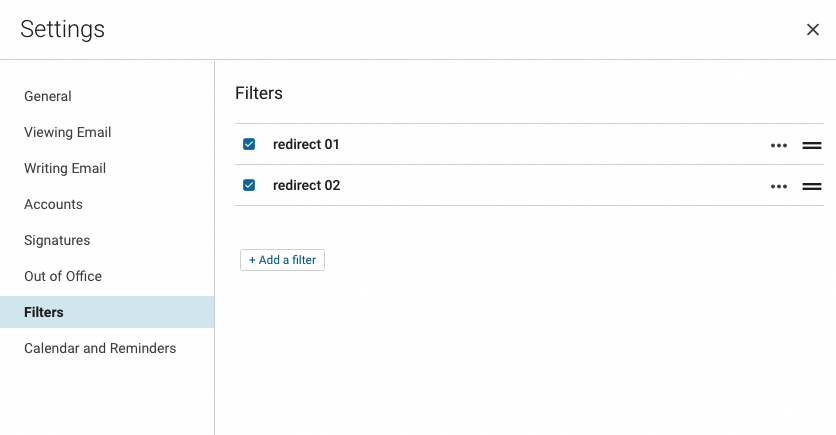
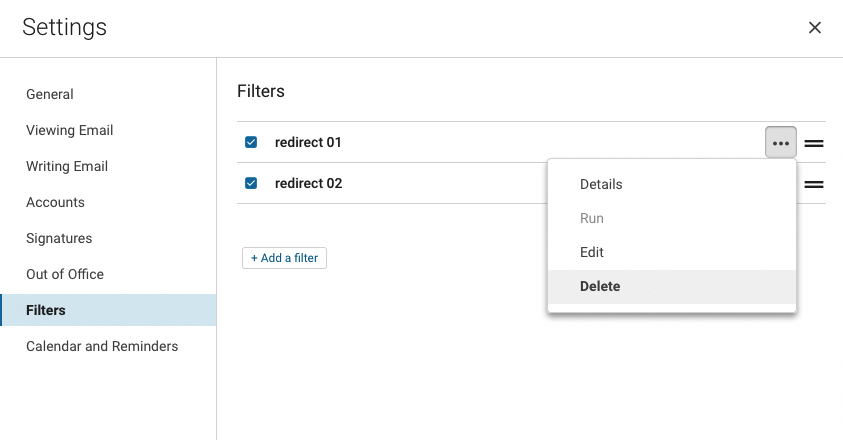
Click the ... button to the right of the filter concerned, then click Delete.
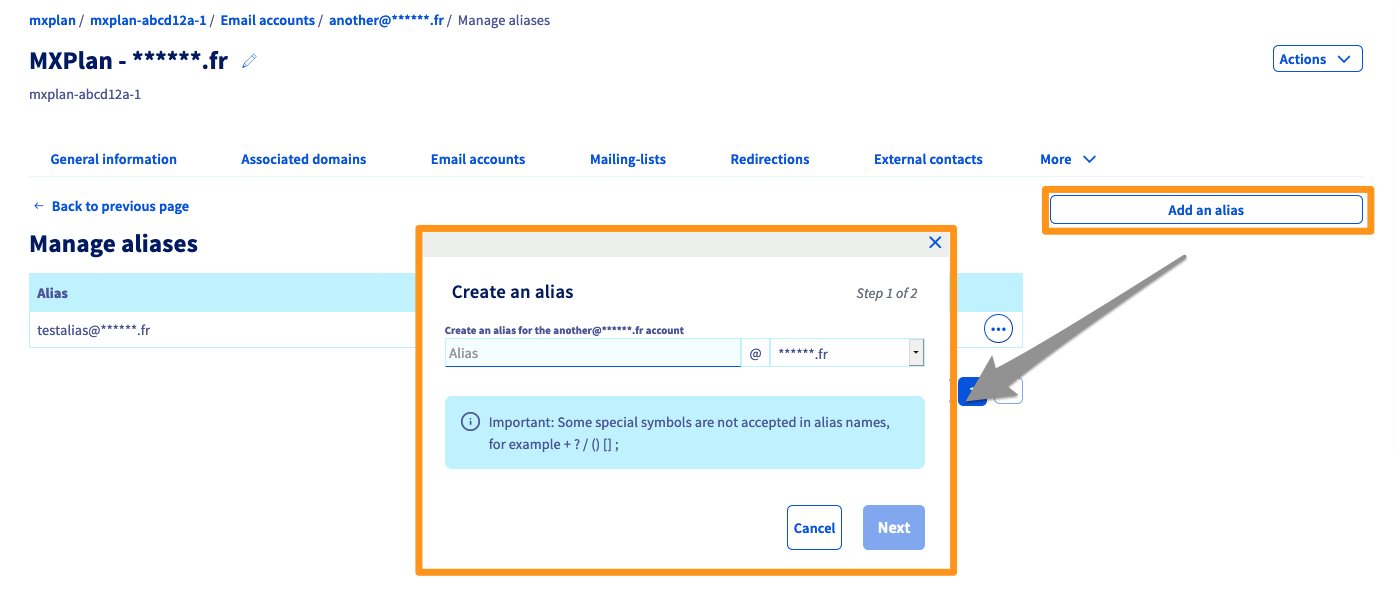
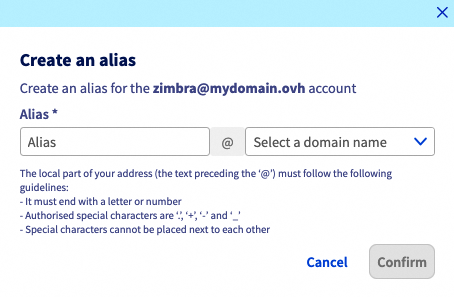
Create an alias
Creating an alias for your email address allows you to provide a "mask" address to your contacts, without having to provide your personal email address to the sender.
Exchange / Email Pro / MX Plan
From your email service (Exchange, Email Pro or MX Plan), click the Email accounts tab.
To add an alias to your email account, follow the steps described by clicking on each tab below:
In the table that appears, you will find an Alias column.

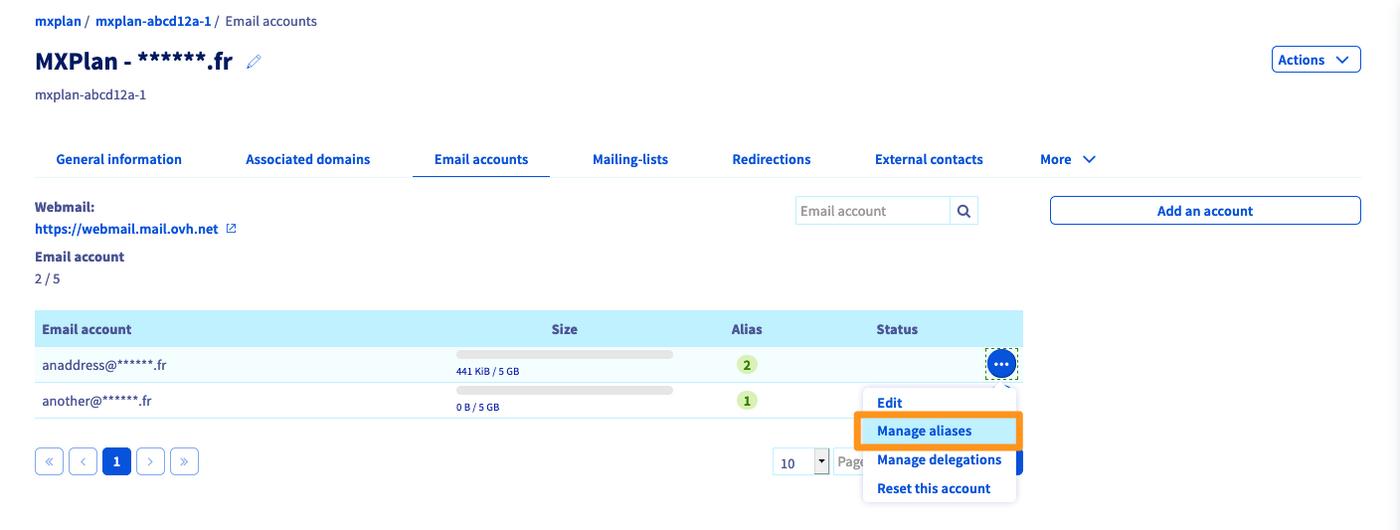
Click the ... button, then Configure aliases (or Manage aliases).
Click Add an alias, then enter the address you have chosen for your alias and confirm your choice.
MX Plan Roundcube
To create an alias on an MX Plan Roundcube email account, you must do it the same way as a redirection. Simply determine an email address that does not exist on your domain name and point to an existing address. Follow the MX Plan / MX redirect chapter in the "Create a redirection" section of this guide.
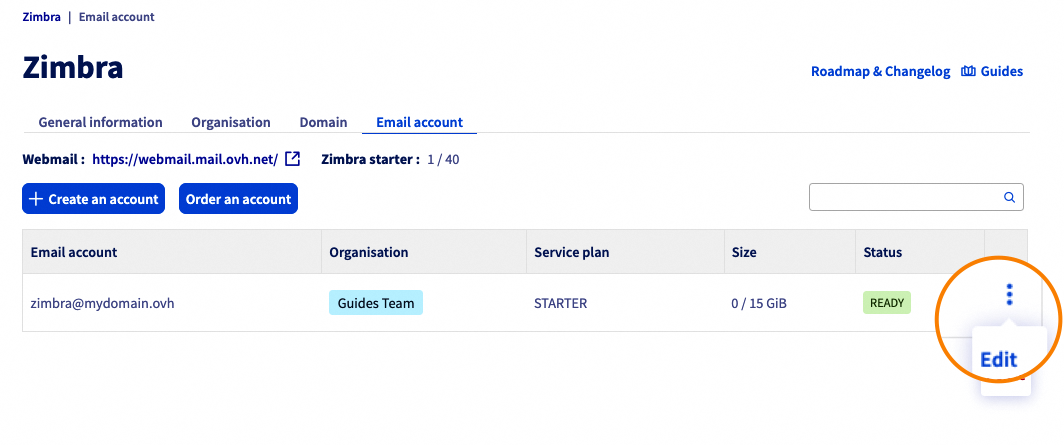
Zimbra
From your Zimbra service, click the Email accounts tab.
- Click the
⁝button to the right of the email account concerned. - Click
Modify.
The window for configuring your email account will open. Click the Alias tab above.
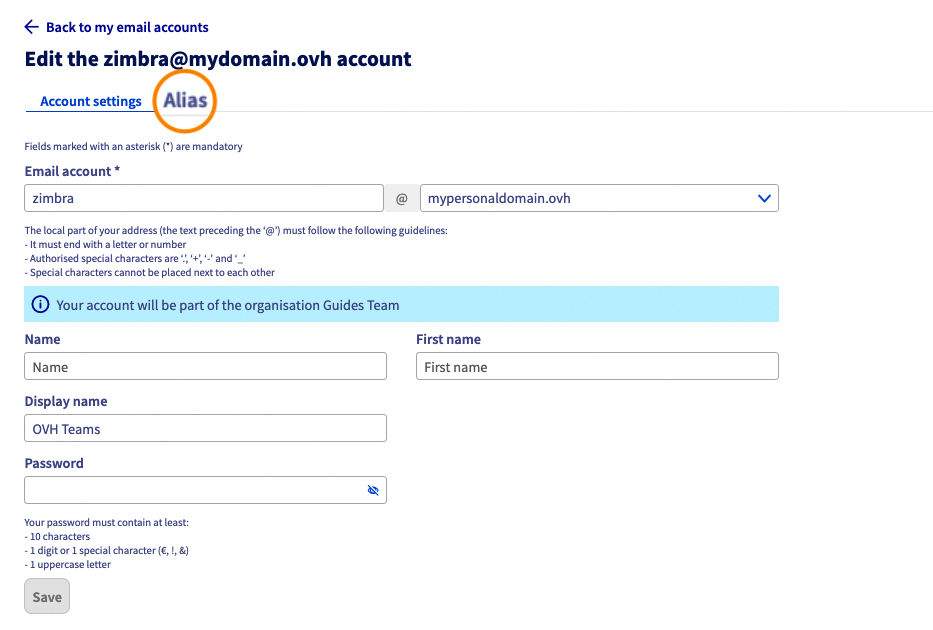
The following window will contain a list of aliases that you can associate with the account concerned. Click the Create Alias button.
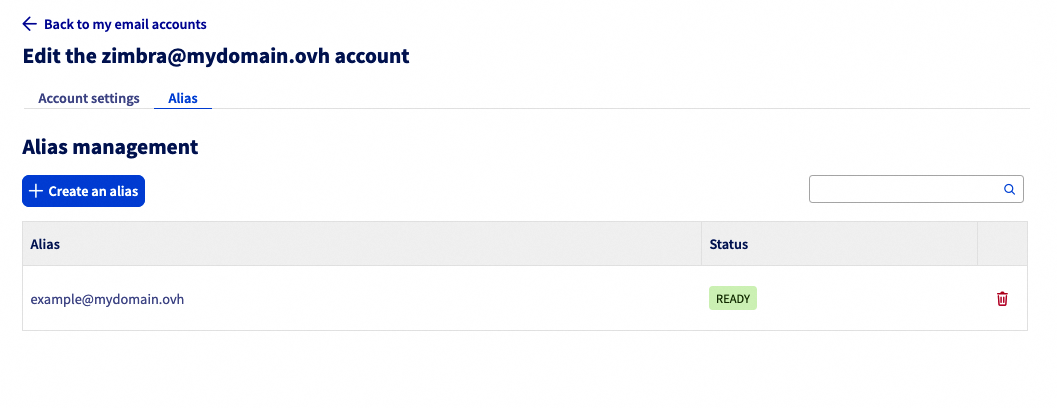
Determine the address of your alias and select one of the domain names associated with your Zimbra service.
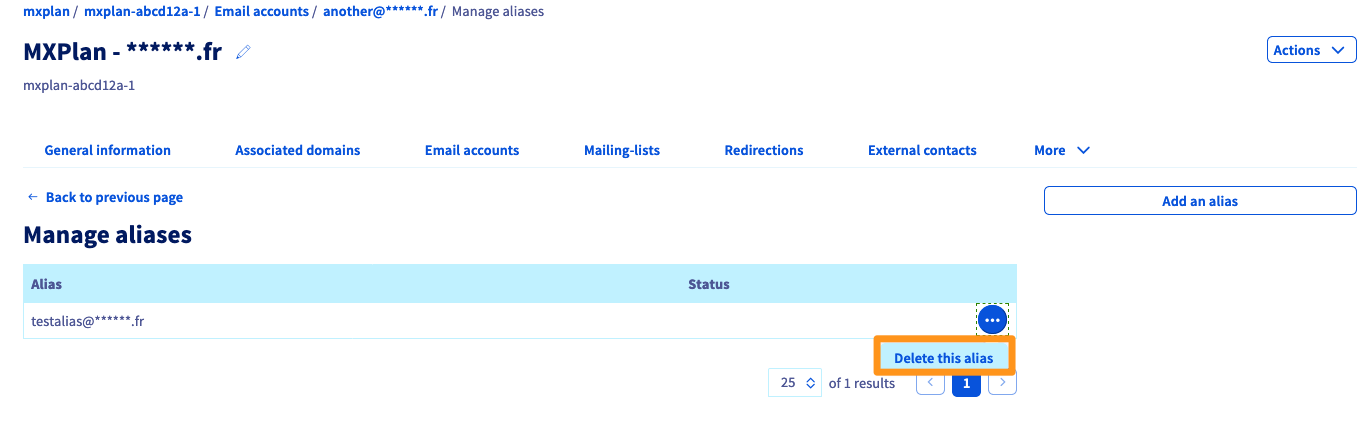
Delete an alias
Exchange / Email Pro / MX Plan
From your email service (Exchange, Email Pro or MX Plan), click the Email accounts tab.
In the Email accounts tab, click the ... button to the right of the email address concerned. Then click Configure aliases (or Manage aliases).
Click the ... button to the right of the alias concerned, in the alias management menu. Finally, click Delete alias.
MX Plan Roundcube
To delete an alias on an MX Plan Roundcube email account, you must do it the same way as a redirection. You will need to manage the redirections for your MX Plan service.
From the Emails tab, click Manage redirections on the right-hand side of the window.
Click the ... button to the right of the redirection concerned, then click Delete redirection.
You cannot modify a redirection or an alias. You must delete and recreate it.
Zimbra
From your Zimbra service, click the Email accounts tab.
- Click the
⁝button to the right of the email account concerned. - Click
Modify.
The window for configuring your email account will open. Click the Alias tab above.
The following window contains a list of aliases that you can associate with the account concerned. Click the Create Alias button.
Go further
Getting started with the MX Plan solution
Getting started with the Hosted Exchange service
Getting started with the Private Exchange service
Getting started with the Email Pro solution
For specialized services (SEO, development, etc.), contact the OVHcloud partners.
If you would like assistance with using and configuring your OVHcloud solutions, we recommend referring to our range of support solutions.
Join our community of users.

