Configure Additional IPs in Bridge Mode on a Dedicated Server
8349 Views
This article is about Additional IPv4 configuration on a public interface. You can also configure IPv6 addresses on your virtual machines using this guide.
Please note that Additional IP addresses can also be configured in a vRack (private network), which allows interconnection over a wide range of OVHcloud services, offering more flexibility.
Learn how to configure Additional IP addresses in a vRack with our guides for IPv4 and IPv6.
Objective
Bridged networking can be used to configure your virtual machines. Some tweaking is necessary to make the network configuration work on our network.
Requirements
- A dedicated server with a hypervisor installed (e.g. Citrix Xen Server, Proxmox, etc.)
- At least one Additional IP address routed to the server.
OVHcloud Control Panel Access
- Direct link: Public IP
- Navigation path:
Network>Public IP Addresses
This feature might be unavailable or limited on servers of the Eco product line.
Please visit our comparison page for more information.
As of May 2025, this guide can be used for servers of the Scale and High Grade ranges.
Alternatively, to configure Additional IPs using in routed mode or in a vRack, please refer to Configuring the network on Proxmox VE on the High Grade & Scale ranges or Configuring the network on Windows Server with Hyper-V on the High Grade & Scale ranges.
Instructions
The basic steps are always the same, independent of the underlying system:
- creating a virtual MAC address for an Additional IP
- creating a VM on a host
- setting the MAC address of the VM to that new virtual MAC address
- configuring the IP address, netmask, gateway and route to the gateway inside the VM
Code samples in the following instructions have to be replaced with your own values:
- SERVER_IP = The main IP address of your server
- ADDITIONAL_IP = The address of your Additional IP
- GATEWAY_IP = The address of your default gateway
Assign a virtual MAC address
In the case of a block of IPs, virtual MAC addresses are created on each individual IP in the block.
You can use the drop-down menu underneath My public IP addresses and associated services and select All Additional IPs to filter your services accordingly, or directly type the desired IP address in the search bar.
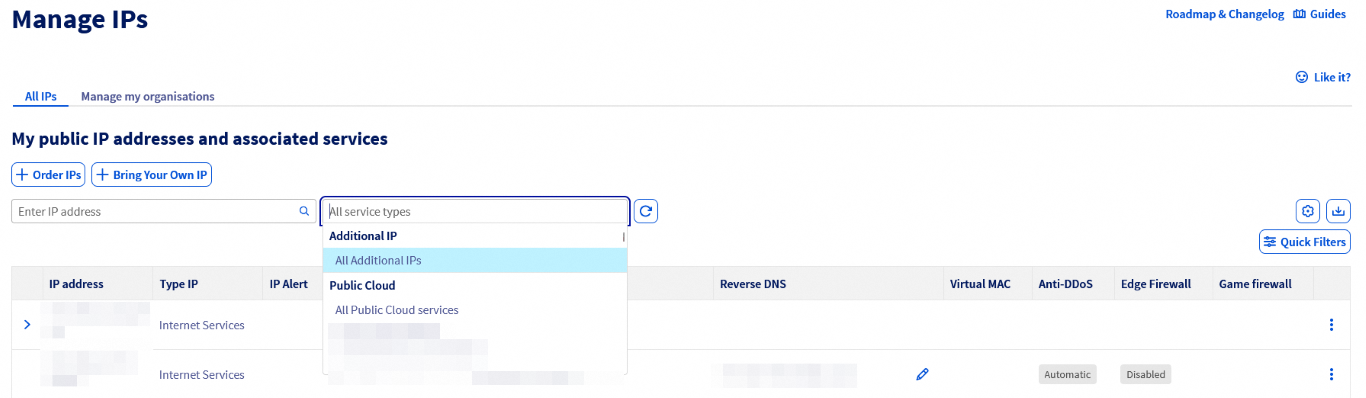
Next, locate your Additional IP address in the table and click the ⁝ button to open the menu. Select Add a virtual MAC.
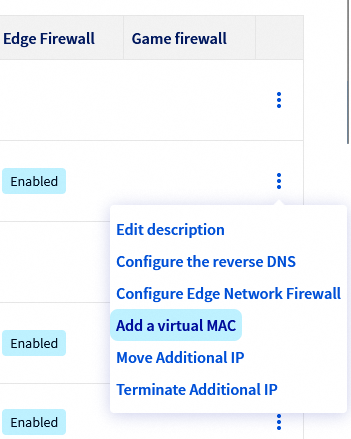
Choose ovh from the "Type" drop-down menu unless you are using VMware ESXi - in that case choose vmware. Type a name in the “Name of virtual machine” field, and click on Confirm.

After a few seconds, a virtual MAC will appear in the "Virtual MAC" column of your Additional IP row. This virtual MAC will be required when configuring your VM on the host.
Determine the gateway address
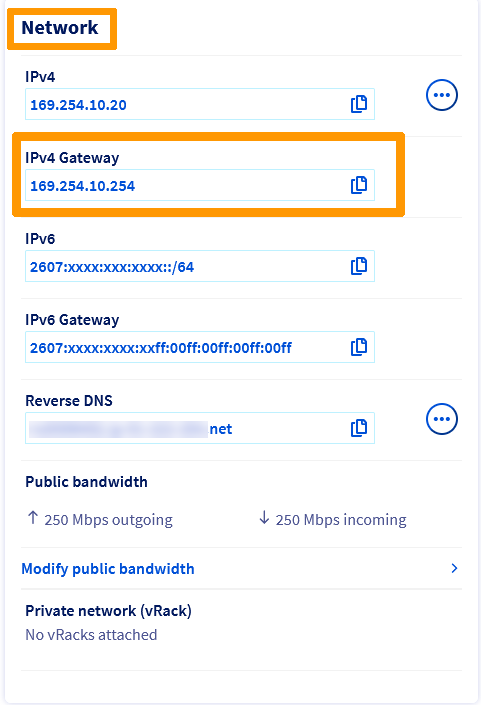
To configure your virtual machines for Internet access, you need to know the gateway of your host machine, i.e. your dedicated server.
You can retrieve the gateway address via your customer area or the OVHcloud API.
The IPv4 gateway assigned to your server will appear in the Network section of the General Information tab. Once you have copied it, continue with applying the configuration.
On the OVHcloud API page, click on Login in the top right-hand corner. On the next page, enter your OVHcloud credentials.
Execute the following API call, indicating the internal server name (example: ns3956771.ip-169-254-10.eu):
Prepare the host
For all operating systems and distributions, you must configure your virtual machine with the virtual MAC address you have created in the OVHcloud Control Panel.
The following instructions apply to a previously created VM with an OS already installed. If you have not created a VM, please review the options on the Qemu/KVM Virtual Machine page by Proxmox.
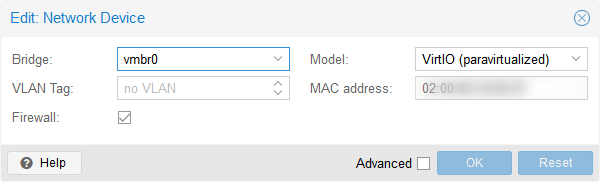
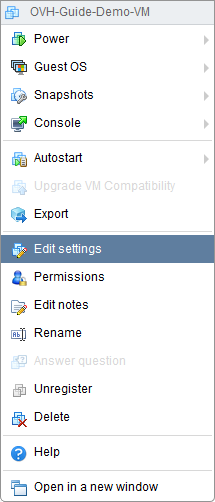
After creating the VM and while it is still powered off, right-click the VM and click Edit settings.
- Select the VM.
- Open the
Hardwaresection. - Select
Network Device. - Click the
Editbutton.
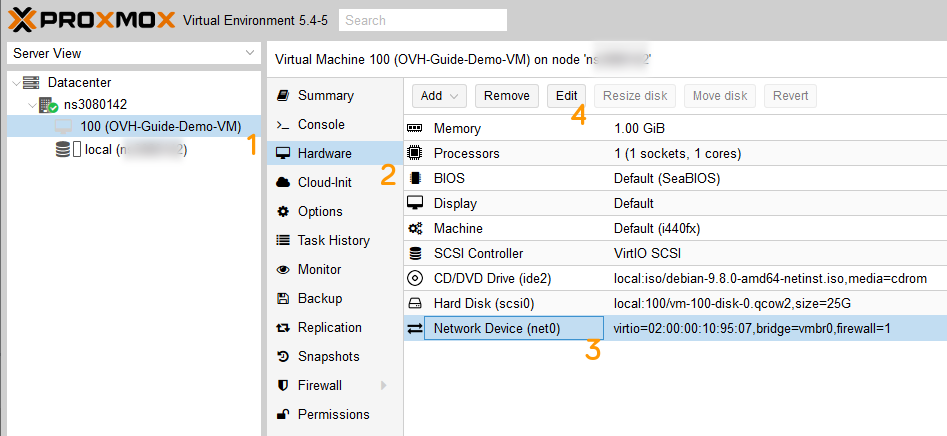
Then add the virtual MAC address created previously.
Now you can start the VM and proceed with the configuration steps, depending on the operating system installed.
The following instructions apply to a previously created VM with an OS already installed. If you have not created a VM, please review the guide Create a Virtual Machine in the VMware Host Client on the VMware page.
After you've created the virtual machine and while it's powered off, right click the VM and click Edit settings.
Fold out Network Adapter 1, change the value in the MAC Address drop-down menu to Manual and enter the virtual MAC address created previously.

Now you can start the VM and proceed with the configuration steps, depending on the operating system installed.
Configure the virtual machines
Please note that the following examples assume that you are logged in as a user with limited privileges, hence the use of sudo in front of each command. If you are logged in as root, you will not need to do this.
Select the tab corresponding to your operating system.
By default, the virtual machine's network configuration file is located in /etc/network/interfaces.
Once you are connected to the shell of your virtual machine, run the following command to identify your interface name:
Next, make a copy of the configuration file, so that you can revert at any time:
In case of a mistake, you will be able to revert the changes, using the commands below:
Edit the file so that it reflects the configuration below, replace INTERFACE_NAME, ADDITIONAL_IP and GATEWAY_IP with your own values.
Configuration example
Save and close the file.
Next, edit or create the file /etc/resolv.conf:
Add the following line:
Save and close the file.
Now you will need to bring your network interface online. To do so, enter the following command (replace ens192 with your own values):
Finally, restart your networking service using the following command:
CentOS, Rocky Linux 8/9, Alma Linux 8/9, etc.
By default, the virtual machine's network configuration file is located in /etc/sysconfig/network-scripts/.
Once logged into your virtual machine shell, run the following command to identify the name of your interface:
Then make a copy of the configuration file, so that you can go back at any time:
In the event of an error, you can go back to the beginning using the commands below:
You can then edit this file using the nmcli handler, replacing ADDITIONAL_IP and GATEWAY_IP with your own values.
- Add the IP address:
- Add the Gateway:
- Add a DNS server:
- Change the configuration to manual:
- Make the configuration persistent:
- Reboot your network with the following command:
For more information on nmcli, consult this page.
By default, the virtual machine's network configuration file is located in /etc/rc.conf.
Once you are connected to the shell of your virtual machine, run the following command to identify your interface name:
Next, make a copy of the configuration file, so that you can revert at any time:
In case of a mistake, you will be able to revert the changes, using the commands below:
Edit the file so that it reflects the configuration below, replace ADDITIONAL_IP and GATEWAY_IP with your own values. In this example, the interface name is em0. Replace this value if it does not apply.
Save and close the file.
Next, edit or create the file /etc/resolv.conf and add this line.
Save and close the file, then reboot your virtual machine.
First, disable cloud-init:
If you want to configure your VM with cloud-init, go to this page
Add this line to the 99-disable-network-config.cfg file:
Then create the network configuration file in /etc/netplan/ with the following command:
Then apply these permissions on /etc/netplan:
Run the following command to identify the name of your interface:
Next, make a copy of the configuration file, so that you can revert at any time. For demonstration purposes, our file is called 00-installer-config.yaml:
In case of a mistake, you will be able to revert the changes, using the commands below:
Next, open the network configuration file:
Edit the file so that it reflects the configuration below, replace INTERFACE-NAME, ADDITIONAL_IP and GATEWAY_IP with your own values.
Configuration example
Save and close the file. You can test the configuration with the following command:
If it is correct, apply it using the following command:
Before configuring your virtual machine, you need to create a virtual switch.
From the command line of your dedicated server, run the following command and note the name of the network adapter that contains the server's main IP address:
In the Hyper-V Manager, create a new virtual switch and set the connection type to External.
Select the adapter with the server’s IP, then tick the option Allow management operating system to share this network adapter.
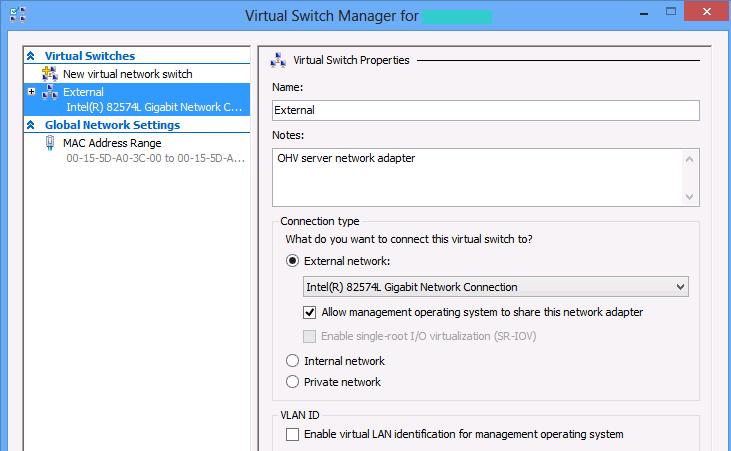
This step is only required once for a Hyper-V server. For all VMs, a virtual switch is required to connect the VM’s virtual network adapters to the server’s physical adapter.
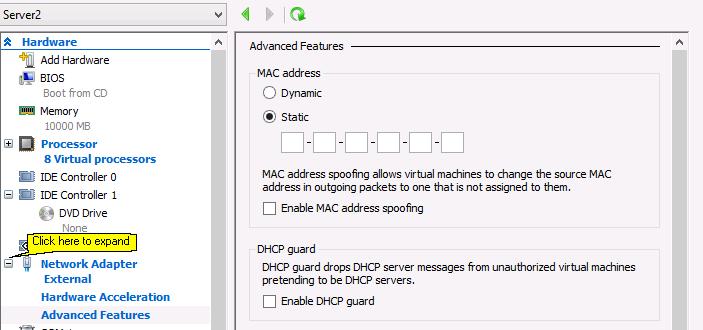
Next, select the VM you wish to add the Additional IP to. Use the Hyper-V Manager to change the settings of the VM and shut it down.
Expand the network adapter in the left-hand menu and click on Advanced Features. Change the MAC address to Static, and enter the virtual MAC address for the Additional IP. Once you have entered these settings, press OK to apply the changes.
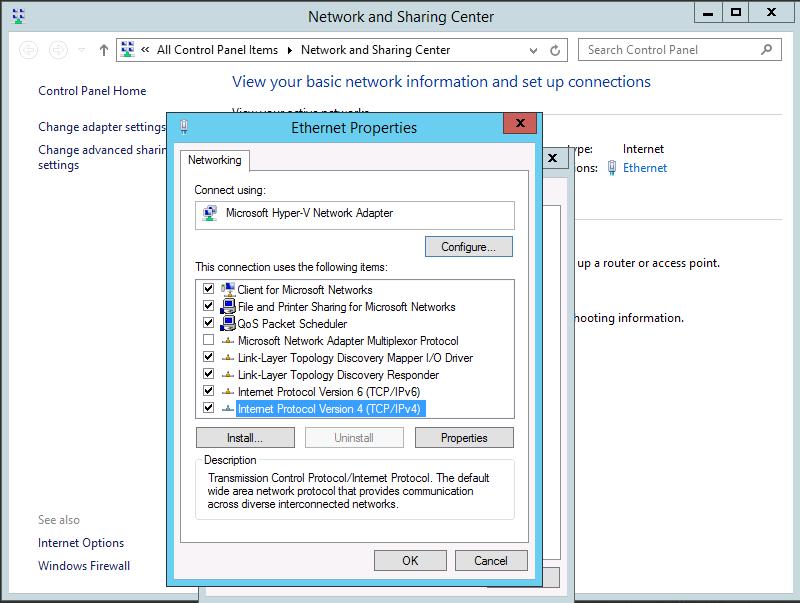
Next, start the VM and log in as an administrator, then go to the Control Panel's Network and Sharing Center. Click on Ethernet to open the settings and click on the Properties button to view the Ethernet Properties.
Select Internet Protocol Version 4 (TCP/IPv4), and then click on the Properties button.
In the IPv4 Properties window, select Use the following IP address. Enter the Additional IP into the IP address field, and enter 255.255.255.255 into the subnet mask.
Fill in your server’s gateway IP address in the appropriate field below and enter 213.186.33.99 into the Preferred DNS Server field.
Finally, click OK, and ignore the warning message about the gateway IP and the assigned IP not being in the same subnet.

After rebooting the server, the VM should be connected to the internet using the Additional IP.
To verify that the virtual machine is fully connected to the Internet, use the following command:
For Linux
For Windows
If you receive a response, this means that the Additional IP has been correctly configured. If not, reboot your virtual machine and retry the ping command.
Troubleshooting
If you are unable to establish a connection from your VM to the public network and you suspect a networking problem, please reboot the server in rescue mode and set up the bridging network interface directly on the host.
Enter the following command in the rescue mode terminal, in which you replace MAC_ADDRESS with the vMAC address that you have generated in the Control Panel and ADDITIONAL_IP with your Additional IP address:
Next, ping your Additional IP address from an external device.
-
If it responds, that probably means that there is a configuration error either on the VM or the host that prevents the Additional IP from working in normal mode.
-
If the IP address is still not working, please open a support ticket via the help center to relay your test results to our support teams.
Go further
Configuring IP Aliasing on a Dedicated Server
Configuring IPv6 on Dedicated Servers
Dedicated Server - Configuring pfSense Network Bridge
Join our community of users.

