Web Hosting - How to use FileZilla
5038 Views
FTP Explorer/Net2FTP tool deactivated
For web hosting plans, you can no longer log in to your FTP storage space via the FTP Explorer/Net2FTP online tool. To continue connecting to your web hosting plan via FTP, use the FileZilla or Cyberduck software.
Objective
FileZilla is free software available on several operating systems (Windows, macOS, etc.).
You can use it to put files or your website online by connecting to your web hosting plan’s storage space.
Find out how to log in to your OVHcloud Web Hosting plan’s storage space, and manage the data stored on it, using FileZilla software.
Requirements
- An OVHcloud Web Hosting plan.
- You need to have installed the FileZilla client on your computer. It is available free of charge from the page filezilla-project.org.
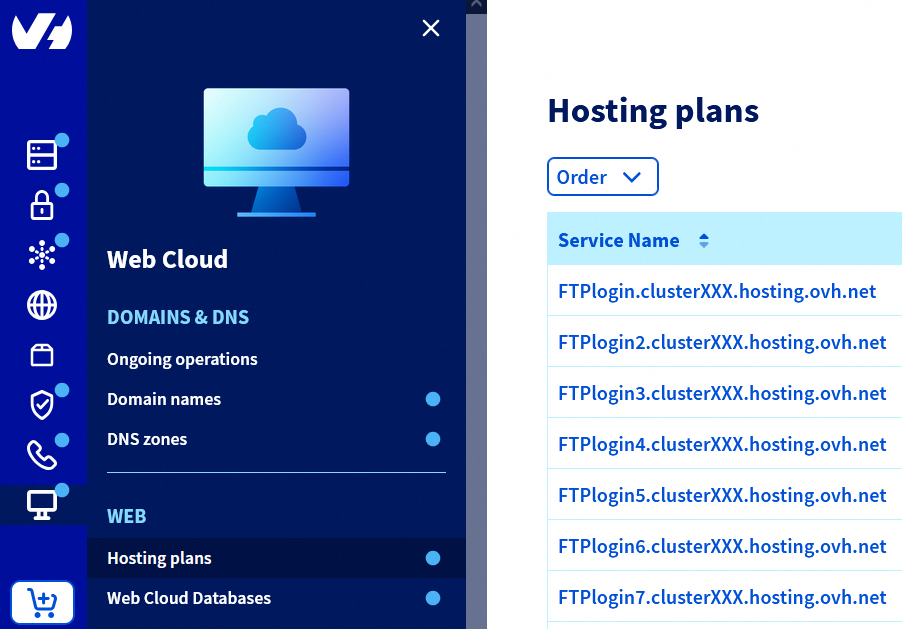
OVHcloud Control Panel Access
- Direct link: Hosting plans
- Navigation path:
Web Cloud>Hosting plans> Select your web hosting plan
Interface overview
Click here to see the contents of this section.
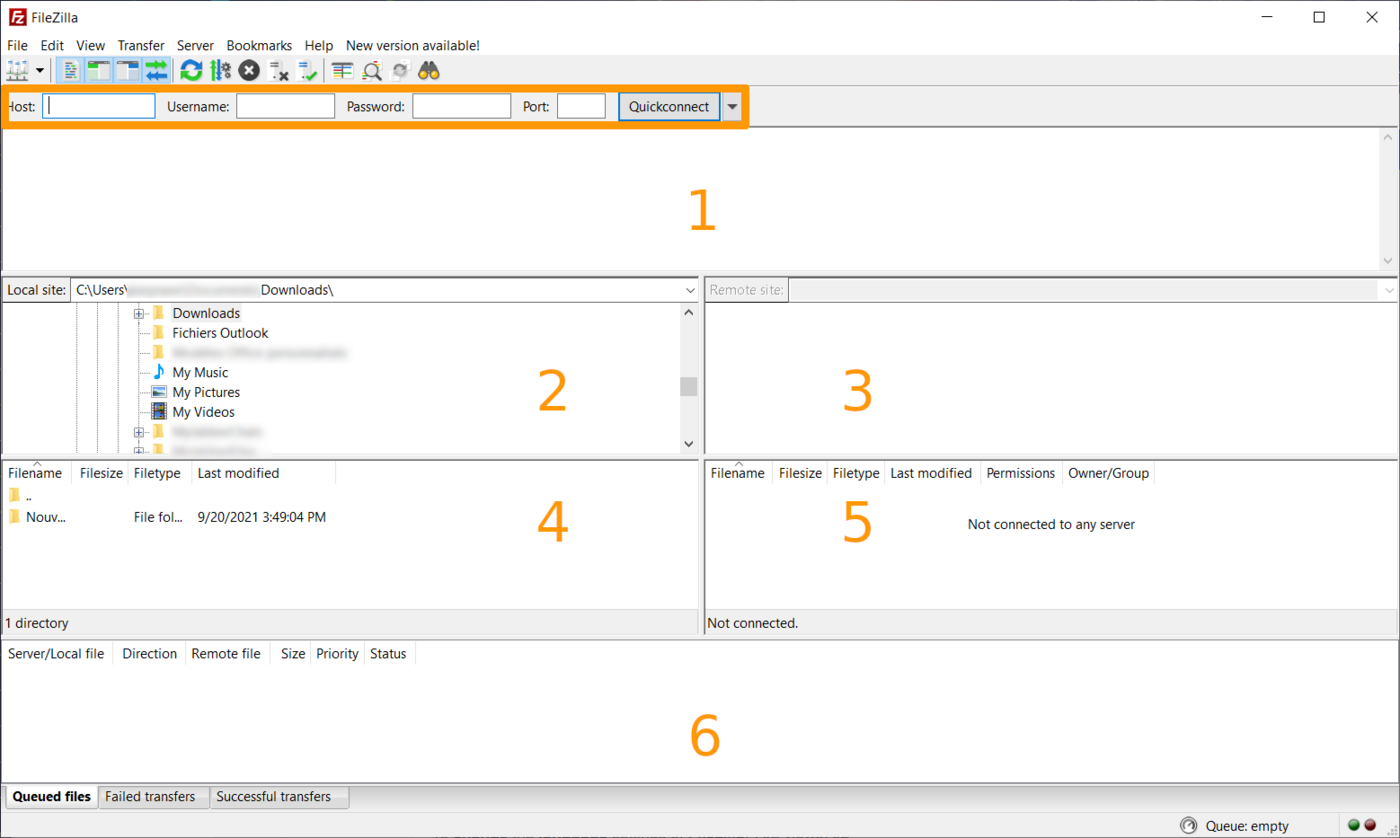
- The top connection bar allows you to log in to your hosting plan quickly, by entering its host name, user name, associated password and port number.
- Section 1: Displays details on the operation history, connection to the FTP space, file transfers, errors, etc. For more information, please refer to the official FileZilla documentation.
- Section 2: The directory tree of local files on your computer.
- Section 3: The directory tree of remote files when you are connected to your hosting.
- Section 4: The list of directories/files in the directory selected locally on your computer.
- Section 5: The list of remote directories/files in the selected directory on your hosting.
- Section 6: The list of pending transfer operations or transfers in error status between your computer and your hosting.
Instructions
1 - Retrieve the login information for the web hosting plan storage space
Click on the tabs below to view each of the 3 steps.
Go to the Hosting plans page, then select the web hosting plan concerned.
Click on the FTP - SSH tab.
The information related to your storage space will appear. Retrieve the following elements:
- The
FTP and SFTP serverrepresented as follows:ftp.clusterXXX.hosting.ovh.net(where each of the 3Xcorresponds to a number between0and9). - One of the users listed in the
Logincolumn of the table at the bottom of the page. You can also use theMain loginif you wish. - The number of the
FTP portor the number of theSFTP portdepending on the connection protocol you will want to use to connect to your storage space.
For security reasons, a user’s password does not appear on the page of the FTP - SSH tab. If you have forgotten it, please refer to this guide to modify it.
2 - Log in to your hosting plan’s storage space using FileZilla
You can connect via two file transfer protocols:
- File Transfer Protocol (FTP).
- Secure File Transfer Protocol (SFTP).
Whenever possible, we recommend that you use the SFTP protocol to log in to your storage space with FileZilla.
The SFTP protocol encrypts the data exchanged between your device and your web hosting plan. However, if you experience any usage constraints, such as user or folder segmentation, you will need to use the FTP protocol.
Click on the connection protocol of your choice to view explanations.
Log in to your Web Hosting plan’s storage space via SFTP using FileZilla.
The SFTP uses, like SSH, port 22 by default instead of port 21. If you are using a Cloud Web hosting plan, you will need to use the port that appears in your OVHcloud Control Panel. Port 22 is disabled in SSH and SFTP for Cloud Web hosting.
SFTP can be activated for free for all OVHcloud hosting plans (except the legacy 60free and demo1g plans).
Check SFTP protocol activation
To do this, refer to our guide "Web Hosting - How to enable SFTP access".
Log in via SFTP with FileZilla

Using the quick connection bar, enter the information using the table below:
| Information to enter | Details |
|---|---|
| Host | Server address used to access your Web Hosting plan’s storage space. This usually takes the form of: ftp.clusterXXX.hosting.ovh.net (the XXX represents the cluster number where your Web Hosting plan is located). |
| Username | The ID you need to access your web hosting plan’s storage space. |
| Password | The password associated with the user. |
| Port | Enter the SFTP port number you retrieved earlier in the first part of this guide for an SFTP connection. |
Once you have entered everything correctly in the 1 box in the image below, click Quick Connect.
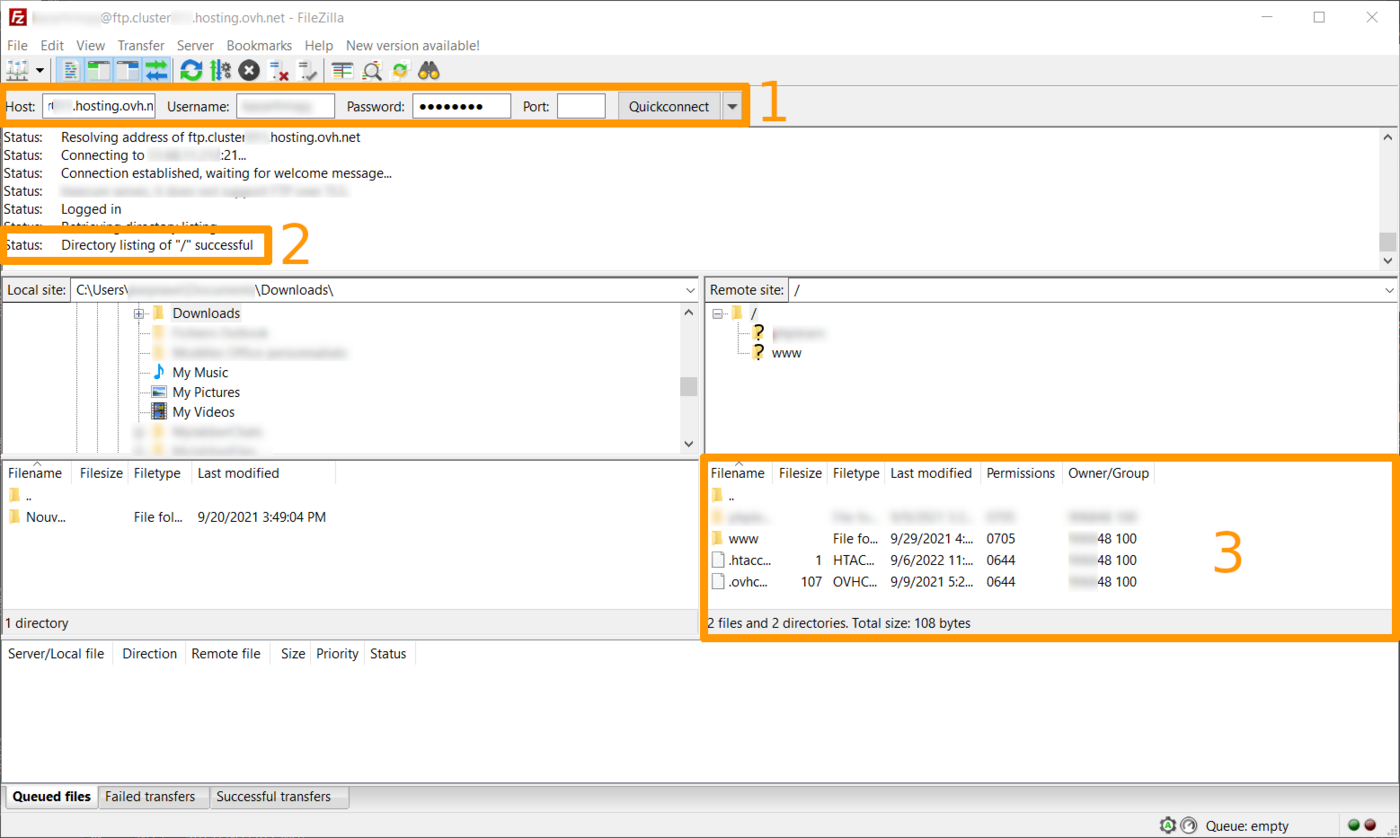
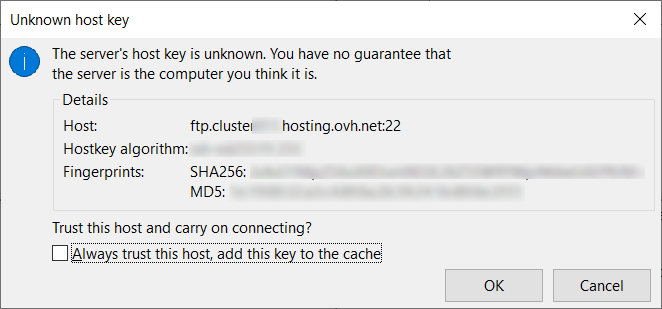
A dialog box will then open (see the image below) to certify the connection to the host you are about to connect to. By being logged in to an OVHcloud host, you can tick the Always trust this host, add this key to the cache box so that the software won't ask you again in the future.
Log in to your Web Hosting plan’s storage space via FTP using FileZilla.
Using the quick connection bar, enter the information using the table below:
| Information to enter | Details |
|---|---|
| Host | Server address used to access your Web Hosting plan’s storage space. This usually takes the form of: ftp.clusterXXX.hosting.ovh.net (the XXX represents the cluster number where your Web Hosting plan is located). |
| Username | The ID you need to access your web hosting plan’s storage space. |
| Password | The password associated with the user. |
| Port | It is usually completed automatically by the software. Otherwise, enter port 21 for an FTP connection. |
Once you have entered everything correctly in the 1 box in the image below, click Quick Connect.
If the connection is successful, you will be informed via the status in the 2 box in the image above. You can then see your folders and files already on your hosting (box 3).
Connection errors
Click on the error you are experiencing to view the solution.
Authentication failed - Could not connect to server
The message displayed below indicates an identification error when connecting to the shared hosting plan using FTP or SFTP:

This type of message is generated by an error in the Login/Password pair.
Check your login details to ensure that no errors are entered. If applicable, you can change the FTP access password of your web hosting plan directly in the OVHcloud Control Panel.
Connection timed out after 20 seconds of inactivity - Could not connect to server
In the following case, the error is generated by an incorrect host name:
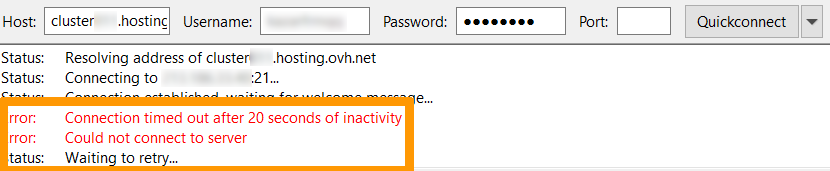
Check that it is linked to the host name declared in your OVHcloud Control Panel.
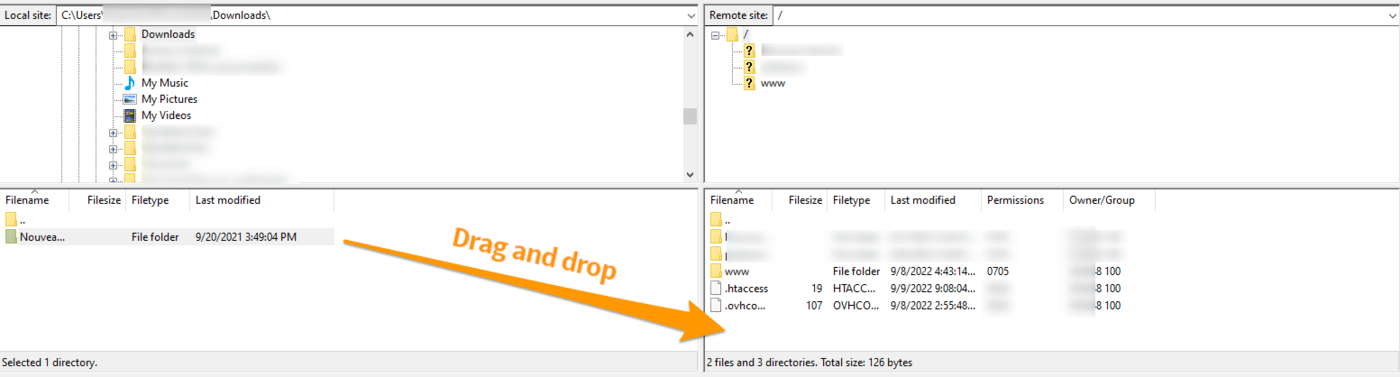
3 - File transfer
To transfer your files via (S)FTP, you can select them, then drag and drop the directories/files from the left window (Local site) to the right window (Remote site) (sections 4 and 5 described in this tutorial under Interface overview).
Be sure to select the correct target directory on the hosting in the right-hand window.
Once this is done, your files will automatically queue to be uploaded to the server.
4 - Other features of FileZilla
Click on the headings below to view their respective contents.
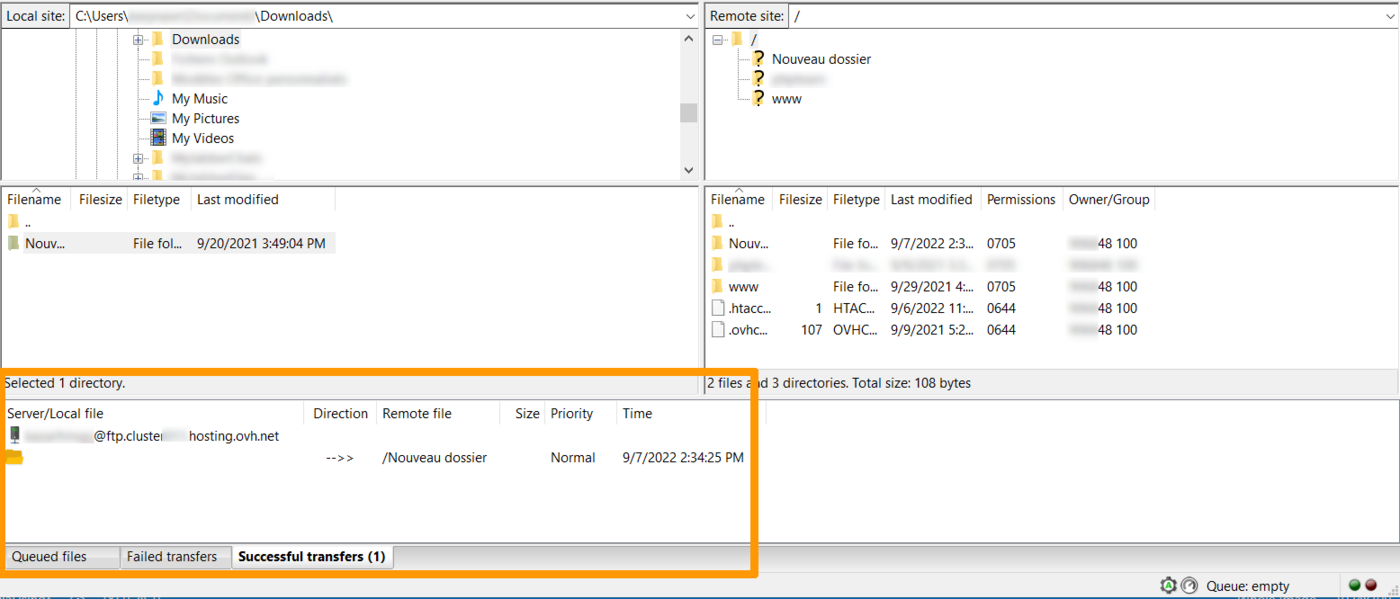
Queue view
A view of the queue is available (section 6 described in this tutorial under Interface overview).
In this zone, you will find:
- Files that are waiting to be transferred to the remote server that are still in the queue.
- Files for which the transfer failed.
- Files that are successfully transferred to the remote hosting.
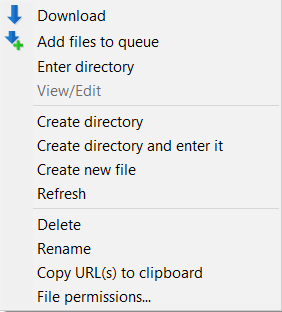
Server context menu
You can right-click on one of the files in section 5 (described in this tutorial under Interface overview).
A popup menu will appear, and you can choose from:
- Download: Downloads the file to the local open folder.
- Add files to queue: Adds the file to the queue, to delay the data upload for example.
- View/Edit: Allows you to view or edit directly a file on your hosting. However, you must have a software program installed on your device that can read the file.
- Create directory: Allows you to create a new folder directly on the remote hosting.
- Refresh: Refreshes the data display to provide an up-to-date view of the files.
- Delete: Allows you to delete the selected file.
- Rename: Allows you to rename the selected file.
- Copy URL(s) to clipboard: Allows you to automatically copy the direct link to the selected file. Example of a URL that can be generated:
ftp://loginftp@ftp.clusterXXX.hosting.ovh.net/www/MY_FOLDER/my_file.jpg. - File permissions...: Allows you to modify access permissions (chmod).
File and folder access rights (CHMOD)
Right-click on one of the files on the server, then select File permissions....
You can modify the access rights (chmod) of your files and folders present on the hosting.
Generally, it is easier to manage chmod rights with the three-digit number format (composed of 3 digits from 0 to 7). The permissions can range from 000 (no rights) to 777 (all rights).
Warning, it is not recommended to set "chmod 000" rights on your folders or files. You will no longer be able (at least via FTP) to manage this item (including as an FTP administrator).
Similarly, do not use "chmod 777", because in this case anyone can edit these folders or files. This results in a significant security vulnerability for your hosted data.
The first of the three chmod digits corresponds to the owner/administrator rights, the second to group rights (rarely used and generally set to 0) and the third to visitors to your website on your hosting.
By default, we recommend that you do not exceed "chmod 705" for folders and "chmod 604" for files.
The higher the number is, the more elevated are the permissions.
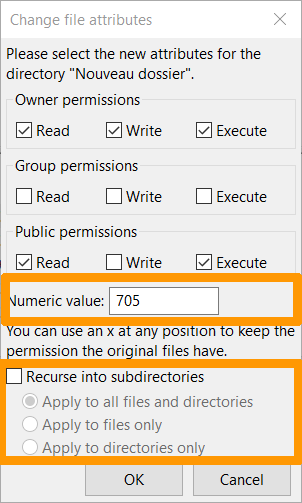
Enter the permissions you want to assign. The chmod value will be automatically updated.
You can select the “Recurse into subdirectories” option to not only change the rights of the folder in question but those of the folders and files located inside this folder as well.
Site reopening
Regardless of your actions, your hosting plan may be disabled if our security systems detect malicious files or files that are not authorized on your hosting plan.
You must then secure your services while correcting the security vulnerabilities mentioned in the notification received via email.
Then click Server and select Enter custom command. (This option may also be called Enter FTP command).
Enter the following command:
This command does not work via SFTP.
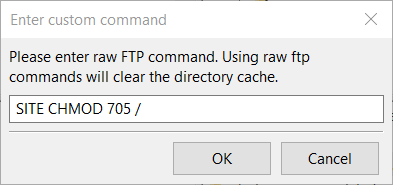
If you get the error 550 would not change perms on /. no such file or directory, use the following command:
To check that the reopening is effective, open your website in a web browser after a few minutes.
Be sure to test the website display after a waiting time of 3 hours.
Our robots check status changes every 3 hours.
Depending on when the above changes are made, your website may be restored more or less quickly.
If the 3-hour time limit has passed and your website is still not online, verify that the command you have entered has been applied by retrying the operation.
If it still does not work, please contact our support team.
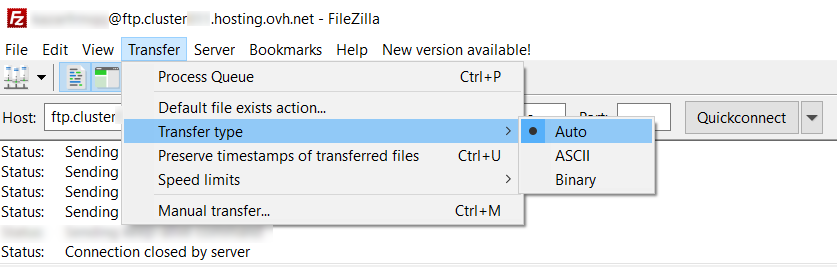
Binary file transfer
For binary type files, such as CGI files, it may be of interest to choose how the transfer will be done.
To change the transfer type, select Transfer from the main menu, then Transfer type.
Folder comparison
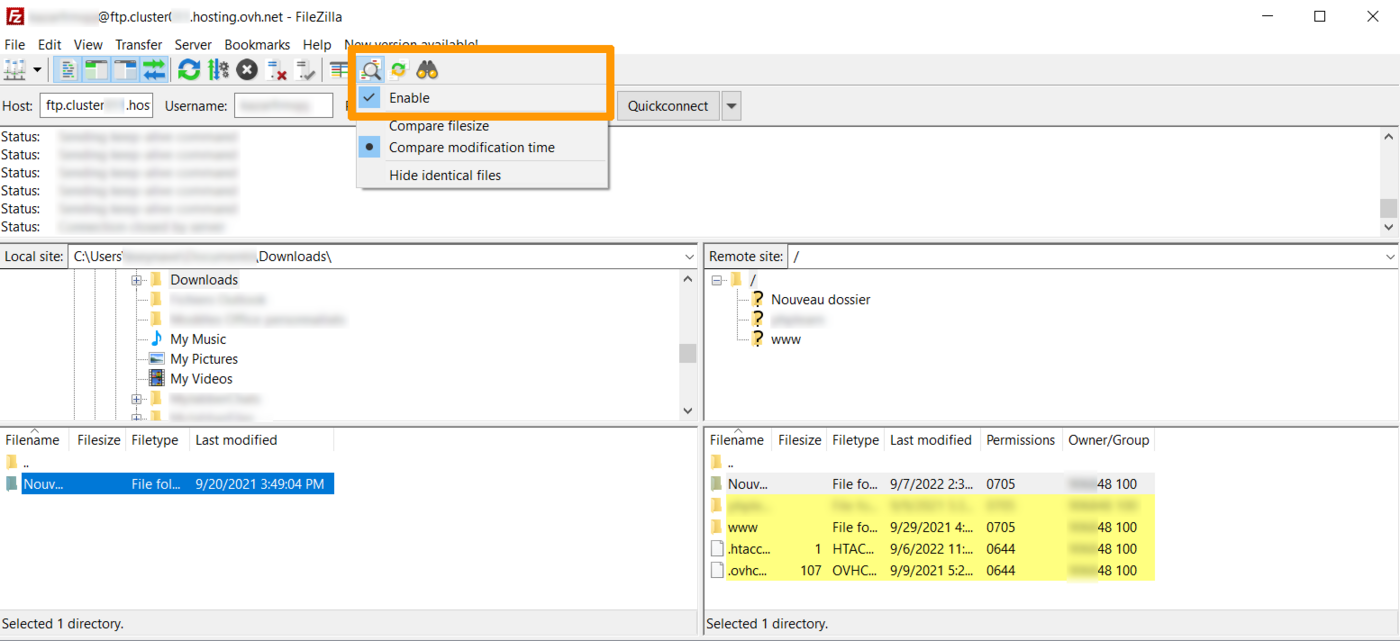
The file comparison option displays colours in zones 4 and 5 (shown in this tutorial under Interface overview). Use this option to highlight the differences between local files and folders and those on the server.
By right-clicking on the icon, you can change the comparison mode. You have the choice to enable or disable the option, as well as:
- Compare the file size.
- Compare timestamps.
- Hide identical files.
Meaning of the colour coding:
- Yellow: The file exists only on one side.
- Green: The file is newer than the uncoloured file on the other side.
- Red: The file sizes are different.
Go further
Consult our documentation for resolving recurring errors when using FTP software.
Generally, find all our guides related to shared hosting here.
Do not hesitate to consult the official page of FileZilla.
For specialised services (SEO, development, etc.), contact OVHcloud partners .
If you would like assistance using and configuring your OVHcloud solutions, please refer to our support offers.
Join our community of users.

