Automate SMS sending with n8n via the OVHcloud API
298 Views
Objective
This guide explains how to integrate the OVHcloud SMS API into n8n, in order to automatically send SMS from your workflows. You will learn how to configure a signed HTTP call via the OVHcloud API to trigger the sending of a message.
Find out how to send SMS from n8n using the OVHcloud API.
Requirements
- An OVHcloud SMS account and a valid SMS sender.
- An OVHcloud VPS, a server, or a local machine with n8n installed and accessible.
Instructions
If you have not yet installed n8n on your VPS, follow the instructions in our guide "How to install n8n on an OVHcloud VPS".
Step 1 – Generate OVHcloud API credentials
Before you can send SMS via the OVHcloud API, you must have the following three identifiers:
- Application key
- Application secret
- Consumer key
To do this, consult the section Advanced usage: pair OVHcloud APIs with an application in our guide "First Steps with the OVHcloud APIs", then copy and save the three identifiers Application key, Application secret and Consumer key.
Step 2 – Create the workflow and nodes
Log in to your n8n interface and click the Create Workflow button.
Create the following nodes (empty for now):
Set - Credentials: of type Edit Fields (Set).Set - Request Details: of type Edit Fields (Set).Merge: of type Merge.Sign - Generate Signature: of type Code.SMS - Send: of type HTTP Request.
For more details on creating nodes, see the official n8n documentation.
Connect the nodes in this order:
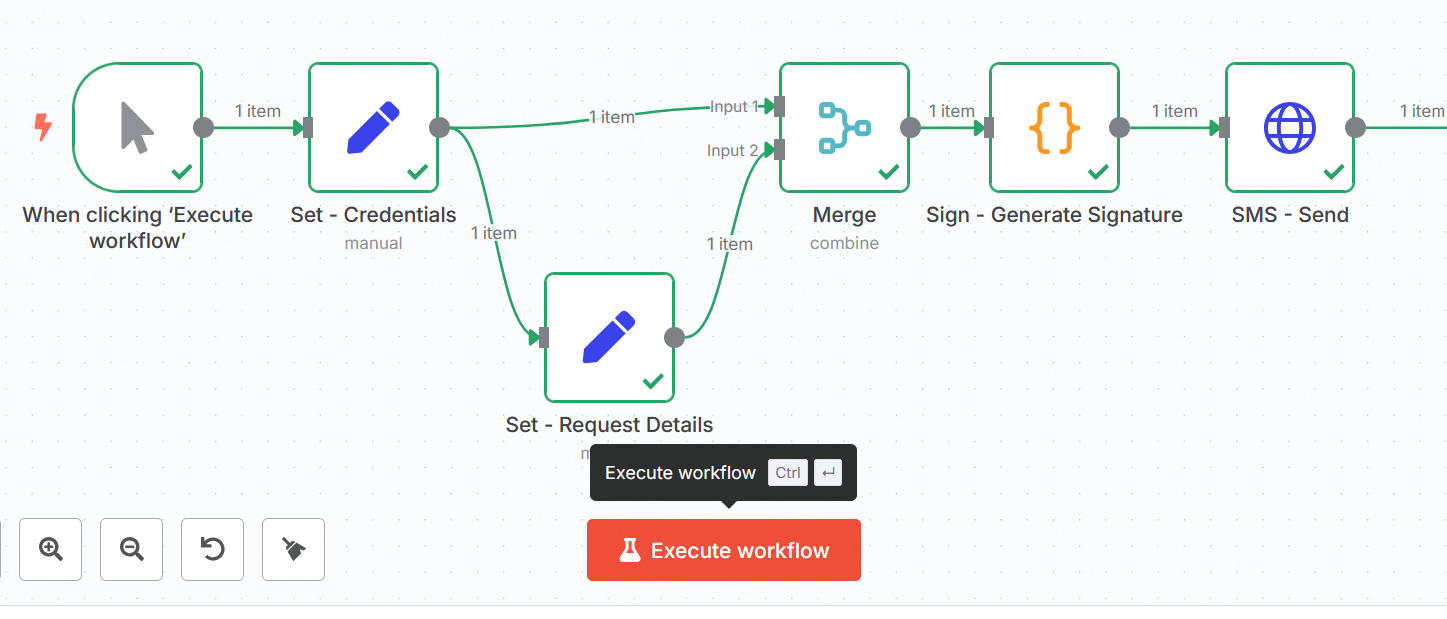
The Merge node receives the outputs from the two Set - Credentials and Set - Request Details nodes, then feeds into Sign - Generate Signature, which feeds into SMS - Send.
Step 3 – Configure the Set – Credentials node
Add the following parameters to your Set - Credentials node:
- Mode:
Manual Mapping.
| Name | Value |
|---|---|
| applicationKey | "YOUR_APPLICATION_KEY" |
| consumerKey | "YOUR_CONSUMER_KEY" |
| serviceName | "YOUR_OVHCLOUD_SMS_ACCOUNT" (e.g. "sms-ab12345-1") |
| applicationSecret | "YOUR_APPLICATION_SECRET" |
| timestamp | {{ Math.floor(Date.now() / 1000) }} |
Step 4 – Configure the Set – Request Details node
Configure the Set - Request Details node:
- Mode:
Manual Mapping. - Add a field named
bodyof typeObjectwith the content below (minimal example).
- The recipient's number (
receivers) must be in international format and for example start with "+336" or "+337" for a French mobile number. - The sender must be defined in your OVHcloud account. To perform a test without declaring a sender and using a short number, replace
"sender": "Your_sender"with"senderForResponse": true.
Step 5 – Configure the Merge node
Configure the Merge node:
- Mode:
Combine. - Combine by:
Position. - Number of Inputs:
2.
Connect Set - Credentials to Input 1 and Set - Request Details to Input 2.
At the output (output), you should have at the same level: applicationKey, applicationSecret, consumerKey, serviceName, timestamp and body.
Step 6 – Configure the Sign – Generate Signature node
Configure the Sign - Generate Signature node:
- Mode:
Run once for each item. - Language:
JavaScript.
Paste the code below:
Do not use HMAC here (OVHcloud expects "$1$" + SHA1(AppSecret + … + Timestamp)). The bodyString parameter is exactly the JSON that will be sent next (no other stringify). The signed URL must be strictly identical to the sending URL (same host, no extra / at the end).
Step 7 – Configure the SMS - Send node
Configure the SMS - Send node:
- Method:
POST. - URL:
{{$json.url}}. - Authentication:
None. - Send Headers:
ON. - Specify Headers:
Using fields below.
Add the following header parameters:
| Name | Value |
|---|---|
| Content-Type | application/json |
| X-Ovh-Application | {{$json.applicationKey}} |
| X-Ovh-Consumer | {{$json.consumerKey}} |
| X-Ovh-Timestamp | {{$json.timestamp}} |
| X-Ovh-Signature | {{$json.signature}} |
Enable Send Body and add the following body parameters:
| Name | Value |
|---|---|
| Body Content Type | Raw |
| Content Type | application/json |
| Body | {{$json.bodyString}} |
Test your workflow
Run your workflow. The following steps are executed:
- Set - Credentials: provides applicationKey, consumerKey, serviceName (and optionally applicationSecret if you have not externalized it).
- Set - Request Details: prepares the body object containing the SMS body.
- Merge (Combine/Position): merges the outputs of the previous two nodes.
- Sign - Generate Signature (Code): calculates bodyString, timestamp, signature (simple SHA-1) and the call URL.
- SMS - Send (HTTP Request): sends the POST to the URL with the body {{$json.bodyString}} and the X-Ovh-* headers.
The message is then transmitted via the OVHcloud API to your recipient.
Common errors
Invalid_signature (400)
- The signed URL is different from the sent URL (different host, extra
/at the end). - The signed body is different from the sent body (re-
stringify, spaces, order, etc.). - The local clock is too far off. Rather use the OVHcloud server time (see the section Industrialization and security).
SMS sender ... does not exist (403)
The sender (sender) is not declared/validated in your OVHcloud Control Panel. Test with "senderForResponse": true or validate your sender.
Bad Request
- Check in each node the name and value of your parameters.
- Make sure that the headers and body are complete.
- Check that the URL of the
SMS - Sendnode follows the following format:https://eu.api.ovh.com/1.0/sms/sms-ab12345-1/jobs
Code node errors
- Do not use
require('crypto')in n8n but rather the pure JavaScript SHA-1 above. - Use the per item mode and avoid calling
$input.all()in your code.
Industrialization and security
If you want to industrialize your workflow and make it more secure, apply the following tips.
OVHcloud server time
Add a HTTP Request node before the signature:
GET https://eu.api.ovh.com/1.0/auth/time- Retrieve the value and replace
timestampwith this exact value.
Do not pass the applicationSecret
- Store it as an environment variable (e.g.
OVH_APP_SECRET) and read it in the Code node (Sign - Generate Signature) via$env.OVH_APP_SECRET, or via the Secrets/Credentials feature of n8n. - Failing that, never return the secret at the output of the node.
Character management
If your message contains emojis/accents not in GSM, use "coding": "ucs2".
Go further
Join our community of users.

