Object Storage - Getting started
5371 Views
Objective
This guide helps you manage your buckets and objects.
Learn how to create an Object Storage bucket and manage it.
If you are using legacy Swift Object Storage, then:
- for Standard object storage - SWIFT API storage class, see the Standard object storage - SWIFT API guide.
- for Cloud Archive - SWIFT API storage class, see the Cloud Archive - SWIFT API guide.
For new projects, we highly recommend using our S31-compatible Object Storage which benefits from our latest innovations and new features.
Requirements
- A Public Cloud project in your OVHcloud account
- An Object Storage user already created
OVHcloud Control Panel Access
- Direct link: Public Cloud Projects
- Navigation path:
Public Cloud> Select your project
Instructions
If you wish to use the OVHcloud Terraform provider, you can see the Terraform guide for Object Storage S3.
Preparation
To use the AWS CLI
To install the AWS CLI in your environment, see the official AWS documentation.
Check installation
If you need more information about AWS CLI installation, read the AWS documentation.
Collect Credentials
- Retrieve your user's Access key and Secret key. You can access this information in the
Object Storage userstab in your OVHcloud Control Panel. - You will also need your endpoint_url. If you have already created your bucket, find this information in the
My containerstab, then in the details of your bucket. If needed, see the Object Storage - Endpoints and Object Storage geoavailability guide.
Where to find the Endpoint URL of a bucket?
Click on the name of your bucket and view its details in the General information tab:

Configuration
Use the interactive configuration to generate the configuration files, or create them manually.
To use the interactive configuration, run the following command:
aws configure
or:
aws configure --profile <profile_name>
The configuration file format in the AWS client is as follows:
Here are the configuration values you can set:
| Variable | Type | Value | Definition |
|---|---|---|---|
| max_concurrent_requests | Integer | Default: 10 | The maximum number of simultaneous requests. |
| max_queue_size | Integer | Default: 1000 | The maximum number of tasks in the task queue. |
| multipart_threshold | Integer String | Default: 8MB | The size threshold that the CLI uses for multipart transfers of individual files. |
| multipart_chunksize | Integer String | Default: 8MB Minimum for uploads: 5MB | When using multipart transfers, this is the byte size that the CLI uses for multipart transfers of individual files. |
| max_bandwidth | Integer | Default: None | The maximum bandwidth that will be used to load and download data to and from your buckets. |
| verify_ssl | Boolean | Default: true | Enable / Disable SSL certificate verification |
For a list of endpoints by region and storage class, see the Object Storage - Endpoints and Object Storage geoavailability guide.
Usage
If you have more than one profile, add --profile <profile_name> to the command line.
Using the OVHcloud Control Panel
To manage an Object Storage bucket, navigate to Object Storage in the left-hand menu.
Listing your buckets
Via AWS s3
Via AWS S3api
Click on Object Storage in the navigation bar on the left and then on the My containers tab.
Enter the following command:
Create a bucket
Via AWS s3
Via AWS S3api
Click Create Object Container:
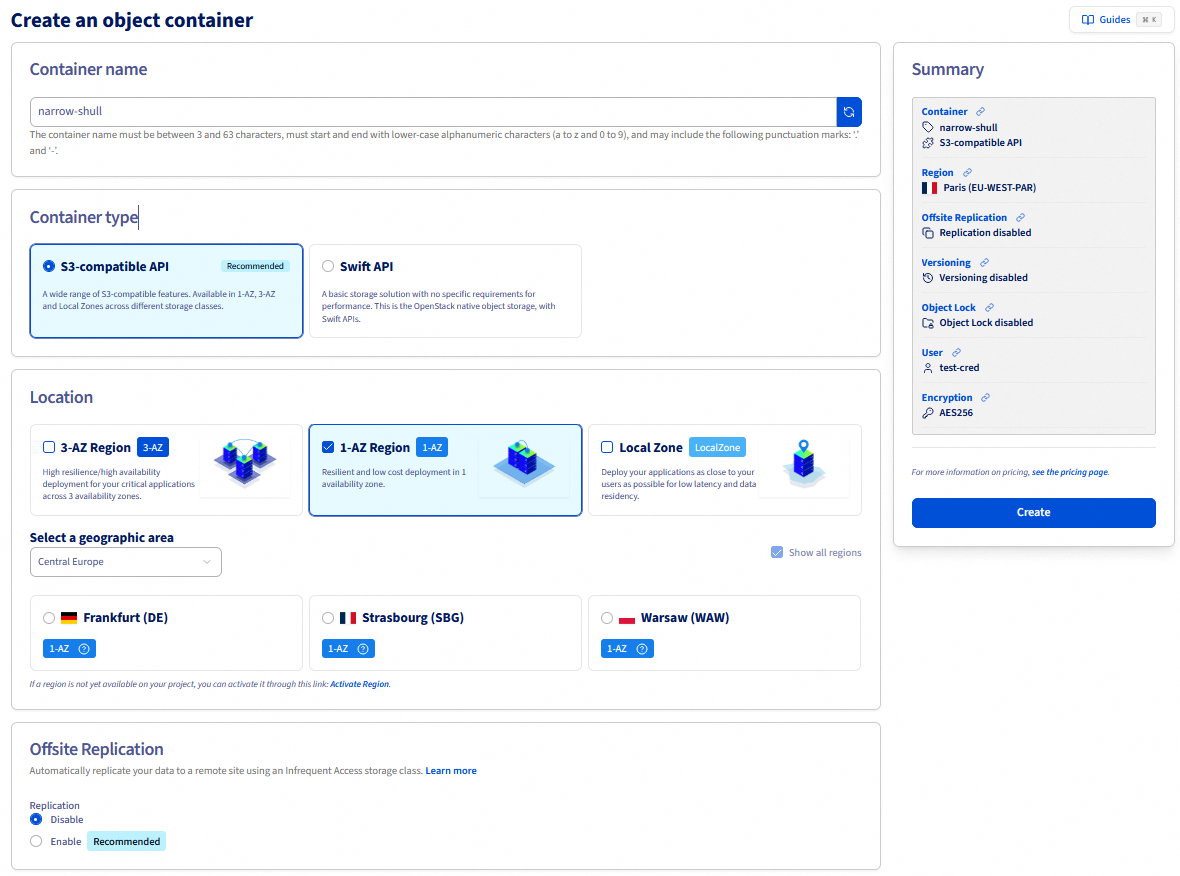
You can enter the name of your bucket (optional) and then select your offer.
Select a deployment mode.
OVHcloud provides multiple deployment modes to meet different needs in terms of resilience, availability and performance. Each mode is optimized for specific use cases and offers varying levels of redundancy and fault tolerance.
Select a region.
Regions can vary depending on the chosen deployment mode.
You can then set the configuration parameters for your bucket.
If you have selected the 3AZ deployment mode, an additional option appears to configure offsite replication.
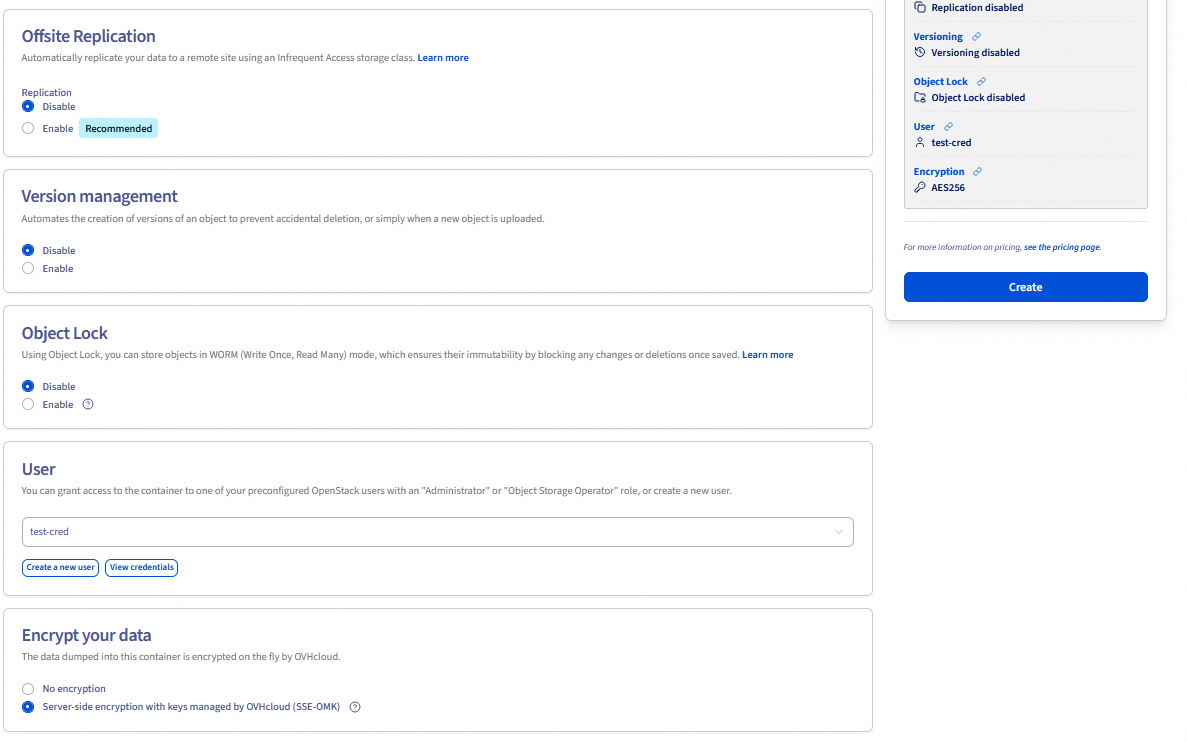
At this stage, you can decide whether or not to enable versioning.
Versioning allows you to keep multiple variants of an object in the same bucket. This feature helps preserve, retrieve, and restore every version of every object stored in your buckets, making it easier to recover from unintended user actions or application failures. By default, versioning is disabled on buckets; enable it explicitly if needed. For more information about versioning, see the Object Storage - Getting Started with Versioning guide.
You can also enable Object Lock to store your objects in WORM (Write Once, Read Many) mode and guarantee their immutability for a defined retention period.
Note: this option must be enabled when creating a bucket, it cannot be enabled later.
You must link a user to the bucket.
To do this, you can either:
- Link an existing Object Storage user. To check the credentials, click on
View credentials. - Or create a new Object Storage user.
You can now decide whether or not you wish to encrypt your data using SSE-OMK (server-side encryption with OVHcloud Managed Keys).
Once you have finished configuring your bucket, click Create.
Enter the following command, replacing <region> with your region code (e.g. GRA, BHS) and <bucket_name> with the desired name:
To create a bucket with versioning and encryption enabled:
To create a bucket with Object Lock enabled:
The --object-lock-status enabled option must be set at bucket creation time; it cannot be enabled later.
Uploading your files as objects in your bucket
When uploading objects, select a storage class to control availability, redundancy, and cost. To help you choose the right storage class for your needs, see the Choosing the right storage class for your needs guide.
To upload an object:
Via AWS s3
By default, objects are named after files, but they can be renamed.
The aws s3 cp command will use STANDARD as default storage class for uploading objects.
To store objects in the High Performance tier, use the aws s3api put-object command instead, as aws s3 cp does not support the EXPRESS_ONEZONE storage class which is used to map the High Performance storage tier.
To learn more about the storage class mapping between OVHcloud storage tiers and AWS storage classes, you can check our documentation here.
Via AWS s3api
By default, objects are named after files, but can be renamed.
Click on the name of your container, then click the Add objects button in the Objects tab.
A window will appear where you can add a prefix to your object's name (the object name is the same as the file name). Select the file you are about to upload and click the Import button.
Downloading an object from a bucket
Via AWS s3
Downloading an object from a bucket:
Uploading an object from one bucket to another bucket:
Downloading or uploading an entire bucket to the host/bucket:
Via AWS s3api
Downloading an object from a bucket:
Uploading an object from one bucket to another bucket:
Click on the download icon (down arrow in a blue base) on the object line.
Synchronising buckets
Deleting objects and buckets
A bucket can only be deleted if it is empty.
Via AWS s3
Deleting objects and buckets:
Deleting objects and buckets with versioning enabled:
If versioning is enabled, a standard delete operation on your objects will not permanently remove them.
In order to permanently delete an object, you must specify a version id:
To list all objects and their version IDs, use the following command:
With the above delete-object command, iterate over all your object versions. You can also use the following one-liner to empty your bucket:
Via AWS s3api
Deleting objects and buckets
Deleting objects and buckets with versioning enabled
If versioning is enabled, a standard delete operation on your objects will not permanently delete them.
To permanently delete an object, you need to specify a version identifier:
If your bucket has Object Lock enabled, you will not be able to permanently delete your objects. See our documentation to learn more about Object Lock.
If you use Object Lock in GOVERNANCE mode and have the permission to bypass GOVERNANCE mode, you will have to add the --bypass-governance-retention option to your delete commands.
Deleting a bucket
In the list of Object Storage containers, click the ... button on the container line, then click Delete.
Enter TERMINATE to confirm your choice and click Confirm.
Deleting objects
Go to the bucket and open the Objects tab.
Click the delete icon (trash can) on the object line, type PERMANENTLY DELETEto confirm permanent deletion, then click Delete.
Deleting objects
Deleting a bucket
The bucket must be empty before deletion.
Deleting objects with versioning enabled
If versioning is enabled, specify the version ID to permanently delete an object:
To delete all versions of an object, combine the version list and deletion:
Manage tags
Setting tags on a bucket:
Deleting tags on a bucket:
Setting tags on an object:
Deleting tags on an object:
The OVHcloud CLI lets you set tags on a bucket at creation time or when editing it via the --tag key=value option (repeatable for multiple tags). Individual tag management (reading, deleting) is not available via the CLI.
Setting tags when creating a bucket
Updating tags on an existing bucket
Go further
If you need training or technical assistance to implement our solutions, contact your sales representative or click on this link to get a quote and ask our Professional Services experts for assisting you on your specific use case of your project.
Join our community of users.
1: S3 is a trademark of Amazon Technologies, Inc. OVHcloud’s service is not sponsored by, endorsed by, or otherwise affiliated with Amazon Technologies, Inc.

