Enterprise File Storage - Getting started with Trident CSI

Knowledge Base

Enterprise File Storage - Getting started with Trident CSI


Icons/System/eye-open Created with Sketch. 151 Views 18.02.2026 Cloud / Enterprise File Storage

Objective

The guide will provide a clear, step-by-step reference for deploying and configuring NetApp Trident CSI on OVHcloud Managed Kubernetes (MKS), enabling seamless access to Enterprise File Storage through the vRack. This guide consolidates best practices, prerequisites, IAM setup, backend configuration, and advanced features such as snapshots and volume management.

Requirements

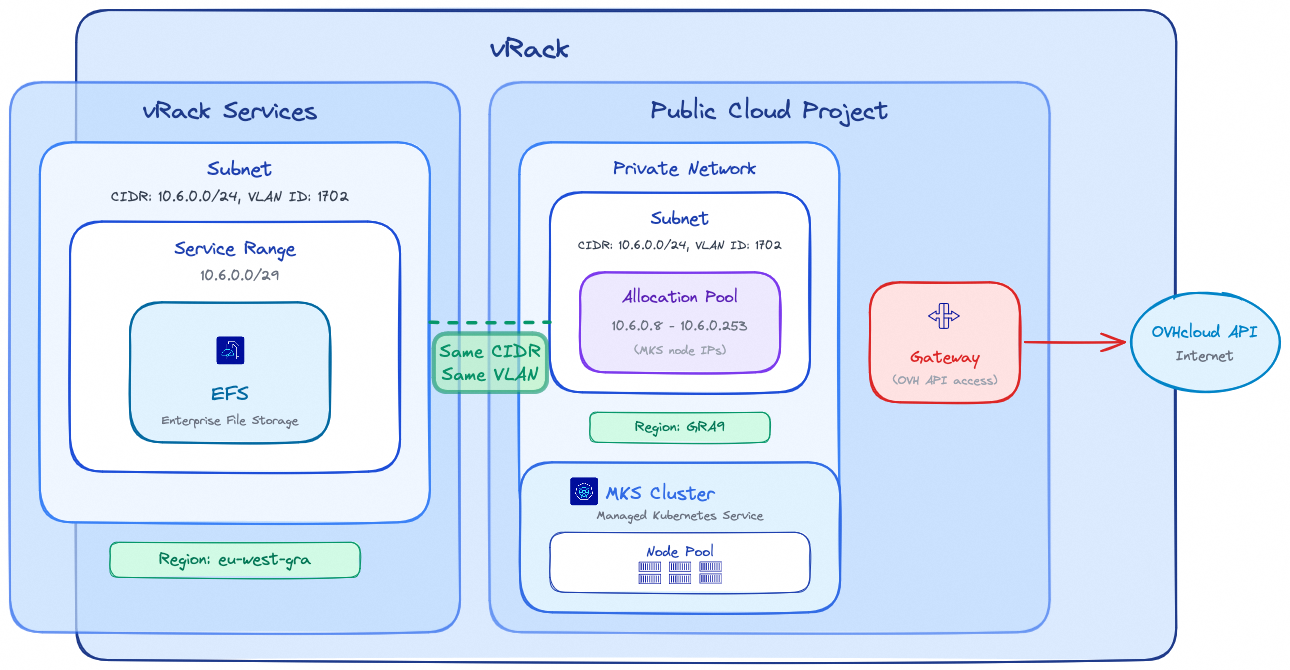
Before beginning, ensure your environment meets the following criteria:

vRack

  • Public Cloud Project and vRack Services belong to the same vRack

Region

  • vRack Services and EFS are inside the same region

Network

  • Same VLAN ID is used for the vRack Services subnet and the MKS Private Network
  • Same CIDR is used for vRack Services subnet and MKS Private network subnet
  • MKS Private network Allocation Pool IPs do not overlap with the vRack Services Service Range

Connectivity

  • A Gateway is required for MKS nodes to reach the OVHcloud API

Trident Requirements Schema

Note: EFS and MKS regions may differ; be aware that latency between different regions may impact your storage workloads performance.

It's highly recommended to keep your storage and compute as close as possible.

Instructions

IAM Configuration (Identity and Access Management)

Trident requires a dedicated service account to interact with the OVHcloud API and manage Enterprise File Storage volumes. Follow these steps to configure IAM properly.

1. Service Account Creation (OAuth2)

Create an OAuth2 client with the OVHcloud API or CLI using the CLIENT_CREDENTIALS flow.

Use the following API call:

With the following request body:

{
  "description": "Service Account for Trident CSI",
  "flow": "CLIENT_CREDENTIALS",
  "name": "TRIDENT-CSI"
}

The API will respond with:

{
  "clientId": "EU.xxxxxxxxxxxxxxxx",
  "clientSecret": "aaaaaaaaaaaaaaaaaaaaaaaaaaaaaaaa"
}

The Service account can be created with the OVHcloud CLI and the following command (complete it with your values):

ovhcloud account api oauth2 client create --name "TRIDENT-CSI" --description "Service Account for Trident CSI" --flow "CLIENT_CREDENTIALS"

The CLI will respond with the client ID and client secret values:

✅ OAuth2 client created successfully (client ID: EU.xxxxxxxxxxxxxxxx, client secret: aaaaaaaaaaaaaaaaaaaaaaaaaaaaaaaa)

Note: Save the clientId and clientSecret securely, they are required for backend configuration.

2. IAM Policy Creation

Configure an IAM policy that must contain the following elements: the service account to authorize, the Enterprise File Storage service(s) to include, and the actions to grant, which are summarized in the table below:

ActionDescription
storageNetApp:apiovh:getList services
storageNetApp:apiovh:serviceInfos/getGet service information
storageNetApp:apiovh:share/accessPath/getGet NFS mount point for a share
storageNetApp:apiovh:share/acl/createCreate ACL
storageNetApp:apiovh:share/acl/deleteDelete ACL
storageNetApp:apiovh:share/acl/getList ACL for a share
storageNetApp:apiovh:share/createCreate a share
storageNetApp:apiovh:share/deleteDelete a share
storageNetApp:apiovh:share/editUpdate a share
storageNetApp:apiovh:share/extendExtend a share
storageNetApp:apiovh:share/getList shares
storageNetApp:apiovh:share/revertToSnapshotRestore a snapshot
storageNetApp:apiovh:share/snapshot/createCreate a snapshot
storageNetApp:apiovh:share/snapshot/deleteDelete a snapshot
storageNetApp:apiovh:share/snapshot/editUpdate a snapshot
storageNetApp:apiovh:share/snapshot/getList snapshots

Use the following API call to create the IAM policy:

With the following request body:

In the identities field, replace xx11111-ovh with your OVHcloud account ID (NIC handle) and EU.xxxxxxxxxxxxxxxx with the clientId obtained in step 1.

{
  "description": "Trident CSI",
  "identities": [
    "urn:v1:eu:identity:credential:xx11111-ovh/oauth2-EU.xxxxxxxxxxxxxxxx"
  ],
  "name": "trident-policy",
  "permissions": {
    "allow": [
      {
        "action": "storageNetApp:apiovh:get"
      },
      {
        "action": "storageNetApp:apiovh:serviceInfos/get"
      },
      {
        "action": "storageNetApp:apiovh:share/accessPath/get"
      },
      {
        "action": "storageNetApp:apiovh:share/acl/create"
      },
      {
        "action": "storageNetApp:apiovh:share/acl/delete"
      },
      {
        "action": "storageNetApp:apiovh:share/acl/get"
      },
      {
        "action": "storageNetApp:apiovh:share/create"
      },
      {
        "action": "storageNetApp:apiovh:share/delete"
      },
      {
        "action": "storageNetApp:apiovh:share/edit"
      },
      {
        "action": "storageNetApp:apiovh:share/extend"
      },
      {
        "action": "storageNetApp:apiovh:share/get"
      },
      {
        "action": "storageNetApp:apiovh:share/revertToSnapshot"
      },
      {
        "action": "storageNetApp:apiovh:share/snapshot/create"
      },
      {
        "action": "storageNetApp:apiovh:share/snapshot/delete"
      },
      {
        "action": "storageNetApp:apiovh:share/snapshot/edit"
      },
      {
        "action": "storageNetApp:apiovh:share/snapshot/get"
      }
    ]
  },
  "resources": [
    {
      "urn": "urn:v1:eu:resource:storageNetApp:xxxxxxxx-xxxx-xxxx-xxxx-xxxxxxxxxxxx"
    }
  ]
}

The API will respond with the created policy details:

{
  "id": "xxxxxxxx-xxxx-xxxx-xxxx-xxxxxxxxxxxx",
  "name": "trident-policy",
  "description": "Trident CSI",
  ...
}

The IAM policy can be created with the OVHcloud CLI and the following command (complete it with your values):

In the identities field, replace xx11111-ovh with your OVHcloud account ID (NIC handle) and EU.xxxxxxxxxxxxxxxx with the clientId obtained in step 1.

cat <<EOF | ovhcloud iam policy create --from-file -
{
  "description": "Trident CSI",
  "identities": [
    "urn:v1:eu:identity:credential:xx11111-ovh/oauth2-EU.xxxxxxxxxxxxxxxx"
  ],
  "name": "trident-policy",
  "permissions": {
    "allow": [
      {
        "action": "storageNetApp:apiovh:get"
      },
      {
        "action": "storageNetApp:apiovh:serviceInfos/get"
      },
      {
        "action": "storageNetApp:apiovh:share/accessPath/get"
      },
      {
        "action": "storageNetApp:apiovh:share/acl/create"
      },
      {
        "action": "storageNetApp:apiovh:share/acl/delete"
      },
      {
        "action": "storageNetApp:apiovh:share/acl/get"
      },
      {
        "action": "storageNetApp:apiovh:share/create"
      },
      {
        "action": "storageNetApp:apiovh:share/delete"
      },
      {
        "action": "storageNetApp:apiovh:share/edit"
      },
      {
        "action": "storageNetApp:apiovh:share/extend"
      },
      {
        "action": "storageNetApp:apiovh:share/get"
      },
      {
        "action": "storageNetApp:apiovh:share/revertToSnapshot"
      },
      {
        "action": "storageNetApp:apiovh:share/snapshot/create"
      },
      {
        "action": "storageNetApp:apiovh:share/snapshot/delete"
      },
      {
        "action": "storageNetApp:apiovh:share/snapshot/edit"
      },
      {
        "action": "storageNetApp:apiovh:share/snapshot/get"
      }
    ]
  },
  "resources": [
    {
      "urn": "urn:v1:eu:resource:storageNetApp:xxxxxxxx-xxxx-xxxx-xxxx-xxxxxxxxxxxx"
    }
  ]
}
EOF

The CLI will respond with the following output:

✅ IAM policy xxxxxxxx-xxxx-xxxx-xxxx-xxxxxxxxxxxx created successfully

Trident CSI Installation

The installation uses Helm with custom images hosted on Docker Hub. These images include an additional storage driver that enables consumption of persistent storage from OVHcloud Enterprise File Storage.

Create a trident-values.yaml file to reference the OVHcloud-hosted images:

cat <<EOF > trident-values.yaml
tridentSilenceAutosupport: true
operatorImage: "ovhcom/trident-operator:25.02.1-linux-amd64"
tridentImage: "ovhcom/trident:25.02.1-linux-amd64"
EOF

Run the installation:

helm repo add netapp-trident https://netapp.github.io/trident-helm-chart
helm install trident-operator netapp-trident/trident-operator \
  --version 100.2502.1 \
  --create-namespace \
  --namespace trident \
  -f trident-values.yaml

The output should show that the Helm chart was deployed:

NAME: trident-operator
LAST DEPLOYED: Tue Feb 17 13:51:15 2026
NAMESPACE: trident
STATUS: deployed
REVISION: 1
TEST SUITE: None
NOTES:
Thank you for installing trident-operator, which will deploy and manage NetApp's Trident CSI
storage provisioner for Kubernetes.

Your release is named 'trident-operator' and is installed into the 'trident' namespace.
Please note that there must be only one instance of Trident (and trident-operator) in a Kubernetes cluster.

To configure Trident to manage storage resources, you will need a copy of tridentctl, which is
available in pre-packaged Trident releases.  You may find all Trident releases and source code
online at https://github.com/NetApp/trident.

To learn more about the release, try:

  $ helm status trident-operator
  $ helm get all trident-operator

Once the installation is complete, verify that all Trident pods are in Running state in the trident namespace before proceeding:

kubectl get pods -n trident

The output should show all pods in Running state:

NAME                                  READY   STATUS    RESTARTS        AGE
trident-controller-75869d7499-ffmkt   6/6     Running   0               4m25s
trident-node-linux-4gv6w              2/2     Running   1 (4m24s ago)   4m25s
trident-node-linux-g942s              2/2     Running   1 (4m24s ago)   4m24s
trident-node-linux-tfjc2              2/2     Running   0               4m25s
trident-operator-787b98cb7c-sgtdh     1/1     Running   0               4m26s

Trident Backend Creation

The Trident backend connects NetApp Trident to the OVHcloud Enterprise File Storage service using the IAM credentials previously created.

1. Secret Creation

Create a secret containing the connection information that allows Trident to access the OVHcloud API.

Replace clientID and clientSecret values with the credentials obtained in step 1.

cat <<EOF | kubectl create -n trident -f -
apiVersion: v1
kind: Secret
metadata:
  name: tbc-ovh-efs-secret
type: Opaque
stringData:
  clientID: "EU.xxxxxxxxxxxxxxxx"         # Replace with your clientId
  clientSecret: "aaaaaaaaaaaaaaaaaaaaaa"  # Replace with your clientSecret
EOF

The output will confirm the secret creation:

secret/tbc-ovh-efs-secret created

2. Trident Backend Creation

Create your backend with the command below:

The ovh-efs storage driver must be used. Replace exportRule, location, and other parameters with values matching your environment.

cat <<EOF | kubectl create -n trident -f -
apiVersion: trident.netapp.io/v1
kind: TridentBackendConfig
metadata:
  name: tbc-ovh-efs-gra
spec:
  version: 1
  backendName: backend-ovh-efs
  defaults:
    exportRule: 10.0.32.0/24    # CIDR of your network for NFS ACLs
  storageDriverName: ovh-efs
  clientLocation: ovh-eu
  location: eu-west-gra         # Location of your EFS service
  serviceLevel: premium
  nfsMountOptions: rw,hard,rsize=65536,wsize=65536,nfsvers=3,tcp
  credentials:
    name: tbc-ovh-efs-secret
EOF

The output will confirm the backend creation:

tridentbackendconfig.trident.netapp.io/tbc-ovh-efs-gra created

Verify that the backend has been created correctly with the command below:

kubectl get tridentbackendconfig -n trident

The output should show the backend in Bound state:

NAME                  BACKEND NAME      BACKEND UUID                           PHASE   STATUS
tbc-ovh-efs-gra       backend-ovh-efs   xxxxxxxx-xxxx-xxxx-xxxx-xxxxxxxxxxxx   Bound   Success

StorageClass and Usage

This section describes how to expose Enterprise File Storage to Kubernetes workloads using Trident.

1. StorageClass

Define a StorageClass to enable dynamic provisioning via the Trident CSI driver:

cat <<EOF | kubectl create -f -
apiVersion: storage.k8s.io/v1
kind: StorageClass
metadata:
  name: ovh-efs-gra-premium
provisioner: csi.trident.netapp.io
parameters:
  backendType: "ovh-efs"
  fsType: "nfs"
allowVolumeExpansion: true
EOF

The output will confirm the StorageClass creation:

storageclass.storage.k8s.io/ovh-efs-gra-premium created

This StorageClass allows volumes to be provisioned on demand and expanded dynamically.

2. Volume Creation (PVC)

Create a PersistentVolumeClaim with ReadWriteMany (RWX) access mode:

cat <<EOF | kubectl create -f -
apiVersion: v1
kind: PersistentVolumeClaim
metadata:
  name: premium-pvc
spec:
  accessModes:
    - ReadWriteMany
  resources:
    requests:
      storage: 100Gi
  storageClassName: ovh-efs-gra-premium
EOF

The output will confirm the PVC creation:

persistentvolumeclaim/premium-pvc created

Verify that the PVC has been created with the command below:

kubectl get pvc

The output should show the PVC in Bound state:

NAME         STATUS   VOLUME                                     CAPACITY   ACCESS MODES   STORAGECLASS          VOLUMEATTRIBUTESCLASS   AGE
premium-pvc  Bound    pvc-xxxxxxxx-xxxx-xxxx-xxxx-xxxxxxxxxxxx   100Gi      RWX            ovh-efs-gra-premium   <unset>                 5m34s

Once a Pod uses this PVC, the volume will be automatically mounted via the NFS protocol.

Advanced Features

Snapshot Management

NetApp Trident supports on-demand volume snapshots for Enterprise File Storage.

  • Define a VolumeSnapshotClass to manage snapshot lifecycle:
cat <<EOF | kubectl create -f -
apiVersion: snapshot.storage.k8s.io/v1
kind: VolumeSnapshotClass
metadata:   
  name: csi-snapclass
driver: csi.trident.netapp.io
deletionPolicy: Delete
EOF

The output will confirm the VolumeSnapshotClass creation:

volumesnapshotclass.snapshot.storage.k8s.io/csi-snapclass created
  • Create a VolumeSnapshot in the same namespace as the source PersistentVolumeClaim:
cat <<EOF | kubectl create -f -
apiVersion: snapshot.storage.k8s.io/v1
kind: VolumeSnapshot
metadata:
  name: my-snapshot
spec:
  volumeSnapshotClassName: csi-snapclass
  source:
    persistentVolumeClaimName: premium-pvc
EOF

The output will confirm the VolumeSnapshot creation:

volumesnapshot.snapshot.storage.k8s.io/my-snapshot created

Verify that the VolumeSnapshot has been created with the command below:

kubectl get volumesnapshot

The output should show the VolumeSnapshot in READYTOUSE=true state:

NAME          READYTOUSE   SOURCEPVC     SOURCESNAPSHOTCONTENT   RESTORESIZE   SNAPSHOTCLASS   SNAPSHOTCONTENT                                    CREATIONTIME   AGE
my-snapshot   true         premium-pvc                           100Gi         csi-snapclass   snapcontent-0274f0ec-e8ab-48f4-8d89-4422c3875d92   27s            30s

The snapshot is created on the Enterprise File Storage service and can be used for backup or restore workflows.

Troubleshooting

  • Backend not bound: Verify that the IAM credentials (clientId/clientSecret) are correct and the IAM policy grants all required permissions.
  • PVC stuck in Pending: Check that all Trident pods are in Running state, the backend is in Bound state and the StorageClass references the correct backend type. Review errors inside Trident pods logs with kubectl logs -n trident <pod-name>.
  • Network connectivity issues: Verify that the MKS cluster can reach the Enterprise File Storage service through the vRack.

Go further

Enterprise File Storage - Private network configuration

Enterprise File Storage - Connect a Public Cloud instance to an EFS Volume via vRack Private Network

Managing OVHcloud service accounts via the API

Enterprise File Storage - FAQ

If you need training or technical assistance to implement our solutions, contact your sales representative or click on this link to get a quote and ask our Professional Services experts for assisting you on your specific use case of your project.

Join our community of users.

Related articles