AI Endpoints - Create your own voice assistant
555 Views
AI Endpoints is covered by the OVHcloud AI Endpoints Conditions and the OVHcloud Public Cloud Special Conditions.
Introduction
Imagine having a virtual assistant that listens to your voice, understands your questions, and responds with spoken answers, in under 100 lines of code. Thanks to AI Endpoints, this is now easily achievable.
Objective
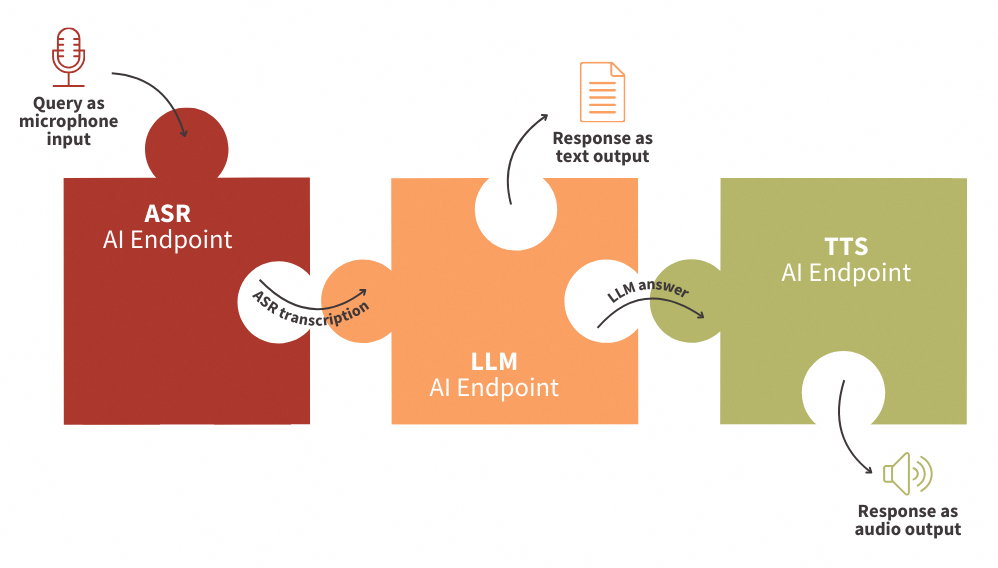
In this tutorial, you will learn how to create a fully functional Audio Virtual Assistant that:
- Accepts voice input from a microphone
- Transcribes it using ASR (Automatic Speech Recognition)
- Processes the request using LLM (Large Language Models)
- Responds using TTS (Text-To-Speech)
All of this is done by connecting AI Endpoints like puzzle pieces—allowing you to build your assistant in under 100 lines of Python code.
Definitions
- Automatic Speech Recognition (ASR): Technology that converts spoken language into text. ASR makes it possible in this context for your assistant to understand voice input.
- Large Language Models (LLMs): Advanced models trained to understand context and generate human-like responses. Here, LLMs will handle the logic and answer your questions intelligently.
- Text-To-Speech (TTS): Technology that converts written text into spoken audio. With TTS, your assistant will respond with natural-sounding speech, completing the conversation loop.
Requirements
- A Public Cloud project in your OVHcloud account
- An access token for OVHcloud AI Endpoints. To create an API token, follow the instructions in the AI Endpoints - Getting Started guide.
Instructions
Set up the environment
In order to use AI Endpoints APIs easily, create a .env file to store environment variables:
Make sure to replace the token value (OVH_AI_ENDPOINTS_ACCESS_TOKEN) by yours. If you do not have one yet, follow the instructions in the AI Endpoints - Getting Started guide.
In this tutorial, we will be using the Whisper-Large-V3 and gpt-oss-120b models. Feel free to choose alternative models available on the AI Endpoints catalog.
Then, create a requirements.txt file with the following libraries:
Then, launch the installation of these dependencies:
Note that Python 3.11 is used in this tutorial.
Importing necessary libraries and variables
Once this is done, you can create a Python file named audio-virtual-assistant-app.py, where you will first import Python librairies as follows:
After these lines, load and access the environnement variables of your .env file:
Next, define the clients that will be used to interact with the models:
💡 You are now ready to start coding your web app!
Transcribe input question with ASR
First, create the Automatic Speech Recognition (ASR) function in order to transcribe microphone input into text:
In this function:
- The audio input is sent from microphone recording, as
question. - An API call is made to the ASR AI Endpoint named
whisper-large-v3. - The text from the transcript response is returned by the function.
🎉 Now that you have this function, you are ready to transcribe audio files.
Generate LLM response to input question
Now, create a function that calls the LLM client to provide responses to questions:
In this function:
- The conversation/messages are retrieved as parameters.
- A call is made to the chat completion LLM endpoint, using the
gpt-oss-120bmodel. - The model's response is extracted and the final message text is returned.
⏳ Almost there! All that remains is to implement the TTS to transform the LLM response into spoken words.
Return the response using TTS
Then, build the Text To Speech (TTS) function in order to transform the written answer into oral reply:
In this function:
- The LLM response is retrieved.
- A call is made to the TTS AI endpoint named
nvr-tts-en-us. - The audio sample and the sample rate are returned to play the audio automatically.
⚡️ You're almost there! The final step is to build your web app, making your solution easy to use with just a few lines of code.
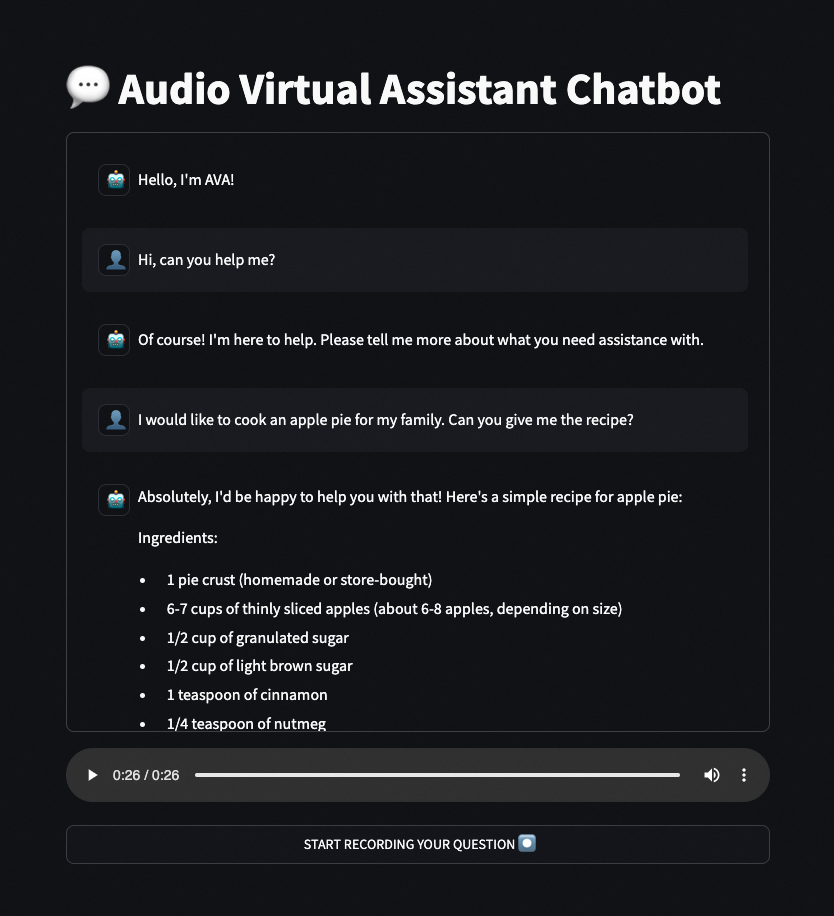
Build the LLM chat app with Streamlit
In this last step, create the chatbot app using Streamlit, an open-source Python library that allows to quickly create user interfaces for Machine Learning models and demos. Here is a working code example:
Launch Streamlit web app locally
🚀 That’s it! Now your web app is ready to be used! You can start this Streamlit app locally by launching the following command:
Improvements
By default, the nvr-tts-en-us model supports only a limited number of characters per request when generating audio. If you exceed this limit, you will encounter errors in your application.
To work around this limitation, you can replace the existing tts_synthesis function with the following implementation, which processes text in chunks:
Conclusion
You’ve just created an Audio Virtual Assistant capable of natural conversation using voice, powered by ASR, LLM, and TTS endpoints.
This example demonstrates how powerful, yet simple, it is to leverage OVHcloud AI services to build intelligent applications with just a few lines of code.
➡️ Access the full code here.
Going further
If you want to go further and deploy your web app in the cloud, making your interface accessible to everyone, refer to the following articles and tutorials:
- AI Deploy – Tutorial – Build & use a custom Docker image
- AI Deploy – Tutorial – Deploy a Gradio app for sketch recognition
If you need training or technical assistance to implement our solutions, contact your sales representative or click on this link to get a quote and ask our Professional Services experts for a custom analysis of your project.
Feedback
Please feel free to send us your questions, feedback, and suggestions regarding AI Endpoints and its features:
- In the #ai-endpoints channel of the OVHcloud Discord server, where you can engage with the community and OVHcloud team members.

