Configure a send connector on your Private or Trusted Exchange platform
1346 Views
Objective
Adding an SMTP send connector to your Exchange platform allows one or more Exchange email addresses to send emails via a sending server external to your Exchange platform. It can be used, for example, as part of a mass email campaign, or even as an external anti-spam solution. Only the email addresses attached to the send connector will use the send connector.
Find out how to configure a send connector on your Private Exchange platform.
Example
The email address newsletter@mydomain.ovh is attached to the send connector configured on the Exchange platform. The address contact@mydomain.ovh is not attached to the send connector.
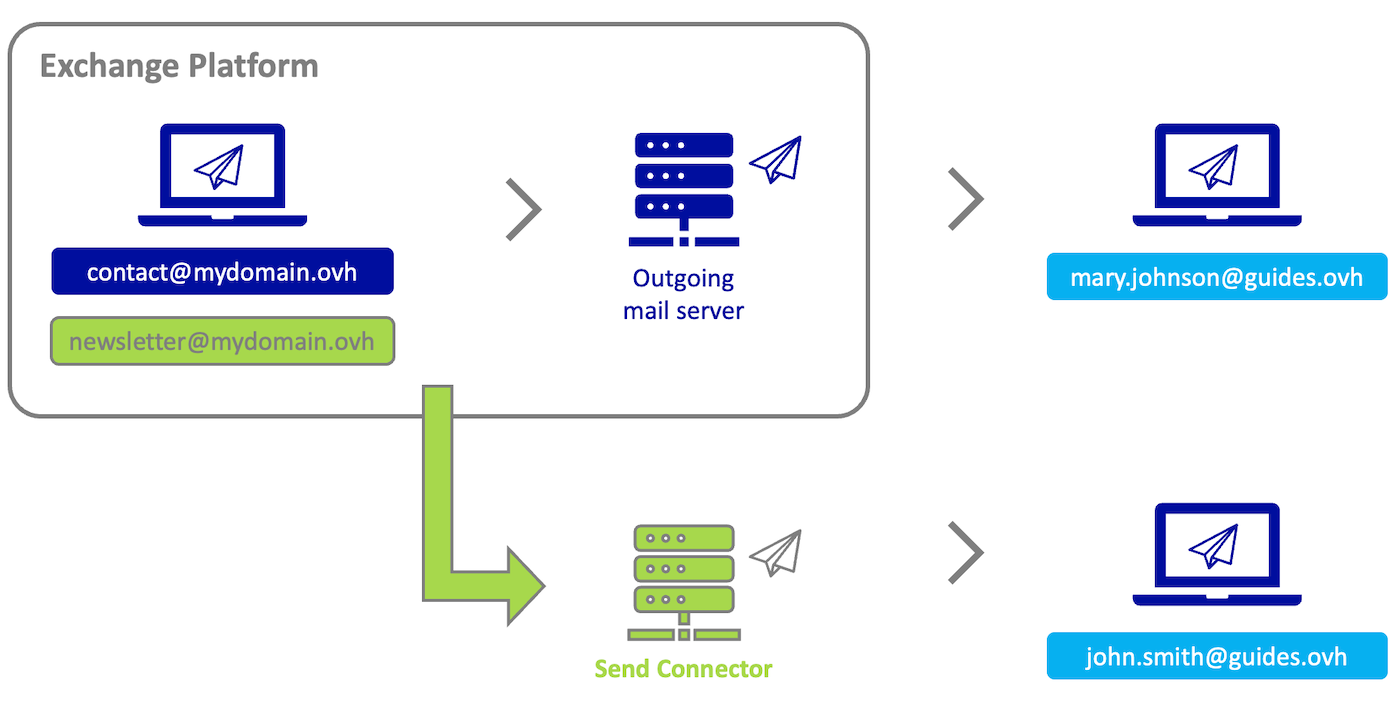
Here is the context of the diagram above:
- contact@mydomain.ovh sends an email to the address mary.johnson@guides.ovh: This is a standard sending, as the sending connector has not been attached to the address contact@mydomain.ovh. mary.johnson@guides.ovh receives the email from the sending server of the Exchange platform (outgoing mail server).
- newsletter@mydomain.ovh sends an email to john.smith@guides.ovh: newsletter@mydomain.ovh has been attached to the send connector, john.smith@guides.ovh will receive the email from the send connector server configured on the Exchange platform.
Requirements
- An OVHcloud Private Exchange or OVHcloud Trusted Exchange platform.
- Access to the OVHcloud API
- The configuration details needed for the send connector received from your service provider
OVHcloud Control Panel Access
- Direct link: Exchange
- Navigation path:
Web Cloud>Exchange> Select your platform
Instructions
Setting up a send connector is done in 3 steps.
- 1. Add the send connector to your platform: You enter the parameters for the send connector that your service provider sent to you.
- 2. Configure an email address on a send connector: You attach the send connector to one or more email addresses so that they send through this connector when sending.
- 3. Check that your email address uses the send connector: Send from an email address configured with a connector, and retrieve the email header from the receive email address to check that the email has been sent through the send connector.
You will also find other useful operations concerning send connectors in this guide.
- Remove a send connector attached to an email address
- Set a send connector as the default send server
- Lists of other API calls related to send connectors
Add a send connector to your Exchange platform
The addition of a send connector is reserved and planned for the OVHcloud Private Exchange and OVHcloud Trusted Exchange solutions. If you enable a send connector on an OVHcloud Exchange solution other than the ones mentioned above, you risk having it disabled at any time by our administrators for security reasons.
Before you begin, make sure you have the following information, provided by the service provider delivering the send connector.
- The sending server address (SMTP)
- The port used for sending (example: 587)
- The associated username (e.g. email address) may be optional, depending on your send connector
- The password associated with the user name may be optional, depending on your send connector
Next, log in to the OVHcloud API console with your login credentials. Refer to our Getting started guide for the OVHcloud API.
To add a send connector to your Exchange platform, use the following API call.
In the section PATH PARAMETERS:
exchangeService: Enter the name of your Exchange platform, which is in the form of "private-zz11111-1" or "dedicated-zz111111-1".organizationName: Enter the name of your Exchange platform, which is in the form of "private-zz11111-1" or "dedicated-zz111111-1".
In the EXAMPLE tab in the REQUEST BODY section, fill in the fields with your values:
displayName: The display name of your send connector.maxSendSize: Maximum size in MB of an email when sending (100MB maximum and default if left empty).password: The password attached to the send connector user.port: The port used for sending.requireTLS: Use TLS security protocol on send.smartHost: Send connector (SMTP) address.smartHostAuthMechanism: Authentication mechanism used for send connector.user: The user associated with the send connector.
The Only required fields button below the input box displays only the required fields.
Click Execute to launch the API call.
You get this type of result:
Once the send connector has been created, use the following API call to retrieve its ID.
In the section PATH PARAMETERS:
exchangeService: Enter the name of your Exchange platform, which is in the form of "private-zz11111-1" or "dedicated-zz111111-1".organizationName: Enter the name of your Exchange platform, which is in the form of "private-zz11111-1" or "dedicated-zz111111-1".
Click Execute to launch the API call.
You get this type of result:
You can find the details of your send connector using this API call:
In the section PATH PARAMETERS:
exchangeService: Enter the name of your Exchange platform, which is in the form of "private-zz11111-1" or "dedicated-zz111111-1".id: Enter the ID of your send connector, obtained as a number in the previous step.organizationName: Enter the name of your Exchange platform, which is in the form of "private-zz11111-1" or "dedicated-zz111111-1".
Click Execute to launch the API call.
You get this type of result:
Configure an email address to use a send connector
To send emails via a send connector, you will need to link it to one or more email addresses.
Use the Exchange account setup API call to add your send connector ID to an email address:
In the section PATH PARAMETERS:
exchangeService: Enter the name of your Exchange platform, which is in the form of "private-zz11111-1" or "dedicated-zz111111-1".organizationName: Enter the name of your Exchange platform, which is in the form of "private-zz11111-1" or "dedicated-zz111111-1".primaryEmailAddress: Enter one of the email addresses of your Exchange platform, to which you want to attach the send connector.
In the EXAMPLE tab in the REQUEST BODY section, modify the values in the two fields below:
sendConnectorId: Enter the ID of your send connector, obtained as a number in the previous step.deleteVirus: Enter “true” instead of “false” to avoid getting an error when executing the API call.
Click Execute to launch the API call.
The result is as follows:
Test your send connector
If your configuration conforms to the information sent by the send connector provider, your email address will send its emails through this send connector. There is no particular handling to do for the sending. Simply send from the email address(es) attached to the sending connector.
To test your sending, send an email from an address that is attached to the send connector to a test address that you have chosen and that you can view. Once the test email has been sent, log in to the recipient email address and look at the email header to check that it has been sent through the send connector. If you need to do so, please refer to our guide on Retrieving email headers.
Header example
The email address newsletter@mydomain.ovh sends an email to john.smith@guides.ovh. The email address newsletter@mydomain.ovh has been attached to the send connector. The domain name of the send connector is sender-id.example.com
Here is an example of the header of an email sent from a Private Exchange that uses a send connector, in the context mentioned above:
<robert@hisdomain.ovh>
Return-Path: <bounces-249164590-newsletter=mydomain.ovh@sender-id.example.com>
Delivered-To: john.smith@guides.ovh
Received: from localhost (HELO queue) (127.0.0.1)
    by localhost with SMTP; 28 Feb 2023 09:51:02 +0200
Received: from unknown (HELO output28.mail.ovh.net) (192.168.11.93)
    by 192.168.1.2 with AES256-GCM-SHA384 encrypted SMTP; 28 Feb 2023 09:51:02 +0200
Received: from vr45.mail.ovh.net (unknown [10.101.8.45])
    by out28.mail.ovh.net (Postfix) with ESMTP id 4PQqLG4KHRzRxRQZj
    for <john.smith@guides.ovh>; Tue, 28 Feb 2023 07:51:02 +0000 (UTC)
Received: from in31.mail.ovh.net (unknown [10.101.4.31])
    by vr45.mail.ovh.net (Postfix) with ESMTP id 4PQqLF6ZBMz37ZHNP
    for <john.smith@guides.ovh>; Tue, 28 Feb 2023 07:51:01 +0000 (UTC)
Received-SPF: Pass (mailfrom) identity=mailfrom; client-ip=11.22.333.44; helo=sender-id.example.com; envelope-from=bounces-249164590-newsletter=mydomain.ovh@sender-id.example.com; receiver=john.smith@guides.ovh
Authentication-Results: in31.mail.ovh.net;
    dkim=pass (1024-bit key; unprotected) header.d=smtp.example.com header.i=@smtp.example.com header.b="HDetLEPl";
    dkim-atps=neutral
Received: from sender-id.example.com (sender-id.example.com [11.22.333.44])
    by in31.mail.ovh.net (Postfix) with ESMTPS id 4PQsPF43SEm78WdxQ
    for <john.smith@guides.ovh>; Tue, 28 Feb 2023 07:51:01 +0000 (UTC)
DKIM-Signature: v=1; a=rsa-sha256; c=relaxed/relaxed; d=smtp.example.com;
    q=dns/txt; s=mail; bh=gZnUUk4TldsnAE7L+M9zwjuOeOmD6FwV4Yyq99XN2a0=;
    h=from:subject:date:to:mime-version:content-type:list-unsubscribe:x-csa-complaints:list-unsubscribe-post;
    b=HDiySKAl0J78ByyGlPjCVc+zvEv/DP9NkfUdso8DkB5z1Lig4rfbqCLnD6SE6wh7sjsZMsae0gk
    Muy0Uur0tw2nWq/WI94O4grD/KAWWC+jo2w/1+0ol1VCQN2+zQEhM+HJj4pcnn+MfU/RrXLkXfDV
    BLfqJiRcWJCQ3fy3Gag=
Received: by smtp-relay.smtp.example.com with ESMTP id 12185513-794a-4762-b3ee-a4044d30975e; Tue Feb 28 2023 07:51:00 GMT+0000
X-Mailin-EID: MjAxMTY0NTkwfm5vLXJlcGx5QHRlc3QtbXV0dS5jb21%2BPDE2N2U1NdkfOTQ3MzQ1YWFiNzY3NWY3ZmJkMWUzZGJkQHRlYW1qZXJlbS5vdmg%2B25ead5LmQuc2VuZGVyLXNpYi5jb20%3D
To: <john.smith@guides.ovh>
Date: Tue, 28 Feb 2023 07:50:56 +0000
Subject: Test SBR 3 (SIB)
Message-Id: <12185193-354a-4762-b3ee-a40484d30975e@smtp-relay.smtp.example.com>
Origin-messageId: <167e568a947345aab7675f7fbd1e3dbd@mydomain.ovh>
Thread-Index: AQHZS0ljK1OFDltwD80S81Qo68wiBIQ==
Accept-Language: fr-FR, en-US
Content-Language: fr-FR
X-MS-Has-Attach:
X-MS-TNEF-Correlator:
x-mclm-sbr-processed: true
MIME-Version: 1.0
X-sib-id: 8dUZE2ztHUSpKwRy5O0fOawZARq-Dh8BNrytyOAwG9i3ybk5nxMfOvwZLeo778wLsYKejwcxuIEci6PKSzh3d4X7w126g-32syWTSQKRPQZTyxdXonPcl3lqm3pXkNolSaGbfG4dHY38OoEF7aXWMGvRsJtNlvsy1sEx8vGFOpxg_3cK
X-CSA-Complaints: csa-complaints@eco.de
From: <newsletter@mydomain.ovh>
Remove a send connector attached to an email address
To remove a send connector attached to an account from the Exchange platform, use the setup API call for the Exchange account concerned in order to change the ID of your send connector to the ID of the send server from your Exchange platform:
In the section PATH PARAMETERS:
exchangeService: Enter the name of your Exchange platform, which is in the form of "private-zz11111-1" or "dedicated-zz111111-1".organizationName: Enter the name of your Exchange platform, which is in the form of "private-zz11111-1" or "dedicated-zz111111-1".primaryEmailAddress: Enter one of the email addresses of your Exchange platform, to which you want to attach the send connector.
In the EXAMPLE tab in the REQUEST BODY section, modify the values in the two fields below:
sendConnectorId: Enter the ID of your send connector, obtained as a number in the previous step.deleteVirus: Enter “true” instead of “false” to avoid getting an error when executing the API call.
Click Execute to launch the API call.
The result is as follows:
Set a send connector as the default send server
You can automatically attach a send connector each time you add an Exchange account to your platform. This way, all of the accounts that will be added will pass through the send connector that you have defined by default.
To do this, use the following API call:
In the section PATH PARAMETERS:
domainName: Enter the domain name that will benefit from the send connector.exchangeService: Enter the name of your Exchange platform, which is in the form of "private-zz11111-1" or "dedicated-zz111111-1".organizationName: Enter the name of your Exchange platform, which is in the form of "private-zz11111-1" or "dedicated-zz111111-1".
In the EXAMPLE tab in the REQUEST BODY section, modify the values in the two fields below:
sbrDefault: Leave empty.sendConnectorIdDefault: Enter the ID of your send connector, obtained as a number in this step.
Click Execute to launch the API call.
The result is as follows:
To reset the default send server for the Exchange platform, type "0" in the sendConnectorIdDefault box.
Lists of other API calls related to send connectors
- Retrieve the send connectors already created on an Exchange service:
- Delete an existing send connector:
- Retrieve the details of an existing send connector:
- Edit an existing send connector:
- Change the authentication method of an existing send connector:
Go further
Adding a domain name to your Exchange service
For specialised services (SEO, development, etc.), contact OVHcloud partners.
If you would like assistance using and configuring your OVHcloud solutions, please refer to our support offers.
Join our community of users.

