Configuring your Email Pro solution
9397 Views
Objective
You have just purchased an Email Pro solution, which gives you affordable professional email addresses to support or start up your business.
This guide explains the steps to correctly configure your Email Pro solution.
Requirements
- An Email Pro solution
- An email confirming that your Email Pro solution has been set up
- A domain name
OVHcloud Control Panel Access
- Direct link: Email Pro
- Navigation path:
Web Cloud>Email Pro> Select your platform
Instructions
Step 1: Add your domain name
The name of an Email Pro service in the OVHcloud Control Panel begins with emailpro-, contains part of your NIC handle, and ends with a number (1 for the first Email Pro service installed, 2 for the second, etc.).
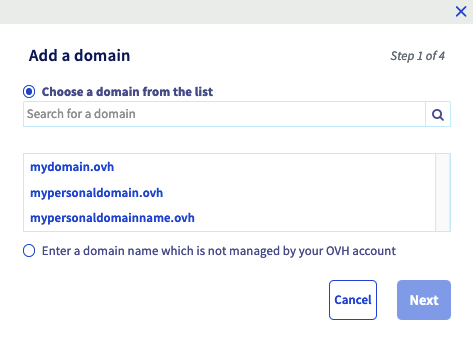
After ordering your Email Pro service, a window will automatically appear prompting you to Add a domain. If the window does not appear, go to the Associated domains tab, then click on the Add a domain button.
You will need to choose an option:
- Select a domain from the list. Only the domain names that you manage are displayed in the OVHcloud Control Panel. If the domain name is registered with OVHcloud but does not appear in your Control Panel, you will need to add it with the option to "Enter a domain name not managed by your OVHcloud account".
- Enter a domain name that is not managed by your OVHcloud account. Choose this option if the domain name concerned is registered with OVHcloud, but configurable from another customer account, or if your domain name is registered with another registrar. You will need to be able to modify the domain name’s configuration (its DNS zone) in order for the Email Pro service to work correctly.
Once you have selected an option, click on the Next button.
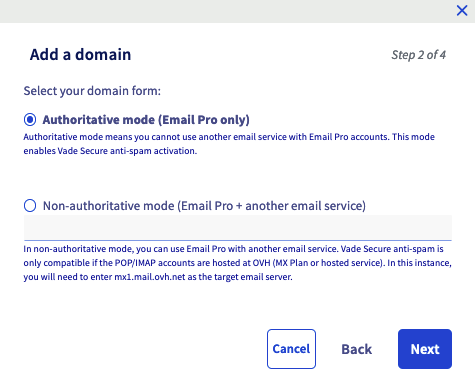
The window will then show information on configuring modes.
-
If you have entered a non-OVHcloud domain name, non-authoritative mode will be configured by default.
-
If you have selected a domain name managed by OVHcloud from the list, you will need to choose between two modes.
- Authoritative: Choose this if your Email Pro solution is the only email solution you use with your domain name. It does not allow the use of another email solution with your service.
- Non-authoritative: Choose this if you use the Email Pro solution and another email solution that uses the same domain name.
Understanding Authoritative and Non-Authoritative Modes
- When an email is sent to your Email Pro (Inbound mail server Email Pro) platform in authoritative mode, this means that all of your domain name’s email addresses are only hosted on this platform.
For example, if you send an email to the address mary.johnson@mydomain.ovh, the Email Pro server Inbound mail server Email Pro will send a failure message to the sender, because that address does not exist on the Email Pro server "Inbound mail server Email Pro".- When an email is sent to your Email Pro (Inbound mail server Email Pro) email platform in non-authoritative mode, this means that the email addresses for your domain name are divided between your main email platform (Inbound mail server Email Pro) and another email service (Inbound mail server MX Plan).
For example, if you send an email to the address mary.johnson@mydomain.ovh, the Email Pro "Inbound mail server Email Pro" will send the email to the MX Plan server Inbound mail server MX Plan so that it can deliver it.

If you receive the message "authoritative domain detected" when adding your domain name to your email platform, this means that this domain name is declared in authoritative mode on another email platform. You will need to switch it to non-authoritative mode for both platforms so that they can coexist.
If you choose non-authoritative mode and use:
- OVHcloud email (Exchange or MX Plan): Enter mx1.mail.ovh.net as the target email server (works the same way with mx0.mail.ovh.net, mx2.mail.ovh.net, mx3.mail.ovh.net, mx4.mail.ovh.net).
- Email external to OVHcloud (email solution from another provider, private email server): In the target email server box, enter the host name of the incoming server for this external service, and ensure that it authorises email requests from your Email Pro service.
The choice of mode is not definitive, and can be changed later from the OVHcloud Control Panel.
Click on the Next button to continue adding the domain.
If you have selected a domain name managed by OVHcloud, it can be configured automatically. To do this, tick the boxes you want, and click the Next button to continue adding the domain.
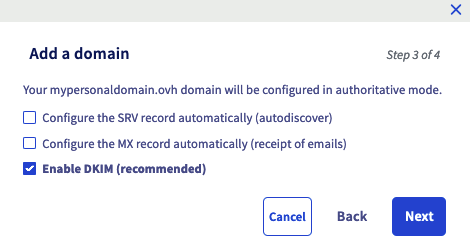
- SRV: A DNS record that automatically configures your email software when you add your email address to it.
- MX: DNS record for email servers required to receive emails on the domain name concerned.
- DKIM: Setting up an encrypted digital signature to secure email exchanges. Refer to our guide on How to improve email security with a DKIM record for more information.
For a non-OVHcloud domain name, follow Step 3.
At the end of the configuration process, check the information displayed, then click on the Confirm button to start adding the domain.
Step 2: Configure your domain name
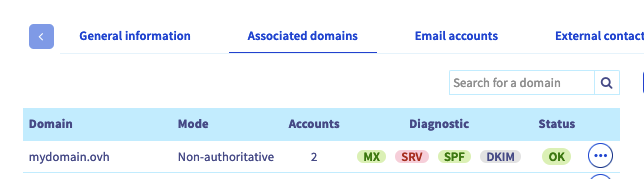
Once you have added the domain name as an associated domain, check its configuration using the table that pops up.
You can use the Diagnosis column to check the domain name’s DNS configuration. A red box will appear if these configurations need to be changed. There are two possibilities:
-
Automatic configuration when you add an OVHcloud domain name: If you have just made the change, it may take a few hours before it is displayed in the OVHcloud Control Panel.
-
Manual configuration for a non-OVHcloud domain name: Click on the red box to view the changes you will need to make.
- For a CNAME record, you can use our guide on "Creating a CNAME record when adding an associated domain".
- For an MX record, please refer to our guide on "Adding an MX record to your domain name’s configuration".
- For an SRV record, modify your DNS zone using the information provided when you click on the box. You can use our guide on "Editing an OVHcloud DNS zone" to add this record.
- For an SPF record, modify your DNS zone using the information provided when you click on the box. You can use our guide on "How to improve email security with an SPF record" to add this record. For a DKIM record, modify your DNS zone using the information provided when you click on the box. You can refer to our guide on "How to improve email security with a DKIM record" to add this record.
Step 3: Configure the Email Pro accounts
To configure your email accounts, go to the Email accounts tab. The table displays the accounts that you have ordered in this format: “@configureme.me”.
To configure them, click the ... icon then Edit.
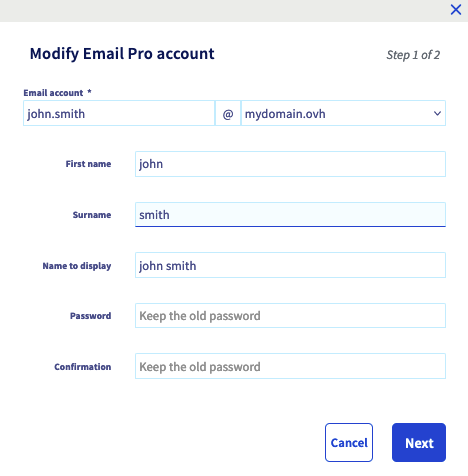
Enter the information requested.
- Email account: Enter the name that your email address will bear (your first name.surname, for example), and select the domain in question from the list.
The name of your email address must meet the following conditions:
- Minimum 2 characters
- Maximum 32 characters
- No accents
- No special characters, except for the following characters:
.,,,-and_
- First name: Enter a first name.
- Name: Enter a name.
- Display name: Enter the name that will be displayed as a sender when emails are sent from this address.
- Password and confirmation: Set a strong password consisting of at least 8 characters and including at least one upper-case letter, one lower-case letter, and one number. For security reasons, we recommend not using the same password twice, choosing one that does not contain any personal information (e.g. your surname, first name and date of birth), and renewing it regularly.
The password must meet the following requirements:
- Minimum 9 characters
- Maximum 30 characters
- No accents
Once the information is complete, click on the Next button, check the information displayed, then click Confirm to start configuring the account.
Repeat this step as necessary according to the number of accounts you have. You can order additional accounts using the Order accounts button.
Step 4: Use your email addresses
Once you have configured your accounts, you can start using them straight away. To do this, OVHcloud offers an web application, available here. You will need to enter your email address and password to log in.
If this is your first time logging in to OWA with this email address, you will be prompted to set the interface language and time zone. Next, click Save to continue.
Time zones are listed according to the UTC (Coordinated Universal Time) standard, not in alphabetical order of cities.
Example: For Western Europe, it is UTC +1 (Brussels, Copenhagen, Madrid, Paris).
If you would like to configure your email address on an email client or device (e.g. a smartphone or tablet), you can refer to our configuration guides. If you simply need the information required to configure your Email Pro account, the settings to use are listed below:
| Server type | Server name | Security type | Port |
|---|---|---|---|
| Incoming | pro?.mail.ovh.net | SSL/TLS | 993 |
| Outgoing | pro?.mail.ovh.net | STARTTLS | 587 |
In our guides, we use as the server name: pro?.mail.ovh.net. You will need to replace the "?" with the actual number indicating the appropriate server for your Email Pro service.
You can find this information in the General Information tab of your Email Pro service, in the Connection box.
Go further
Using the Outlook Web App with an Exchange account
Adding an alias to your email account
Creating automatic replies in OWA
Managing the billing for your Email Pro accounts
Managing the security policy of an email service
For specialised services (SEO, development, etc.), contact OVHcloud partners.
If you would like assistance using and configuring your OVHcloud solutions, please refer to our support offers.
Join our community of users.

