How to Automate Server Backups with Plakar
59 Views
Objective
This guide aims to show you how to:
- Set up a dedicated backup server capable of automatically protecting your servers.
- Configure Plakar to manage backups in a secure, encrypted, and deduplicated way.
- Schedule automated backups and monitor their status through an intuitive web interface.
- Centralise your data in resilient Object Storage, ensuring availability in case of failure.
By the end of this guide, you will have a reliable, fully automated backup system ready for a professional infrastructure.
Requirements
- A VPS server or a dedicated server.
- Administrative (sudo) access to your server via SSH.
- Plakar installed on the backup server (or the ability to install it).
- An S31-compatible Object Storage service to host your backups.
- A basic understanding of GNU/Linux system administration.
OVHcloud Control Panel Access
- Direct link: Public Cloud Projects
- Navigation path:
Public Cloud> Select your project
Architecture Overview
The automated backup system is built around three main components.
-
Backup Server (Dedicated VPS):
- Runs Plakar, which handles backup scheduling, deduplication, and encryption.
- Monitors all operations through an intuitive web interface.
-
Source Servers:
- The servers whose data needs to be backed up.
- Connected to the Backup Server via secure SSH/SFTP, enabling fully automated backups without manual intervention.
-
Object Storage (S3-compatible):
- Receives and stores backups in a resilient and secure manner.
- Keeps encrypted and deduplicated snapshots, ensuring data availability in the event of a failure.

Instructions
Step 1: Set Up Object Storage
Before performing any backups, you need an S3-compatible Object Storage to store your data securely and independently from the backup server.
Using Object Storage ensures your backups remain available even if the backup server is lost or fails.
Access Object Storage
In the left-hand menu, go to Object Storage.
Create an Object Storage User
- Open the
Userstab. -
Click
Create user.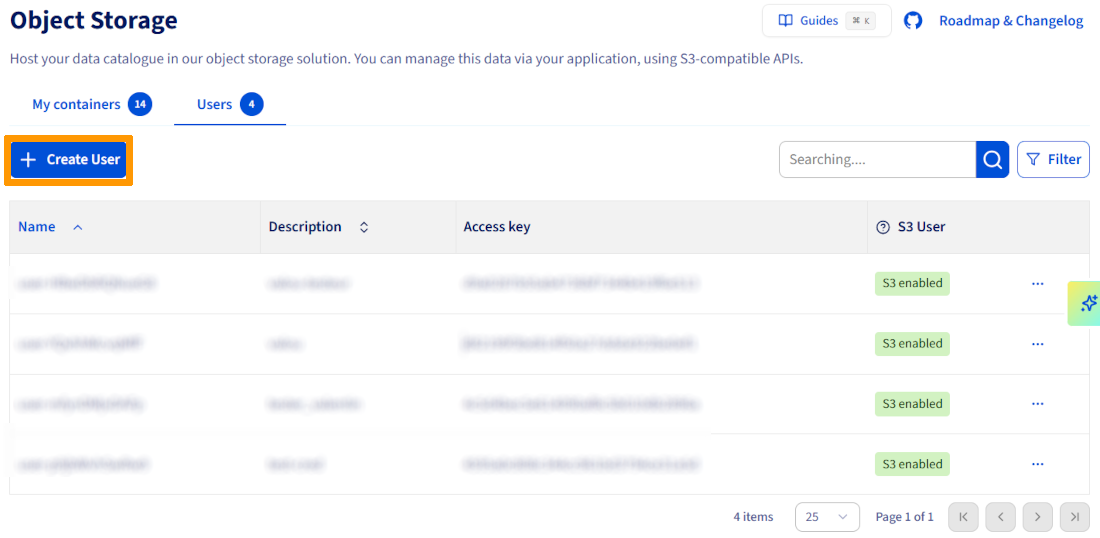
-
Give the user a description (e.g. plakar-backup).
- Download and securely store the S3 credentials:
- Access Key
- Secret Key
Note: These credentials will be used by Plakar to access your Object Storage.
Create an Object Storage Bucket
- Click
Create an Object Storage container. - Configure the container:
- Name: plakar-backups (or equivalent)
- Container API: S3-compatible
- Container type: choose according to your needs (3-AZ for high availability, 1-AZ for cost efficiency)
- Region: select the region closest to your servers
- User selection: select the user you created
- Click
Createto confirm.
For more details on creating and managing an Object Storage bucket, you can follow our guide Object Storage – Getting started with Object Storage.
Step 2: Provision the Backup Server
To run Plakar and automate your backups, you need a dedicated VPS.
Create a VPS
- Go to
Bare Metal Cloud>VPS. -
Click
Order, thenConfigure your VPS.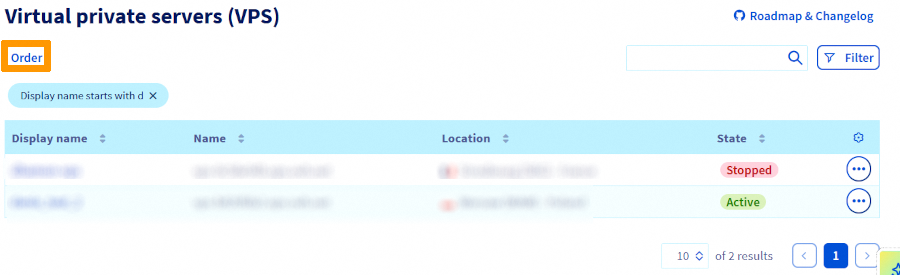
-
Choose a configuration that fits your needs:
- Model: general-purpose (e.g., VPS-1, 2 vCores, 8 GB RAM, 75 GB storage)
- Region: close to your Object Storage for faster backups
- Image: Ubuntu 25.04 (or any other supported distribution)
- Place your VPS order.
Access the VPS
Connection details (IP, temporary username, password) are sent via a secure email.
Log in for the first time via SSH:
Replace ubuntu with your actual username and <VPS_IP> with the IP address provided in your delivery email.
On first login, you will be prompted to change the temporary password. Once changed, the session will close automatically. Reconnect using your new password.
For more information on initial VPS setup and security, see our guide Getting started with a VPS.
Step 3: Install Plakar
Now that your VPS is ready, it’s time to install Plakar, which will handle backups, encryption, and deduplication.
Connect to the VPS
From your local machine or directly on the VPS, connect via SSH:
Replace ubuntu with your actual username and <VPS_IP> with your server’s IP address.
Install Plakar
Follow the official Plakar installation guide for your distribution.
Verify that Plakar is installed:
Step 4: Configure Object Storage in Plakar
In this step, you will connect Plakar to your S3 Object Storage and initialize it as a Kloset Store, enabling secure and encrypted backup storage.
Install the S3 integration in Plakar
First, log in to Plakar so you can install integrations:
Then, on your VPS, install the S3 package:
Add Object Storage as a Storage Connector
Storage connectors in Plakar define where your backups are stored. By configuring a connector once, you can reference it in all future backup commands using a simple alias.
Add your OVHcloud Object Storage as a storage connector using the S3 endpoint and credentials you generated in Step 1:
Replace:
- : your OVHcloud S3 endpoint (e.g., s3.eu-west-par.io.cloud.ovh.net)
- : name of the container you created (e.g., plakar-backups)
- and : credentials generated in Step 1
- : passphrase to encrypt your backups (use single quotes if it contains special characters)
By configuring the passphrase in the storage connector, automated backups can run without prompting for credentials each time.
Initialize the Kloset Store
Finally, initialize your Object Storage bucket as a Kloset Store:
Since the passphrase was already configured when adding the storage connector, Plakar will automatically use it to encrypt all data before sending it to Object Storage.
Once this step is complete, your backup server is fully connected to Object Storage and ready to receive encrypted and deduplicated snapshots.
Step 5: Configure SSH Access to Source Servers
For Plakar to back up your servers, it needs access to their files via SSH. SSH key-based authentication is recommended: it is more secure than passwords and allows automated backups without manual intervention.
Install the SFTP integration
On the backup server, install the SFTP integration:
Generate SSH keys
Generate an SSH key pair on the backup server:
Press Enter to leave the passphrase empty (recommended for automated backups).
Copy the public key to the source servers
Copy the public key to each server you want to back up:
Replace user with the username that has access to the files you want to back up.
Test SSH access
Ensure the backup server can connect without a password:
Create SSH host aliases (recommended)
SSH host aliases simplify commands and centralise connection settings. Instead of typing the full hostname, port, and key path every time, you can use a short alias.
This makes Plakar commands cleaner and reduces the chance of errors.
Add a host alias in ~/.ssh/config:
Test the alias to ensure it works:
If the message Alias works appears, your SSH aliases are correctly configured. You can now use these aliases in all Plakar commands, simplifying backup management.
Step 6: Configure Backup Sources
In Plakar, source connectors define which servers and directories should be backed up. Once configured, these sources can be reused across multiple backup commands, making management easier and reducing the risk of errors.
Add source connectors
For each server you want to back up, add a source connector:
- Replace
source-1andsource-2with the SSH aliases you created earlier. /var/wwwcorresponds to the directory you want to back up on each server.- You can add multiple sources, even on the same server or across different servers.
Verify source configuration
To ensure all sources are correctly configured:
This command lists all configured source connectors with their paths, allowing you to quickly verify that all servers and directories to be backed up are correctly defined.
Step 7: Run Your First Backup
Before setting up automated backups, it’s important to test the configuration manually.
This ensures SSH connections work, Object Storage credentials are correct, and Plakar can back up your data successfully.
Back up a single source
To test a backup for a single source:
- Plakar will connect to the source server via SSH/SFTP, read the files, deduplicate, encrypt, and upload them to Object Storage.
- Monitor the progress to ensure the backup completes successfully.
Back up multiple sources
To back up multiple servers at once:
- The sources defined in Step 6 will be backed up to the same Kloset Store.
- This command is useful for testing a full backup before moving to automation.
Verify backups
To confirm that backups were successfully created, list snapshots in your Kloset Store:
- This command lists the snapshots in the Kloset Store, showing their timestamp and snapshot ID.
- Ensure the snapshots correspond to the sources you just backed up.
Step 8: Schedule Automated Backups
Manual backups are useful for testing, but in production it is essential to run backups automatically. Plakar includes a built-in scheduler to handle scheduling and to verify backups after they are created.
Create the scheduler configuration file
Create a file named scheduler.yaml in your home directory:
This configuration:
- Defines two backup tasks (one per source)
- Runs each backup every 24 hours (interval: 24h)
- Verifies each backup after creation (check: true)
Start the scheduler
To start the Plakar scheduler using your configuration:
- The scheduler runs in the background and performs backups according to the defined interval.
- Plakar ensures that each task is checked and successfully completed after execution.
For more information on scheduler configuration, refer to the official Plakar Scheduler documentation.
Step 9: Configure systemd Services for Plakar
Currently, the Plakar scheduler and UI only run within your SSH session. If the VPS reboots, these processes will stop.
To ensure continuous operation, configure them as systemd services, so they start automatically on boot and restart in case of failure.
Create the systemd service for the scheduler
Creating a systemd service ensures the scheduler starts automatically when your VPS boots and restarts if it crashes.
Create the systemd service file /etc/systemd/system/plakar-scheduler.service:
Replace ubuntu with your actual username if required.
Create the systemd service for the UI
The Plakar Web UI must also run continuously so you can monitor your backups at any time, not only when connected via SSH.
Create a systemd service for the Plakar Web UI at /etc/systemd/system/plakar-ui.service:
Replace ubuntu with your actual username if required.
If Plakar is installed in a different location, update the path accordingly. Use the which plakar command to find the correct path.
Enable and start the services
Reload systemd and enable the services:
Verify that the services are running:
Access the Plakar UI
The Plakar Web UI requires an access token for security reasons. You can either define a custom token or use the token automatically generated by Plakar.
Set a custom token (recommended)
Set the PLAKAR_UI_TOKEN environment variable before starting the UI service. Update your systemd service file:
Replace your-secure-token-here with a strong token of your choice (for example, a UUID or a random string).
Reload systemd and restart the service:
Open your browser and access the UI: http://<YOUR_VPS_IP>:8080?plakar_token=your-secure-token
Use an automatically generated token
If you do not set PLAKAR_UI_TOKEN, Plakar will generate a random token.
To retrieve it:
Look for a line similar to:
Copy the token from the URL and open the UI: http://your-vps-ip:8080. If prompted, paste the token to access the interface.
For production use, configure a firewall to restrict access to port 8080 to only your IP addresses, or set up a reverse proxy with SSL.
Troubleshooting
- Authentication errors: Verify your SSH keys and that the user has read permissions on the source servers.
- Cannot connect to Object Storage: Check your S3 credentials, endpoint, and passphrase (command
plakar store show ovh-s3-backups). - Permission denied on source servers: Ensure the SSH user can read the directories to be backed up.
- Services won’t start after reboot: Check the service status and logs (
systemctl status/journalctl -u).
You can also run the Plakar UI locally on your own computer by installing Plakar and configuring the same store with your OVHcloud S3 credentials. This allows you to access backups without connecting to the VPS.
Go further
Join our community of users.
1: S3 is a trademark of Amazon Technologies, Inc. OVHcloud's service is not sponsored by, endorsed by, or otherwise affiliated with Amazon Technologies, Inc.

