How to use the backup storage on a Dedicated Server
23856 Views
Objective
OVHcloud dedicated servers include additional backup space to store important data and configuration files. This space is scalable, secure and independent of the main server.
This guide explains how to enable and use your storage space.
We recommend to consult the product page as well for further details about the service.
Note that this guide is not applicable for OVHcloud US services.
Requirements
- A dedicated server in your OVHcloud account
OVHcloud Control Panel Access
- Direct link: Dedicated Servers
- Navigation path:
Bare Metal Cloud>Dedicated servers> Select your server
This feature might be unavailable or limited on servers of the Eco product line.
Please visit our comparison page for more information.
Instructions
Activating the backup storage
On the Backup storage tab, click the Enable backup storage button.

Click the Confirm button in the popup window.
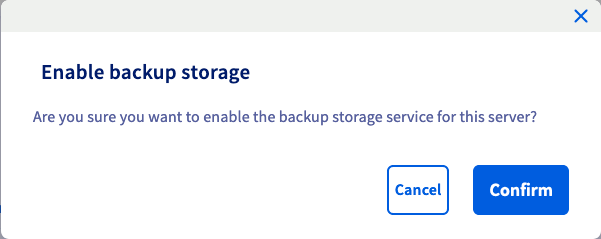
Your backup storage will be configured within a few minutes. A confirmation email will be sent as soon as it is ready.
Managing access control
Access to the backup storage is restricted by IP address according to an access control list (ACL). Only IPs linked to your OVHcloud customer account will be able to access the storage, once they are whitelisted in the ACL. The access protocols (FTP, NFS and CIFS) are not authorised by default but have to be selected when adding IP addresses.
Adding a backup access
On the Backup storage tab, click on the button Add an access.
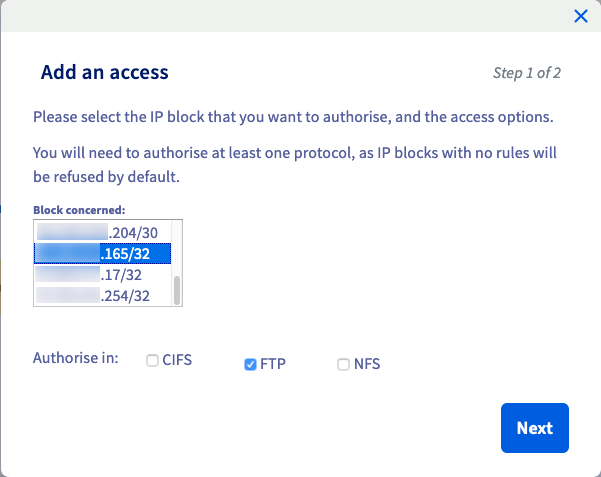
You will then need to select the IP block that you want to authorize. After selecting the IP block, select the protocol(s) for the access, and click the Next button.
Only IP blocks in your OVHcloud customer account can be added to the ACL from your Control Panel.
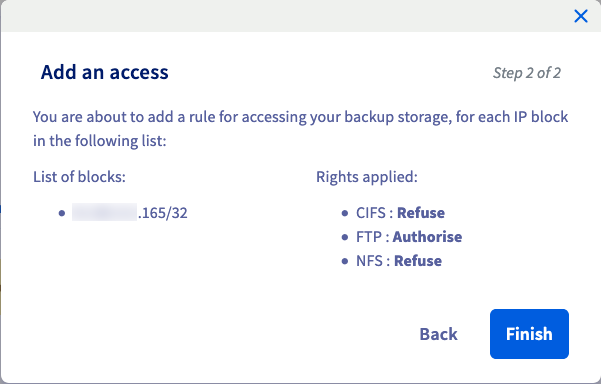
Confirm by clicking on Finish. You will now be able to access your server's backup storage from the IP block you have selected.
Modifying or deleting a backup access
Once the service is enabled, your ACL table will be displayed in the Backup storage tab. Click on ... in the row of an IP block to open the access menu.
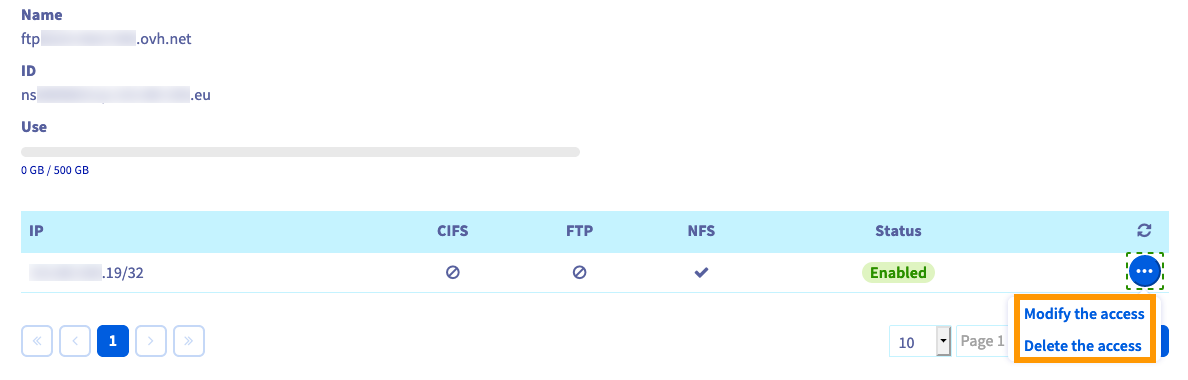
To change the protocols for an authorized IP block, click on Modify the access and select/deselect protocols in the popup window. Save the changes by clicking on Confirm.
To revoke authorization for an IP block, click on Delete the access and then on Confirm in the popup window.
Accessing the backup storage from an IP address outside of your account
Access to the storage space of your dedicated server is restricted to IP addresses linked to your OVHcloud customer acccount.
In order to add other IP addresses from which to access, you can use the OVHcloud API. This will allow you to retrieve your backup data from a different service.
Only OVHcloud IP addresses can be authorized.
Log in to the OVHcloud API console with your customer account credentials and use the following call:
Edit the parameters as follows:
serviceName: Enter the internal name of your server (ns1111111.ip-203-0-113.eu).cifs: Set totrueif applicable.ftp: Set totrueif applicable.ipBlock: Enter the IP address that will have access, in the form203.0.113.100/32.nfs: Set totrueif applicable.
Click the button EXECUTE.
To verify that your IP address is authorized, use the following call:
Resetting your password
On the Backup storage tab, click on the button Forgotten your password?.
If you click on Confirm in the popup window, a password recovery email will be sent to the email address of your admin contact. Follow the instructions in the email to reset your password.
Deleting the backup storage
On the Backup storage tab, click on the button Delete backup storage.
If you click on Confirm in the popup window, the backup storage will be disabled within a few minutes. All data on the storage space will be deleted.
Ordering more disk space
On the Backup storage tab, click on the button Order disk space.
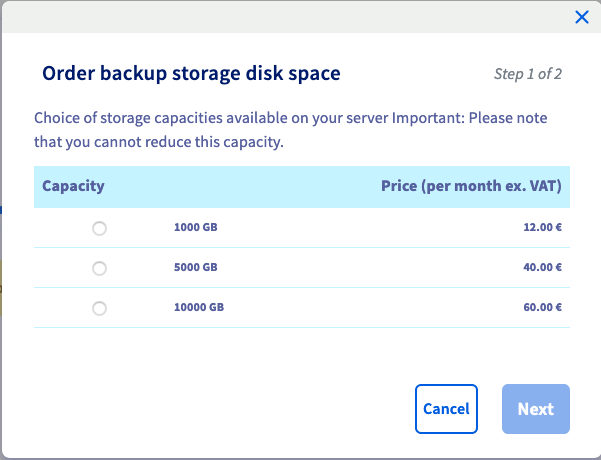
Select the additional storage capacity you would like to order and then click on the Next button.
Take note of the pricing and contract information in the next window and click on Confirm.
An order will be created and once your payment has been processed, you will be notified about the successful expansion of the space.
Using the backup storage
The backup storage service does not automatically back up your data, it only provides the space and the access protocols. It is your responsibility to implement an adequate backup strategy using the tools of your choice.
The backup storage service has a limit of three simultaneous connections on an IP.
To retrieve the Hostname of your backup storage, click on the Backup Storage tab in the interface of the dedicated server concerned. The Hostname is usually written as ftpback-rbxX-YYY.ip-Z.Z.Z.net or ftpback-bhsX-YYY.ip-Z.Z.Z.net.
FTP/FTPS
ncftp (for Linux)
To save individual files to your backup storage, you can use the following command:
Please note that this command does not support the FTPS protocol. If you need secure transfer you should use lftp or curl instead.
The code example above contains variables, which you will need to substitute with your own values.
- FtpUsername : Your FTP username
- FtpPassword: Your FTP password
- HostName: The host name of your backup storage
- FolderLocation: The path to the target folder where you want to save the file
- File: The name of the file you want to save
Backing up a folder is done by creating a folder archive, and then uploading it all with one command:
The code example above contains variables, which you will need to substitute with your own values.
- FolderName: The path to the folder you want to back up
- FtpUsername: Your FTP username
- FtpPassword: Your FTP password
- HostName: The host name of your backup storage
- ArchiveName: The name of the folder you want to back up
To download an archive file from your backup storage, you can use the following command:
The code example above contains variables, which you will need to substitute with your own values.
- FtpUsername: Your FTP username
- FtpPassword: Your FTP password
- HostName: The host name of your backup storage
- LocalFolder: The path to the local folder where you want to save the file
- File: The path to the file you want to download
Curl (for Linux)
To use FTPS you must change the hostname of the backup storage. For example, if the name of your backup storage is ftpback-rbxX-YYY.ip-Z.Z.Z.Z.net, you need to change it to ftpback-rbxX-YYY.mybackup.ovh.net. You also need to add the -ssl flag to the commands below.
If the backup storage is located in Canada (BHS), you will need to change it to ftpback-bhsX-YYY.mybackup.ovh.ca.
To save individual files to your backup storage, you can use the following command:
The code example above contains variables, which you will need to substitute with your own values.
- File: The name of the file you want to save
- FtpUsername: Your FTP username
- FtpPassword: Your FTP password
- HostName: The host name of your backup storage
- FolderLocation: The path to the target folder where you want to save the file
Backing up a folder is done by creating a folder archive, and then uploading it all with one command:
The code example above contains variables, which you will need to substitute with your own values.
- FolderName: The path to the folder you want to back up
- FtpUsername: Your FTP username
- FtpPassword: Your FTP password
- HostName: The host name of your backup storage
- FolderLocation: The path to the target folder where you want to save the folder
- ArchiveName: The name of the folder you want to back up
To download an archive file from your backup storage, you can use the following commands:
The code example above contains variables, which you will need to substitute with your own values.
- FtpUsername: Your FTP username
- FtpPassword: Your FTP password
- HostName: The host name of your backup storage
- LocalFolder: The name of the local folder where you want to save the file
- File: The path to the file you want to download
lftp (for Linux)
lftp uses FTP+SSL/TLS by default. So you must change the host name of the backup storage. For example, if the name of your backup storage is ftpback-rbxX-YYY.ip-Z.Z.Z.Z.net, you need to change it to ftpback-rbxX-YYY.mybackup.ovh.net.
If the backup storage is located in Canada (BHS), you will need to change it to ftpback-bhsX-YYY.mybackup.ovh.ca.
To save individual files to your backup storage, you can use the following command:
The code example above contains variables, which you will need to substitute with your own values.
- File: The name of the file you want to save
- FtpUsername: Your FTP username
- FtpPassword: Your FTP password
- HostName: The host name of your backup storage
- FolderLocation: The path to the target folder where you want to save the file
Backing up a folder is done by creating a folder archive, and then uploading it all with one command:
The code example above contains variables, which you will need to substitute with your own values.
- FolderName: The path to the folder you want to back up
- FtpUsername: Your FTP username
- FtpPassword: Your FTP password
- HostName: The host name of your backup storage
- FolderLocation: The path to the target folder where you want to save the folder
- ArchiveName: The name of the folder you want to back up
To download an archive file from your backup storage, you can use the following commands:
The code example above contains variables, which you will need to substitute with your own values.
- FtpUsername: Your FTP username
- FtpPassword: Your FTP password
- HostName: The host name of your backup storage
- LocalFolder: The name of the local folder where you want to save the file
- File: The path to the file you want to download
Filezilla (for Windows)
After installing FileZilla on your server, you can configure it to connect to your backup storage using the FTP credentials that were emailed to you when you activated the Backup storage. To connect successfully, you will need the host name and password of your Backup storage.
NFS
The backup storage is only compatible with NFSv3. First, ensure that you have authorised your IP ranges to access the storage and use the NFS protocol. Depending on your Linux operating system, you might have to install the NFS client and start the NFS/portmap service.
Once you have the NFS client installed and portmap running, you can mount the NFS share like a normal partition as shown below:
The code example above contains variables, which you will need to substitute with your own values.
- HostName: The host name of your backup storage
- ServiceName: The name of your server (
ns1111111.ip-203-0-113.eu) - FolderMount: The folder where you want to mount the NFS share
Once the share is mounted, you can use commands like cp and rsync like on a normal directory.
CIFS
Windows
Log on to your server, open the command prompt, and type the following command:
The code example above contains variables, which you will need to substitute with your own values.
- HostName: The host name of your backup storage
- ServiceName: The name of your server (
ns1111111.ip-203-0-113.eu)
You might receive the following error message:
To correct this error, you need to modify the Windows registry. To do this, open the Registry Editor (regedit), then navigate to the key HKLM\SYSTEM\CurrentControlSet\Services\LanmanWorkstation\Parameters.
Then set the value of the parameter AllowInsecureGuestAuth to "1".
Find more information on this topic on the Microsoft support pages.
Linux
Establish an SSH connection to your server, and type the following command:
In order to mount shares by hostname (as opposed to IP addresses), the mount.cifs utility is required. It is usually part of the cifs-utils package.
mount.cifs is a wrapper which resolves hostnames and adds the ip= parameter to the mount parameters passed to the kernel.
Without mount.cifs, attempts to mount by hostname will result in the following error:
text
mount: /mnt/FolderMount: mount(2) system call failed: No route to host.
       dmesg(1) may have more information after failed mount system call.
SMB version 2.1 and newer are currently not supported.
The code example above contains variables, which you will need to substitute with your own values.
- HostName: The host name of your backup storage
- ServiceName: The name of your server (
ns1111111.ip-203-0-113.eu) - FolderMount: The folder where you want to mount the share (it must already exist)
Go further
Backing Up Data and Databases on a Dedicated Server
Configuring Storage on a HGR-STOR-2 Dedicated Server
Join our community of users.

