How to configure IPv6 on a VPS
3292 Views
This article is about Primary IPv6 configuration on a public interface. You can also configure Additional IP addresses on your VPS using this guide.
Objective
IPv6 is the latest version of the Internet Protocol. Each OVHcloud VPS server is delivered with an IPv4 address and an IPv6 address. However, only IPv4 is configured by default. If you need to configure IPv6, it has to be set up manually on your system.
This guide explains how to configure IPv6 on your OVHcloud VPS using various methods.
OVHcloud is providing you with services for which you are responsible, with regard to their configuration and security. Since we have no administrative access to your devices, it is your responsibility to manage the software and to ensure they function correctly.
This guide is designed to assist you in common tasks as much as possible. Nevertheless, we recommend contacting a specialised provider and/or the software publisher for the service if you encounter any difficulties. We will not be able to assist you ourselves. You can find more information in the Go further section of this guide.
Requirements
- A Virtual Private Server in your OVHcloud account
- Administrative access (sudo) via SSH or remote desktop (Windows) to your server
- A basic understanding of networking
- Access to the OVHcloud API (optional)
OVHcloud Control Panel Access
- Direct link: VPS management
- Navigation path:
Bare Metal Cloud>Virtual private servers> Select your VPS
Instructions
The following sections contain configurations for the distributions we currently offer, as well as the most commonly used distributions/operating systems. The first step is always to log in to your server via SSH or a GUI login session (RDP for a Windows VPS). The examples below presume you are logged in as a user with elevated permissions (Administrator/sudo).
Please note that on the recent Linux operating systems we offer for VPS, the IPv6 address is configured by default. If this is the case, you don't need to configure it. Please check your operating system's configuration file before making any changes.
Please take note of the following terminology that will be used in code examples and instructions of the guide sections below:
| Term | Description | Example |
|---|---|---|
| YOUR_IPV6 | The IPv6 address assigned to your service | 2001:xxxx:xxxx:xxxx:xxxx:xxxx:xxxx:yyyy |
| IPv6_PREFIX | The prefix (or netmask) of your IPv6 block, usually 128 | 2001:xxxx:xxxx:xxxx::/128 |
| IPv6_GATEWAY | The gateway of your IPv6 block | 2001:xxxx:xxxx:xxxx:xxxx:xxxx:xxxx:zzzz |
Step 1: Retrieve the necessary network information
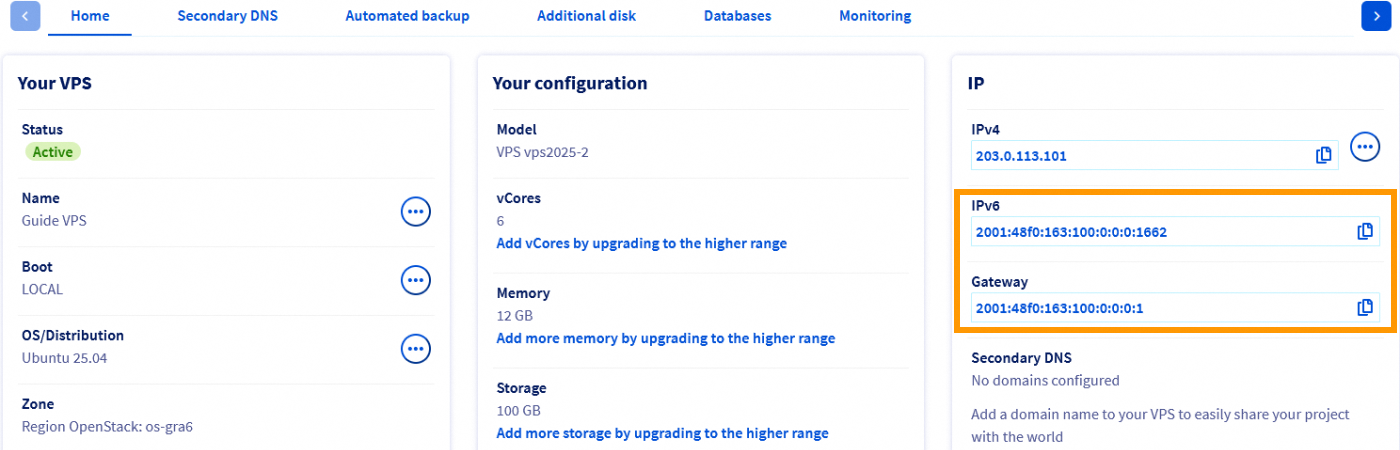
The first step is to identify the IPv6 address and the IPv6 gateway assigned to your server.
The IPv6 address and the IPv6 gateway assigned to your server will appear in the IP section of the Home tab. Once you have copied them, continue with applying the IPv6 configuration.
Go to the OVHcloud console API page:
- Click
Authenticationin the upper left corner. - Select
Login with OVHcloud SSO. - Enter your OVHcloud credentials.
- Click
Authorizeto allow performing API calls through the console.
Use this call to retrieve the IPv6 address assigned to your server:
The following call allows you to recover the IPv6 gateway assigned to your server:
Once you have retrieved these addresses, continue with applying the IPv6 configuration.
Step 2: Apply the IPv6 configuration
Once you have gathered the necessary information for the IPv6 configuration, log in to your VPS via SSH. If you require assistance, please refer to this guide: Introduction to SSH.
There are several ways to apply the IPv6 configuration. Use whichever method best suits your situation and requirements:
- Non-persistent application
- Persistent application on Debian and its derivatives (Ubuntu, Crunchbang, SteamOS, etc.)
- Persistent application on Red Hat and its derivatives (CentOS, Rocky Linux, AlmaLinux, etc.)
- Persistent application on Fedora 42 and later
- Persistent application on Windows Server
Non-persistent application
This configuration will be lost after a restart of your VPS (non-persistent configuration).
Connect to your server via SSH and enter the following commands. Take care to tailor these with:
- The network information, retrieved in the previous step (YOUR_IPV6, IPV6_PREFIX and IPV6_GATEWAY).
- The network interface (if your server is not using eth0).
Persistent application on Debian and its derivatives (Ubuntu, Crunchbang, SteamOS, etc)
Before modifying a configuration file, always create a backup of the original.
There are two ways to configure your network depending on the operating system installed on your server:
-
For Debian 11: use the method based on the interfaces files.
-
For Debian 12, Ubuntu 22.04 and later: use the method based on the Netplan configuration.
In some cases, the appropriate method may not be the one specified above. To make sure, browse your system to check which one is active. Visit https://netplan.io/ for more information, if necessary.
Moreover, keep in mind that the exact file names may vary.
By default, the configuration files are located in /etc/network/interfaces.d/.
The best practice is to create a separate configuration file in the /etc/network/interfaces.d/ directory to configure the IPv6 address. In our example, our file is called 51-cloud-init-ipv6:
Creating a separate file allows you to easily revert the changes in case of an error.
Add the following lines to the file. Replace the generic elements (i.e. YOUR_IPV6, IPV6_PREFIX and IPV6_GATEWAY) as well as the network interface (if your server is not using eth0) with your specific values:
Configuration example:
Then restart your network service with one of the following commands:
Alternatively, you can add the configuration above to one of the following files (with sudo privileges), depending on the generation of the operating system installed on the server:
- the
/etc/network/interfacesfile - the
/etc/network/interfaces.d/50-cloud-init.cfgfile
We recommend that you back up the relevant configuration file. For example, use the following command:
You will then be able to revert the changes, using the commands below:
The network configuration files are located in the /etc/netplan/ directory. By default, the main configuration file is called 50-cloud-init.yaml. Before continuing, first check this file to see if the IPv6 address has already been configured. If so, you don't need to configure the IPv6 address again as you only have one IPv6 with your VPS server.
If the IPv6 address has not been configured, the best approach is to create a separate configuration file to set up the IPv6 address in the /etc/netplan/ directory. This way, you can easily revert the changes in case of an error.
In addition, we recommend that you adjust the permissions for the newly created file. For more information about file permissions, consult the official documentation of ubuntu.
In our example, our file is named 51-cloud-init-ipv6.yaml:
Then edit the 51-cloud-init-ipv6.yaml file, adding the following lines for the IPv6 configuration. Replace the generic elements (i.e. YOUR_IPV6, IPV6_PREFIX and IPV6_GATEWAY) as well as the network interface (if your server is not using eth0) with your specific values.
Configuration example (with prefix /128):
It is important to respect the alignment of each element in this file as represented in the example above. Do not use the tab key to create your spacing. Only the space key is needed.
You can test your configuration using this command:
If it is correct, apply it using the following command:
Persistent application on Red Hat and its derivatives (CentOS, Rocky Linux & AlmaLinux, etc.)
There are two ways to configure your network depending on the operating system installed on your server:
-
For CentOS 7, Rocky Linux & AlmaLinux (8/9): use the method based on network-scripts files.
-
For Rocky Linux & AlmaLinux (10): use the method based on system-connections files.
The network configuration files are located in the /etc/sysconfig/network-scripts/ directory. We recommend that you start by backing up the relevant configuration file. In our example, our file is called ifcfg-eth0, so we copy the ifcfg-eth0 file using the following commands. Remember to replace eth0 with your actual interface if necessary.
You will then be able to revert the changes, using the commands below:
Then we edit the ifcfg-eth0 file, adding only the lines for the IPv6 configuration of the server. Replace the generic elements (i.e. YOUR_IPV6, IPV6_PREFIX and IPV6_GATEWAY) with your specific values. Also, we have omitted the IPv4 configuration to avoid confusion, but the IPv6 configuration is made in the same configuration file.
Configuration example:
On CentOS 7, you have to create a routing file in addition to the steps above:
- Create a file (with sudo privileges), indicating the default IPv6 routes:
- Edit the file and add the lines below. Replace the generic elements (IPV6_GATEWAY and eth0 interface, if necessary) with your specific values.
Example:
Finally, restart your network service to allow the system to apply the new configuration with one of the following commands:
The network configuration file is located in the /etc/NetworkManager/system-connections/. We recommend that you start by backing up the relevant configuration file. In our example, our file is called cloud-init-eth0.nmconnection, so we copy the cloud-init-eth0.nmconnection file using the following commands. Remember to replace eth0 with your actual interface if necessary.
Then we edit the cloud-init-eth0.nmconnection file, adding only the lines for the IPv6 configuration of the server. Replace the generic elements (i.e. YOUR_IPV6, IPV6_PREFIX and IPV6_GATEWAY) with your specific values.
If we assume that your interface is eth0, the configuration should look like this:
We have omitted the IPv4 configuration to avoid confusion, the IPv6 address is configured in the same file.
Configuration example:
Persistent application on Fedora 42 and later
The network configuration file is located in the /etc/NetworkManager/system-connections/. We recommend that you start by backing up the relevant configuration file. In our example, our file is called cloud-init-eth0.nmconnection, so we copy the cloud-init-eth0.nmconnection file using the following commands. Remember to replace eth0 with your actual interface if necessary.
Then we edit the cloud-init-eth0.nmconnection file, adding only the lines for the IPv6 configuration of the server. Replace the generic elements (i.e. YOUR_IPV6, IPV6_PREFIX and IPV6_GATEWAY) with your specific values.
If we assume that your interface is eth0, the configuration should look like this:
We have omitted the IPv4 configuration to avoid confusion, but the IPv6 configuration is made in the same configuration file.
Configuration example:
Persistent application on Windows Server
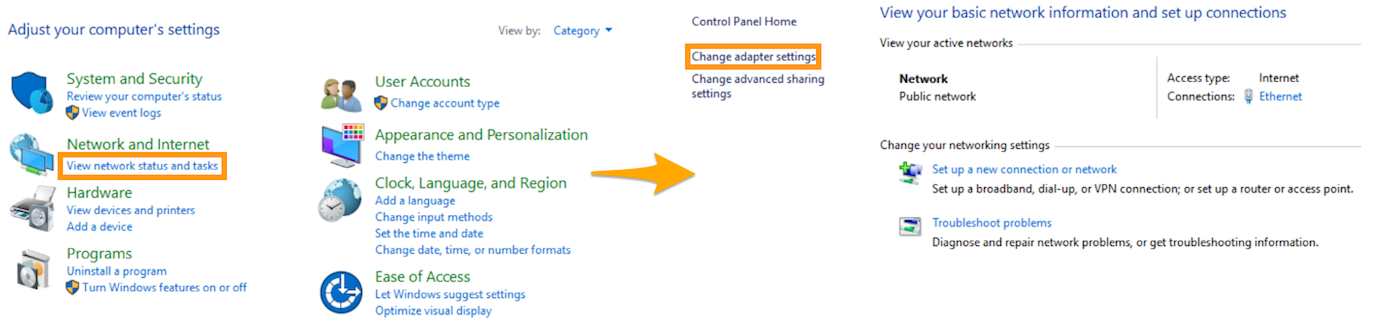
By default, IPv6 is not configured on Windows Servers. To enable it, open the Control Panel and click on View network status and tasks, then on Change adapter settings.
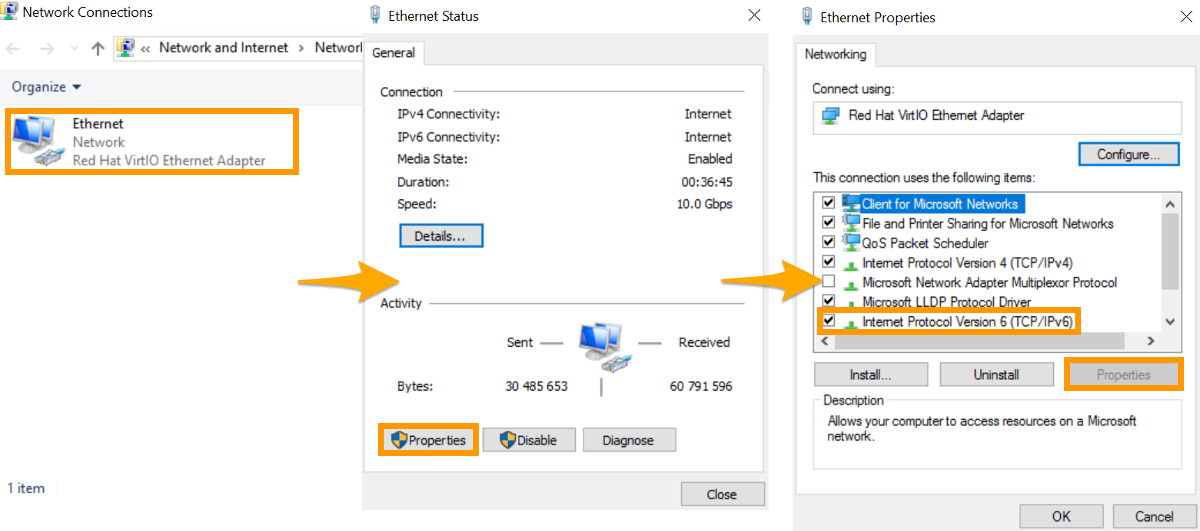
Click on Ethernet to open the settings and click on the Properties button to view the Ethernet Properties.
Select Internet Protocol Version 6 (TCP/IPv6), then click on the Properties button.
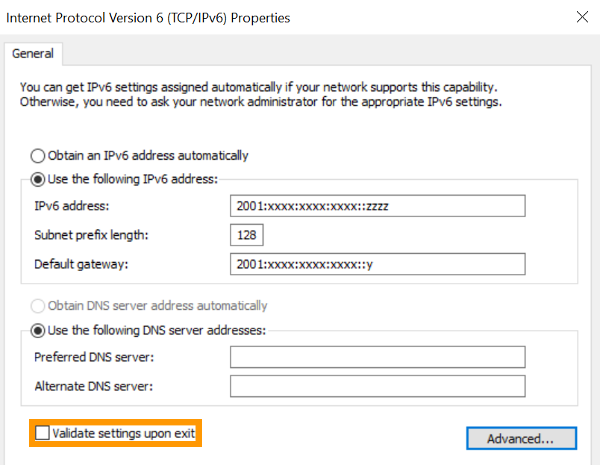
In the IPv6 Properties window, select Use the following IPv6 address. Enter the IP addresses which you have retrieved in the first step.
You also have the option of entering the IPv6 DNS resolvers of your choice under Use the following DNS server addresses. This is not mandatory if the DNS resolvers of the IPv4 configuration are already functional.
Finally, tick the Validate settings upon exit box and click the OK button to validate your changes. An error message may appear if the specified gateway is not on the same IPv6 subnet (/128 and /64 for example). You can ignore this message and continue to the next step regardless.
Step 3: Verify the configuration and test the connection
To verify that the configuration is functional, there are several possible commands, depending on the operating system.
- For a GNU/Linux-based system, here are two examples for the eth0 interface (to be adapted if necessary):
To test the connection, you can use the following command:
- For a Windows-based system, use the following command:
To test the connection, you can use the following command:
You can also test the connection to another remote server. However, IPv6 must be active on the remote server for this operation to work.
If, despite these changes, IPv6 does not seem to work on your server, you may need to make additional modifications (in rare cases). In such cases, try the following steps:
-
Depending on the operating system, try to change the prefix (or netmask) of your IP address from /128 to /64. This will include the IPv6 gateway in your subnet.
-
In addition to restarting the network service, it may be necessary to reboot your server to finalise your IPv6 configuration.
-
In Windows, verify that the firewall allows ICMP requests for IPv6.
Step 4: Disable Cloud-init network management (optional)
This step does not apply to Windows-based systems.
Cloud-init is a package installed by default on a VPS. It functions as a framework to run a script after initially creating your server or rebooting it. The mechanics in place allow the underlying OpenStack infrastructure to inject scripts into the Cloud-init environment and therefore the server configuration.
Depending on the operating system, Cloud-init will manage: the network, the hostname, the resolv.conf file, or the automatic partitioning of the hard disk, in case of an upgrade.
In the case of newer distributions, the default configuration of Cloud-init might sometimes automatically reset the network configuration when the server starts up.
This is relevant for specific use cases in which it is recommended to avoid the reset by disabling automatic network management in Cloud-init. To do this, use the following command to create a file /etc/cloud/cloud.cfg.d/98-disable-network-config.cfg with the value network: {config: disabled}:
It might be necessary to reboot the server for the change to take effect.
To re-enable automatic network management by Cloud-init, delete the newly created file or move it to another directory.
Go further
Join our community of users.

