Managing the security policy of an email service
402 Views
Objective
With OVHcloud email services, you can set up professional email addresses. To maintain this environment, you can manage the global security settings for your email accounts.
Find out how to manage the security policy of your E-mail service.
Requirements
- A preconfigured OVHcloud email solution MX Plan (available with a web hosting plan) or Exchange service
OVHcloud Control Panel Access
MX Plan:
- Direct link: MX Plan
- Navigation path:
Web Cloud>MX Plan> Select your MX Plan service
Exchange:
- Direct link: Exchange
- Navigation path:
Web Cloud>Exchange> Select your platform
Instructions
The security policy management of your email service has four aspects:
- enhancing email account security when users try to log in
- adding complexity to the security of your email account passwords
- strengthening the verification of incoming messages on our servers and to your email addresses (for Exchange accounts only)
- configuring how so-called “unwanted” messages will be displayed in your inbox (for Exchange accounts only)
To access the security policy of your email service, follow the instructions below.
| MX Plan | Exchange |
|---|---|
Click on the More tab, then on Manage security policy. | Click on Security. |
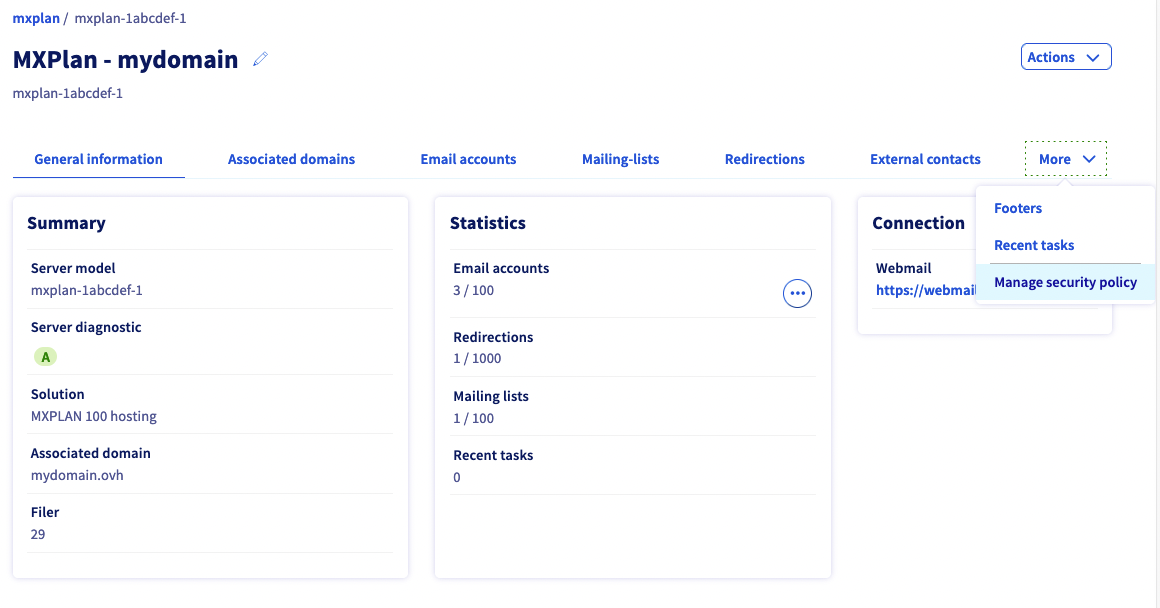 |  |
If you do not see the More tab appear in the control panel of your MX Plan service, this means that you are on a legacy MX Plan offer. There is no security policy management on the legacy MX Plan solution.
Continue to the aspect(s) you want to modify.
- Enhance connection security: Define whether accounts should lock after a number of unsuccessful log-in attempts.
- Add complexity to the security of passwords: Define a complexity requirement, as well as rules for changing passwords.
- Strengthen the verification of incoming messages: Specify whether our servers should check if the messages received come from a legitimate source (i.e. DKIM and/or SPF checks).
- Define the display of unwanted messages: Specify whether unwanted messages should have a tag to identify them, or be automatically moved to the trash.
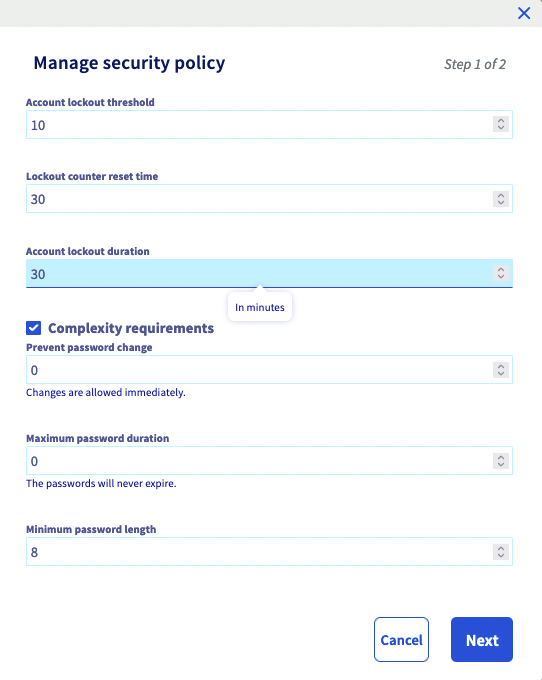
Enhance connection security
This allows you to set whether email accounts should lock after a number of unsuccessful log-in attempts.
To do this, complete the information below:
- Lockout threshold: Set the number of unsuccessful log-in attempts before the account locks. Enter "0" to not apply a lockout threshold.
- Lockout counter reset time: This field will only appear if a lockout threshold has been set. Specify the time in minutes it takes for the failed connection attempt counter to reset.
- Account lockout duration: This field will only appear if a lockout threshold has been set. Specify the time period in minutes during which the Exchange account will remain locked if the lockout threshold has been reached.
Once this information has been entered, you can save these changes for MX Plan solutions by clicking on Next, then Confirm. For the Exchange solution, click Save changes.
Add complexity to the security of passwords
This allows you to set a complexity requirement, as well as rules for changing passwords.
To do this, complete the information below:
- Complexity requirements: Allows user to set rules regarding the complexity of passwords:
- not contain all or part of the user’s account name
- be at least 6 characters long
- contain uppercase and lowercase letters, non-alphabetic characters (! or $ for example), and numbers. - Prevent password change: Allows to enforce a minimum lifetime for your Exchange accounts’ passwords. This means that users will have to wait a certain number of days before they can change their passwords.
- Maximum password duration: Allows to enforce a maximum lifetime for your Exchange accounts’ passwords. This means that users will be forced to change their passwords once this time limit is reached.
- Keep password history: This field will only appear if a maximum lifetime has been set. Specify whether previous passwords can be reused again, and if so, for how long.
- Minimum password length: Allows to set a minimum size for password length when a user wants to change it.
Once this information has been entered, you can save these changes for Email solutions by clicking on Next, then Confirm. For the Exchange solution, click Save changes.
Strengthen the verification of incoming messages (Exchange only)
This allows you to specify whether our servers should check if the messages received in your email accounts come from a legitimate source (DKIM and/or SPF checks).
To do this, tick the appropriate boxes:
- Activate DKIM signature verification: Define whether our servers should check the DKIM signature of the messages you receive on your Exchange accounts. This action guarantees the authenticity of the sending domain and the integrity of the message, making it possible to identify non-legitimate mailings, which will then be marked as spam.
- Activate SPF protection verification: Define whether our servers must verify that the source of the messages you receive is present in the SPF record of the sender domain. This verification can identify illegitimate mailings, which will then be marked as spam.
Once you have made your choice, confirm these changes by clicking Save changes.
Define the display of unwanted messages (Exchange only)
This allows you to define whether unwanted messages you receive on your email accounts should be tagged to identify them, or automatically moved to the trash.
To do this, tick the appropriate boxes:
- Identify SPAM email: Specify whether our servers should add a tag to identify received messages that are considered "unwanted" as spam.
- Move SPAM to junk: Specify whether our servers should automatically move any "unwanted" messages to the "Junk Email" folder.
Once you have made your choice, confirm these changes by clicking Save changes.
Go further
Join our community of users.

