Creating a CNAME record to validate your domain name on your email solution
928 Views
Objective
When you add a domain name to your email service, you may be asked to configure a CNAME record in the DNS zone. The purpose of this procedure is to ensure that the domain name concerned is legitimate for use on the email service.
If the domain name, i.e. its DNS zone, is managed in the same customer account as the email service, configuring the CNAME record is not necessary.
Find out how to validate your domain name for your email service by adding a CNAME record.
Requirements
- An Exchange solution
- A domain name linked to your email service, see Adding a domain name to an email service
- Administrative rights to configure the DNS zone for the domain name concerned (in the OVHcloud Control Panel or an external management interface)
OVHcloud Control Panel Access
- Direct link: Exchange
- Navigation path:
Web Cloud>Exchange> Select your platform
Instructions
Why create a CNAME record?
The CNAME record is used here as an alias, it points to a target that itself points to an IP address. This record is not mapped to an email service.
The CNAME record is used as a validation code (token) for our Hosted Exchange solution. It is added to the DNS zone of the domain name you want to validate for use with your emails. The purpose is to check that the user of the email service is authorised to use the domain name they are adding.
In the diagram below, the email service (Exchange) is represented by the contents of the green frame.
You have created accounts (contact, john.smith and mary.johnson in this example) that will have email addresses associated with them.
The domain name mydomain.ovh has been added to the email service (please refer to the guide on Adding a domain name to your email service).
The email service generates a unique validation code ("abcd1-check" in our example).
If the DNS zone for the domain name mydomain.ovh is not managed in the same OVHcloud customer account, or is managed from an external interface, this code must then be added as a CNAME record. This record is represented by the blue box in the example.
The email service automatically checks the DNS records of the domain name mydomain.ovh for the validation code.
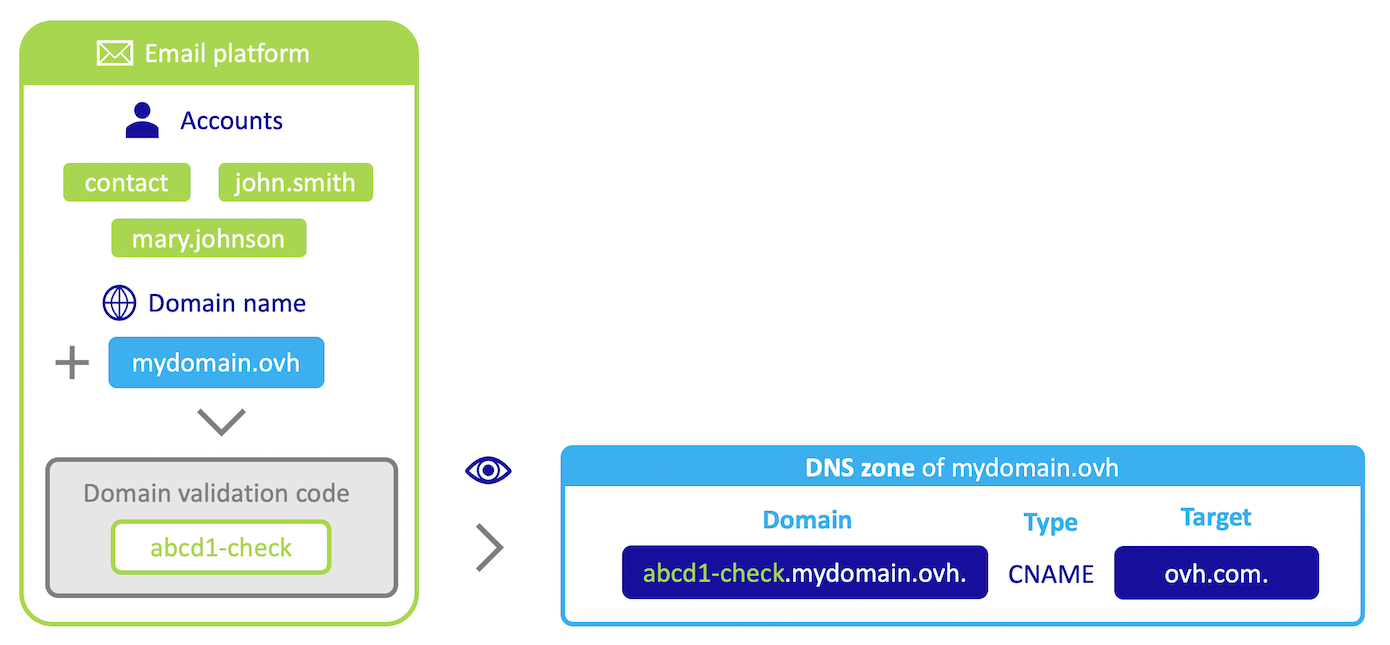
As soon as the email service reads the validation code in the DNS zone of the domain name mydomain.ovh, it becomes possible to use the addresses contact@mydomain.ovh, john.smith@mydomain.ovh and mary.johnson@mydomain.ovh.
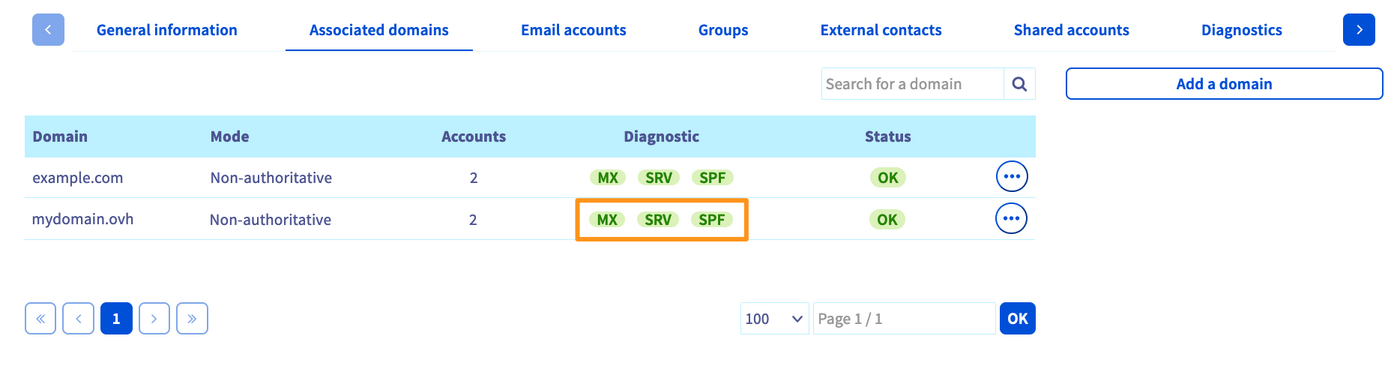
Step 1 - Understand the OVHcloud CNAME diagnostic
The CNAME diagnostic box will appear in the Associated domains tab of your email service after you have added your domain name.
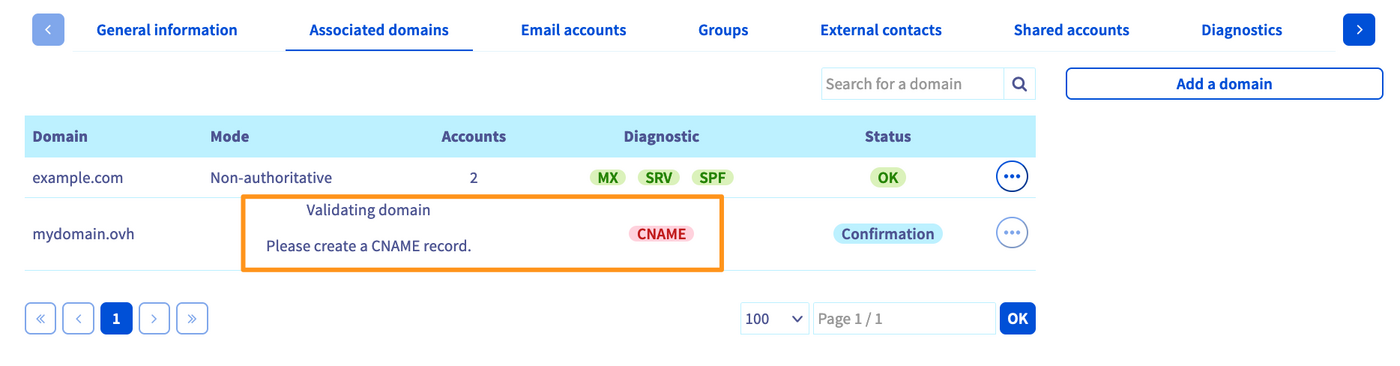
In the example above, the box is red. Here are the possible reasons for this state:
- The domain name declared is not managed in the same OVHcloud customer account as your email service. Access the Control Panel of the OVHcloud account in which the domain name's DNS zone is managed and follow step 3 of this guide.
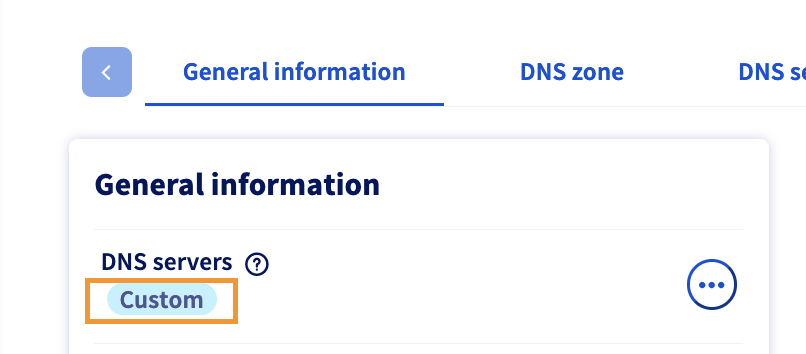
- The domain name declared uses DNS servers not provided by OVHcloud. The domain name is registered with OVHcloud, but it uses custom DNS servers. To check this, select the domain name in the
Domain namessection on the left-hand column. In theGeneral informationtab, check the status below "DNS servers". If it saysCustom, you have declared external servers in theDNS serverstab. Log in to the management interface of your DNS provider in order to edit the CNAME record.
- The domain name declared is not registered with OVHcloud and does not use OVHcloud DNS servers. Your domain name is registered at another registrar. You will need to contact your domain name provider to verify how to access the DNS zone configuration.
Step 2 - Retrieve the validation code
Go to the Associated domains tab, and click on the red CNAME box in the "diagnostic" column to retrieve the information required.
The CNAME record is displayed in the dialog box that appears.
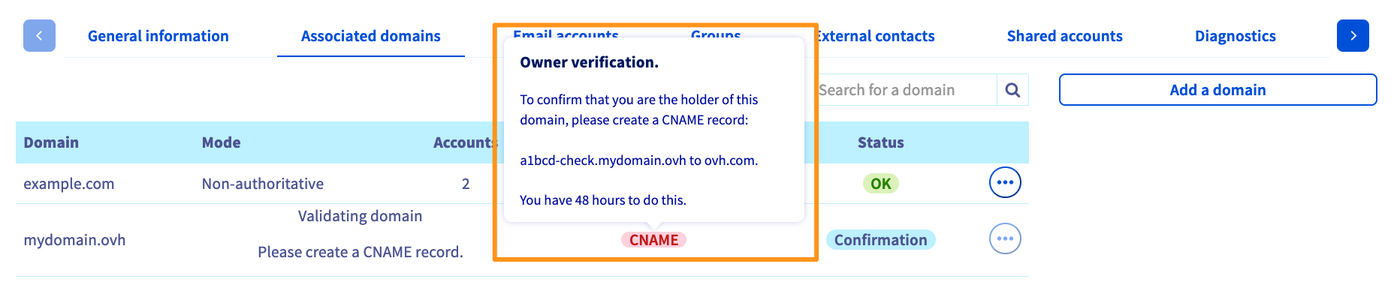
The middle line consists of the verification code and the target (a1bcd-check.mydomain.ovh to ovh.com. in the example above) for the CNAME record.
Step 3 - Create the CNAME record
Select the tab that corresponds to the interface you are using:
In the Web Cloud section, click Domain names, then select the domain name concerned. Switch to the DNS zone tab.
Your DNS zone configuration will appear. To add a CNAME record, click on the button Add Entry on the right.
In the new window, you can select the type of DNS record to add. Click CNAME and fill in the fields according to the information retrieved in step 2 of this guide.
For example, if the validation code is "a1bcd-check", this must be entered into the "Sub-domain" field. Enter "ovh.com." as the "target" and make sure to keep the trailing ".".
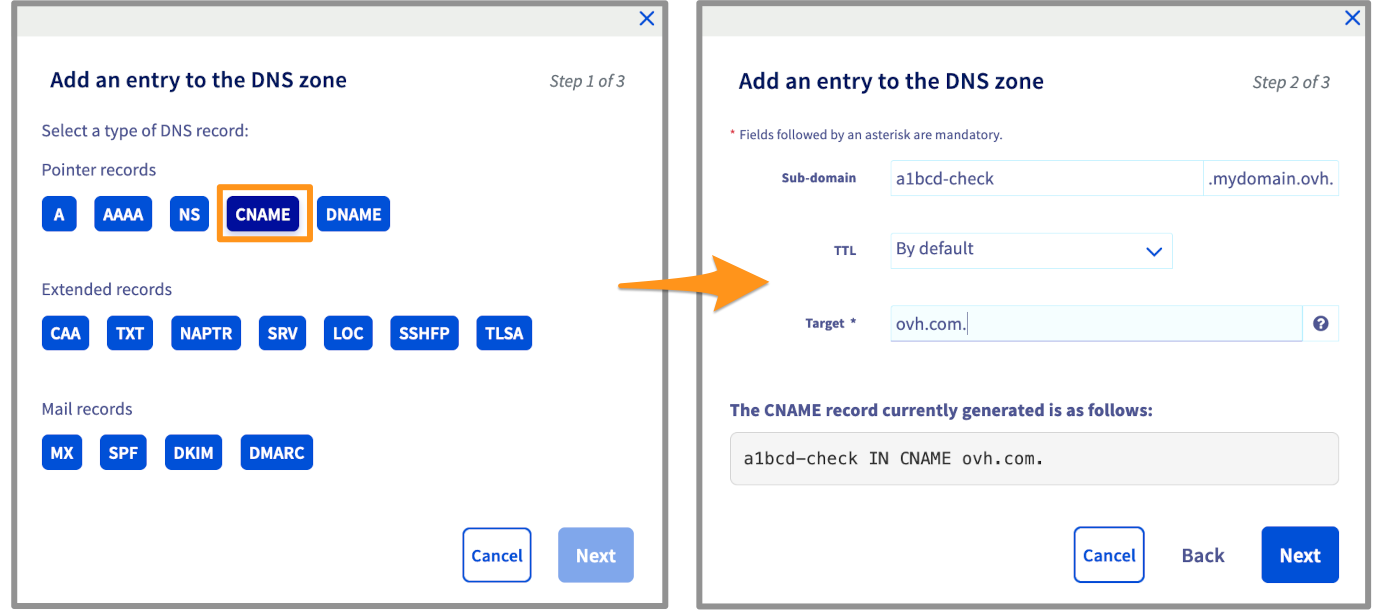
Once you have entered this information, click Next. Verify that the information displayed is correct, then click Confirm.
The modification is usually applied within a few minutes but might require a propagation time up to 24 hours.
Log in to the interface that manages the domain name's DNS zone and add a CNAME record to it, with the following settings:
- Sub-domain: Enter the value in the form "xxxxx-check", replacing "xxxxx" with the unique code listed in step 2 of this guide.
- Target: Enter the value "ovh.com.", keeping in mind the trailing "." (if your input interface has not added it automatically).
Confirm this change in your DNS zone.
The modification is usually applied within a few minutes but might require a propagation time up to 24 hours.
Here is an example of a DNS response after adding a validation CNAME record:
To check that the CNAME record configuration has been successfully queried by your OVHcloud email service, open it in the Control Panel and go to the tab Associated domains. If the CNAME box is no longer present in the "diagnostic" column, the domain name was associated with your service. If not, then your configuration changes may not have propagated fully.
Go further
Join our community of users.

