Modifying an OVHcloud domain name's DNS servers
1775 Views
Objective
The acronym DNS (Domain Name System) is a set of elements (DNS servers, DNS zones, etc.) that map a domain name to an IP address.
Read our guides "Everything you need to know about DNS servers" and "Everything you need to know about DNS zones" for more information.
Find out how to modify the DNS servers for your OVHcloud domain name in 3 steps.
Requirements
- A domain name registered with OVHcloud.
- The appropriate permissions to manage the domain name.
OVHcloud Control Panel Access
- Direct link: Domain names
- Navigation path:
Web Cloud>Domain names> Select your domain name
A domain name registrar is an organisation authorised to sell domain names. OVHcloud is one of these registrars.
If your domain name is not registered with OVHcloud, you will need to modify the DNS servers with the registrar where your domain name is currently registered.
Instructions
Be careful when you modify a domain name's DNS servers.
A configuration error can make your website inaccessible or prevent your email addresses from receiving new emails. Understanding the consequences of such a modification will help you better understand the changes you are about to make.
When you modify your domain name's DNS servers, you are changing its DNS configuration. The new DNS configuration replaces the old one and is stored on the newly defined DNS servers. Technically, the domain name then uses a new DNS zone.
However, it is essential to take the following points into account:
- When changing DNS servers (e.g. from an external DNS to an OVHcloud DNS), the content of the old configuration/DNS zone is not automatically replicated to the new one. Make sure your new DNS zone contains all the DNS records required for the services associated with your domain name to work correctly (e.g. your website and email addresses).
- If you do not want to modify the DNS servers but one or more records of your current DNS configuration/zone, please refer to our guide: "Editing an OVHcloud DNS zone".
- Some organisations (registries) that manage domain name extensions have specific requirements regarding DNS servers (number of name servers, value of records, etc.). If in doubt, check with the registry responsible for the domain name.
1 - Modifying the DNS servers
You may need to modify your domain name's DNS servers in the following situations:
- You want to use the DNS servers provided by OVHcloud.
- You want to use your own DNS servers (or those provided by an external DNS provider).
- You want to combine the DNS servers provided by OVHcloud with your own DNS servers.
When you use OVHcloud DNS servers, the numbers in the server names have no connection with the service(s) you are using. Only the DNS anycast option uses specific DNS servers (ns200.anycast.me and dns200.anycast.me). When subscribed, they are automatically assigned to you.
Click on the options below to view the content.
Option 1 - Use OVHcloud default DNS servers
This option automatically applies the existing OVHcloud DNS zone configuration for your domain name. First, make sure a DNS zone exists at OVHcloud for your domain name.
If needed, refer to the guides "Editing an OVHcloud DNS zone" and/or "Creating an OVHcloud DNS zone" to check if an OVHcloud DNS zone exists for your domain name.
Click on the tabs below to view each of the 4 steps.
Go to the Domain names page, then choose the domain name concerned.
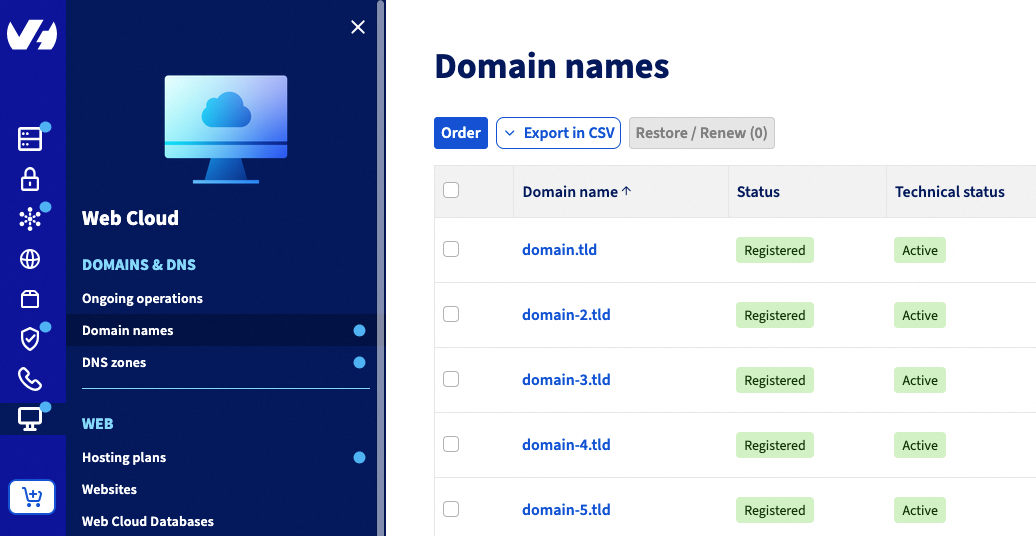
Select the DNS servers tab once you are on the domain name.
The table that appears contains the DNS servers currently set by OVHcloud for your domain name. Several DNS servers can be listed, each with its own row in the table.
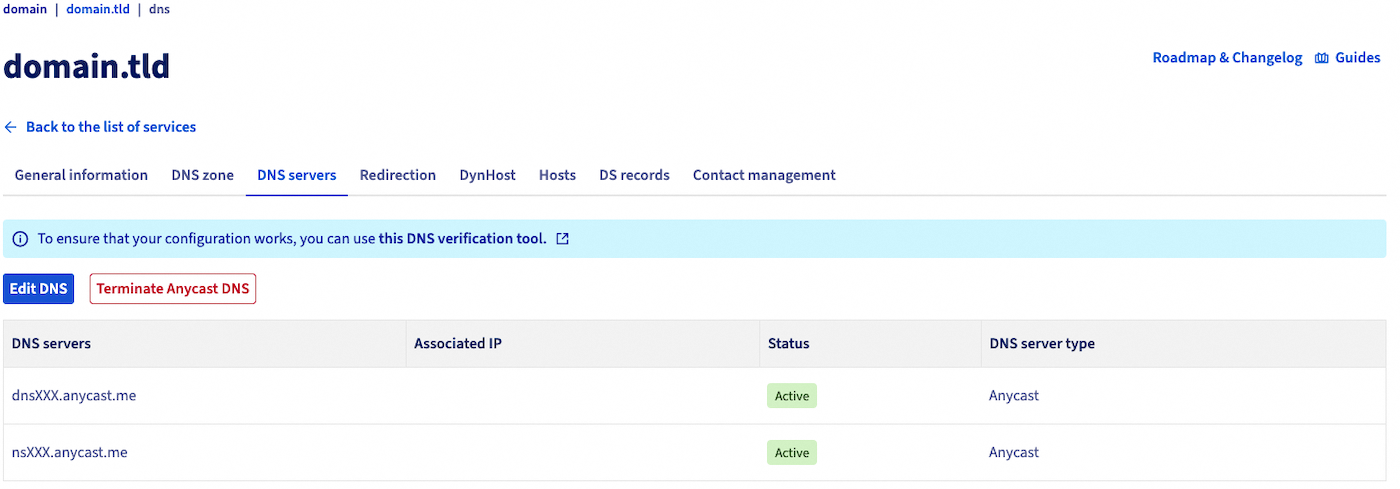
Click the Modify DNS servers button to the right of the "DNS servers" table. Depending on your screen resolution, the button may be below the table.
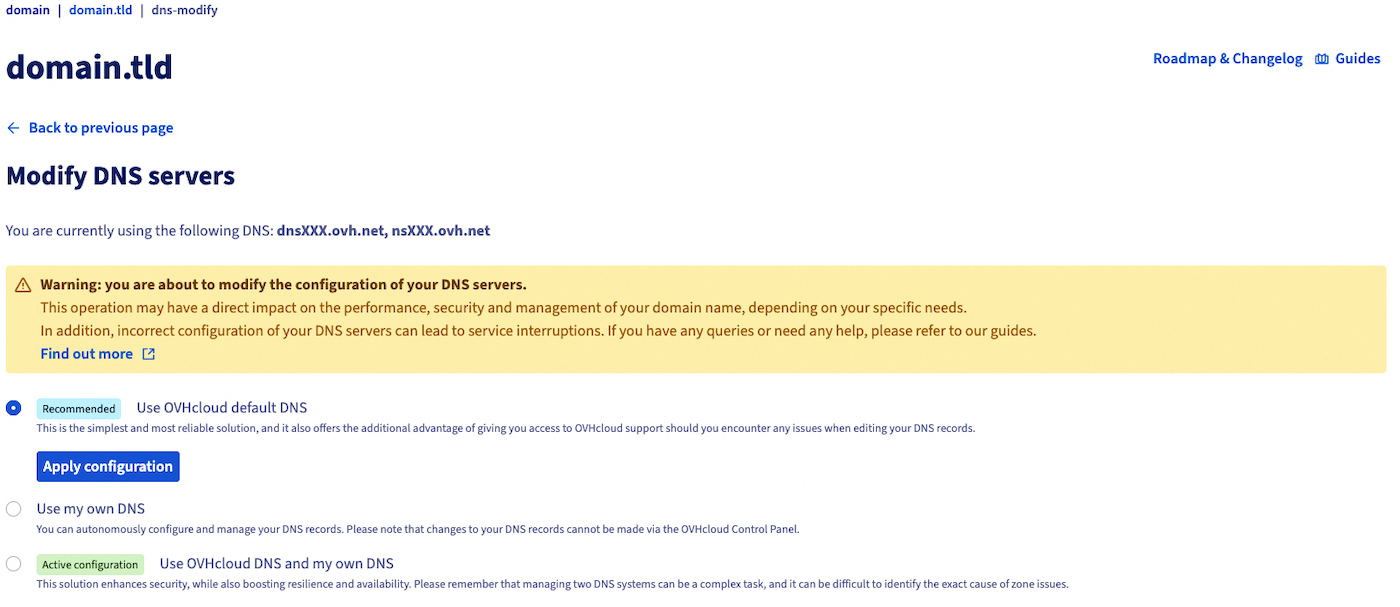
To use the OVHcloud default DNS servers, click Apply configuration. The following window appears:
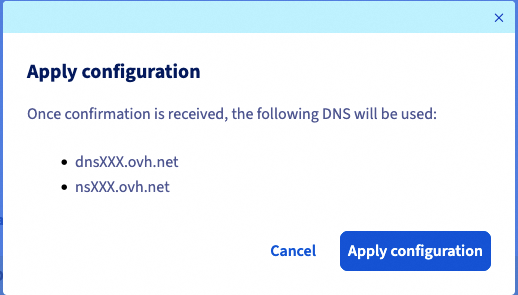
It summarises the names of the 2 DNS servers that will be applied to your domain name. They must have one of the following 3 forms:
nsXX.ovh.netanddnsXX.ovh.netornsXXX.ovh.netanddnsXXX.ovh.net(where eachXrepresents a digit between 0 and 9)nsXX.ovh.caanddnsXX.ovh.caornsXXX.ovh.caanddnsXXX.ovh.ca(where eachXrepresents a digit between 0 and 9)ns200.anycast.meanddns200.anycast.me(if you have subscribed to the DNS anycast option)
If they correspond to the ones you want to apply, click Apply.
The 2 DNS servers declared (in the NS type records of the OVHcloud DNS zone) will then be used for your domain name.
The old declared DNS servers and the DNS configuration they applied will be deactivated for your domain name. The OVHcloud DNS zone will become the active DNS zone for your domain name.
Option 2 - Use my own DNS servers
This option allows you to declare the DNS servers of a DNS zone not managed from the OVHcloud Control Panel.
This can be, for example:
- external DNS servers provided by one of our competitors;
- your own DNS servers if you host your DNS zone on one of your servers. These DNS servers can also be hosted on an OVHcloud infrastructure (dedicated server, VPS, etc.).
Before adding a DNS server, make sure it is reachable and contains a DNS zone for your domain name. Also make sure this DNS zone contains all the NS type records for all the DNS servers you are going to declare for your domain name.
For example: you want to declare the DNS servers ns1.dns-server.tld, ns2.dns-server.tld and ns3.dns-server.tld for your domain name. You will then need to check that the following three NS type records are present in the 3 DNS zones hosted on these 3 DNS servers:
- "Your own domain (or just an @)" IN NS ns1.dns-server.tld.
- "Your own domain (or just an @)" IN NS ns2.dns-server.tld.
- "Your own domain (or just an @)" IN NS ns3.dns-server.tld.
Click on the tabs below to view each of the 5 steps.
Go to the Domain names page, then choose the domain name concerned.
Select the DNS servers tab once you are on the domain name.
The table that appears contains the DNS servers currently set by OVHcloud for your domain name. Several DNS servers can be listed, each with its own row in the table.
Click the Modify DNS servers button to the right of the "DNS servers" table. Depending on your screen resolution, the button may be below the table.
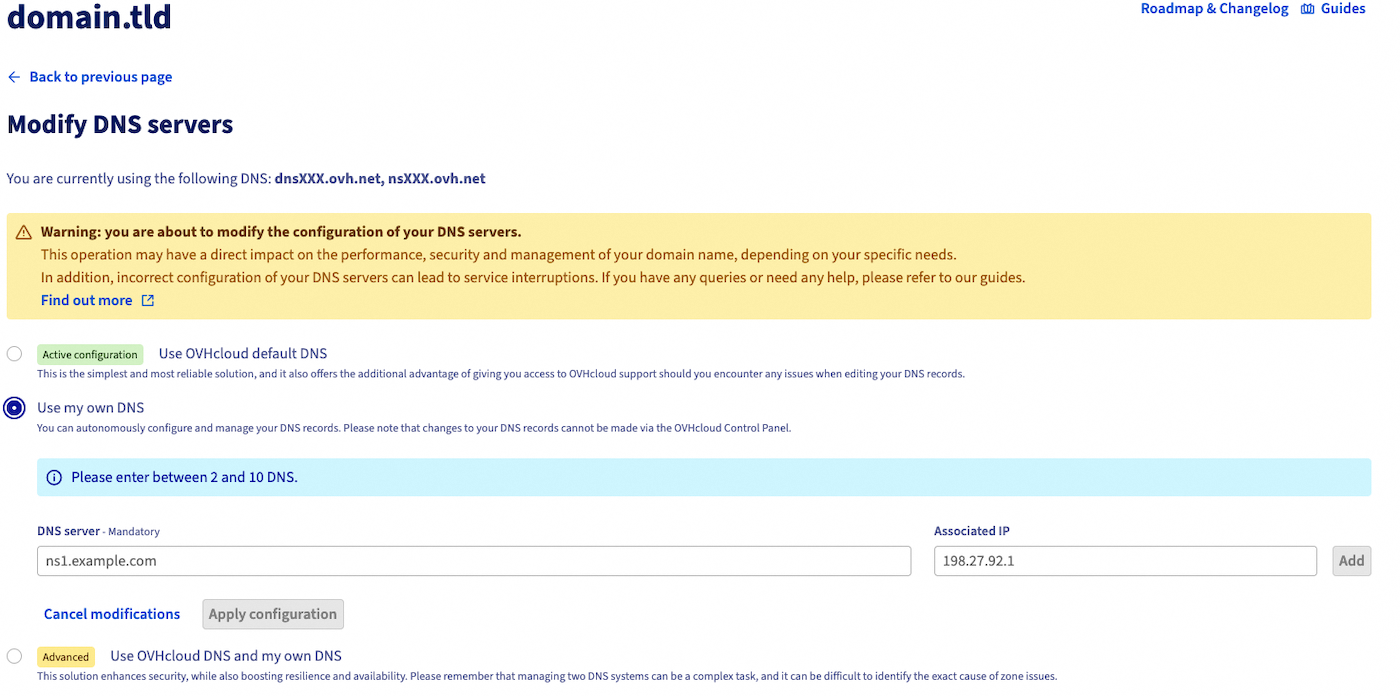
To enter one of your own DNS servers, fill in the 2 form fields in the box as shown below:
DNS server: name of the DNS server to apply to your domain name.Associated IP (optional): IP address (IPv4 or IPv6) of the DNS server entered. You can only enter one IP address in this form.
Each input box (visible in the previous screenshot) can only contain one DNS server at a time. One DNS server therefore corresponds to one box.
In addition, a blue information note located above the first box indicates the range of DNS servers you can declare for your domain name. These values vary depending on the domain name extension.
Once the information has been entered, click the + button to the right of the 2 form fields. This adds the DNS server and displays a new input box below the previous one.
Repeat the operation for each DNS server you want to add, respecting the limits indicated in the information note.
Click the + button for each DNS server to validate its entry and addition.
Once all your own DNS servers have been added, click Apply configuration. The following window appears:
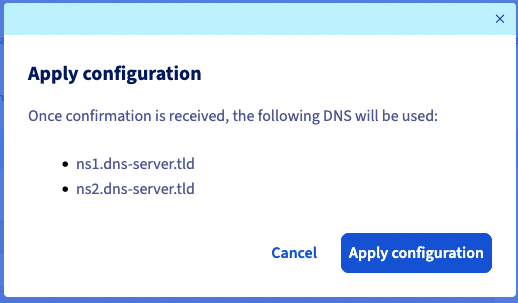
It summarises the names of the DNS servers that will be applied to your domain name.
If they correspond to the ones you want to apply, click Apply.
The old declared DNS servers and the DNS configuration they applied will be deactivated for your domain name. The DNS zone declared on your own DNS servers will become the active DNS zone for your domain name.
Option 3 - Use OVHcloud DNS servers and my own DNS servers
This option allows you to combine the use of your own DNS servers while keeping the OVHcloud DNS servers active for your domain name. This combination allows, for example, greater availability for the various services associated with your domain name (web hosting, email servers, etc.). Indeed, if one group of DNS servers becomes unavailable for a few minutes, the other declared DNS servers can take over.
However, make sure that the DNS zone configurations on the various DNS servers concerned are correctly set up to work together. Most of the time, all DNS servers will be operational. They will all be able to respond to requests made to them randomly on the DNS network.
- Be careful if you decide to use this last option. It requires advanced knowledge of how the DNS network, DNS servers and DNS zones work.
- The DNSSEC option must be disabled to combine the use of your own DNS servers with OVHcloud DNS.
- Be careful not to mix one group of OVHcloud DNS servers with another group of OVHcloud DNS servers. For example, dns19.ovh.net and ns19.ovh.net correspond to one group of OVHcloud DNS servers, they go hand in hand and are synchronised. At OVHcloud, DNS server groups are identifiable by the number in the server names. Two OVHcloud DNS servers are part of the same DNS server group if they share the same number. For example, dns19.ovh.net and ns19.ovh.net.
Before adding a DNS server, make sure it is reachable and contains a DNS zone for your domain name. Also make sure this DNS zone contains all the NS type records for all the DNS servers you are going to declare for your domain name.
For example: you want to declare the DNS servers ns1.dns-server.tld, dnsXX.ovh.net and nsXX.ovh.net for your domain name. You will then need to check that the following three NS type records are present in the 3 DNS zones hosted on these 3 DNS servers:
- "Your own domain (or just an @)" IN NS ns1.dns-server.tld.
- "Your own domain (or just an @)" IN NS dnsXX.ovh.net.
- "Your own domain (or just an @)" IN NS nsXX.ovh.net.
Click on the tabs below to view each of the 5 steps.
Go to the Domain names page, then choose the domain name concerned.
Select the DNS servers tab once you are on the domain name.
The table that appears contains the DNS servers currently set by OVHcloud for your domain name. Several DNS servers can be listed, each with its own row in the table.
Click the Modify DNS servers button to the right of the "DNS servers" table. Depending on your screen resolution, the button may be below the table.
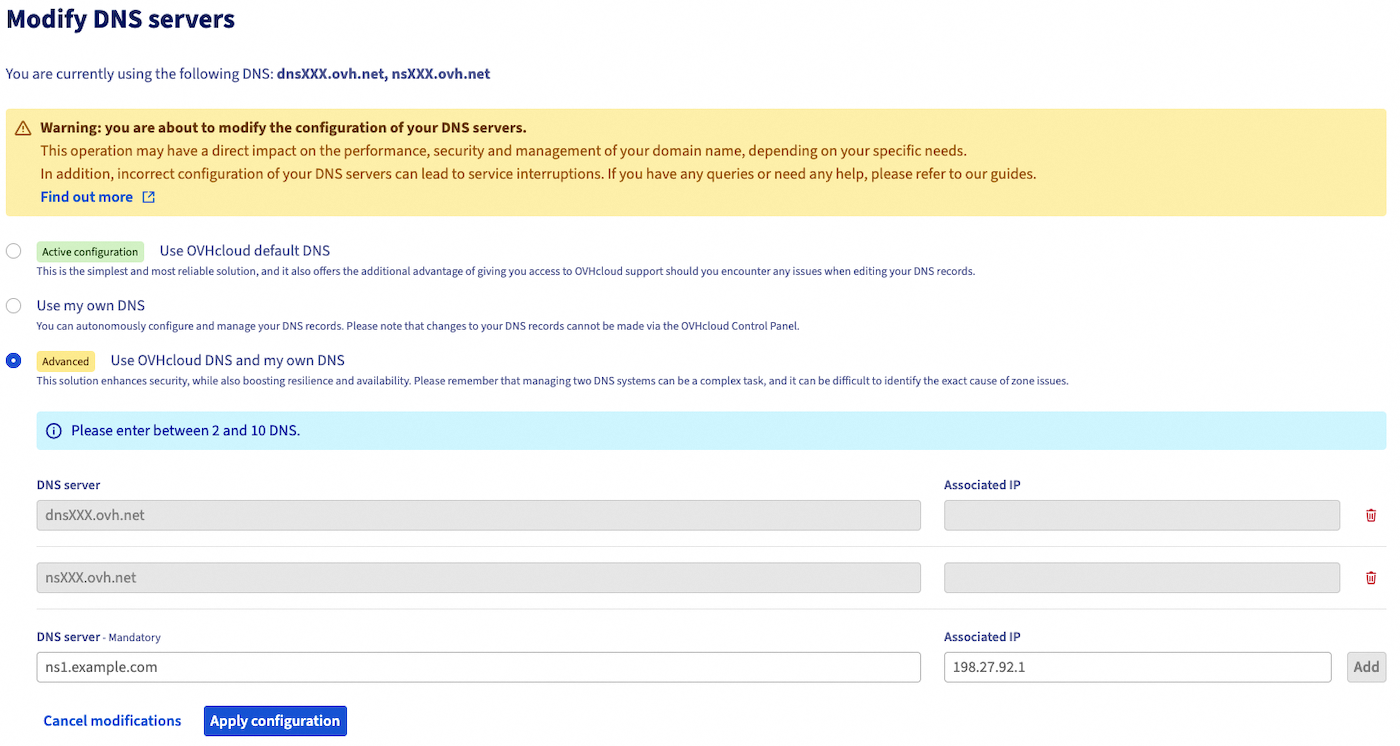
To enter one of your own DNS servers, fill in the 2 form fields in the box as shown below:
DNS server: name of the DNS server to apply to your domain name.Associated IP (optional): IP address (IPv4 or IPv6) of the DNS server entered. You can only enter one IP address in this form.
Each input box (visible in the previous screenshot) can only contain one DNS server at a time. One DNS server therefore corresponds to one box.
In addition, a blue information note located above the first box indicates the range of DNS servers you can declare for your domain name. These values vary depending on the domain name extension.
Once the information has been entered, click the + button to the right of the 2 form fields. This adds the DNS server and displays a new input box below the previous one.
Repeat the operation for each DNS server you want to add, respecting the limits indicated in the information note.
Click the + button for each DNS server to validate its entry and addition.
Once all your own DNS servers have been added, click Apply configuration. The following window appears:
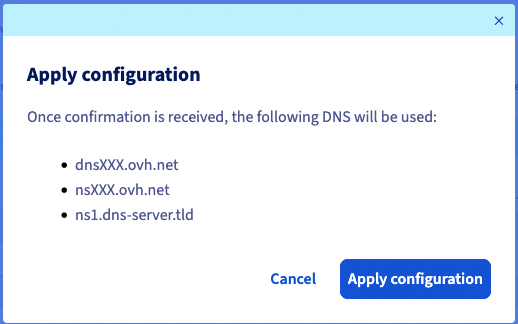
It summarises the names of the DNS servers that will be applied to your domain name.
If they correspond to the ones you want to apply, click Apply.
The old declared DNS servers and the DNS configuration they applied will be deactivated for your domain name. The DNS zones on your own DNS servers and on the OVHcloud DNS servers will become the active ones for your domain name.
2 - DNS server modification propagation
Once your modifications have been made, two successive periods must be taken into account:
- The registry that manages your domain name extension (e.g. the registry for .fr extensions) must be informed of the DNS modification made on the OVHcloud side. Track the progress of this operation on the Ongoing operations page.
- Once the registry information is up to date, allow a maximum of 48 hours for the changes to be fully propagated and effective.
Go further
Everything you need to know about DNS servers
Everything you need to know about DNS zones
Everything you need to know about DNS records
For specialised services (SEO, development, etc.), contact OVHcloud partners.
If you would like assistance using and configuring your OVHcloud solutions, please refer to our support offers.
Join our community of users.

