Hot Swap - Software RAID
766 Views
Objective
If one of the disks on your server is failing, you can hot-swap it if you have a compatible top-range model.
Find out the main steps for hot-swapping a disk on a server with a software RAID configuration.
Requirements
- an mHG, HG or BHG server
- a software RAID (with an LSI card)
- SSH (Linux) or RDP (Windows) access
- the "sas2ircu" utility (use the Broadcom search engine to find it).
Instructions
On Linux
Step 1: Identify the disk concerned
To illustrate the purpose of this guide, we assume that we have received an alert for the/dev/sdb disk. The disk is defective, and we want to hot-swap it. Please adapt the details of this guide according to your specific situation.
To begin, test and check the Serial Number of the disk concerned.
Here, you will note that:
- the "SDB" disk has failed due to uncorrected errors
- its Serial Number corresponds to the alert received (via the datacentre or any other monitoring tool)
To get only the Serial Number:
Step 2: Retrieve the disk’s position
You must now find the Slot ID and the Enclosure ID of the disk concerned. To do this, use the «sas2ircu» tool already installed on the server.
Then start by checking that the disks are properly connected via an LSI card.
If this is the case, determine the ID of this LSI card.
The index corresponds to the ID. Here, the card has the index/ID 0.
With this information, now retrieve for the disk concerned (via its Serial Number): the Slot ID and the Enclosure ID.
This command is used to obtain the disk information, including the Serial Number, which is the K4GW439B here.
In our example, we retrieved the Enclosure ID (corresponding to 1) and the Slot ID (corresponding to 3).
Stage 3: Switch on the disk
Using the information retrieved during the previous steps, turn on the LED of the faulty disk, and replace it with the command ./sas2ircu 0 locate EncID:SlotID on. Customise it to suit your situation, as per the example below:
You can disable the disk flashing, by replacing "on" with "off" in the command.
Step 4: Remove the defective disk from the RAID
If you have not already done so, switch the defective disk to Faulty. Then look at the RAID status.
In this example, the defective disk is part of md1 and md2 (sdb1 and sdb2). We will therefore change this one to Faulty, respectively sdb1 in md1 and sdb2 in md2.
once you have made these changes, check the RAID status again.
The sdb1 and sdb2 have been switched to faulty (F). You can now remove the disk from the RAID.
Finally, check that the disk is no longer present.
The defective disk is now ready to be replaced by a datacentre technician. Once the operation is complete, you just have to resync the RAID. To do this, you can use the following guide: Configuring software RAID
On Windows
Step 1: Identify the disk
To illustrate the purpose of this guide, we assume that we have received an alert for the/dev/sdb disk. The disk is defective, and we want to hot-swap it. Please adapt the details of this guide according to your specific situation.
It is important to launch the command terminal as an administrator, so that you do not receive any errors.
To begin, test and check the Serial Number of the disk concerned. In the screenshot below, the storage is not really defective, but we will act as if it were.
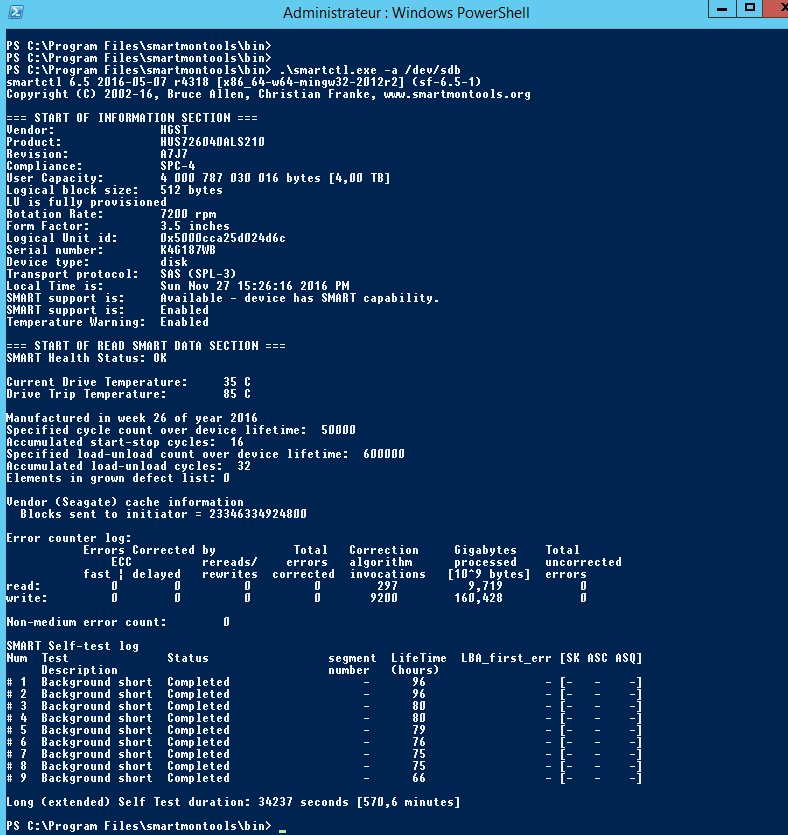
Here, you will note that:
- the "SDB" disk has failed due to uncorrected errors
- its Serial Number corresponds to the alert received (via the datacentre or any other monitoring tool)
Step 2: Retrieve the disk’s position
You will now need to find the Slot ID and the Enclosure ID of the disk concerned. To do this, use the «sas2ircu» tool already installed on the server.
Start by determining the ID of this LSI card.
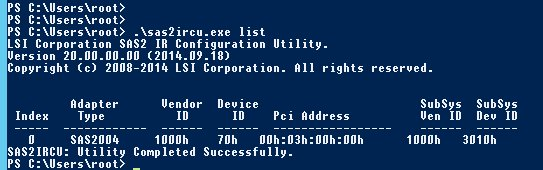
Our LSI card has the index/ID “0”.
With this information, now retrieve for the disk concerned (via its Serial Number): the Slot ID and the Enclosure ID.
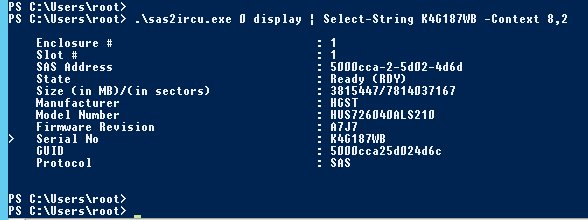
You can use this command to retrieve the disk information, including the Serial Number, which is K4G187WB here.
In our example, we have retrieved the Enclosure ID (corresponding to 1) and the Slot ID (corresponding to 1).
Stage 3: Switch on the disk
Using the information retrieved during the previous steps, turn on the LED of the faulty disk, and replace it with the command .\sas2ircu 0 locate EncID:SlotID on. Customise it to suit your situation, as per the example below:
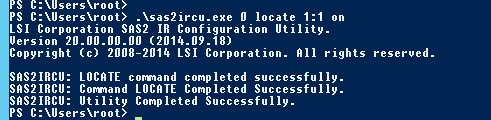
You can disable the disk flashing, by replacing "on" with "off" in the command.
Step 4: Remove the defective disk from the RAID
You can do this from the Disk Management interface of your Windows server.
The defective disk is now ready to be replaced by a datacentre technician. Once the operation is complete, you just have to resync the RAID. To do this, you can use the following guide: Configuring software RAID
Go Further
Join our community of users.

