Configuring the vRack on your dedicated servers
3677 Views
Objective
The OVHcloud vRack (virtual rack) allows multiple servers to be grouped together (regardless of number and physical location in our data centres) and connects them to a virtual switch within the same private network. Your servers can communicate privately and securely between each other, within a dedicated VLAN.
This guide explains how to configure the vRack on two or more dedicated servers.
Requirements
- A vRack service activated in your account
- Two or more dedicated servers (compatible with vRack)
- Administrative access (sudo) to the server via SSH or RDP
- A private IP address range of your choice
This feature might be unavailable or limited on servers of the Eco product line.
Please visit our comparison page for more information.
OVHcloud Control Panel Access
- Direct link: vRack
- Navigation path:
Network>vRack private network
Instructions
Step 1: Ordering the vRack
Click the button Add a service (shopping cart icon) in the left-hand menu. Use the filter at the top of the page or scroll down to find the service vRack.
Click on the vRack box to be redirected to the page where you can validate the order. It will take a few minutes for the vRack to be set up in your account.
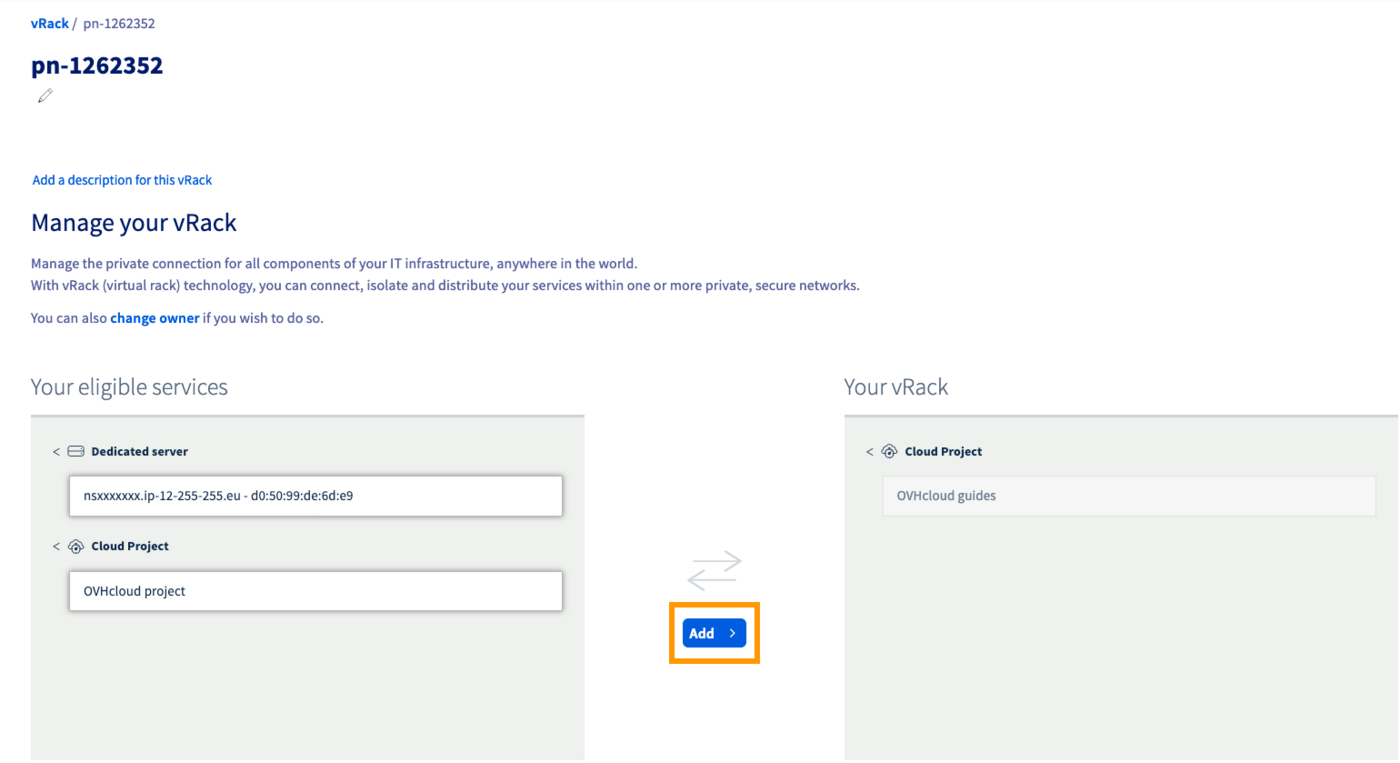
Step 2: Adding your servers to the vRack
Once the vRack is activated in your account, select your vRack from the list to display the list of eligible services. Click on each server you want to add to the vRack and then click the Add button.
Step 3: Configuring your network interfaces
The following sections contain the configurations for the most commonly used recent distributions/operating systems. The first step is always to log in to your server via SSH or a RDP session (for Windows). The examples below presume you are logged in as a user with elevated permissions (Administrator/sudo).
Concerning different distribution releases, please note that the proper procedure to configure your network interface as well as the file names may have been subject to change. We recommend to consult the manuals and knowledge resources of the respective OS versions if you experience any issues.
For example purposes, the configuration details below will have the IP address range 192.168.0.0/16 (Subnet mask: 255.255.0.0).
You can use any private IP range of your choice and any address within that range.
Identifying the vRack interface
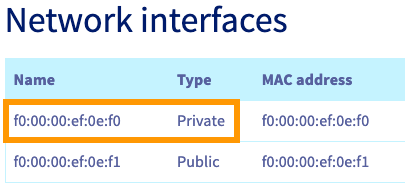
The network interface names of your servers are not always the same.
The sure way to verify the correct interface for the vRack is to check the tab Network interfaces of your server in the OVHcloud Control Panel. In the table at the bottom, take note of the MAC address which is also the Name of the Private interface.
Once connected to your server via SSH, you can list your network interfaces with the following command:
In the line that begins with link ether, you can verify that this interface matches the Private interface listed in your OVHcloud Control Panel. Use this interface name to replace NETWORK_INTERFACE in the configurations below (example: eth1).
For example purposes, we will use the IP address range of 192.168.0.0/16 (Subnet mask: 255.255.0.0).
GNU/Linux configurations
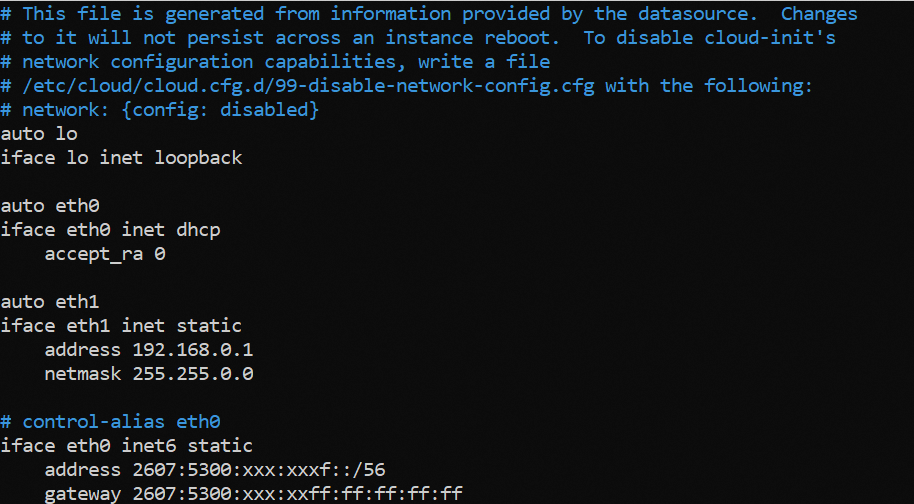
Using a text editor of your choice, open the network configuration file located in /etc/network/interfaces.d for editing. Here the file is called 50-cloud-init.
Add the following lines to the existing configuration, replace NETWORK_INTERFACE, IP_ADDRESS and NETMASK with your own values:
Example
Save your changes to the config file and exit the editor.
Restart the networking service to apply the configuration:
Repeat this process for your other server(s) and assign an unused IP address from your private range. Once you have done this, your servers will be able to communicate with each other on the private network.
Using a text editor of your choice, open the network configuration file located in /etc/netplan/ for editing. Here the file is called 50-cloud-init.yaml.
Add the following lines to the existing configuration after the line version: 2. Replace NETWORK_INTERFACE and IP_ADDRESS/PREFIX with your own values.
Example:
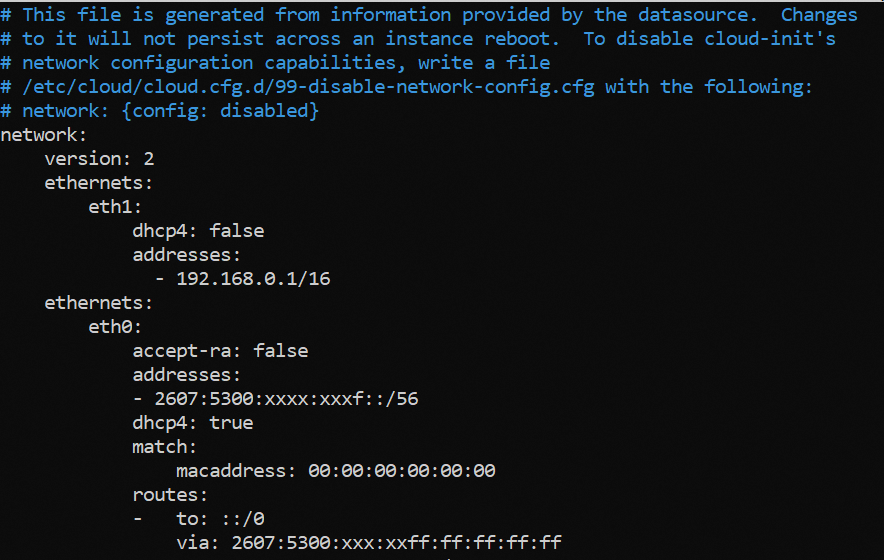
It is important to respect the alignment of each element in yaml files as represented in the example above. Do not use the tab key to create your spacing. Only the space key is needed.
Save your changes to the config file and exit the editor.
Apply the configuration:
Repeat this process for your other server(s) and assign an unused IP address from your private range. Once you have done this, your servers will be able to communicate with each other on the private network.
Once you have identified your private network interface, use the following command to create a network configuration file.
Replace NETWORK_INTERFACE with your own value.
For example, if the private interface is named eth1, we have the following:
Next, use a text editor of your choice to edit this file.
Add these lines, replacing NETWORK_INTERFACE, IP_ADDRESS and NETMASK with your own values:
Example:

Save your changes to the config file and exit the editor.
Restart the networking service to apply the changes:
Repeat this process for your other server(s) and assign an unused IP address from your private range. Once you have done this, your servers will be able to communicate with each other on the private network.
Once you have identified the name of your private interface (as explained here), verify that is it connected. In our example, our interface is called eno2:
If the STATE of the DEVICE appears as disconnected, it must be connected before configuring the IP.
When adding an ethernet connection, we have to create a configuration profile which we then assign to a device.
Run the following command, replacing INTERFACE_NAME and CONNECTION_NAME with your own values.
In our example, we named our configuration profile private-interface.
Example:
- Check that the interface has been connected correctly:
Once this is done, a new configuration file named xxxxxxxxxx.nmconnection will be created in the folder /etc/NetworkManager/system-connections.
You can then edit this file using the nmcli handler, replacing IP_ADDRESS, PREFIX and CONNECTION_NAME with your own values.
- Add your IP:
Example:
- Change the configuration from auto to manual:
Example:
- Make the configuration persistent:
Example:
Reboot your network with the following command:
Windows configuration
For example purposes, the following configurations will use the IP address range of 192.168.0.0/16 (Subnet mask: 255.255.0.0).
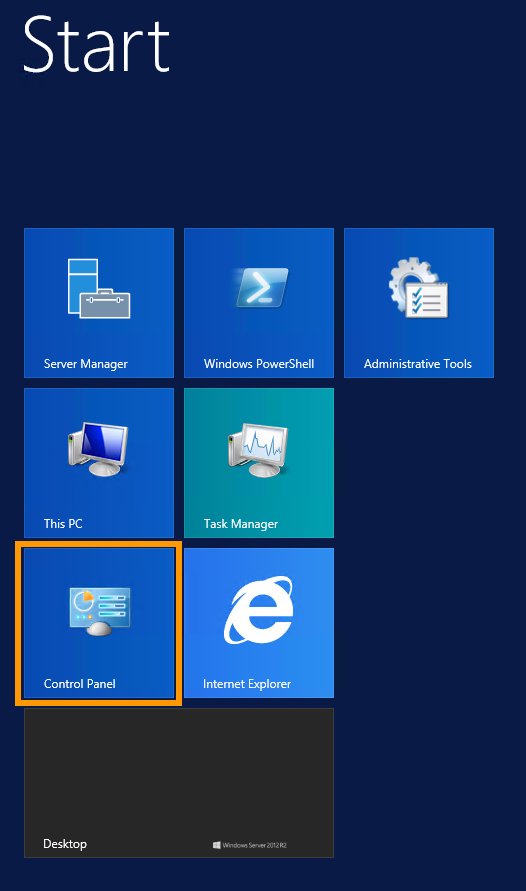
Log on to your Windows server via remote desktop and go to the Control Panel.
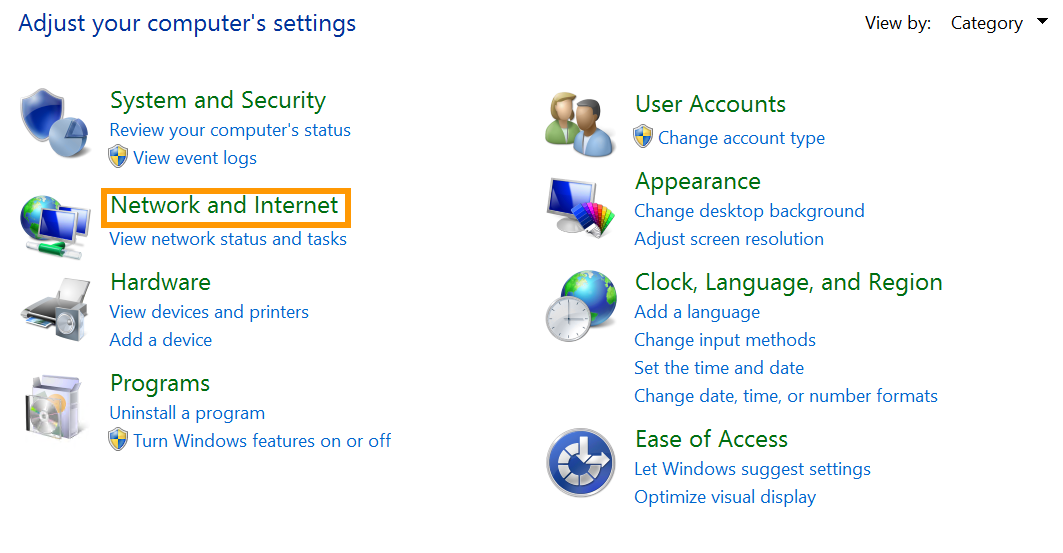
Click on Network and Internet.
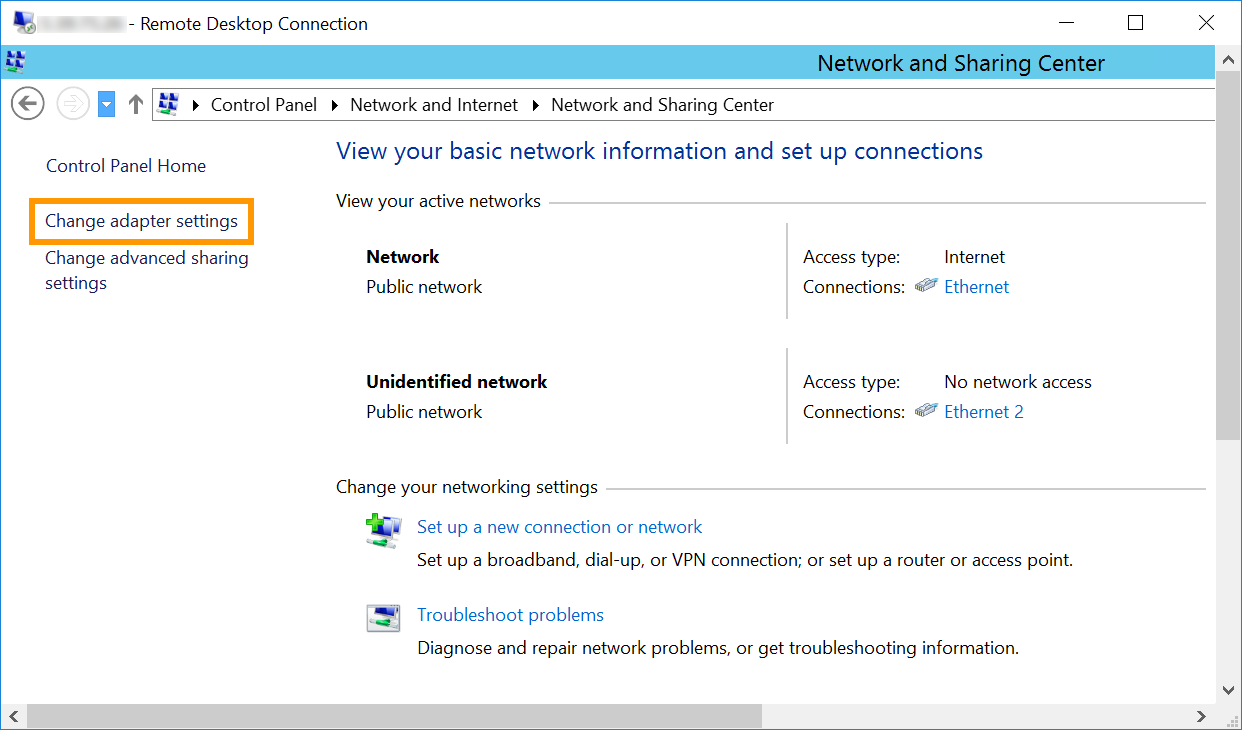
Open Network and Sharing Center.

Click on Change Adapter Settings.
Right-click the secondary network interface and then click Properties.
Note that in our example Ethernet 2 is the interface used for the vRack. However, it is possible that the vRack NIC is a different interface in your configuration. The correct one to select will be the interface that does not have the server's main IP address or has a self-assigned IP.
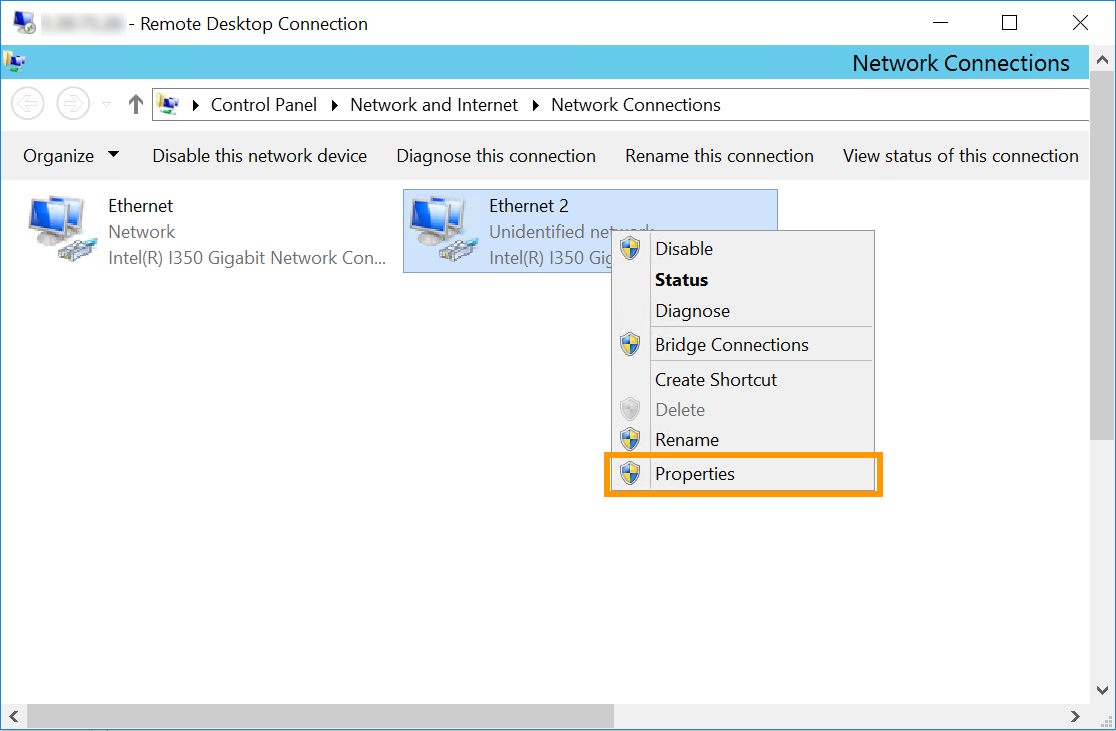
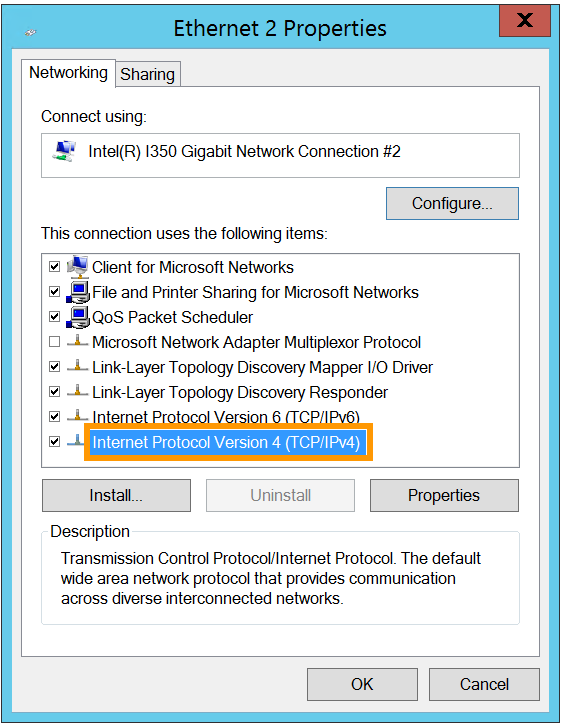
Double-click Internet Protocol Version 4 (TCP/IPv4).
Click on Use the following IP address. Enter any IP address from your private range and the appropriate Subnet mask (255.255.0.0 in this example) into the corresponding fields.
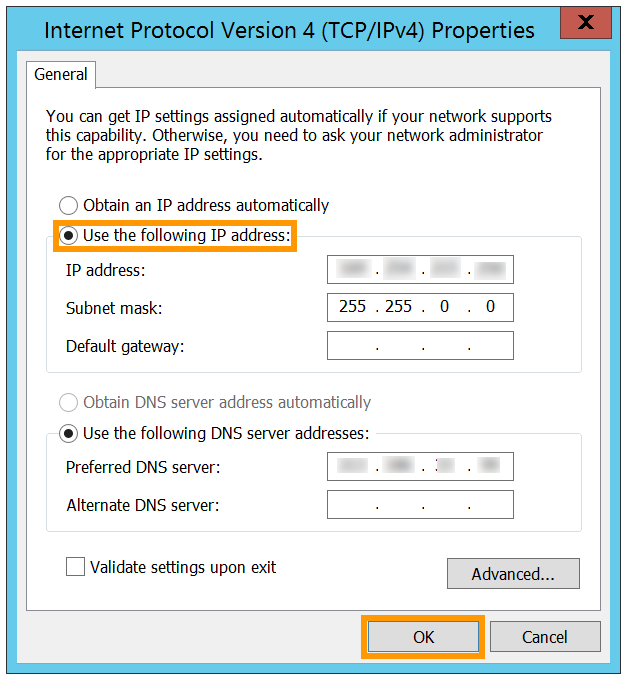
Click on OK to save the changes and reboot your server to apply them.
Repeat this process for your other server(s) and assign an unused IP address from your private range. Once you have done this, your servers will be able to communicate with each other on the private network.
Go further
Creating multiple vLANs in a vRack
Join our community of users.

